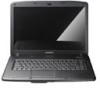
eMachines E520 eMachines Notebook User Guide (All Series)
eMachines E520 Manual
 |
View all eMachines E520 manuals
Add to My Manuals
Save this manual to your list of manuals |
eMachines E520 manual content summary:
- eMachines E520 | eMachines Notebook User Guide (All Series) - Page 1
eMachines Series Generic User Guide - eMachines E520 | eMachines Notebook User Guide (All Series) - Page 2
Acer Incorporated. All Rights Reserved. eMachines Series Generic User Guide Original Issue: 08/2008 This company makes no representations or warranties, either express or implied, with respect to the contents hereof and specifically Such changes will be incorporated in new editions of this manual or - eMachines E520 | eMachines Notebook User Guide (All Series) - Page 3
Observe the following guidelines when connecting and disconnecting power to the power supply unit: Install the power supply unit before connecting the power cord to the AC power outlet. Unplug the power cord before removing the power supply unit from the computer. If the system has multiple sources - eMachines E520 | eMachines Notebook User Guide (All Series) - Page 4
which will probably cause unexpected short current or damage rotor devices, HDD, Optical drive, and even exposure risk from lithium battery pack. • Your device and its enhancements may contain small parts. Keep them out of the reach of small children. Using electrical power • This product should - eMachines E520 | eMachines Notebook User Guide (All Series) - Page 5
covered by the operating instructions, since improper adjustment of other controls may result in damage and will often require extensive work by a qualified technician to restore the product to normal condition. Guidelines for safe battery usage This notebook uses a Lithium-ion battery. Do not use - eMachines E520 | eMachines Notebook User Guide (All Series) - Page 6
waste. Wireless devices may be susceptible to interference from the battery, which could affect performance. Replacing the battery pack The notebook uses lithium batteries. Replace the battery with the same type as that which came bundled with your product. Use of another battery may present a risk - eMachines E520 | eMachines Notebook User Guide (All Series) - Page 7
a good quality connection to the network. In some cases, transmission of data files or messages may be delayed until such a connection is available. Ensure that the above separation distance instructions are followed until the transmission is completed. Parts of the device are magnetic. Metallic - eMachines E520 | eMachines Notebook User Guide (All Series) - Page 8
speed control systems, and air bag systems. For more information, check with the manufacturer, or its representative, of your vehicle or any equipment that has been added. Only qualified personnel should service the device, or install the device in a vehicle. Faulty installation or service may - eMachines E520 | eMachines Notebook User Guide (All Series) - Page 9
the Electronic Industries Alliance at www.eiae.org. For lamp-specific disposal information, check www.lamprecycle.org. Rechargeable Recycling Program in US and Canada Acer supports the efforts of the Rechargeable Battery Recycling Corporation's Call2Recycle (RBRC) program. The RBRC is deigned to - eMachines E520 | eMachines Notebook User Guide (All Series) - Page 10
product can be done through Windows power management. Tips and remove the strain on your leg muscles • take short rests to relax your neck and shoulders • avoid tensing your muscles or shrugging your shoulders • install the external display, keyboard screens, very small typefaces and low-contrast - eMachines E520 | eMachines Notebook User Guide (All Series) - Page 11
: • placing your display in such a way that the side faces the window or any light source • minimizing room light by using drapes, shades or following work habits to make your computer use more relaxing and productive: • Take short breaks regularly and often. • Perform some User Guide. - eMachines E520 | eMachines Notebook User Guide (All Series) - Page 12
poster helps you get started with setting up your computer. eMachines Series Generic User Guide contains useful information applying to all models in the eMachines product series. It covers basic topics such as eMachines Recovery Management, using the keyboard, audio, etc. Please understand that - eMachines E520 | eMachines Notebook User Guide (All Series) - Page 13
following: • Use the Windows shutdown command Click on Start then click on Shut Down up. Taking care of your computer Your computer will serve you well if you take care of it care of your AC adapter Here are some ways to take care of your AC adapter: • Do not connect the adapter to any other - eMachines E520 | eMachines Notebook User Guide (All Series) - Page 14
them away from children. • Dispose of used batteries according to local regulations. Recycle if possible. Cleaning and servicing When cleaning the computer, follow these steps: 1 Turn off the computer and remove the battery pack. 2 Disconnect the AC adapter. 3 Use a soft, moist cloth. Do not use - eMachines E520 | eMachines Notebook User Guide (All Series) - Page 15
care of your AC adapter xiii Taking care of your battery pack xiv Cleaning and servicing xiv Touchpad 1 Touchpad basics (with two-click buttons) 1 Using the keyboard 2 Lock keys and embedded numeric keypad 2 Windows keys 3 Hotkeys 4 Special keys 5 Frequently asked questions - eMachines E520 | eMachines Notebook User Guide (All Series) - Page 16
memory 20 BIOS utility 21 Boot sequence 21 Enable disk-to-disk recovery 21 Password 21 Using software 22 Playing DVD movies 22 Power management 23 eMachines Recovery Management 24 Burn backup discs 25 Restore 26 Restore Windows Vista from backup discs 27 Troubleshooting - eMachines E520 | eMachines Notebook User Guide (All Series) - Page 17
Index 41 - eMachines E520 | eMachines Notebook User Guide (All Series) - Page 18
is sensitive to finger movement; hence, the lighter the touch, the better the response. Tapping harder will not increase the touchpad's responsiveness. Note2: By default, vertical and horizontal scrolling is enabled on your touchpad. It can be disabled under Mouse settings in Windows Control Panel. - eMachines E520 | eMachines Notebook User Guide (All Series) - Page 19
Lock is on, the screen moves one line up or down when you press the up or down arrow keys respectively. Scroll Lock does keyboard legend, cursor-control key symbols are not printed on the keys. Desired access Number keys on embedded keypad Cursor-control keys on embedded keypad Main keyboard keys - eMachines E520 | eMachines Notebook User Guide (All Series) - Page 20
English 3 Windows keys The keyboard has two keys that perform Windows-specific functions. Key Description Windows key Pressed alone, this key has the same effect as clicking on the Windows Start button; it launches the Start menu. It can also be used with other keys to provide a variety of - eMachines E520 | eMachines Notebook User Guide (All Series) - Page 21
4 English Hotkeys The computer employs hotkeys or key combinations to access most of the computer's controls like screen brightness, volume output and the BIOS utility. To activate hotkeys, press and hold the key before pressing the other key in the hotkey combination. Hotkey + - eMachines E520 | eMachines Notebook User Guide (All Series) - Page 22
. The Euro symbol 1 Open a text editor or word processor. 2 Hold and then press the key at the upper-center of the keyboard. Note: Some fonts and software do not support the Euro symbol. Please refer to www.microsoft.com/typography/faq/faq12.htm for more information. The US dollar sign - eMachines E520 | eMachines Notebook User Guide (All Series) - Page 23
Connect the AC adapter to recharge the battery pack. • Make sure that the AC adapter is properly plugged into the computer and to the power outlet. • If it is lit, check the following: • Is a non-bootable (non-system) disk in the external USB floppy drive? Remove or replace it with a system disk and - eMachines E520 | eMachines Notebook User Guide (All Series) - Page 24
to rebuild your C: drive. (Your C: drive will be reformatted and all data will be erased.) It is important to back up all data files before using this option. Before performing a restore operation, please check the BIOS settings. 1 Check to see if eMachines Disk-to-disk recovery is enabled or not - eMachines E520 | eMachines Notebook User Guide (All Series) - Page 25
start the recovery process: 1 Restart the system. 2 While the eMachines logo is showing, press + at the same time to enter the recovery process. 3 Refer to the onscreen instructions to perform system recovery. Important! This feature occupies 15 GB in a hidden partition on your hard disk - eMachines E520 | eMachines Notebook User Guide (All Series) - Page 26
you connect the computer to the AC adapter. Your computer supports charge-in-use, enabling you to recharge the battery while you continue to operate the computer. However, recharging with the computer turned off results in a significantly faster charge time. The battery will come in handy when you - eMachines E520 | eMachines Notebook User Guide (All Series) - Page 27
the more you use the battery, the faster it will reach the end of its effective life. A standard computer battery has a life span of about 300 charges. Installing and removing the battery pack Important! Before removing the battery from the unit, connect the AC adapter if you want to continue using - eMachines E520 | eMachines Notebook User Guide (All Series) - Page 28
English 11 To remove a battery pack: 1 Slide the battery release latch to release the battery. 2 Pull the battery from the battery bay. Charging the battery To charge the battery, first make sure that it is correctly installed in the battery bay. Plug the AC adapter into the computer, and connect - eMachines E520 | eMachines Notebook User Guide (All Series) - Page 29
-low warning When using battery power pay attention to the Windows power meter. Warning: Connect the AC adapter as soon as possible after the battery-low warning appears. Data will be lost if the battery to become fully depleted and the computer shuts down. When the battery-low warning appears, the - eMachines E520 | eMachines Notebook User Guide (All Series) - Page 30
Remove any media, floppy disks or compact disks from the drive(s). 3 Shut down the computer. 4 Close the display cover. 5 Disconnect the cord from the AC adapter. 6 Disconnect the keyboard , you may choose to shut down the computer: Click on Start, Turn Off Computer, then click on Turn Off Or: You - eMachines E520 | eMachines Notebook User Guide (All Series) - Page 31
your computer. If your meeting will be longer, or if your battery is not fully charged, you may want to bring the AC adapter with you to plug in • Check that you have removed all media and compact disks from the drive(s). Failure to remove the media can damage the drive head. • Pack the computer - eMachines E520 | eMachines Notebook User Guide (All Series) - Page 32
condensation. Allow the computer to return to room temperature, and inspect the screen for condensation before turning on the computer. If the temperature change is greater you: • AC adapter • Spare, fully-charged battery pack(s) • Additional printer driver files if you plan to use another printer - eMachines E520 | eMachines Notebook User Guide (All Series) - Page 33
• AC adapter • Power cords that are appropriate for the country to which you are traveling • Spare, fully-charged battery packs • Additional printer driver files AC voltage and the AC adapter power cord specifications are compatible. If not, purchase a power cord that is compatible with the local AC - eMachines E520 | eMachines Notebook User Guide (All Series) - Page 34
a locked drawer. Insert the lock into the notch and turn the key to secure the lock. Some keyless models are also available. Using unauthorized entry into the BIOS utility. Once set, you must enter this password to gain access to the BIOS utility. • User Password an authorized service center. - eMachines E520 | eMachines Notebook User Guide (All Series) - Page 35
password prompt appears in the center of the display screen. • When the Supervisor Password is set, a prompt appears when you press to enter the BIOS utility at boot-up. • Type the Supervisor Password and press to access the BIOS utility. If you enter the password incorrectly, a warning - eMachines E520 | eMachines Notebook User Guide (All Series) - Page 36
PC. For instructions on how to connect different external devices to the computer, read the following section. Built-in network feature The built-in network feature allows you to connect your computer to an Ethernet-based network. To use the network feature, connect an Ethernet cable from the - eMachines E520 | eMachines Notebook User Guide (All Series) - Page 37
English 20 Installing memory Follow these steps to install memory: 1 Turn off the computer, unplug the AC adapter (if connected) and remove the battery pack. Then turn the computer over to access its base. 2 Remove the screws from the memory cover; then lift up and remove the memory cover. 3 (a) - eMachines E520 | eMachines Notebook User Guide (All Series) - Page 38
at the top of the screen. Enable disk-to-disk recovery To enable disk-to-disk recovery (hard disk recovery), activate the BIOS utility, then select Main from the categories listed at the top of the screen. Find D2D Recovery at the bottom of the screen and use the and keys to set this value - eMachines E520 | eMachines Notebook User Guide (All Series) - Page 39
into 6 regions. Once your DVD drive is set to a region code, it will play DVD disks of that region only. You can set the region code a maximum of five times (including the first time), after which the last region code set will remain permanent. Recovering your hard disk does not reset the number of - eMachines E520 | eMachines Notebook User Guide (All Series) - Page 40
23 Power management This computer has a built-in power management unit that monitors system activity. System activity refers to any activity involving one or more of the following devices: keyboard, mouse, hard disk, peripherals connected to the computer, and video memory. If no activity is detected - eMachines E520 | eMachines Notebook User Guide (All Series) - Page 41
specifications may vary. eMachines Recovery Management consists of the following functions: 1 Backup: • Back up factory default to CD/DVD • Back up drivers and applications to CD/DVD 2 Restore: • Restore system to factory default • Reinstall applications/drivers • Password settings This chapter will - eMachines E520 | eMachines Notebook User Guide (All Series) - Page 42
or back up drivers and applications. 1 Click on Start, All Programs, eMachines. 2 eMachines Recovery Management opens to the Backup page. 3 Select the type of backup (factory default or drivers and applications) you would like to burn to disc. 4 Follow the instructions on screen to complete the - eMachines E520 | eMachines Notebook User Guide (All Series) - Page 43
and drivers for your eMachines system. 1 Click on Start, All Programs, eMachines. 2 Switch to the restore page by selecting the Restore button. 3 You can choose to restore the system from a factory default image or reinstall applications and drivers. 4 Follow the instructions on screen to - eMachines E520 | eMachines Notebook User Guide (All Series) - Page 44
only. Actual product specifications may vary. To restore Windows Vista from your previously burned backup discs, you will need to insert the first backup disc and enable the F10 Boot Menu. 1 Turn on your computer and insert the first system recovery disc into the optical disc drive. Restart your - eMachines E520 | eMachines Notebook User Guide (All Series) - Page 45
the IDE 1*, then press the ENTER key. Windows will be installed from the recovery disc. 6 Insert the second recovery disc when prompted, then follow the on screen prompts to complete the restore. 7 Remove the recovery disc from the optical drive once the restore is complete. Do this before rebooting - eMachines E520 | eMachines Notebook User Guide (All Series) - Page 46
ENTER key again to select Yes. The system will reboot. 7 When you reboot, Windows will be installed from the recovery disc. 8 Insert the second recovery disc when prompted, then follow the onscreen prompts to complete the restore. 9 Remove the recovery disc from the optical drive once the restore is - eMachines E520 | eMachines Notebook User Guide (All Series) - Page 47
Exit in the BIOS utility to reboot. Hard disk 0 error Contact your dealer or an authorized service center. Hard disk 0 extended Contact your dealer or an authorized service center. type error I/O parity error Contact your dealer or an authorized service center. Keyboard error or no Contact - eMachines E520 | eMachines Notebook User Guide (All Series) - Page 48
31 If you still encounter problems after going through the corrective measures, please contact your dealer or an authorized service center for assistance. Some problems may be solved using the BIOS utility. English - eMachines E520 | eMachines Notebook User Guide (All Series) - Page 49
can radiate radio frequency energy and, if not installed and used in accordance with the instructions, may cause harmful interference to radio communications. However, there is no guarantee that interference will not occur in a particular installation. If this device does cause harmful interference - eMachines E520 | eMachines Notebook User Guide (All Series) - Page 50
Russian regulatory certification Modem notices Notice for USA This equipment complies with Part 68 of the FCC rules. Located on the modem is a label causes harm to the telephone network, the telephone company may discontinue your service temporarily. If possible, they will notify you in advance. But - eMachines E520 | eMachines Notebook User Guide (All Series) - Page 51
will be notified in advance to give you an opportunity to maintain uninterrupted telephone service . If this equipment should fail to operate properly, disconnect the equipment from the phone line to determine if it is causing the problem. If the problem Switched Telephone Network (PSTN). - eMachines E520 | eMachines Notebook User Guide (All Series) - Page 52
all, it provides no assurance that any item will work correctly in all respects with another item of Telepermitted equipment of a different make or model, nor does it imply that any product is compatible with all of Telecom's network services. 2 This equipment is not capable, under all operating - eMachines E520 | eMachines Notebook User Guide (All Series) - Page 53
English 36 Laser compliance statement The CD or DVD drive used with this computer is a laser product. The CD or DVD drive's classification label (shown below) is located on the drive. CLASS 1 LASER PRODUCT CAUTION: INVISIBLE LASER RADIATION WHEN OPEN. AVOID EXPOSURE TO BEAM. APPAREIL A LASER DE - eMachines E520 | eMachines Notebook User Guide (All Series) - Page 54
. Nevertheless, the notebook PC series shall be used in such a manner that the potential for human contact during normal operation is minimized as follows: 1 Users are requested to follow the RF safety instructions on wireless option devices that are included in the user's manual of each RF option - eMachines E520 | eMachines Notebook User Guide (All Series) - Page 55
built in to the screen section and all persons. Note: The eMachines wireless Mini PCI adapter implements a transmission diversity function. The function does not emit radio frequencies simultaneously from both antennas. One of the antennas is selected automatically or manually PC series employs - eMachines E520 | eMachines Notebook User Guide (All Series) - Page 56
39 LCD panel ergonomic specifications English Design viewing distance Design inclination angle Design azimuth angle Viewing direction range class Screen tilt angle Design screen illuminance Reflection class of LCD panel (positive and negative polarity) Image polarity Reference white: Pre-setting - eMachines E520 | eMachines Notebook User Guide (All Series) - Page 57
English 40 - eMachines E520 | eMachines Notebook User Guide (All Series) - Page 58
checking charge level 11 installing 10 low conditions 12 maximizing life 9 optimizing 11 removing 11 using the first time 9 BIOS utility 21 brightness hotkeys 4 C caps lock 2 care AC adapter xiii battery pack xiv computer xiii CD-ROM ejecting manually 7 troubleshooting 7 charging checking level 11 - eMachines E520 | eMachines Notebook User Guide (All Series) - Page 59
ports 19 printer troubleshooting 7 problems 6 CD-ROM 7 display 6 keyboard 7 printer 7 startup 6 troubleshooting 30 S safety CD or DVD 36 modem notices 33 scroll lock 2 security keylock 17 passwords 17 42 speakers hotkey 4 troubleshooting 6 T touchpad 1 hotkey 4 using 1-?? travel international
-
 1
1 -
 2
2 -
 3
3 -
 4
4 -
 5
5 -
 6
6 -
 7
7 -
8
-
9
-
10
-
11
-
12
-
13
-
14
-
15
-
16
-
17
-
18
-
19
-
20
-
21
-
22
-
23
-
24
-
25
-
26
-
27
-
28
-
29
-
30
-
31
-
32
-
33
-
34
-
35
-
36
-
37
-
38
-
39
-
40
-
41
-
42
-
43
-
44
-
45
-
46
-
47
-
48
-
49
-
50
-
51
-
52
-
53
-
54
-
55
-
56
-
57
-
58
-
59
 |
 |

eMachines Series
Generic User Guide