eMachines T3406 NG3 Hardware Reference
eMachines T3406 Manual
 |
View all eMachines T3406 manuals
Add to My Manuals
Save this manual to your list of manuals |
eMachines T3406 manual content summary:
- eMachines T3406 | NG3 Hardware Reference - Page 1
User Guide for your eMachines computer - eMachines T3406 | NG3 Hardware Reference - Page 2
1 Thank you for purchasing our computer 2 Using the eMachines Web site 2 Using Help and Support 3 Searching for a topic 3 problems 18 Checking the voltage selection 18 Starting your computer 19 Waking up your computer 19 Turning off your computer 19 Restarting (rebooting) your computer - eMachines T3406 | NG3 Hardware Reference - Page 3
Contents www.emachines.com Working with files and folders 29 Viewing drives 29 Creating router 50 Creating an Ethernet network 52 Installing Ethernet cards and drivers 52 Making sure your broadband connection works 52 Naming the computers and the workgroup 52 Configuring the TCP/IP protocol - eMachines T3406 | NG3 Hardware Reference - Page 4
Using a memory card 73 Using the CD or DVD drive 73 Identifying drive types 73 Inserting a CD or DVD 74 Using a second monitor 75 Viewing the display on a television 76 Modifying television settings 78 Using Windows Media Center 79 Manually updating the Media Center Program Guide 80 Using - eMachines T3406 | NG3 Hardware Reference - Page 5
Software 129 System recovery options 130 Copying driver and application recovery files 130 Creating recovery discs 131 Copying driver and application recovery files to a network 132 Creating discs from recovery files on a network 133 Recovering your system 134 Recovering specific files and - eMachines T3406 | NG3 Hardware Reference - Page 6
the front I/O panel 168 Adding or replacing an expansion card 171 Replacing the system board 172 Chapter 14: Troubleshooting 175 Safety guidelines 176 First steps 176 Troubleshooting 177 Add-in cards 177 Audio 177 Battery 177 CD or DVD drives 177 Computer 178 Diskette drive 178 v - eMachines T3406 | NG3 Hardware Reference - Page 7
drive 180 Internet 180 Keyboard 181 Media Center 182 Memory 184 Memory card reader 184 Modem (dial-up 184 Monitor 187 Mouse 188 Networks 188 Passwords 189 Power 189 Printer 189 Sound 191 Telephone support 191 Before calling eMachines Customer Care 191 Telephone numbers 192 Self-help - eMachines T3406 | NG3 Hardware Reference - Page 8
CHAPTER 1 Getting Help • Thank you for purchasing our computer! • Using the eMachines Web site • Using Help and Support • Using Online help • Contact information • Microsoft Certificate of Authenticity - eMachines T3406 | NG3 Hardware Reference - Page 9
all of us at eMachines. Using the eMachines Web site eMachines's online support is available 24 hours per day, 7 days per week, and provides the most current drivers, product specifications, tutorials, and personalized information about your computer. Visit the eMachines Web support site at www - eMachines T3406 | NG3 Hardware Reference - Page 10
, an easily accessible collection of help information, troubleshooters, and automated support. Use Help and Support to answer questions about Windows and to help you quickly discover and use the many features of your eMachines computer. To start Help and Support: ■ Click Start, then click Help and - eMachines T3406 | NG3 Hardware Reference - Page 11
1: Getting Help www.emachines.com To view a topic, click the topic name in the Search Results list. Getting help in Media Center If your computer has Windows XP Media Center Edition, you can access online help or refer to the printed Windows XP Media Center Edition Guide. To access Media Center - eMachines T3406 | NG3 Hardware Reference - Page 12
, searching for a topic or keyword, or browsing through the online help. Contact information The label on the front of your computer case contains information that identifies your computer model and serial number. eMachines Customer Care will need this information if you call for assistance. 5 - eMachines T3406 | NG3 Hardware Reference - Page 13
CHAPTER 1: Getting Help www.emachines.com Microsoft Certificate of Authenticity The Microsoft Certificate of Authenticity label found on the back or side of your computer includes the product key code for your operating system. If you ever reinstall Windows from the installation CD or DVD, you - eMachines T3406 | NG3 Hardware Reference - Page 14
CHAPTER 2 Getting to Know Your Computer • Front • Back • Connecting the dial-up modem • Connecting to a cable or DSL modem or to a wired Ethernet network • Installing a printer, scanner, or other peripheral device • Configuring the audio jacks - eMachines T3406 | NG3 Hardware Reference - Page 15
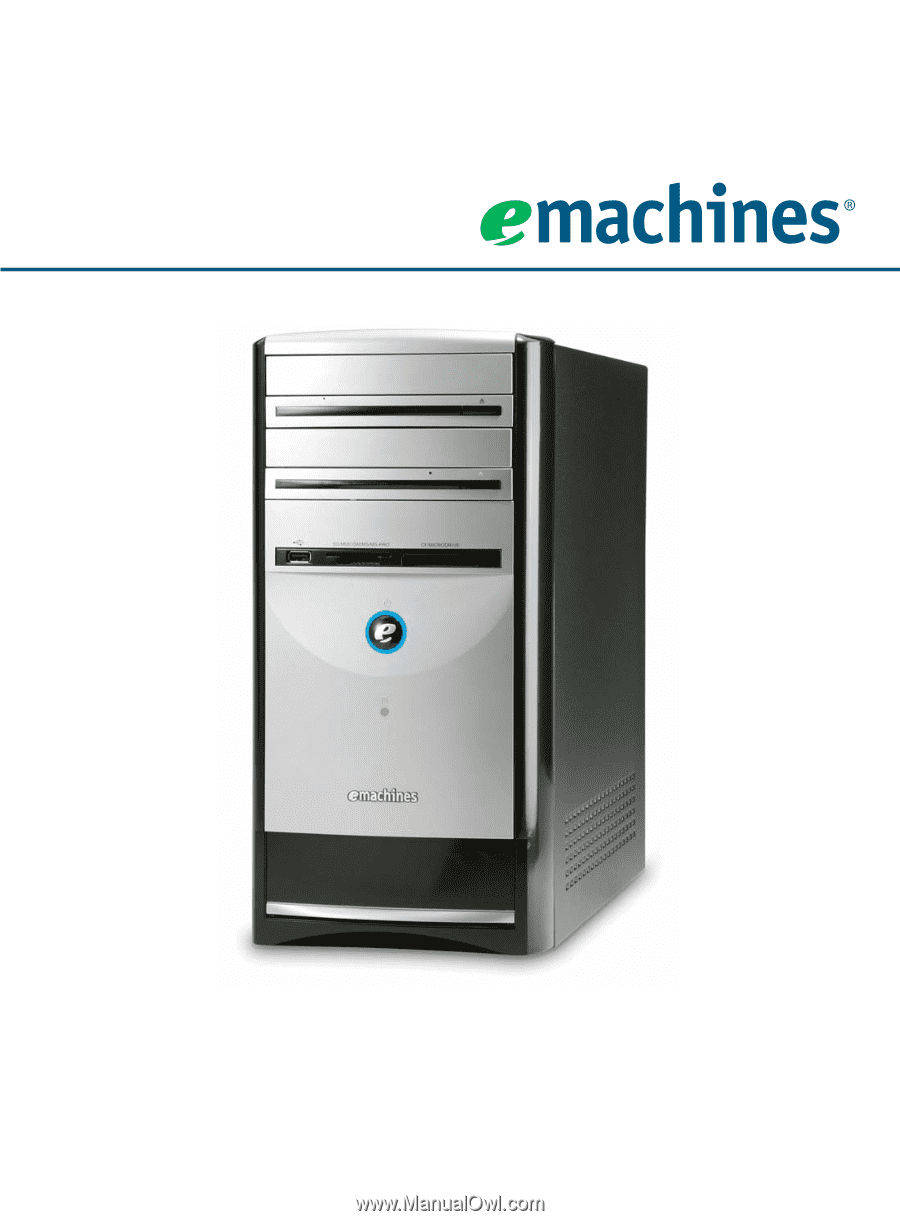
Computer Front Important Your computer hardware options and port locations may vary from the illustration below. Optical drive Optical drive (optional) USB port (optional) Hard drive access indicator www.emachines.com Memory card This drive may be a CD, recordable CD, DVD, or recordable DVD - eMachines T3406 | NG3 Hardware Reference - Page 16
help resources and Customer Care information eMachines model and serial number Insert a memory card from a digital camera, MP3 player, PDA, cellular telephone, or other devices into the memory card reader. For more information, see "Using the memory card reader" on page 72. Press this button - eMachines T3406 | NG3 Hardware Reference - Page 17
2: Getting to Know Your Computer www.emachines.com Back Important Your computer hardware options and port locations may such as Europe, the utility power is supplied at 230 volts at 50 Hz. If your computer is operating in an environment such as this, the voltage switch should be moved to 230 - eMachines T3406 | NG3 Hardware Reference - Page 18
www.emachines.com Connecting the dial-up modem Component Icon Monitor port USB ports ( lime green. Plug an external audio input source (such as a stereo) into this jack so you can record sound on your computer. This jack is color-coded blue. If your modem has a telephone jack, plug the cable for a - eMachines T3406 | NG3 Hardware Reference - Page 19
2: Getting to Know Your Computer www.emachines.com Connecting to a cable or DSL modem or to a wired Ethernet network Important Your computer is equipped with a built-in Ethernet port. For information about setting up a wired or wireless Ethernet network, see "Networking Your Computer" on page 49 - eMachines T3406 | NG3 Hardware Reference - Page 20
instructions. Help and Support For more information about installing peripheral devices, click Start, then click Help and Support. Type the keyword installing devices in the Search box, then click the arrow. Your computer , click Sounds, Speech, and Audio Devices. Click/Double-click Sounds and Audio - eMachines T3406 | NG3 Hardware Reference - Page 21
CHAPTER 2: Getting to Know Your Computer www.emachines.com 14 - eMachines T3406 | NG3 Hardware Reference - Page 22
CHAPTER 3 Using Your Computer • Working safely • Starting your computer • Turning off your computer • Restarting (rebooting) your computer • Using the keyboard • Using the mouse • Adjusting the volume - eMachines T3406 | NG3 Hardware Reference - Page 23
CHAPTER 3: Using Your Computer www.emachines.com Working safely Before using your computer, read the following recommendations for reflect on the monitor screen or shine directly into your eyes. ■ Position the computer desk and monitor so you can avoid glare on your screen and light shining - eMachines T3406 | NG3 Hardware Reference - Page 24
www.emachines.com Working safely ■ Position your chair so the keyboard is ■ Adjust the back of the chair so it supports the lower curve of your spine. You can use a pillow or cushion to provide extra back support. Setting up your computer and computer accessories ■ Set up the monitor so the top - eMachines T3406 | NG3 Hardware Reference - Page 25
Computer www.emachines.com Protecting from power source problems Warning High voltages can enter your computer through both the power cord and the modem connection. Protect your computer is integrated into your computer to provide power to the system board, add-in cards, and peripheral devices. - eMachines T3406 | NG3 Hardware Reference - Page 26
emachines.com Starting your computer Starting your computer Important Your computer has a built-in variable speed fan. In addition, your computer the documentation that came with the device for setup instructions. Waking up your computer Tips & Tricks For more information about changing the - eMachines T3406 | NG3 Hardware Reference - Page 27
CHAPTER 3: Using Your Computer www.emachines.com Restarting (rebooting) your computer Important If your computer does not turn off, press and hold the power button for about five seconds, then release it. If your computer does not respond to keyboard or mouse input, you may have to close - eMachines T3406 | NG3 Hardware Reference - Page 28
www.emachines.com Standard keyboard Function keys Indicators Using the keyboard Navigation keys Internet buttons Keyboard features Windows keys Directional keys Application key Numeric keypad The keyboard - eMachines T3406 | NG3 Hardware Reference - Page 29
CHAPTER 3: Using Your Computer www.emachines.com Using the mouse The mouse is a device that controls the pointer movement on the computer display. This illustration shows the standard mouse. Right button Left button Scroll wheel As you move the mouse, the pointer (arrow) on the display moves - eMachines T3406 | NG3 Hardware Reference - Page 30
emachines.com Adjusting the volume To... Do this... Move the pointer on the computer instructions on how to adjust the volume in Windows, see "Adjusting the volume" on page 81. You can use the volume controls to adjust the overall volume and the volume of specific sound devices in your computer - eMachines T3406 | NG3 Hardware Reference - Page 31
CHAPTER 3: Using Your Computer www.emachines.com 24 - eMachines T3406 | NG3 Hardware Reference - Page 32
CHAPTER 4 Using Windows XP • Using the Windows desktop • Working with files and folders • Searching for files • Working with documents • Using shortcuts - eMachines T3406 | NG3 Hardware Reference - Page 33
emachines.com Using the Windows desktop Help and Support For more information about the Windows desktop, click Start, then click Help and Support. Type the keyword Windows desktop in the Search box, then click the arrow. After your computer them from your computer. For instructions on how to use - eMachines T3406 | NG3 Hardware Reference - Page 34
. The Start menu opens showing you the first level of menu items. Help and Support For more information about the Windows desktop, click Start, then click Help and Support. Type the keyword Windows Start menu in the Search box, then click the arrow. 2 Click All Programs to see all programs and - eMachines T3406 | NG3 Hardware Reference - Page 35
Windows XP www.emachines.com Adding icons to the desktop You may want to add an icon (shortcut) to the desktop for a program that you use frequently. Help and Support For more information about the Windows desktop, click Start, then click Help and Support. Type the keyword desktop icons in the - eMachines T3406 | NG3 Hardware Reference - Page 36
For more information about the Windows desktop, click Start, then click Help and Support. Type the keyword window in the Search box, then click the arrow. Description Clicking the maximize button expands the active window to fit the entire computer display. Clicking the maximize button again - eMachines T3406 | NG3 Hardware Reference - Page 37
CHAPTER 4: Using Windows XP www.emachines.com To see the files and folders on a drive: ■ Double- your computer. In fact, all information on a computer is stored in files. Folders Files Help and Support For more information about the Windows desktop, click Start, then click Help and Support. Type - eMachines T3406 | NG3 Hardware Reference - Page 38
www.emachines.com Working with files and folders Copying and moving of the file or folder appears in the new location. Help and Support For more information about the Windows desktop, click Start, then click Help and Support. Type the keyword creating files and folders or moving files and folders - eMachines T3406 | NG3 Hardware Reference - Page 39
Windows desktop, click Start, then click Help and Support. Type the keyword deleting files and folders in the Search box, then click the arrow. www.emachines.com To delete files or folders: 1 In My Computer or Windows Explorer, click the files or folders that you want to delete. For instructions on - eMachines T3406 | NG3 Hardware Reference - Page 40
www.emachines.com Searching for files Searching for files If you are looking for a particular file or folder or a set of files or folders that have characteristics - eMachines T3406 | NG3 Hardware Reference - Page 41
www.emachines.com 3 Click Search. When the search is completed, Windows lists the files and folders whose names contain the text that you searched for. 4 Open a file, folder, or program by double-clicking the name in the list. Help and Support For more information about the Windows desktop, click - eMachines T3406 | NG3 Hardware Reference - Page 42
www.emachines.com Searching for files To browse for a file: 1 Click Start, then click My Computer. The My Computer window opens contents of this folder. Help and Support For more information about the Windows desktop, click Start, then click Help and Support. Type the keyword files and folders in - eMachines T3406 | NG3 Hardware Reference - Page 43
CHAPTER 4: Using Windows XP www.emachines.com Working with documents Computer documents include word processing files, spreadsheet files, or other similar files. The basic methods of creating, saving, opening, and printing a document apply to most of - eMachines T3406 | NG3 Hardware Reference - Page 44
: 1 Click File, then click Save. The Save As dialog box opens. Save in list File name Help and Support For more information about the Windows desktop, click Start, then click Help and Support. Type the keyword saving in the Search box, then click the arrow. 2 Click the arrow button to open the - eMachines T3406 | NG3 Hardware Reference - Page 45
For more information about the Windows desktop, click Start, then click Help and Support. Type the keyword printing in the Search box, then click the arrow. To print a document, you must have a printer connected to your computer or have access to a network printer. For more information about - eMachines T3406 | NG3 Hardware Reference - Page 46
www.emachines.com Using shortcuts Using shortcuts Help and Support For more information about the Windows desktop, click Start, then click Help and Support. Type the keyword Windows keyboard shortcuts in the Search box, then click the arrow. The following table shows a few shortcuts that you can - eMachines T3406 | NG3 Hardware Reference - Page 47
CHAPTER 4: Using Windows XP www.emachines.com 40 - eMachines T3406 | NG3 Hardware Reference - Page 48
CHAPTER 5 Using the Internet • Learning about the Internet • Setting up an Internet account • Using the World Wide Web • Using e-mail - eMachines T3406 | NG3 Hardware Reference - Page 49
CHAPTER 5: Using the Internet www.emachines.com Learning about the Internet The Internet is a worldwide network of computers linked together to provide information to people everywhere. The two most popular services on the Internet are e-mail and the World Wide Web. You can access this network by - eMachines T3406 | NG3 Hardware Reference - Page 50
www.emachines.com Setting up an Internet account Setting up an Internet account Before you can view the information on the World Wide Web, you need to set up an Internet account with an Internet service provider (ISP). To set up an ISP service or to transfer an existing account to this computer, - eMachines T3406 | NG3 Hardware Reference - Page 51
Support. Type the keyword connecting to Web site in the Search box, then click the arrow. After you set up an account with an Internet service the browser address bar (for example www.emachines.com), then click GO on the browser computer on the Internet, downloads (transfers) data to your computer, - eMachines T3406 | NG3 Hardware Reference - Page 52
the file that you want to download. 5 Follow the on-screen instructions for saving the file in the folder that you want. A copy of the file is downloaded to your computer. The time that it takes to transfer the file to your computer depends on file size and Internet conditions. 6 Open the folder - eMachines T3406 | NG3 Hardware Reference - Page 53
CHAPTER 5: Using the Internet Using e-mail www.emachines.com E-mail (electronic mail) lets you send messages to anyone who has an Internet connection and e-mail address. E-mail is usually a free service of your Internet account. The Internet never closes, so you can send e-mail messages at any time - eMachines T3406 | NG3 Hardware Reference - Page 54
www.emachines.com Using e-mail Checking your e-mail Tips & Tricks To protect your computer from viruses, check any e-mail attachments using McAfee SecurityCenter. For more information, see "Protecting your computer from viruses" on page 121. Help and Support For general information about using - eMachines T3406 | NG3 Hardware Reference - Page 55
CHAPTER 5: Using the Internet www.emachines.com 48 - eMachines T3406 | NG3 Hardware Reference - Page 56
CHAPTER 6 Networking Your Computer • Introduction to Networking • Creating an Ethernet network • Sharing resources • Using the network • Adding a printer to your network - eMachines T3406 | NG3 Hardware Reference - Page 57
6: Networking Your Computer www.emachines.com Introduction to Networking An Ethernet network consists of two or more computers connected together through an Ethernet cable. This connection type is commonly used in offices around the world and can also be used to build computer networks in the - eMachines T3406 | NG3 Hardware Reference - Page 58
www.emachines.com Introduction to Networking Example router-based Ethernet network The following is an example of an Ethernet network. The network is made up of a router, your computers, and cables connecting each of these components. The router is the central control point for the network. - eMachines T3406 | NG3 Hardware Reference - Page 59
already installed. Use the documentation that comes with your Ethernet cards for instructions on installing the card and any required drivers. For information on installing cards in your computer, see "Adding or replacing an expansion card" on page 171. Making sure your broadband connection works - eMachines T3406 | NG3 Hardware Reference - Page 60
www.emachines.com Creating an Ethernet network 4 Click Change. The Computer Name Changes dialog box opens. 5 Type a unique computer name in the Computer name box. This name identifies the computer to other users on the network. Use a computer name of up to 15 characters with no blank spaces. Each - eMachines T3406 | NG3 Hardware Reference - Page 61
CHAPTER 6: Networking Your Computer www.emachines.com 3 Right-click Local Area Connection, then click Properties. The Local Area Connection Properties dialog box opens. - OR - If you do not have a LAN connection setup, click Create a new connection and follow the instructions in the New Connection - eMachines T3406 | NG3 Hardware Reference - Page 62
www.emachines.com Creating an Ethernet network 9 Click OK to close the Local Area Connection Properties dialog box. 10 Click X to close the Network Connections window. 11 Repeat this procedure for every computer on your network. Setting up an Ethernet network Important Category 5 cables are - eMachines T3406 | NG3 Hardware Reference - Page 63
6: Networking Your Computer www.emachines.com In addition to a router, you need a straight-through cable for each computer you want to and the other end into a grounded, 110V electrical outlet. 2 Turn on your computers. 3 Plug one end of a straight-through network cable into any numbered port on - eMachines T3406 | NG3 Hardware Reference - Page 64
After you have named your computers and set up TCP/IP on them, you can configure your router using your Web browser. For these instructions, we assume that you are ■ Temporarily turn off any firewall software on your desktop computer ■ Turn off all of the devices, then power them back on, cable - eMachines T3406 | NG3 Hardware Reference - Page 65
CHAPTER 6: Networking Your Computer www.emachines.com ■ Refer to your router's or access point's troubleshooting information ■ Contact your Internet service provider Sharing resources With a network, you can share your Internet connection, drives, and printers. Sharing drives and printers - eMachines T3406 | NG3 Hardware Reference - Page 66
emachines.com Sharing resources 3 If this is the first time you have shared a drive or folder, click Network Setup Wizard to enable remote access, then follow the on-screen instructions files To un-share drives or folders: 1 In My Computer or Windows Explorer, right-click the drive or folder that - eMachines T3406 | NG3 Hardware Reference - Page 67
network drive ■ Open and copy files stored on other network computers ■ Print documents on network printers Viewing shared drives and folders Help and Support For more information about workgroups, click Start, then click Help and Support. Type the keyword workgroups in the Search box, then click - eMachines T3406 | NG3 Hardware Reference - Page 68
www.emachines.com Using the network Opening files across the network To open files the network, you must install the driver for the printer on the computer you are sending the file from. You can obtain the printer driver and installation instructions from the CD that shipped with your printer or - eMachines T3406 | NG3 Hardware Reference - Page 69
CHAPTER 6: Networking Your Computer www.emachines.com Adding a printer to your network Instead of plugging a printer into your computer, you can add a printer to your network. To add a printer to the network, do one of the following: ■ Connect your printer to your networked computer, then share - eMachines T3406 | NG3 Hardware Reference - Page 70
CHAPTER 7 Sending and Receiving Faxes • Installing and configuring Fax • Sending a simple fax • Setting up your cover page template • Faxing from programs • Faxing a scanned document • Receiving and viewing a fax • Canceling a fax • Automatically retry sending a fax • Automatically canceling a fax - eMachines T3406 | NG3 Hardware Reference - Page 71
emachines.com Installing and configuring Fax This chapter describes using Microsoft Fax and your dial-up modem. You cannot send or receive a fax using a cable or DSL modem by following these instructions. Many Internet services Windows was originally installed on your computer, Fax may not have been - eMachines T3406 | NG3 Hardware Reference - Page 72
www.emachines.com Installing and configuring Fax Configuring Fax Important The first time you run the Fax Configuration Wizard, you may need to provide information in the - eMachines T3406 | NG3 Hardware Reference - Page 73
special characters such as hyphens. We suggest using spaces instead of hyphens in telephone and fax numbers. www.emachines.com 8 Click Next. 9 If you set up your computer to receive faxes, type the receiving fax identifier information, then click Next. This identifier information is required by - eMachines T3406 | NG3 Hardware Reference - Page 74
www.emachines.com Sending a simple fax Sending a simple fax You can use the Send Fax Wizard to send a simple one-page fax to one or more recipients. - eMachines T3406 | NG3 Hardware Reference - Page 75
CHAPTER 7: Sending and Receiving Faxes www.emachines.com Setting up your cover page template You can create your own cover page template that the Fax printer. 4 Click Print. The Send Fax Wizard opens. 5 Complete the wizard by following the instructions in "Sending a simple fax" on page 67. 68 - eMachines T3406 | NG3 Hardware Reference - Page 76
www.emachines.com Faxing a scanned document Faxing a scanned document To fax a document that the Fax printer. 4 Click Print. The Send Fax Wizard opens. 5 Complete the wizard by following the instructions in "Sending a simple fax" on page 67. Receiving and viewing a fax To receive and view a fax - eMachines T3406 | NG3 Hardware Reference - Page 77
CHAPTER 7: Sending and Receiving Faxes www.emachines.com Important Fax is automatically set up to retry and the amount of time between retries. 6 Click OK. Automatically canceling a fax If your computer tried to send a fax and failed to connect to a fax machine, you can automatically cancel - eMachines T3406 | NG3 Hardware Reference - Page 78
the memory card reader • Using the CD or DVD drive • Using a second monitor • Viewing the display on a television • Using Windows Media Center • Using multimedia • Playing music and movies • Creating audio files and music libraries • Creating and editing videos • Creating music CDs and video DVDs - eMachines T3406 | NG3 Hardware Reference - Page 79
also use the memory card reader to transfer data between your computer and a device that uses memory cards, such as a PDA, MP3 player, or cellular telephone. Memory card types Activity indicator Memory card reader slots The memory card reader supports the following card types: Card Type Secure - eMachines T3406 | NG3 Hardware Reference - Page 80
www.emachines.com Using a memory card Caution To avoid memory card damage or errors while using a memory card, insert only one memory card in a slot at a time. Caution Do not remove the memory card or turn off the computer while the memory card reader access indicator is blinking. You could lose - eMachines T3406 | NG3 Hardware Reference - Page 81
video and data to DVD-RAM discs. Inserting a CD or DVD Important Some music CDs have copy protection software. You may not be able to play these CDs on your computer indicator Manual eject hole (location varies) (location varies) To insert a CD or DVD: 1 Press the eject button on the CD or DVD - eMachines T3406 | NG3 Hardware Reference - Page 82
and may not represent the actual screens on your computer. Tips & Tricks For the location of the VGA port on your computer, see the setup poster or "Back" on page 10. If your computer's video card supports it (it must have two video connections), you can connect an additional monitor or projector - eMachines T3406 | NG3 Hardware Reference - Page 83
CHAPTER 8: Using Drives and Ports www.emachines.com Viewing the display on a television Important The TV out feature is available only on computers that have a Video out or S-Video out jack. computer. Important The dialog boxes shown in this section are examples only and may not represent the - eMachines T3406 | NG3 Hardware Reference - Page 84
www.emachines.com Viewing the display on a television 8 Click Advanced. The Multiple Monitors Properties dialog box opens. Enable TV TV Important If the Enable TV and TV buttons are grayed out, your computer has not detected the television. Make sure that the television is turned on and connected - eMachines T3406 | NG3 Hardware Reference - Page 85
CHAPTER 8: Using Drives and Ports www.emachines.com Modifying television settings To modify television settings: 1 On the Multiple Monitors Properties dialog box Displays tab, click TV. The TV Properties dialog box opens. 2 Modify the settings, then click OK. 78 - eMachines T3406 | NG3 Hardware Reference - Page 86
emachines.com Using Windows Media Center Using Windows Media Center If your computer came with Windows Media Center installed and with a Media Center remote control (optional), you can use the remote control to watch TV, videos Video menu. Audio/Video (A/V) control Center computer in Standby mode - eMachines T3406 | NG3 Hardware Reference - Page 87
or satellite service provider. However, on occasion, you may need to update the Program Guide manually. Important Media Center requires Internet access to update the Media Center Program Guide. Make sure that you connect to the Internet before continuing the manual Program Guide update instructions - eMachines T3406 | NG3 Hardware Reference - Page 88
www.emachines.com Using multimedia Using multimedia Adjusting the volume You can use the Windows volume controls to adjust the overall volume and the volume of specific sound devices in your computer. To adjust the overall volume level from Windows: 1 Click Start, then click Control Panel. The - eMachines T3406 | NG3 Hardware Reference - Page 89
CHAPTER 8: Using Drives and Ports 3 Click the Volume tab. www.emachines.com 4 Click Advanced in the Device volume area. If the device you want to adjust does not appear in the window, click Options, Properties, the - eMachines T3406 | NG3 Hardware Reference - Page 90
www.emachines.com Playing music and movies Playing music and movies Playing WAV audio files Sound Recorder is a simple Windows program that lets you record and play WAV files. WAV is the most common audio file format used for your Windows system sounds. To play a WAV audio file with Sound - eMachines T3406 | NG3 Hardware Reference - Page 91
and Ports Shortcut Double-click the file in My Computer. www.emachines.com To play a file using Windows Media Player: 1 Click Start, All Programs, then click Windows Media Player. Windows Media Player opens. Video screen Play Stop Video file information 2 Click File, then click Open. The Open - eMachines T3406 | NG3 Hardware Reference - Page 92
emachines.com Shortcut Insert a CD or DVD Ö Windows Media Player opens and plays the disc Playing music and movies To play a CD or DVD: 1 Make sure that the speakers are turned on or headphones are plugged in and that the volume is turned up. 2 Insert a CD or DVD into the CD list of CD players or - eMachines T3406 | NG3 Hardware Reference - Page 93
CHAPTER 8: Using Drives and Ports www.emachines.com Help & Support For more information about playing DVDs using is turned up. 2 Click Start, All Programs, CyberLink PowerDVD, then click PowerDVD. The PowerDVD video screen and control panel open. 3 Insert a DVD into the DVD drive, then click (play). - eMachines T3406 | NG3 Hardware Reference - Page 94
information about making or playing an audio recording, click Start, then click Help and Support. Type the phrases recording audio or playing audio in the Search box, then click the arrow. Recording WAV audio files Sound recorder is a simple Windows program that lets you record and play WAV files - eMachines T3406 | NG3 Hardware Reference - Page 95
Drives and Ports www.emachines.com Important Some music CDs have copy protection software. You cannot copy tracks from these CDs. Creating WMA and MP3 music files using Windows Media Player Using Windows Media Player, you can copy the tracks from a music CD to your computer's hard drive as WMA - eMachines T3406 | NG3 Hardware Reference - Page 96
emachines.com Creating audio files and music libraries 5 Click File, CDs and Devices, Rip Audio CD, then click the drive that contains the audio CD may become corrupt. If you are having trouble listening to, or working with, a files from Windows Explorer or your desktop to the music library. ■ - eMachines T3406 | NG3 Hardware Reference - Page 97
Drives and Ports www.emachines.com Editing track computer so that you can download video from the camera as data files. You can also create video from a Web cam attached to your computer. For instructions on how to create video, see your camera's user guide. Editing videos Help & Support - eMachines T3406 | NG3 Hardware Reference - Page 98
www.emachines.com Creating and editing videos Transferring your video to your computer To transfer your video to your computer: 1 Connect your video camera to your computer by following the camera manufacturer's instructions. 2 If a dialog box opens with a list of video editing programs, click - eMachines T3406 | NG3 Hardware Reference - Page 99
with additional space required for editing. www.emachines.com 4 Complete the screens in the Video Capture Wizard, clicking Next after each one. My Computer to save your movie to your hard drive. ■ Click Save to CD to save your movie to a recordable CD. ■ Click Send in e-mail to send your video - eMachines T3406 | NG3 Hardware Reference - Page 100
www.emachines.com Creating music CDs and video DVDs Creating music CDs and video DVDs Important Some CDs have copy protection software. You cannot create MP3, WAV, or WMA files from these CDs and you may not be able to listen to these CDs on your computer. Tips & Tricks You can also use Windows - eMachines T3406 | NG3 Hardware Reference - Page 101
8: Using Drives and Ports www.emachines.com 5 Click Edit Playlist. The Edit Playlist dialog box opens. 6 Click songs in the left column to add them to the playlist. After all the songs are added to your list, click OK. 7 Click Start Burn. Creating a music CD with CyberLink Power2Go To create - eMachines T3406 | NG3 Hardware Reference - Page 102
www.emachines.com Creating music CDs and video DVDs 3 Click Start, All Programs, CyberLink DVD Solution, Power2Go, then click Power2Go. folder that contains the files or folders you want to burn to the CD or DVD. Click to select the file or folder. Press and hold the CTRL key to select multiple files - eMachines T3406 | NG3 Hardware Reference - Page 103
CHAPTER 8: Using Drives and Ports www.emachines.com 6 Drag the files or folders into the bottom pane. 7 After you select all your files, click . The Configuration/Information dialog box opens. 8 If you have one CD or DVD burner, click Burn. The Burning dialog box opens and Power2Go burns the files - eMachines T3406 | NG3 Hardware Reference - Page 104
www.emachines.com Creating music CDs and video DVDs Creating video DVDs You can create video DVDs using Windows Media Player or CyberLink Power2Go. Important TV programs that have been recorded with the Media Center can be recorded to DVD and replayed on another Media Center computer or on a non - eMachines T3406 | NG3 Hardware Reference - Page 105
CHAPTER 8: Using Drives and Ports www.emachines.com Creating a video DVD with CyberLink Power2Go To create a video DVD: 1 Insert a blank, writable DVD into your DVD drive. 2 If a dialog box opens, click Take no action, then click OK. 3 Click Start, All Programs, CyberLink - eMachines T3406 | NG3 Hardware Reference - Page 106
www.emachines.com Creating music CDs and video DVDs 4 Click Video/Photo Disc in the left-hand column, select your disc type in the right-hand column, then click OK. The Select a Burning Task dialog box - eMachines T3406 | NG3 Hardware Reference - Page 107
Drives and Ports www.emachines.com 11 After you set up your DVD, click . The Configuration/Information dialog box opens. 12 Click the Video tab, then select the Burn. The Burning dialog box opens and Power2Go burns the files to the CD or DVD. 100 15 When a message tells you that the recording is - eMachines T3406 | NG3 Hardware Reference - Page 108
www.emachines.com Creating and copying data CDs and DVDs Creating and copying data CDs and DVDs Creating a data CD or DVD with CyberLink Power2Go You can use CyberLink Power2Go to create data CDs or DVDs. To create a data CD or DVD: 1 Insert a blank, writable CD or DVD into your CD or DVD drive. - eMachines T3406 | NG3 Hardware Reference - Page 109
CHAPTER 8: Using Drives and Ports www.emachines.com 4 Click Data Disc in the left-hand column, select your the top pane, browse to the folder that contains the files or folders you want to burn to the CD or DVD. Click to select the file or folder. Press and hold the CTRL key to select multiple files - eMachines T3406 | NG3 Hardware Reference - Page 110
www.emachines.com Creating and copying data CDs and DVDs If you have more than one CD or DVD burner, select the burner, then click Burn. The Burning dialog box opens and Power2Go burns the files to the CD or DVD. Copying a CD or DVD 9 When a message tells you that the recording is complete, click - eMachines T3406 | NG3 Hardware Reference - Page 111
emachines.com 2 Click Copy disc in the left-hand column, then click OK. The Copy Disc dialog box opens. 104 3 Insert the music CD, data CD, or data DVD you want to copy into your CD the arrow to open the To list, then click your recordable CD or DVD drive. 6 Click Copy. The Burning dialog box opens - eMachines T3406 | NG3 Hardware Reference - Page 112
emachines Player online help. Use the following instructions to make an audio recording by speaking computer. For the location of the Microphone jacks, see your computer's setup poster or "Back" on page 10. 2 Click Start, All Programs, Accessories, Entertainment, then click Sound Recorder. The Sound - eMachines T3406 | NG3 Hardware Reference - Page 113
CHAPTER 8: Using Drives and Ports www.emachines.com 106 - eMachines T3406 | NG3 Hardware Reference - Page 114
CHAPTER 9 Customizing Your Computer • Adjusting the screen and desktop settings • Changing the mouse settings • Changing Power-Saving Settings • Installing an uninterruptible power supply - eMachines T3406 | NG3 Hardware Reference - Page 115
CHAPTER 9: Customizing Your Computer www.emachines.com Adjusting the screen and desktop settings Tips & Tricks If you images seems "false" or "jumpy," especially after you have played a game or run a video-intensive program, check the color depth setting and return it to 32-bit True Color, if - eMachines T3406 | NG3 Hardware Reference - Page 116
www.emachines.com Help and Support For more information about changing the power scheme, click Start, then click Help and Support. Type the keyword changing display settings in the Search box, then click the arrow. Adjusting the screen and desktop settings 4 Click the arrow button to open the Color - eMachines T3406 | NG3 Hardware Reference - Page 117
CHAPTER 9: Customizing Your Computer www.emachines.com Changing the colors on your Windows desktop You can change the colors of Windows desktop items, such as the background color and dialog box title bars. To change desktop colors: 1 Click Start, then click Control Panel. The Control Panel window - eMachines T3406 | NG3 Hardware Reference - Page 118
-click the Display icon. The Display Properties dialog box opens. 3 Click the Desktop tab. Help and Support For more information about changing the power scheme, click Start, then click Help and Support. Type the keyword changing desktop background in the Search box, then click the arrow. 4 Click - eMachines T3406 | NG3 Hardware Reference - Page 119
Computer www.emachines.com Selecting a screen saver Caution If you are using a monitor (not a flat-panel display), an image may get burned in on your monitor screen if you leave your computer and Support For more information about changing the power scheme, click Start, then click Help and Support. - eMachines T3406 | NG3 Hardware Reference - Page 120
www.emachines.com Adjusting the screen and desktop settings Using an extended desktop If your computer supports dual monitors (it must have multiple monitor ports), you can use a second monitor to roughly double the size of your Windows desktop. You can use the additional desktop space to - eMachines T3406 | NG3 Hardware Reference - Page 121
CHAPTER 9: Customizing Your Computer www.emachines.com Changing the mouse settings You can The Mouse Properties dialog box opens. Help and Support For more information about changing the power scheme, click Start, then click Help and Support. Type the keyword mouse settings in the Search box - eMachines T3406 | NG3 Hardware Reference - Page 122
www.emachines.com Changing Power-Saving Settings Changing Power-Saving Settings . The Power Options Properties dialog box opens. Help and Support For more information about changing the power scheme, click Start, then click Help and Support. Type the keyword power scheme in the Search box, - eMachines T3406 | NG3 Hardware Reference - Page 123
Customizing Your Computer www.emachines.com Changing Support. Type the keyword power management in the Search box, then click the arrow. Activating and using Hibernate mode Hibernate (also called save to disk) writes all current memory (RAM) information to the hard drive, then turns your computer - eMachines T3406 | NG3 Hardware Reference - Page 124
www.emachines. . 5 Click OK. Help and Support For more information about changing the power scheme, click Start, then click Help and Support. Type the keyword hibernate in the the Power buttons lists. ■ As a manually-selected power savings mode: Click Start, then click Shut Down. Press and hold - eMachines T3406 | NG3 Hardware Reference - Page 125
CHAPTER 9: Customizing Your Computer www.emachines.com Installing an uninterruptible power supply To install an 3 Click the UPS tab. Help and Support For more information about changing the power scheme, click Start, then click Help and Support. Type the keyword uninterruptible power supply in - eMachines T3406 | NG3 Hardware Reference - Page 126
CHAPTER 10 Protecting Your Computer • Hardware security • Data security • Security updates - eMachines T3406 | NG3 Hardware Reference - Page 127
to eMachines so we can reset it. Use a startup and hard drive password to keep other people from using your computer. You have to enter your password when you turn on your computer or access your files. These passwords are set in your computer's BIOS Setup utility. Use a password that you can - eMachines T3406 | NG3 Hardware Reference - Page 128
www.emachines.com Data security Help & Support For more information about Windows XP user accounts, click Start, then click Help and Support. your computer from viruses Help & Support For more information about protecting your computer against viruses, click Start, then click Help and Support. - eMachines T3406 | NG3 Hardware Reference - Page 129
10: Protecting Your Computer www.emachines.com Your new eMachines computer has McAfee SecurityCenter installed. McAfee SecurityCenter includes the following components: ■ McAfee VirusScan is an anti-virus subscription service. You can use VirusScan to protect your computer from viruses, worms - eMachines T3406 | NG3 Hardware Reference - Page 130
www.emachines.com Data security Starting McAfee SecurityCenter To start McAfee SecurityCenter: ■ Click Start, All Programs, McAfee, then click McAfee Security Center. McAfee SecurityCenter opens. Scanning for - eMachines T3406 | NG3 Hardware Reference - Page 131
CHAPTER 10: Protecting Your Computer 3 Click Scan My Computer for Viruses. www.emachines.com 4 Click the location you want to scan, then select your scan options. 5 Click Scan. To remove a virus: 1 If McAfee SecurityCenter finds a virus, follow all on-screen instructions to remove the virus. 2 - eMachines T3406 | NG3 Hardware Reference - Page 132
www.emachines.com Data security Using Windows XP Security Center Windows Security Center helps protect your computer through: ■ a firewall ■ automatic Windows updates ■ third party virus protection software ■ security options in Internet Explorer Modifying security settings To modify security - eMachines T3406 | NG3 Hardware Reference - Page 133
10: Protecting Your Computer www.emachines.com Security updates To keep your computer secure, you need to keep Windows XP and your computer's system software up -priority Windows update to fix the problem. You should update Windows regularly to keep your computer secure. ■ Express-Click Express to - eMachines T3406 | NG3 Hardware Reference - Page 134
www.emachines.com Security updates Windows XP Security Center Use the Windows XP Security Center to schedule automatic updates. Windows can routinely check for the latest important updates for your computer and install them automatically. To schedule automatic updates: 1 Click Start, Control Panel, - eMachines T3406 | NG3 Hardware Reference - Page 135
CHAPTER 10: Protecting Your Computer www.emachines.com BigFix Your computer may include BigFix. BigFix monitors your computer for problems and conflicts. It automatically gathers information about the latest bugs, security alerts, and updates from BigFix sites on the Internet. Whenever BigFix - eMachines T3406 | NG3 Hardware Reference - Page 136
CHAPTER 11 Protecting and Recovering Your Files and Software • System recovery options • Copying driver and application recovery files • Recovering your system - eMachines T3406 | NG3 Hardware Reference - Page 137
Your Files and Software www.emachines.com System recovery options Most computer problems can be solved by following the information in "Troubleshooting" on page 175 or at eMachines.com. Problem-solving may also involve re-installing some or all of the computer's software (also called recovering or - eMachines T3406 | NG3 Hardware Reference - Page 138
you have blank discs ready. Depending on the type of recordable drive your computer has, you need either several CD-R discs or one DVD-R or DVD+R disc. 2 Click Start, All Programs, System Recovery, then click Create My Drivers-Applications CD(s). A message asks you if you want to "Burn ISO" (record - eMachines T3406 | NG3 Hardware Reference - Page 139
can burn unlimited sets of driver and application recovery discs from a different computer that has a recordable drive. To copy driver and application recovery files to a network: 1 Click Start, All Programs, System Recovery, then click Create My Drivers-Applications CD(s). A message asks you if you - eMachines T3406 | NG3 Hardware Reference - Page 140
driver and application recovery files to. 3 Click OK. The program prepares the recovery files, then copies them to the location you specified. Tips & Tricks Store your recovery (ISO) images in a folder that indicates which computer the files are for. For example, store the files for an eMachines - eMachines T3406 | NG3 Hardware Reference - Page 141
, you can find the eMachines Customer Care contact information on the label located on the front or side of your computer. If you have problems with your computer and you need to recover your system, you can restore specific drivers and programs from a set of recovery discs, roll back your system - eMachines T3406 | NG3 Hardware Reference - Page 142
specific files using either the Start menu or a driver and application recovery disc that you have created. To restore your system from the driver and application recovery discs: 1 Click Start, All Programs, System Recovery, then click Application & Driver Recovery. - OR - Turn on your computer - eMachines T3406 | NG3 Hardware Reference - Page 143
Microsoft System Restore Before using eMachines System Recovery, you should try Microsoft System Restore to determine whether you can restore your system to a previous condition. Every time you install new device drivers or software, and every 24 hours (while your computer is turned on), Microsoft - eMachines T3406 | NG3 Hardware Reference - Page 144
solve your problem, restart eMachines System Recovery. See "Recovering your system from the hard drive" on page 137 for instructions. Recovering your Updates. To recover your system from the hard drive: 1 Remove all CDs and DVDs from the disc drives, disconnect all USB devices except the keyboard - eMachines T3406 | NG3 Hardware Reference - Page 145
and Recovering Your Files and Software www.emachines.com 2 If you can still run Windows, click Start, All Programs, System Recovery, System Recovery, then click Yes. Your computer restarts, then the System Recovery program starts. - OR - Turn on or restart your computer and press F11 while your - eMachines T3406 | NG3 Hardware Reference - Page 146
CHAPTER 12 Maintaining Your Computer • Caring for your computer • Updating Windows • BigFix • Managing hard drive space • Moving from your old computer - eMachines T3406 | NG3 Hardware Reference - Page 147
CHAPTER 12: Maintaining Your Computer www.emachines.com Caring for your computer To extend the life of your computer: ■ When transporting your computer, we recommend that you put it in the original packaging materials. ■ Keep diskettes and your computer away from magnetic fields. Magnetic fields - eMachines T3406 | NG3 Hardware Reference - Page 148
www.emachines.com Caring for your computer Warning When you shut down your computer, the power turns off, but some electrical current still flows through your computer. To avoid possible injury from electrical shock, unplug the power cord and modem cable from the wall outlets. Cleaning the - eMachines T3406 | NG3 Hardware Reference - Page 149
Computer www.emachines.com Cleaning CDs or DVDs Wipe from the center to the edge, not around in a circle, using a product made especially for the purpose. Updating Windows Help and Support Follow the on-screen instructions. BigFix BigFix* monitors your computer for problems and conflicts. It - eMachines T3406 | NG3 Hardware Reference - Page 150
www.emachines.com Managing hard drive space To learn more about using BigFix: ■ From the drive. Checking hard drive space To check hard drive space: 1 Click Start, then click My Computer. The My Computer window opens. 2 Right-click the drive that you want to check for available file space, then - eMachines T3406 | NG3 Hardware Reference - Page 151
CHAPTER 12: Maintaining Your Computer www.emachines.com 2 Right-click the hard drive that you want to delete files from, for example Local Disk (C:), then click Properties. The Properties dialog box opens at the General tab. Help and Support For more information about Windows Update, click Start, - eMachines T3406 | NG3 Hardware Reference - Page 152
a summary of the problems that it found. 6 Correct any problems that are found by following the on-screen instructions. 7 Click OK. In order for your computer to use a file, Windows must search for the pieces of the file and put them back together. This process slows the hard drive performance - eMachines T3406 | NG3 Hardware Reference - Page 153
emachines.com To defragment the hard drive: 1 Click Start, then click My Computer. The My Computer window opens. 2 Right-click the hard drive that you want to defragment, for example Local Disk (C:), then click Properties. The Properties dialog box opens. 3 Click the Tools tab. Help and Support CD - eMachines T3406 | NG3 Hardware Reference - Page 154
on-screen instructions to customize the task. Moving from your old computer Using the Files and Settings Transfer Wizard Help and Support For more , from your old computer to your new one by using the Files and Settings Transfer Wizard. The wizard also moves specific files or entire folders - eMachines T3406 | NG3 Hardware Reference - Page 155
Computer www.emachines.com Transferring files You can manually transfer your personal data files by copying them to removable media, such as a diskette, writable CD the My Computer icon on the desktop. Go to File type Documents Spreadsheets Pictures Movies Sound and Music File usually ends in... - eMachines T3406 | NG3 Hardware Reference - Page 156
Support. Type the keyword Internet connection in the Search box, then click the arrow. Setting up your ISP ■ If your current Internet service provider (ISP) software came pre-installed on your new computer settings by following the on-screen instructions. Transferring your e-mail and address book - eMachines T3406 | NG3 Hardware Reference - Page 157
you have trouble after you install the software for your old devices, you can use System Restore to restore your computer's previous settings. Installing a USB printer or scanner USB devices may have special installation instructions. See your USB device's installation guide. Help and Support For - eMachines T3406 | NG3 Hardware Reference - Page 158
Windows Update, click Start, then click Help and Support. Type the keyword System Restore in the Search box, then click the arrow. You probably use some programs that did not come installed on your new computer, such as personal finance software, graphics programs, or games. Spend some time going - eMachines T3406 | NG3 Hardware Reference - Page 159
CHAPTER 12: Maintaining Your Computer www.emachines.com 152 - eMachines T3406 | NG3 Hardware Reference - Page 160
Components • Preventing static electricity discharge • Opening the case • Closing the case • Installing memory • Replacing the system battery • Adding or replacing a CD or DVD drive • Replacing the memory card reader • Adding or replacing a hard drive • Replacing the rear fan • Replacing the - eMachines T3406 | NG3 Hardware Reference - Page 161
emachines.com Preventing static electricity discharge Warning To avoid exposure to dangerous electrical voltages and moving parts, turn off your computer cards by their edges or their metal mounting instructions in "Preventing static electricity discharge" on page 154. 2 Shut down your computer - eMachines T3406 | NG3 Hardware Reference - Page 162
www.emachines.com Opening the case 4 Remove the two thumbscrews from the side panel cover, slide the side panel cover toward the back of the computer, then lift the panel away from the computer. 155 - eMachines T3406 | NG3 Hardware Reference - Page 163
CHAPTER 13: Adding and Replacing Components www.emachines.com Removing the front bezel Caution There the system board so you can remove the front bezel and cables from the computer. To remove the front bezel: ■ Position the computer where you can grasp the top front edge of the bezel, then pull - eMachines T3406 | NG3 Hardware Reference - Page 164
www.emachines.com Closing the case Closing the case Replacing the front bezel To replace the front bezel: 1 If you disconnected the bezel cables when you removed the bezel, reconnect them to the system board. 2 Align the latch pins on the bezel with the computer latch holes. 3 Press the bezel - eMachines T3406 | NG3 Hardware Reference - Page 165
from the illustration below. When you upgrade the computer memory, make sure that you install the correct type of memory module for your computer. Your computer uses DIMM memory. To install or replace DIMM memory: 1 Remove the side panel by following the instructions in "Removing the side panel" on - eMachines T3406 | NG3 Hardware Reference - Page 166
www.emachines.com Replacing the system battery 6 Replace the side panel by following the instructions in "Replacing the side panel" on page 157. 7 Return your computer to its upright position. 8 Turn on your computer. Windows starts and the Windows desktop appears. 9 Click Start, Control Panel, - eMachines T3406 | NG3 Hardware Reference - Page 167
www.emachines.com 9 Make sure that the positive (+) side of the new battery is facing up, then press the battery into the socket until it snaps into place. 10 Replace the side panel by following the instructions in "Replacing the side panel" on page 157. 11 Turn on your computer. 12 Open the BIOS - eMachines T3406 | NG3 Hardware Reference - Page 168
emachines.com Adding or replacing a CD or DVD drive 4 Disconnect the power, data, and sound (if attached) cables from the back of the drive. 5 Slide the drive out of the case toward the front. 6 Slide the new drive into the drive bay from the front of the case. 7 Connect the power, data, and sound - eMachines T3406 | NG3 Hardware Reference - Page 169
a Phillips screwdriver to add or replace a CD or DVD drive. Important The color and shape of your replacement component's front cover may vary from your original component. To replace the memory card reader: 1 Remove the side panel by following the instructions in "Removing the side panel" on page - eMachines T3406 | NG3 Hardware Reference - Page 170
into the bay from the front of the case. 7 Connect the new card reader's USB cable to the system board. 8 Use the screw you removed previously to secure the card reader to the bay. 9 Replace the front bezel by following the instructions in "Replacing the front bezel" on page 157. 10 Replace the - eMachines T3406 | NG3 Hardware Reference - Page 171
CHAPTER 13: Adding and Replacing Components www.emachines.com 4 Remove the screw that secures the hard drive bay to the case. Screw 5 Slide the hard drive bay away from the system board and - eMachines T3406 | NG3 Hardware Reference - Page 172
www.emachines.com Replacing the rear fan 11 Slide the hard drive bay back into position, then secure it to the case using the screw you removed previously. 12 Replace the side panel by following the instructions in "Replacing the side panel" on page 157. Replacing the rear fan Tips & Tricks You - eMachines T3406 | NG3 Hardware Reference - Page 173
CHAPTER 13: Adding and Replacing Components www.emachines.com 5 Use the four screws you removed the new fan's power cable to the system board. 7 Replace the side panel by following the instructions in "Replacing the side panel" on page 157. Replacing the power supply Tips & Tricks You need - eMachines T3406 | NG3 Hardware Reference - Page 174
www.emachines.com Tips & Tricks On some models, you may first need to remove the . To replace the heat sink: 1 Remove the side panel by following the instructions in "Removing the side panel" on page 154. 2 Place the computer case on its side. 3 Disconnect the heat sink fan's power connector from - eMachines T3406 | NG3 Hardware Reference - Page 175
CHAPTER 13: Adding and Replacing Components www.emachines.com 4 Loosen the four captive screws that sink fan's power connector to the system board. 10 Replace the side panel by following the instructions in "Replacing the side panel" on page 157. Replacing the front I/O panel Important The - eMachines T3406 | NG3 Hardware Reference - Page 176
www.emachines.com Replacing the front I/O panel 3 Pry the front bezel away from the front of the case. 4 Slide the front bezel's power and LED cables through the hole in the front of the case, then remove the bezel completely. 169 - eMachines T3406 | NG3 Hardware Reference - Page 177
CHAPTER 13: Adding and Replacing Components www.emachines.com 5 Disconnect the front I/O panel cables from the system board. 170 6 Remove the single screw that secures the front I/O panel to the case. Screw 7 Rotate - eMachines T3406 | NG3 Hardware Reference - Page 178
www.emachines.com Adding or replacing an expansion card 11 Insert the front bezel's cables through an expansion card To add or replace an expansion card: 1 Remove the side panel by following the instructions in "Removing the side panel" on page 154. 2 If you are adding a new expansion card, go to - eMachines T3406 | NG3 Hardware Reference - Page 179
the system board: 1 Remove the side panel by following the instructions in "Removing the side panel" on page 154. 2 Place the computer case on its side. 3 Remove each screw that secures an expansion card to the case, then remove each expansion card and place them in static-free bags for storage - eMachines T3406 | NG3 Hardware Reference - Page 180
www.emachines.com Replacing the system board 6 Disconnect the heat sink fan power connector from the system board. Connector 7 Loosen the four captive screws that secure the - eMachines T3406 | NG3 Hardware Reference - Page 181
CHAPTER 13: Adding and Replacing Components www.emachines.com 11 Remove the memory from the memory slots and place it in a static-free bag for to the system board. 25 Reinstall each expansion card. 26 Replace the side panel by following the instructions in "Replacing the side panel" on page 157. - eMachines T3406 | NG3 Hardware Reference - Page 182
CHAPTER 14 Troubleshooting • Safety guidelines • First steps • Troubleshooting • Telephone support - eMachines T3406 | NG3 Hardware Reference - Page 183
discharge" on page 154. First steps Help and Support For more information about troubleshooting, click Start, then click Help and Support. Type the keyword troubleshooting in the Search box, then click the arrow. If you have problems with your computer, try these things first: ■ Make sure that - eMachines T3406 | NG3 Hardware Reference - Page 184
the BIOS Setup utility by pressing and holding F1 while your computer restarts. Make sure that the IDE controllers are enabled. ■ Make sure that the drive is configured correctly by following the instructions in the drive documentation. ■ Reinstall the device driver. Audio CD does not produce sound - eMachines T3406 | NG3 Hardware Reference - Page 185
CHAPTER 14: Troubleshooting Computer Diskette drive 178 www.emachines.com ■ Make sure that the volume controls are . ■ Shut down and restart your computer. ■ Clean the disc. For more information, see "Cleaning CDs or DVDs" on page 142. ■ Reinstall the audio device drivers. A DVD movie will not play - eMachines T3406 | NG3 Hardware Reference - Page 186
www.emachines.com Troubleshooting ■ Try a different diskette. Occasionally diskettes are flawed restarting your computer. DVD drives See "CD or DVD drives" on page 177. File management Help and Support For more information about troubleshooting, click Start, then click Help and Support. Type - eMachines T3406 | NG3 Hardware Reference - Page 187
CHAPTER 14: Troubleshooting www.emachines.com Hard drive Caution All deleted files will be lost when you empty the Recycle Bin. Help and Support For more information about troubleshooting, click Start, then click Help and Support. Type the keyword file management in the Search box, then click the - eMachines T3406 | NG3 Hardware Reference - Page 188
www.emachines.com Troubleshooting Help and Support For more information about troubleshooting, click Start, then click Help and Support. Type the keyword troubleshooting connections in the Search box, then click the arrow. You see an "Unable to locate host" message and are unable to browse the - eMachines T3406 | NG3 Hardware Reference - Page 189
functions, however, is not as good as VGA output. S-Video display output is not optimized for computer video display. ■ Quality of video cables-Poor quality or the incorrect type of video cables can cause problems and affect the video quality. Cable connections must be made correctly for optimal - eMachines T3406 | NG3 Hardware Reference - Page 190
emachines.com Troubleshooting ■ Age of the TV-Newer TVs usually have more advanced features, produce a better quality picture, and support higher screen resolutions. The Media Center video such as WinDVD). The non-Media Center computer must also have Windows XP with Service Pack (SP) 1 or 2, Windows - eMachines T3406 | NG3 Hardware Reference - Page 191
computer. For information about manually updating the Program Guide, see "Manually updating the Media Center Program Guide" on page 19. Memory Help and Support For more information about troubleshooting, click Start, then click Help and Support. Type the keyword memory telephone services such as - eMachines T3406 | NG3 Hardware Reference - Page 192
popping sounds). Line noise is a common problem that can support. ■ See if the modem works with a different communications program. The problem may be with just one program. ■ Review the troubleshooting service provider equipment, or ISP limitations, may lower the speed even further. If your computer - eMachines T3406 | NG3 Hardware Reference - Page 193
Support For more information about troubleshooting, click Start, then click Help and Support. Type the keyword troubleshooting in the Search box, then click the arrow. The modem is not recognized by your computer handshaking sounds when the modems first connect. If the handshaking sounds are too - eMachines T3406 | NG3 Hardware Reference - Page 194
position. ■ Make sure that the monitor cable is connected to the video port on the back of your computer. ■ Check the cable for bent or damaged pins. ■ Reinstall the device driver. ■ Connect a monitor that you know works to your computer. The color is not uniform Make sure that the monitor warms up - eMachines T3406 | NG3 Hardware Reference - Page 195
CHAPTER 14: Troubleshooting www.emachines.com Tips & Tricks For more information, see "Adjusting the screen and desktop settings" on page and video card documentation. Mouse The mouse does not work ■ Make sure that the mouse cable is plugged in correctly. ■ Shut down and restart your computer. ■ - eMachines T3406 | NG3 Hardware Reference - Page 196
www.emachines.com Passwords Power Printer Troubleshooting ■ Make sure that all computers are using the same Subnet Mask. ■ If you assigned IP addresses to the computers, make sure that all computers have different IP addresses. For home networks, IP addresses should be 192.168.N.N where N is a - eMachines T3406 | NG3 Hardware Reference - Page 197
Printer. ■ Reinstall the printer driver. See the guide that came with your printer for instructions on installing the printer driver. Help and Support For more information about troubleshooting, click Start, then click Help and Support. Type the keyword printer troubleshooter in the Search box - eMachines T3406 | NG3 Hardware Reference - Page 198
Telephone support Before calling eMachines Customer Care Warning To avoid bodily injury, do not attempt to troubleshoot your computer problem if instructions provided with it. If you did not purchase the hardware or software from eMachines, see the manufacturer's documentation and technical support - eMachines T3406 | NG3 Hardware Reference - Page 199
" on page 191 before calling) eMachines Customer Care telephone numbers vary by country or region. See the label on the front or side of your computer. Self-help Help and Support For more information about troubleshooting, click Start, then click Help and Support. Type the keyword practice in the - eMachines T3406 | NG3 Hardware Reference - Page 200
APPENDIX A Safety, Regulatory, and Legal Information • Important safety information • Regulatory compliance statements • Environmental information • Notices - eMachines T3406 | NG3 Hardware Reference - Page 201
emachines.com Important safety information Warning Always follow these instructions to help guard against personal injury and damage to your eMachines system. Your eMachines card, instructions. ■ When the computer is turned off, a small amount of electrical current still flows through the computer - eMachines T3406 | NG3 Hardware Reference - Page 202
are: shielded video cable when approved by eMachines could void 47) rules. On the computer or modem card is a label that 68-compliant. See installation instructions for details. The service may be required. The telephone company may request that you disconnect the equipment until the problem - eMachines T3406 | NG3 Hardware Reference - Page 203
the unit ever need servicing, contact an authorized service location. Television antenna connectors protection (for systems fitted with TV/cable TV tuner cards) 196 External television antenna grounding If an outside antenna or cable system is to be connected to your eMachines PC, make sure that - eMachines T3406 | NG3 Hardware Reference - Page 204
Electric service equipment 2 Power service grounding eMachines to see if this program is available in your area. ■ If you need further assistance in recycling, reusing, or trading in your "end of life" product, you may contact us at the Customer Care number listed in your product's user guide - eMachines T3406 | NG3 Hardware Reference - Page 205
and Legal Information www.emachines.com Notices Copyright © prior consent in writing from Gateway. The information in this manual has been carefully checked and is believed to be accurate. of their respective companies. Macrovision statement If your computer has a DVD drive and an analog TV - eMachines T3406 | NG3 Hardware Reference - Page 206
Lock indicator 21 capturing video to computer 91 cards adding expansion 171 inserting memory card 73 installing memory card 73 removing memory card 73 replacing expansion 171 slots 72 troubleshooting add-in card 177 troubleshooting memory card 184 types of memory cards supported 72 case closing 157 - eMachines T3406 | NG3 Hardware Reference - Page 207
camera 9, 11, 90 Zip drive 8, 11 copying data CD 103 data DVD 103 files across network 61 files and folders 31, 39 music CD 103 text and graphics 39 creating desktop icons 28 desktop shortcuts 28 documents 36 folders 30 music CD 93 music files 88 video DVD 97 WMA files 88 customizing 107 cutting - eMachines T3406 | NG3 Hardware Reference - Page 208
emachines.com Index equipment needed 51 example 51 installing cards 52 installing drivers 52 jack 11, 12 Ethernet network creating 52 expansion card adding 171 replacing 171 extended desktop from old computer 149 troubleshooting 180, 185 using 42 watching television 105 Internet service provider ( - eMachines T3406 | NG3 Hardware Reference - Page 209
player memory cards 72 MPEG file playing 83 multimedia adjusting volume 23, 81 playing audio CD 84 playing DVD 84, 86 recording audio 87, 105 using DVD drive 73 using Windows Media Player 83 multiple monitors 113 music library building 89 music tracks copying 88 muting sound 23, 81 N name computer - eMachines T3406 | NG3 Hardware Reference - Page 210
PS/2 port keyboard 10 mouse 10 R radio listening with Windows Media Player 105 RAM See memory rebooting computer 20 recordable drive 8 identifying 73 locating drive 8 troubleshooting 177 recording audio file 87, 105 CD tracks 88, 103 recovering files and folders 31 Recycle Bin 26 deleting files and - eMachines T3406 | NG3 Hardware Reference - Page 211
files from Internet 45 files from old computer 147, 148 Internet settings from old computer 149 settings from old computer 147 video to computer 91 troubleshooting add-in cards 177 cards 177 CD drive 177 cleaning CD 142 cleaning DVD 142 computer startup 178 diskette drive 178 display 179 - eMachines T3406 | NG3 Hardware Reference - Page 212
Movie Maker capturing video to computer 91 editing video 90, 92 saving video 92 transferring video to computer 91 Video Capture Wizard 92 Windows Security Alert dialog box 66, 67 Windows Security Center icon 26 using 121, 125 Windows Update 125, 142 wired Ethernet troubleshooting 188 WMA file - eMachines T3406 | NG3 Hardware Reference - Page 213
Index www.emachines.com 206 - eMachines T3406 | NG3 Hardware Reference - Page 214
MAN EM NG3 DT USR / HW REF R1 01/06
-
 1
1 -
 2
2 -
 3
3 -
 4
4 -
 5
5 -
 6
6 -
 7
7 -
8
-
9
-
10
-
11
-
12
-
13
-
14
-
15
-
16
-
17
-
18
-
19
-
20
-
21
-
22
-
23
-
24
-
25
-
26
-
27
-
28
-
29
-
30
-
31
-
32
-
33
-
34
-
35
-
36
-
37
-
38
-
39
-
40
-
41
-
42
-
43
-
44
-
45
-
46
-
47
-
48
-
49
-
50
-
51
-
52
-
53
-
54
-
55
-
56
-
57
-
58
-
59
-
60
-
61
-
62
-
63
-
64
-
65
-
66
-
67
-
68
-
69
-
70
-
71
-
72
-
73
-
74
-
75
-
76
-
77
-
78
-
79
-
80
-
81
-
82
-
83
-
84
-
85
-
86
-
87
-
88
-
89
-
90
-
91
-
92
-
93
-
94
-
95
-
96
-
97
-
98
-
99
-
100
-
101
-
102
-
103
-
104
-
105
-
106
-
107
-
108
-
109
-
110
-
111
-
112
-
113
-
114
-
115
-
116
-
117
-
118
-
119
-
120
-
121
-
122
-
123
-
124
-
125
-
126
-
127
-
128
-
129
-
130
-
131
-
132
-
133
-
134
-
135
-
136
-
137
-
138
-
139
-
140
-
141
-
142
-
143
-
144
-
145
-
146
-
147
-
148
-
149
-
150
-
151
-
152
-
153
-
154
-
155
-
156
-
157
-
158
-
159
-
160
-
161
-
162
-
163
-
164
-
165
-
166
-
167
-
168
-
169
-
170
-
171
-
172
-
173
-
174
-
175
-
176
-
177
-
178
-
179
-
180
-
181
-
182
-
183
-
184
-
185
-
186
-
187
-
188
-
189
-
190
-
191
-
192
-
193
-
194
-
195
-
196
-
197
-
198
-
199
-
200
-
201
-
202
-
203
-
204
-
205
-
206
-
207
-
208
-
209
-
210
-
211
-
212
-
213
-
214
 |
 |
User Guide
for your eMachines computer