eMachines eView_17s User Guide
eMachines eView_17s Manual
 |
View all eMachines eView_17s manuals
Add to My Manuals
Save this manual to your list of manuals |
eMachines eView_17s manual content summary:
- eMachines eView_17s | User Guide - Page 1
pattern 4 2.4 Safety protection 4 2.5 Timing guide 4 3. Technical information 5 3.1 Products specifications 5 3.2 Signal connector pin assignment 6 4.Troubleshooting 6 IMPORTANT SAFEGUARDS Warnings: 1. Read all of these instructions. Save these instructions for later use, please. 2. Follow - eMachines eView_17s | User Guide - Page 2
operating instructions. Adjust only those controls that are covered by the operating instructions as service. 16. When replacement parts are required, be sure the service technician has used replacement parts Your monitor. (2) Power cord. (3) User's manual. 1.2 Precautions - when using this monitor 1. - eMachines eView_17s | User Guide - Page 3
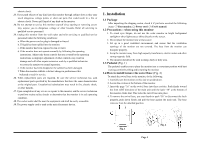
2 Front control locations and functions 2.1 Operation (1) Power ON/OFF Switch ( ): This button is used to turn the monitor on and off. (2) Power indicator: This indicator lights up green when the monitor operates normally. If the monitor is in Energy saving mode, this indicator color changes to - eMachines eView_17s | User Guide - Page 4
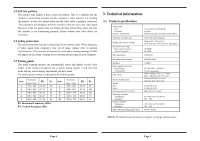
will protect by itself and a warning message of OSD will appear on the screen, warning you to resetting monitor type on your computer. 2.5 Timing guide This multi-scanning monitor can automatically detect and display several video modes. If the monitor recognizes one of preset timing signals, it - eMachines eView_17s | User Guide - Page 5
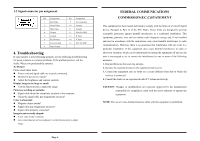
Troubleshooting If your monitor is not performing properly, use the following troubleshooting for quick solutions to common problems, If the problem be completely attached to the computer. Check the signal cable device. Pursuant to Part 15 of the FCC accordance with the instructions, may cause harmful
-
 1
1 -
 2
2 -
 3
3 -
 4
4 -
 5
5
 |
 |

Table of Contents
IMPORTANT SAFEGUARDS
1.Installation
………………………...…………………….1
1.1 Package………………………….………
.....
…………………..…1
1.2 Precautions-when using this monitor………………….……...…..1
1.3 Pedestal ………..………….……………..……………..……...…1
1.4 How to install/remove the swivel base …..……………..……...…1
2. Front control location and functions
…………….………………2
2.1 Operation ……………………………………..………...……..…2
2.2 Adjusting and programming …………………….…….…….….3
2.3 Self test pattern ………………….………………………….…...4
2.4 Safety protection …………….……………..……………………4
2.5 Timing guide ……………………………………..………..……4
3. Technical information
……..………………..……………..….……5
3.1 Products specifications ………………. ………………...……..5
3.2 Signal connector pin assignment …………….…….……...……6
4.Troubleshooting
…………………..………….……………..…6
IMPORTANT SAFEGUARDS
Warnings:
1.
Read all of these instructions. Save these instructions for later use, please.
2.
Follow all warning and instructions marked on the product.
3.
Unplug this monitor from the wall outlet before cleaning. Do not use liquid cleaners
or aerosol cleaners. Use a damp cloth for cleaning.
4.
Do not use attachments not recommended by the monitor manufacturer as they may
cause hazards.
5.
Do not use this monitor near water. For example near a bathtub, washbowl, kitchen
sink, or laundry tub, in a wet basement, or near a swimming pool, etc.
6.
Do not place this monitor on an unstable cart, stand, or table. The monitor may fall,
causing serious injury to a child or adult, and serious damage to the appliance. Use
only with a cart or stand recommended by the manufacturer or sold with monitor.
Wall or shelf mounting should follow the manufacturer's instructions, and should
use a mounting kit approved by the manufacturer.
7.
Slots and openings in the cabinet and the back or bottom are provided for ventilation,
and to insure reliable operation of the television receiver and to protect it from
overheating, these openings must not be blocked or covered. The openings should
never be blocked by placing the monitor on a bed, sofa, rug, or other similar surface.
This monitor should never be placed near or over a radiator or heat register. This
monitor should not be placed in built-in installation such as a bookcase unless
proper ventilation is provided.
8.
This monitor should be operated only from the type of power source indicated on the
marking label. If you are not sure of the type of power supplied in your home,
consult your monitor dealer or local power company.
9.
This monitor is equipped with a three-wire grounding type plug, a plug having a
third (grounding) pin. This plug will only fit into a grounding-type power outlet.
This is a safety feature. If you are unable to insert the plug into the outlet. Contact
your electrician to replace your obsolete outlet. Do not defeat the safety purpose of
the grounding-type plug.
10
.Do not allow anything to rest on the power cord. Do not locate this monitor where
the cord will be abused by persons working on it.
11.
For added protection for this monitor, when it is left unattended and unused for long
periods of time, unplug it from the wall outlet. This will prevent damage to the
monitor due to power-line surges.
12.
Do not overload wall outlets and extension cords as this can result into fire or