1997 Mercury Tracer Owner's Manual
1997 Mercury Tracer Manual
1997 Mercury Tracer manual content summary:
- 1997 Mercury Tracer | Owner's Manual - Page 1
Contents BEFORE DRIVING Introduction Instrumentation Controls and Features Seating and Safety restraints STARTING AND DRIVING Starting Driving Roadside Emergencies SERVICING Maintenance and Care Capacities and Specifications Reporting Safety Defects Index 124 179 186 187 85 93 107 2 4 15 53 1 - 1997 Mercury Tracer | Owner's Manual - Page 2
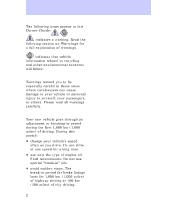
this Owner Guide: indicates change your vehicle's speed often as you drive. Do not drive at one speed for a long time. • use only the type of engine oil Ford recommends. Do not use special "break-in" oils. • avoid sudden stops. The break-in period for brake linings lasts - 1997 Mercury Tracer | Owner's Manual - Page 3
Introduction Information about this guide This guide describes equipment and gives specifications for equipment that was in effect when this guide was approved for printing. Ford may discontinue models or change specifications or design without any notice and without incurring obligation. 3 - 1997 Mercury Tracer | Owner's Manual - Page 4
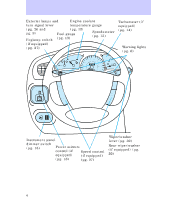
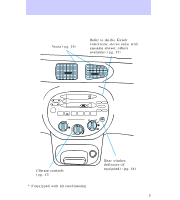
0 0 0 0 0 160 20 20 0 0 0 0 180 200 T MIS OFF INT 1 2 OFF ON MIRRORS RSM L R OFF CST SET ACC Instrument panel dimmer switch Power mirrors (pg. 15) control (if Speed control equipped) (if equipped) (pg. 16) (pg. 27) Wiper/washer lever (pg. 30) Rear wiper/washer (if equipped) (pg. 30) 4 - 1997 Mercury Tracer | Owner's Manual - Page 5
to Audio Guide (electronic stereo radio with cassette shown; others available) (pg. 17) AM FM SEEK SCAN H TAPE M BASS TUNE VOL PUSH ON BAL 1 SIDE 1-2 2 3 4 5 6 EJ REW FF - TREB + FADE LO A/C MAX A/C OFF R.DEF HI Climate controls (pg. 17) * if equipped with air conditioning Rear window - 1997 Mercury Tracer | Owner's Manual - Page 6
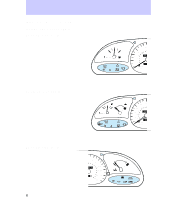
LOW FUEL SERVICE ENGINE SOON 10 BRAKE P ABS 0 0 0 0 MPH km/h Base cluster lights 60 70 100 80 120 50 E FUEL FILL 1 / 2 40 F 80 140 C H 30 40 60 90 100 1 10 C H 0 0 0 0 0 0 160 20 20 SERVICE ENGINE SOON BRAKE ! P ABS 10 0 0 0 0 MPH km/h 180 200 LOW FUEL 120 THEFT CHECK COOLANT - 1997 Mercury Tracer | Owner's Manual - Page 7
. Service engine soon Illuminates when the engine's emissions control system requires service. The light will also illuminate, and will remain illuminated, when the ignition key is turned to ON and the engine is off. Air bag readiness Illuminates when the air bag system requires servicing. The light - 1997 Mercury Tracer | Owner's Manual - Page 8
to the next highest manual transaxle gear for the maximum fuel economy. Brake Illuminates when the parking brake is activated and the ignition is keyed to ON or the brake fluid level is low. In addition, with the parking brake off, the light will illuminate when the engine is cranked. BRAKE P ! 8 - 1997 Mercury Tracer | Owner's Manual - Page 9
Instrumentation Anti-lock brake system (ABS) Illuminates when the ABS needs service. The light will also briefly illuminate when the ignition key is turned to ON and the engine is off. Turn signal Illuminates when the left hand or right hand turn signal or the hazard lamps are illuminated. High - 1997 Mercury Tracer | Owner's Manual - Page 10
a problem with the engine coolant system. Stop the vehicle and check the engine coolant level as soon as possible. The light will also briefly illuminate when the ignition key is turned to ON and the engine is off. For more information on engine coolant, refer to Checking and adding engine coolant - 1997 Mercury Tracer | Owner's Manual - Page 11
Instrumentation Key-in-ignition warning chime A warning chime sounds when the key is left in the ignition and any door is opened. Headlamps-on warning chime A warning chime sounds when the headlamps are on, the ignition is off, and a door is opened. 11 - 1997 Mercury Tracer | Owner's Manual - Page 12
Instrumentation Instrument cluster gauges Base cluster gauges 50 E FUEL FILL 60 70 100 120 12 / F 40 30 40 60 80 140 80 90 100 1 10 C H 0 0 0 0 0 0 160 20 20 10 0 0 0 0 MPH km/h 180 200 120 Sport cluster gauges 50 E FUEL FILL 60 70 100 120 12 / 40 F 80 140 3 4 5 6 7 8 80 - 1997 Mercury Tracer | Owner's Manual - Page 13
into the H zone: 1. Pull off the road as soon as is safely possible. 2. Turn off the engine and let it cool. 3. Check and add engine coolant as necessary. Refer to Checking and adding engine coolant in the Maintenance and care chapter. If the coolant level and mixture is not properly maintained, the - 1997 Mercury Tracer | Owner's Manual - Page 14
Instrumentation Odometer The odometer gives a six digit reading of how many kilometers (miles) your vehicle has traveled. Trip odometer The trip odometer gives a four digit reading of how many kilometers (miles) your vehicle has traveled in an individual trip. Press the reset button to begin an - 1997 Mercury Tracer | Owner's Manual - Page 15
Controls and features 50 E FUEL FILL 60 70 100 120 12 / 40 F 80 140 3 80 C H 30 40 60 CD LO OFF HI *A/C *MAX A/C INSTRUMENT PANEL DIMMER SWITCH To adjust the instrument panel dimmer switch: • Rotate the switch to the right to dim the instrument panel lighting. • Rotate the switch - 1997 Mercury Tracer | Owner's Manual - Page 16
SET SET ACC AM FM SEEK TUNE TUNE DISCS VOL- PUSH ON BAL 1 SIDE 1-2 2 3 4 5 COMP 1 SIDE 1-2 FADE SCAN BASS EJ REW FF - + TREB TAPE CD LO OFF HI *A/C *MAX A/C MIRRORS L R 2. Move the mirror control in the desired direction. 3. Lock the mirror by moving the switch to the center position. 16 - 1997 Mercury Tracer | Owner's Manual - Page 17
1 SIDE 1-2 FADE SCAN BASS EJ REW FF - + TREB TAPE CD LO OFF HI *A/C *MAX A/C CLIMATE CONTROLS Your vehicle has one of the following climate control systems: • Manual heating system • Manual heating and air conditioning system In some modes, the two systems function similarly; in modes where the - 1997 Mercury Tracer | Owner's Manual - Page 18
and down according to your airflow preference. SET ACC AM FM TAPE CD SET SEEK TUNE TUNE DISCS VOL- PUSH ON SCAN BASS EJ REW FF - BAL 1 SIDE 1-2 2 3 4 5 COMP 1 SIDE 1-2 + FADE TREB LO OFF HI *A/C *MAX A/C Operating the climate control Turn the fan speed dial to the desired speed. LO HI Turn - 1997 Mercury Tracer | Owner's Manual - Page 19
humidity buildup inside of the vehicle, always drive with the climate control system turned on. Do not put objects under the front seats that interfere with the flow of air to the back seat area. * If equipped with air conditioning OFF *A/C *MAX A/C Using the MAX A/C mode • MAX A/C mode (if - 1997 Mercury Tracer | Owner's Manual - Page 20
TAPE CD LO OFF HI *A/C *MAX A/C Using the floor mode In the OFF mode, outside air is shut out and the fan will not operate. Using the panel/floor mode Manual heating system • This mode brings in outside air and can be used for heating and ventilating. Manual heating and air conditioning system - 1997 Mercury Tracer | Owner's Manual - Page 21
L R XXXX SET SET ACC AM FM SEEK TUNE TUNE DISCS VOL- PUSH ON BAL 1 SIDE 1-2 2 3 4 5 COMP 1 SIDE 1-2 FADE SCAN BASS EJ REW FF - + TREB TAPE CD LO OFF HI *A/C *MAX A/C Using the defrost/floor mode Manual heating system • This brings in outside air and can be used for heating or ventilating. 21 - 1997 Mercury Tracer | Owner's Manual - Page 22
REW FF - + TREB TAPE CD LO OFF HI *A/C *MAX A/C Using the defrost mode Manual heating system • This brings in outside air and can be used for heating and ventilating and will clear ice or fog from the windshield and front side windows. Manual heating and air conditioning system • This brings in - 1997 Mercury Tracer | Owner's Manual - Page 23
at the same time: LO OFF *A/C HI *MAX A/C * If equipped with air conditioning For about the same temperature airflow toward your chest and feet: LO OFF *A/C HI *MAX A/C * If equipped with air conditioning For better airflow Remove snow, ice, and leaves from the intake vents for the best - 1997 Mercury Tracer | Owner's Manual - Page 24
rear window defroster. The defroster turns off automatically after fifteen minutes. To manually turn off the defroster before fifteen minutes have passed, push the switch again. 50 E FUEL FILL 60 70 COMP 1 SIDE 1-2 FADE SCAN BASS EJ REW FF - + TREB TAPE CD LO OFF HI *A/C *MAX A/C R.DEF 24 - 1997 Mercury Tracer | Owner's Manual - Page 25
FF - + TREB TAPE LO A/C MAX A/C OFF HI Ignition LOCK locks the steering wheel and allows the key to be removed from the ignition. (Push the key in while turning to LOCK on vehicles with manual transaxles.) LOCK also locks automatic transaxle gearshifts. K AC C LOC 0 I ON II T AR ST III 25 - 1997 Mercury Tracer | Owner's Manual - Page 26
Controls and features ACC allows operation of some accessories without starting the engine. ON allows testing of the vehicle's warning lights. START cranks the engine. The key returns to the ON position after it is released. For more information on the vehicle ignition and starting the vehicle, - 1997 Mercury Tracer | Owner's Manual - Page 27
Controls and features The daytime running light (DRL) system the switch to turn the foglamps on and off. OFF OFF Speed control (if equipped) Maintain vehicle speed at least 50 km/h (30 mph) to operate the speed control system. 50 SCAN BASS EJ REW FF - + TREB TAPE CD LO OFF HI *A/C *MAX A/C 27 - 1997 Mercury Tracer | Owner's Manual - Page 28
to decrease speed in 1.6 km/h (1 mph) increments. Speed control can be canceled by pressing the brake pedal or clutch pedal (if equipped). Do not shift into N (automatic transaxle) or neutral (manual transaxle) with the speed control on. Use only Federal Communications Commission (FCC) or Canadian - 1997 Mercury Tracer | Owner's Manual - Page 29
angle. Push the lever back up to lock the steering wheel in position. Never adjust the steering wheel when the vehicle is moving. You could lose control of the vehicle and injure someone. Hazard flasher switch For information on the hazard flasher switch, refer to the Roadside emergencies chapter - 1997 Mercury Tracer | Owner's Manual - Page 30
Controls and features Windshield wipers and washer Wipers Rotate the windshield wiper switch to the desired interval position. Push up and release to wipe the windshield only once. Pull down to select the wipers on continuously. Washer Pull toward you for windshield washer fluid operation. MIST - 1997 Mercury Tracer | Owner's Manual - Page 31
Lamps Move the overhead lamp switch to the desired position: OFF Overhead lamp off DOOR Overhead lamp illuminates when a door is opened ON Overhead lamp on Map lamps (if equipped) Press to turn the map lamps on and off. OFF DOOR ON DOOR MOUNTED CONTROLS Power door locks (if equipped) Push to - 1997 Mercury Tracer | Owner's Manual - Page 32
Controls and features • Driver side U L LOCK • Front passenger side L U 32 - 1997 Mercury Tracer | Owner's Manual - Page 33
Controls and features Childproof locks The rear doors can be set to prevent children from opening the doors from the inside. To set the rear childproof locks: The childproof lock must be set separately for each door. Setting the lock on one door will not set the lock for both rear doors. To return - 1997 Mercury Tracer | Owner's Manual - Page 34
Controls and features Power windows (if equipped) Driver side controls Press the appropriate window switch to operate the power windows. U L LOCK • Driver window LOCK • Front passenger window LOCK • Left rear passenger window LOCK 34 - 1997 Mercury Tracer | Owner's Manual - Page 35
. U L LOCK One-touch down feature To open the driver side window completely, press and release the lower portion of the driver side window switch. To stop the window while it is in motion, press the switch again. Passenger controls Press the window switch to operate the power window at each door - 1997 Mercury Tracer | Owner's Manual - Page 36
Controls and features • Front passenger side L U • Rear passengers CONSOLE CONTROLS Gearshift For information about the gearshift on vehicles with automatic or manual transaxles, refer to the Transaxles section of the Driving chapter. 36 - 1997 Mercury Tracer | Owner's Manual - Page 37
Controls and features • Automatic • Manual 1 3 5 2 4 R 37 - 1997 Mercury Tracer | Owner's Manual - Page 38
Controls and features Parking brake For information on the parking brake, refer to Preparing to start the vehicle in the Driving chapter. 38 - 1997 Mercury Tracer | Owner's Manual - Page 39
Controls and features FLOOR CONTROLS Floor mat hook (if equipped) Fasten the floor mat to the floor to prevent the mat from shifting. 39 - 1997 Mercury Tracer | Owner's Manual - Page 40
Controls and features TRUNK/LIFTGATE CONTROLS Compact disc changer (if equipped) For information on compact disc changer, refer to the Audio Guide. Wagon liftgate lamp Press the switch to turn the liftgate lamp on or off. OFF 40 ON - 1997 Mercury Tracer | Owner's Manual - Page 41
into the notches in the rear trim panels. Rewinding the sliding shade If the shade is damaged or loses its spring tension from excessive use, manual rewind of the shade may be necessary. The following procedure is a two-person operation: 41 - 1997 Mercury Tracer | Owner's Manual - Page 42
Controls and features 1. Remove the shade from the mounting brackets by detaching the safety clip of the tube. 4. Push in the right end cap (marked R) about 6 mm (1/4 inch) to disengage the clutch and hold in while turning the tube toward you fourteen times. 5. Let go of the right end cap and unfold - 1997 Mercury Tracer | Owner's Manual - Page 43
reset. If you see or smell fuel, do not reset the switch or try to start your vehicle. Have all the passengers get out of the vehicle and call the local fire department or a towing service. The fuel pump shut-off switch is located in the rear passenger side of your vehicle. With - 1997 Mercury Tracer | Owner's Manual - Page 44
Controls and features • Wagon 44 - 1997 Mercury Tracer | Owner's Manual - Page 45
Controls and features REMOTE ENTRY AND ANTI-THEFT SYSTEM • Sedan LO CK U LO N CK NIC TR UN K PA • Wagon LO CK U LO N CK PA NIC Remote entry system (if equipped) The remote entry system is available as a driver-door only or as an all-door system. The remote entry features only operate with the - 1997 Mercury Tracer | Owner's Manual - Page 46
to be up to 10 meters (33 ft) away from your vehicle. Unlocking the doors and wagon liftgate Driver-door only system • Press once to unlock the driver side door. • Press again within five seconds to unlock the wagon liftgate (if equipped) • Sedan LO CK U LO N CK NIC TR UN K PA • Wagon LO CK U LO - 1997 Mercury Tracer | Owner's Manual - Page 47
Controls and features • Press again within five seconds to unlock passenger doors and wagon liftgate (if equipped). Opening the trunk (if equipped) Press once to open the trunk. • Sedan PA LO CK U LO N CK NIC TR UN K Locking the doors Driver-door only system • Press once to lock only the driver - 1997 Mercury Tracer | Owner's Manual - Page 48
and features driver's door. The other doors must be locked manually. • Sedan LO CK U LO N CK NIC TR UN K PA • Wagon LO CK U LO N CK PA NIC All-door system • Press once to lock all doors. • Press again within five seconds to verify doors are locked (horn will sound once and parking lamps will - 1997 Mercury Tracer | Owner's Manual - Page 49
Controls and features Sounding a panic alarm Press once to sound an alarm (with either the driver-door only or all-door system). • Sedan LO CK U LO N CK PA NIC TR UN K • Wagon LO CK U LO N CK PA NIC The parking lamps flash, the horn sounds, and the illuminated entry system turns on. Press - 1997 Mercury Tracer | Owner's Manual - Page 50
off after approximately three minutes. The lights and horn will remain off unless another unauthorized entry is attempted. Arming the system The anti-theft system can be armed when: • the ignition is in the LOCK position and the key is removed • the panic alarm is off • all doors are closed 50 - 1997 Mercury Tracer | Owner's Manual - Page 51
Press once to disarm the untriggered anti-theft system. If the driver armed the system but did not exit the vehicle, the system can also be disarmed by inserting the key and turning the ignition to ON. The system will not disarm by using the key in any door/trunk lock cylinder. LO CK U LO N CK PA - 1997 Mercury Tracer | Owner's Manual - Page 52
to the two following conditions: (1) this device may not cause harmful interference, and (2) this device must accept any interference received, including interference that may cause undesired operation. Replacement batteries for the remote entry and/or anti-theft system transmitters can be purchased - 1997 Mercury Tracer | Owner's Manual - Page 53
Seating and safety restraints FRONT SEATS Lift handle to slide the seat forward or backward Lift to adjust the seatback 53 - 1997 Mercury Tracer | Owner's Manual - Page 54
Seating and safety restraints Head restraints Push the release button to lower the head restraint To raise the head restraint, pull without pushing the release button. REAR SEATS Stow the built-in child seat (if equipped) in order to fold the rear seatback down. Refer to Built-in child seat in this - 1997 Mercury Tracer | Owner's Manual - Page 55
reduce the risk of serious injury in a collision, always drive and ride with your seatback upright and the lap belt snug and low across the hips. Safety belts must be worn by all vehicle occupants to be properly restrained and help reduce the risk of injury in a collision. To prevent the risk - 1997 Mercury Tracer | Owner's Manual - Page 56
the tongue into the slot to fasten. Push the red release button and remove the tongue from the slot to unfasten. The lap belts should fit snugly and as low as possible around the hips, not around the waist. The outboard safety restraints in the vehicle are combination lap - 1997 Mercury Tracer | Owner's Manual - Page 57
movement. For example, if the driver brakes suddenly or turns a corner sharply, the combination safety belts will lock to restrain forward movement of the driver and passengers. The retractor can be made to lock by pulling sharply on the belt. Automatic locking mode In this mode, the occupant is - 1997 Mercury Tracer | Owner's Manual - Page 58
Seating and safety restraints Using the automatic locking mode The automatic locking mode must be used when installing an aftermarket child safety seat in any outboard passenger seat. 1. Buckle the combination lap and shoulder belt. 2. Grasp the shoulder belt portion and pull downward until the - 1997 Mercury Tracer | Owner's Manual - Page 59
adjustment assembly to make sure it is locked in place. Lap belt A lap belt is located in the center of the rear seat. Adjusting the lap belt Because the lap belt does not have a retractor to automatically adjust itself during vehicle movement, the lap belt should be adjusted before use. • To - 1997 Mercury Tracer | Owner's Manual - Page 60
. Pull the loose end of the belt until snug. • To lengthen the belt: Tip and pull the tongue. The lap belt must fit snugly and as low as possible around the hips. Do not wear the lap belt around your waist. Safety belt maintenance Check the safety belt systems periodically for damage and to ensure - 1997 Mercury Tracer | Owner's Manual - Page 61
of a collision, the sew pattern may release, and the orange portion of the warning label may become visible. If this occurs, the safety belt and buckle must be replaced. Failure to follow these instructions will affect the performance of the safety belts and increase the risk of personal injury. 61 - 1997 Mercury Tracer | Owner's Manual - Page 62
driver's side safety belt is buckled while the indicator light is illuminated and the warning chime is sounding...The driver's safety belt is buckled before the ignition key is turned to ON...AIR BAG PRECAUTIONS Your vehicle is equipped with an air bag supplemental restraint system (SRS) designed to - 1997 Mercury Tracer | Owner's Manual - Page 63
with a deploying air bag. Failure to follow this instruction may increase the risk of personal injury in the event of a collision. Do not attempt to service, repair, or modify the air bag SRS or its fuses. See your Ford or Lincoln-Mercury dealer. AIR BAG SYSTEM DESCRIPTION The air bags and their - 1997 Mercury Tracer | Owner's Manual - Page 64
safety belts in order for the air bag system to operate effectively. AIR BAG WARNING LIGHT AND WARNING CHIME When you turn the ignition key to the ON position, the air bag system performs a self-check of the: • air bag sensors • air bag module • air bag inflators • available battery power • air bag - 1997 Mercury Tracer | Owner's Manual - Page 65
light does not illuminate, stays lit, or flashes, the air bag system requires immediate service. Have the vehicle serviced in safety seats made specially for children. Check your local and state laws for specific in a collision. Always follow the instructions and warnings that come with any infant - 1997 Mercury Tracer | Owner's Manual - Page 66
of your child safety seat) should always wear safety belts. Follow all the important safety restraint and air bag precautions that apply to adult passengers in your vehicle. If the shoulder belt portion of a combination lap and shoulder belt can be positioned so it does not cross or rest - 1997 Mercury Tracer | Owner's Manual - Page 67
wish to dicuss the specific needs of your child with your pediatrician. CHILDREN AND INFANT OR CHILD SAFETY SEATS Carefully follow all of the manufacturer's instructions included with the safety seat you put in your vehicle. If you do not install and use the safety seat properly, the child may be - 1997 Mercury Tracer | Owner's Manual - Page 68
Seating and safety restraints • put the safety belt in the automatic locking mode. Refer to Using the automatic locking mode in this chapter. Installing child safety seats in combination lap and shoulder belt seating positions 1. Position the child safety seat in a seat with a combination lap and - 1997 Mercury Tracer | Owner's Manual - Page 69
. Make sure the tongue is latched securely by pulling on it. 5. To put the retractor in the automatic locking mode, grasp the shoulder portion of the belt and pull downward until all of the belt is extracted. 6. Allow the belt to retract. The belt will click as it retracts to indicate it is in the - 1997 Mercury Tracer | Owner's Manual - Page 70
out of the retractor to make sure the retractor is in the automatic locking mode (you should not be able to pull more belt out). If the retractor is not locked, unbuckle the belt and repeat steps two through nine. • Check to make sure the child seat is properly secured before each use. Installing - 1997 Mercury Tracer | Owner's Manual - Page 71
one is not provided with the seat. The tether anchor hardware kit is part number 613D20. Your vehicle has tether anchor attachment locations on the rear package tray behind the back seat (sedan) or along the rear edge of the roof (wagon). Carefully follow the instructions provided with the kit. 71 - 1997 Mercury Tracer | Owner's Manual - Page 72
obtained at no charge from any Ford or Lincoln-Mercury dealer. Only use the tether Ford recommends using child safety seats with a top tether strap designed to secure an aftermarket child safety seat in the front or rear seating position. Follow the child safety seat manufacturer's instructions - 1997 Mercury Tracer | Owner's Manual - Page 73
Seating and safety restraints Ford recommends you attach tethered safety seats in a rear seating position with the tether strap attached to the tether anchoring bracket as shown in the instructions provided with the tether anchor kit. If a tethered seat must be installed in the front passenger seat: - 1997 Mercury Tracer | Owner's Manual - Page 74
. This child seat conforms to all federal and Canadian motor vehicle safety standards. Read the labels located on the child seat cushion and the shoulder belt for information on the built-in child seat. Use the built-in child seat only under the following conditions: At least one year old 10-27 kg - 1997 Mercury Tracer | Owner's Manual - Page 75
interior during a sudden stop or crash. Never use the built-in child seat as a booster cushion with the adult safety belts. A child using the adult belts could slide forward and out from under the safety belts. The rear seatback must be fully locked before operating the child restraint system. 75 - 1997 Mercury Tracer | Owner's Manual - Page 76
Seating and safety restraints Ensure that the latch release buttons are in the full up (locked) position. When the latch release buttons are in full up (locked) position and the built-in child seat is open, the rear seatback cannot be unlocked or folded down. 1. Pull down the top portion of the - 1997 Mercury Tracer | Owner's Manual - Page 77
Seating and safety restraints 2. Release the cushion retention clip. 3. Lower the child seat cushion. If the child seat cannot be opened, return it to the dealer for repair. 77 - 1997 Mercury Tracer | Owner's Manual - Page 78
Seating and safety restraints 4. Fold the end portion of the child seat under the child seat cushion. 5. Disconnect the chest clip, if connected. Squeeze together the release tabs on the top and bottom of the chest clip. 78 - 1997 Mercury Tracer | Owner's Manual - Page 79
Seating and safety restraints 6. Place the child in the seat and position the shoulder belts. 7. Insert the left safety belt tongue into the left side of the buckle. Repeat for the right side. Verify that the indicator window on each tongue is green to ensure proper safety belt connections. 79 - 1997 Mercury Tracer | Owner's Manual - Page 80
may be used if the child is sleeping or attempting to get out of the child seat. If not placed in an automatic locking mode, the child seat shoulder belts are in the vehicle sensitive (emergency locking) mode which locks the shoulder belt in the event of a crash, hard braking, or hard cornering. 80 - 1997 Mercury Tracer | Owner's Manual - Page 81
tighten snugly against the child's shoulders. Canceling the automatic locking mode on the built-in child seat 1. Disconnect the chest clip. Press the buckle release button and remove both safety belt tongues from the buckle. 2. Slide both shoulder belts from the child's shoulders and arm and allow - 1997 Mercury Tracer | Owner's Manual - Page 82
Seating and safety restraints Removing your child from the built-in child seat 1. Disconnect the chest clip by squeezing the release tabs together and pulling the two sides apart. 82 - 1997 Mercury Tracer | Owner's Manual - Page 83
safety restraints 2. Press the release button on the buckle. 3. Slide the shoulder belts off the child's shoulders and remove the child. 4. Return the child seat cushion to the stowed (upright) position. 5. Ensure the shoulder belts are in the center of the built-in child seatback and connect the - 1997 Mercury Tracer | Owner's Manual - Page 84
attaching hardware should be inspected by a qualified Dealer technician after any collision. If the child seat was in use during a collision, Ford recommends replacing it. However, if the collision was minor and a qualified technician finds that the child restraints do not show damage and continue - 1997 Mercury Tracer | Owner's Manual - Page 85
Starting A computer system controls the engine's idle revolutions per minute (RPM). When the engine starts, the idle RPM runs higher than when the engine is warm. If the engine idle speed does not slow down automatically, have the vehicle checked. Do not allow the vehicle to idle for more than ten - 1997 Mercury Tracer | Owner's Manual - Page 86
buckled their safety belts. For more information on safety belts and their proper usage, refer to the Seating and safety restraints chapter. 2. Make sure the headlamps and vehicle accessories are off. OFF If starting a vehicle with an automatic transaxle: • Make sure the parking brake is set. 86 - 1997 Mercury Tracer | Owner's Manual - Page 87
Starting If starting a vehicle with an automatic transaxle: • make sure that the gearshift is in P. P R N D D L If starting a vehicle with a manual transaxle: • push the clutch pedal to the floor. • place the gearshift in the neutral position. 1 3 5 2 4 R 87 - 1997 Mercury Tracer | Owner's Manual - Page 88
serviced. If the driver's safety belt is light does not fastened, the illuminate. K AC C LOC 0 I ON II T AR ST III 5 40 30 40 60 80 20 20 LOW FUEL SERVICE ENGINE SOON ABS 10 MP km/ 0 120 80 140 90 100 1 10 CHECK brake and release the parking brake. 88 K AC C LOC 0 I ON II T AR ST III - 1997 Mercury Tracer | Owner's Manual - Page 89
Starting Special conditions when starting Starting a cold engine At temperatures -12°C (10°F) and below, do not hold the key in the START position longer than 15 seconds. If the engine does not start on the first attempt: 1. Turn the ignition key to LOCK and wait approximately ten seconds. 2. Try - 1997 Mercury Tracer | Owner's Manual - Page 90
°C (-20°F) or below during the winter months. An engine block heater warms the engine coolant, which improves starting, warms up the engine faster, and allows the heater-defrost system to respond quickly. If your vehicle is equipped with an engine block heater, use it whenever the temperature is -23 - 1997 Mercury Tracer | Owner's Manual - Page 91
your vehicle immediately. Do not drive if you smell exhaust fumes. Have the exhaust and body ventilation systems checked whenever: • the vehicle is raised for service • the sound of the exhaust system changes • the vehicle has been damaged in a collision Improve vehicle ventilation by keeping all - 1997 Mercury Tracer | Owner's Manual - Page 92
Starting If the engine is idling while the vehicle is stopped in an open area for long periods of time, open the windows at least 2.5 cm (1 in). Adjust the heating or air conditioning (if equipped) to bring in fresh air. 50 E FUEL FILL 60 70 100 120 1 / 2 40 F 80 140 3 80 C H 30 40 60 90 - 1997 Mercury Tracer | Owner's Manual - Page 93
to dry them. Anti-lock brake system (ABS) Apply ABS brakes steadily. Do not pump the brakes in a panic stop. The brake system will prevent wheel lockup by automatically releasing and reapplying the brakes. Even with ABS, the brakes could lock up on roads with alternating slippery and dry patches - 1997 Mercury Tracer | Owner's Manual - Page 94
The ABS brake system conducts a self-test each time the vehicle is driven. A mechanical noise may be heard while the system conducts its self-test. ABS warning light The ABS light in the instrument cluster illuminates and remains illuminated if an ABS fault is detected. Have your vehicle serviced - 1997 Mercury Tracer | Owner's Manual - Page 95
is fully released but the BRAKE warning light remains on, have the brakes checked immediately. They may not be working properly. P ! Always set the parking brake fully and make sure that the gearshift is securely latched in P (automatic transaxle) or first gear (manual transaxle). To release the - 1997 Mercury Tracer | Owner's Manual - Page 96
BASS EJ REW FF - + TREB TAPE CD LO OFF HI *A/C *MAX A/C To move the automatic transaxle gearshift: P - Park R - Reverse N - Neutral D - Overdrive: the normal driving position for best fuel economy D - Drive: more engine braking than D L - Low: more engine braking than D at speeds up to 60 km - 1997 Mercury Tracer | Owner's Manual - Page 97
gearshift Automatic transaxle vehicles are equipped with a shift-lock safety feature that prevents the gearshift from being moved out of P without the brake pedal depressed. If you cannot move the gearshift out of P with the brake pedal depressed: 1. Continue depressing the brake pedal, and remove - 1997 Mercury Tracer | Owner's Manual - Page 98
may not be operating properly. For more information on fuses and fuse replacement, refer to Fuses and relays in the Roadside emergencies chapter. P R N D D L Do not drive your vehicle until you verify that the brakelamps are working. If an automatic transaxle vehicle gets stuck in mud or snow it - 1997 Mercury Tracer | Owner's Manual - Page 99
To move the manual transaxle gearshift: • Depress the brake pedal and then the clutch. • Move the gearshift to the selected gear. Always come to a complete stop BAL 1 SIDE 1-2 2 3 4 5 COMP 1 SIDE 1-2 FADE SCAN BASS EJ REW FF - + TREB TAPE CD LO OFF HI *A/C *MAX A/C 1 3 5 2 4 R 1 3 5 2 4 R 99 - 1997 Mercury Tracer | Owner's Manual - Page 100
not be harmed if the transaxle is not shifted when the light illuminates, but the vehicle will use more fuel. light can be ignored when The you are: • downshifting • driving on steep hills • using the engine to brake the vehicle • seeking more power for a difficult acceleration To maximize gearshift - 1997 Mercury Tracer | Owner's Manual - Page 101
pedal to hold the vehicle at a standstill. These actions will reduce clutch life. • Downshift on steep hills to reduce the vehicle's chances of stalling and to prevent unnecessary brake wear. LOADING YOUR VEHICLE Before loading a vehicle, familiarize yourself with these terms: • Base curb weight - 1997 Mercury Tracer | Owner's Manual - Page 102
axle system (front and rear). This amount is specific to each vehicle and is listed on the Safety Compliance Certification Label on the driver's door and GAWR limitations. (Replacement tires with a higher vehicle may be damaged or you may lose control and cause injury. Trailer towing Your vehicle - 1997 Mercury Tracer | Owner's Manual - Page 103
in engine damage, transaxle/axle damage, structural damage, loss of control, automatic transaxle system (if equipped ) if you are planning on: • traveling farther than 80 km (50 miles). • towing in hilly terrain. • towing frequently. Using a hitch Do not use hitches that clamp onto the vehicle bumper - 1997 Mercury Tracer | Owner's Manual - Page 104
and change the weight on the hitch. Using trailer brakes Use electric brakes or manual, automatic, or surge-type hydraulic brakes that meet federal and local regulations. Install and adjust the brakes according to the manufacturer's instructions. Do not connect a trailer's hydraulic brake system - 1997 Mercury Tracer | Owner's Manual - Page 105
long, steep grades. If driving with an automatic transaxle: • use D or L rather than D while towing up or down steep hills. • anticipate stops and brake gradually. If driving with a manual transaxle: • select a gear that avoids jerking or excessive engine speed. • avoid driving excessively in first - 1997 Mercury Tracer | Owner's Manual - Page 106
acceleration • driving with the brake pedal depressed • sudden stops • extended engine idling • use of speed control in hilly terrain • extended use of the air conditioner, defroster, rear window defroster and other accessories • underinflated tires • heavy loads • aftermarket add-ons such as bike - 1997 Mercury Tracer | Owner's Manual - Page 107
see or smell fuel, do not reset the switch or try to start your vehicle. Have all passengers get out of the vehicle and call the local fire department or a towing service. To reset the fuel pump, press the button on the switch. The switch is located immediately below the hole in the trunk - 1997 Mercury Tracer | Owner's Manual - Page 108
Roadside emergencies • Sedan • Wagon 108 - 1997 Mercury Tracer | Owner's Manual - Page 109
TUNE DISCS VOL- PUSH ON BAL 1 SIDE 1-2 2 3 4 5 COMP 1 SIDE 1-2 FADE SCAN BASS EJ REW FF - + TREB TAPE CD Always replace a fuse with one that has the specified amperage rating. Using a fuse with a higher amperage rating can cause severe wire damage and could start a fire. LO OFF *A/C HI *MAX - 1997 Mercury Tracer | Owner's Manual - Page 110
fuse is replaced, it will continue to blow if the cause of the overload is not identified and corrected. If a fuse continues to blow, have the vehicle's electrical system checked. The (POWER WIND) 30A on the instrument panel fuse BASS EJ REW FF - + TREB TAPE CD LO OFF HI *A/C *MAX A/C HEATER 30A - 1997 Mercury Tracer | Owner's Manual - Page 111
cluster illumination, license plate lamp, parking lamps, side marker lamps, tail lamps, (radio, climate control illumination) Not used Speed control Not used Power door locks Horn A/C, clutch 3 Sun roof 4 ASC 5- 6 (Door lock) 7 Horn 8 (Air Conditioning) - 10 amp - 30 amp 15 amp 15 amp 111 - 1997 Mercury Tracer | Owner's Manual - Page 112
reminder chime Windshield wipers and washer Rear wiper and washer Hazard flashers, turn signals Clock, interior lamp, luggage compartment lamp, safety belt warning chime, radio power Engine control system Power mirrors Not used Not used Daytime running lamps / fog lamps Not used Cigar lighter Radio - 1997 Mercury Tracer | Owner's Manual - Page 113
1 2 7 3 4 8 5 6 BTAA 9 10 12 11 USE THE DESIGNATED FUSES ONLY Engine compartment fuse panel Number Fuse amperage rating 1 Fuel injection 2 Defog. 3 Main 30 amp 30 amp 100 amp Circuits protected Fuel injection system, air bags Rear window defroster Overall circuit protection 113 - 1997 Mercury Tracer | Owner's Manual - Page 114
protected Passenger compartment fuses 1, 2, 6, 12, 13, 7 Anti-lock brake system (ABS) Cooling fan Head lamp relay - On-board diagnostics Fuel pump Passenger side headlamps Driver side headlamps 5 (ABS) 6 Cooling fan 7 Head 8 Not used 9 OBD II 10 Fuel pump 11 Head RH 12 Head LH CHANGING THE TIRES - 1997 Mercury Tracer | Owner's Manual - Page 115
spare tire or remove it from its wheel • use the wheel for any other type of vehicle Tire changing procedure 1. Park on a level surface. 2. Activate the hazard flashers. 3. Set the parking brake. 4. Place the gearshift in P (automatic transaxle) or R (manual transaxle). • Automatic P R N D D L 115 - 1997 Mercury Tracer | Owner's Manual - Page 116
Roadside emergencies • Manual 1 3 5 2 4 R 5. Block the diagonally opposite wheel. • Remove the lug wrench first. Use the lug wrench to remove the hold-down bolts on the spare tire and jack. 116 - 1997 Mercury Tracer | Owner's Manual - Page 117
handle and spare tire from the vehicle's rear cargo area. • Locate the wheel cover hold-down lug nut. • Completely remove this lug nut. Use the lug wrench provided with the jack to loosen the retention bolts on the spare tire. • Do not attempt to remove the wheel cover until lug nuts are - 1997 Mercury Tracer | Owner's Manual - Page 118
jack at the jack notch closest to the wheel. 9. Insert the jack handle and raise the vehicle until the tire just clears the ground. 10. Remove the wheel lug nuts and flat tire, and install the spare with the ''temporary use'' label facing outward. 11. Install the same metric wheel lug - 1997 Mercury Tracer | Owner's Manual - Page 119
Roadside emergencies Installation of an English thread nut on a metric stud (or vice-versa) will not properly secure the wheel to the hub. Damaged studs may result in wheel separation and possible injury. 12. Lower the vehicle and tighten the wheel lug nuts in the pattern shown. 13. Unblock the - 1997 Mercury Tracer | Owner's Manual - Page 120
Make sure that you can breathe fresh air. Batteries contain sulfuric acid which burns skin, eyes, and clothing. If the battery acid touches someone's skin, eyes, or in doubt, call for road service. Before jump-starting a vehicle: • make sure the booster battery vehicle has a 12-volt starting 120 - 1997 Mercury Tracer | Owner's Manual - Page 121
damage • park the vehicles close to each other, but do not allow the two vehicles to touch. • check to make sure neither battery is disconnected • remove any excessive corrosion from the battery terminals • turn on the heater fan in each vehicle to prevent damage from voltage surges To jump start - 1997 Mercury Tracer | Owner's Manual - Page 122
positive terminal 4 Previously disabled battery positive terminal Let the vehicle idle for a few minutes to allow the engine to relearn the proper idle conditions. Avoid using unneccessary electrical accessories for a short while to let the battery recharge. A battery charger may be necessary to - 1997 Mercury Tracer | Owner's Manual - Page 123
Roadside emergencies WRECKER TOWING If towing is necessary, it is recommended that your vehicle be towed with wheel lift or flatbed equipment. Do not tow with slingbelt equipment. Ford Motor Company has not developed or approved a T-hook or slingbelt towing procedure. 123 - 1997 Mercury Tracer | Owner's Manual - Page 124
, your dealership can provide the necessary parts and service. Check the Warranty Information Guide to find out what parts and services are covered. Use only recommended fuels, lubricants, fluids, and service parts conforming to Ford specifications. Motorcraft parts are designed and built to provide - 1997 Mercury Tracer | Owner's Manual - Page 125
lit cigarettes and other smoking materials away from the battery and all fuel-related parts. Working with the engine off 1. Set the parking brake and make sure that the gearshift is securely latched in P (automatic transaxle), or first gear (manual transaxle). 2. Turn the engine off and remove the - 1997 Mercury Tracer | Owner's Manual - Page 126
Maintenance and care 3. Block the wheels to prevent the vehicle from moving unexpectedly. 5 126 - 1997 Mercury Tracer | Owner's Manual - Page 127
Maintenance and care Working with the engine on 1. Set the parking brake and make sure that the gearshift is securely latched in P (automatic transaxle), or N (manual transaxle). 2. Do not work on a vehicle in an enclosed space with the engine running. P R N D D L P R N D D L 127 - 1997 Mercury Tracer | Owner's Manual - Page 128
done with the engine running, avoid wearing loose clothing or jewelry that could get caught in moving parts. Take appropriate position with the prop rod. 4. To close the hood, remove the prop rod and shut so that the auxiliary latch is closed REW FF - + TREB TAPE CD LO OFF *A/C HI *MAX A/C 128 - 1997 Mercury Tracer | Owner's Manual - Page 129
care IDENTIFYING COMPONENTS IN THE ENGINE COMPARTMENT 4 1 3 7 8 6 5 1. 2. 3. 4. 5. 6. 7. 8. 9. Engine oil dipstick Engine oil filler cap Brake fluid reservoir Windshield washer fluid Coolant reservoir Steering fluid reservoir Automatic transmission dipstick Battery Air filter assembly 2 9 129 - 1997 Mercury Tracer | Owner's Manual - Page 130
MILES (5,000 KM) OR 3 MONTHS SEVERE DUTY SCHEDULE EXTENSIVE IDLING TRAILER TOWING DRIVING IN SEVERE DUST POLICE, TAXI, OR DELIVERY Oil change intervals Refer to the Service Guide booklet for additional information. Checking the engine oil Check the engine oil every time you fuel your vehicle. 130 - 1997 Mercury Tracer | Owner's Manual - Page 131
care To check the engine oil, follow these steps: 1. Once the engine is warm, turn the engine off. Make sure the vehicle is parked on level ground. 2. Automatic transaxle: • Engage the parking brake. • Place the gearshift in P. Manual transaxle: • Engage the parking brake. • Depress the clutch and - 1997 Mercury Tracer | Owner's Manual - Page 132
Maintenance and care Adding engine oil 1. Check the engine oil. For instructions, refer to Checking the engine oil in this chapter. 2. If the fluid level is not within the normal range, add engine oil by removing the engine oil filler cap and pouring in oil. 3. Confirm that the oil level is full, - 1997 Mercury Tracer | Owner's Manual - Page 133
checked and refilled as needed at least once a year: • Clean the reservoir cap before removal to prevent dirt or water from entering the reservoir. • Visually inspect the fluid level. • If necessary, add brake fluid until the level reaches MAX. • Use only a DOT 3 brake fluid certified to meet Ford - 1997 Mercury Tracer | Owner's Manual - Page 134
Maintenance and care CHECKING AND ADDING MANUAL TRANSAXLE CLUTCH FLUID The brake fluid reservoir and clutch master cylinder are part of the same unit; both are refillable through the brake fluid reservoir with brake fluid. During normal operation, the fluid level in the brake fluid reservoir will - 1997 Mercury Tracer | Owner's Manual - Page 135
engine compartment. If washer fluid needs to be added to the reservoir: • Lift the windshield reservoir cover. • Add enough washer fluid to fill the reservoir. Washer fluid for the liftgate (if equipped) The wagon's rear reservoir is located on the passenger side of the storage compartment. Remove - 1997 Mercury Tracer | Owner's Manual - Page 136
make it difficult to see through the windshield. When the engine is cool, add a 50/50 mixture of engine coolant and water to the engine coolant recovery reservoir - DO NOT ADD DIRECTLY TO THE RADIATOR. Add straight water only in an emergency, but you should replace it with a 50/50 mixture of coolant - 1997 Mercury Tracer | Owner's Manual - Page 137
may harm your engine cooling system. The use of an improper coolant may void the warranty of your vehicle's engine cooling system. Recycled Engine Coolant Ford Motor Company recommends that Ford and Lincoln-Mercury dealers use recycled engine coolant produced by Ford-approved processes. Not - 1997 Mercury Tracer | Owner's Manual - Page 138
which meets Ford specification ESE-M97B44-A, and use of such coolant may harm engine and cooling system components. Always check the engine cooling system for leaks if you have to add more than a quart (liter) of engine coolant per month. Severe Winter Climate If you drive in extremely cold climates - 1997 Mercury Tracer | Owner's Manual - Page 139
and hoses of the power steering system for leaks and damage. • If new fluid is frequently required, consult a qualified service technician. C K AC C LOC 0 I ON II T AR S T III H CHECKING AND ADDING TRANSAXLE FLUID Checking and adding automatic transaxle fluid Check the automatic transaxle - 1997 Mercury Tracer | Owner's Manual - Page 140
temperature is above 10 °C (50 °F) to obtain an accurate fluid level check. P R N D D L K AC C LOC 0 I Checking the automatic transaxle fluid 1. Park the vehicle on a level surface. 2. With the vehicle running and the brake pedal depressed, move the gearshift through each of the gear ranges - 1997 Mercury Tracer | Owner's Manual - Page 141
Set the parking brake. 5. Remove the dipstick and wipe it with a clean, dry rag. 6. Install the dipstick. 7. Remove the dipstick and 20°C 68°F) FAOZ When adding automatic transaxle fluid: • Ensure that the correct type is added. For automatic transaxle fluid specifications, refer to Capacities - 1997 Mercury Tracer | Owner's Manual - Page 142
For information on checking and adding manual transaxle fluid, refer to Checking and adding clutch fluid in this section. WHAT YOU SHOULD KNOW ABOUT YOUR BATTERY If the original equipment maintenance-free battery needs replacing, it may be replaced with a low-maintenance battery. For information on - 1997 Mercury Tracer | Owner's Manual - Page 143
on the ends when lifting a battery could cause acid to spill. Lift the battery with a carrier or with your hands on opposite corners. Servicing your battery The low-maintenance battery has removable vent caps for checking the electrolyte level and adding water. Check the electrolyte level every 24 - 1997 Mercury Tracer | Owner's Manual - Page 144
or a new battery is installed, the computer must "relearn" its idle conditions before your vehicle will drive properly. To begin this process: 1. Put the gearshift in P (automatic transaxle) or N (manual transaxle). 2. Turn off all accessories and start the vehicle. 3. Let the engine idle for at - 1997 Mercury Tracer | Owner's Manual - Page 145
to find out more about recycling automotive batteries. CHECKING AND CHANGING YOUR AIR FILTER If the vehicle is operated in very dusty or sandy areas, replace the filter more often than the recommended intervals. Do not drive without an air filter; this could result in excessive engine wear. 145 - 1997 Mercury Tracer | Owner's Manual - Page 146
closed and secure the locking clamp. CHECKING AND CHANGING YOUR WIPER BLADES Check the windshield wiper blades at least twice a year; also check them whenever the wipers seem less effective than usual. Substances such as tree sap and some hot wax treatments used by commercial car washes can reduce - 1997 Mercury Tracer | Owner's Manual - Page 147
turn the ignition to LOCK. Do not move the wipers manually across the windshield, this may cause damage to the wipers. Inspect the wiper arm pivots on a regular basis to ensure that the wiper arms move freely. Lubricate the pivot points as necessary. Replacing wiper blades If the wiper blades do not - 1997 Mercury Tracer | Owner's Manual - Page 148
Maintenance and care 1. Pull the wiper arm away from the windshield and lock into the service position. 2. Turn the blade at an angle from the wiper arm. Push the lock pin with a screwdriver to release the blade and pull the wiper blade down toward the windshield to remove it from the arm. 3. Attach - 1997 Mercury Tracer | Owner's Manual - Page 149
of heat and its ability to dissipate heat when tested under controlled conditions on a specified indoor laboratory test wheel. Sustained high temperature corresponds to a level of performance which all passenger car tires must meet under the Federal Motor Vehicle Safety Standard No. 109. Grades A and - 1997 Mercury Tracer | Owner's Manual - Page 150
tire failure. SERVICING YOUR TIRES Checking the tire pressure Check the tire pressure periodically and inflate tires as necessary. To check the tire door inside latch pillar. Improperly inflated tires can affect vehicle handling and can fail suddenly, possibly resulting in loss of vehicle control - 1997 Mercury Tracer | Owner's Manual - Page 151
even wear. These intervals are listed in the Service Guide. • Four-tire rotation • Five-tire rotation Replacing the tires Replace the tires when the wear band is visible through the tire treads. When replacing full size; tires, never mix radial bias belted or bias-type tires. Use only the tire - 1997 Mercury Tracer | Owner's Manual - Page 152
to lose control and roll over. IDENTIFYING TIRE TYPES Your vehicle requires the use of the following tire types: wagon and sedan 18565R14 tires and T115/70D14 mini-spare. When purchasing replacemment tires for your vehicle, consult your Ford or Lincoln-Mercury dealer or qualified service technician - 1997 Mercury Tracer | Owner's Manual - Page 153
brake lines, or fuel lines. • Install tire chains on front tires only. • Drive cautiously. If you hear the chains rub or bang against your vehicle, stop and retighten the chains. If this does not work, remove insulation and bumpers will help prevent vehicle damage. Do not remove these components - 1997 Mercury Tracer | Owner's Manual - Page 154
with fuel could cause an adverse reaction. Consult a physician immediately. If you replace your fuel cap with an aftermarket fuel filter cap, the customer warranty may be void if any damage to the fuel tank and/or fuel system occurs. Do not overfill the fuel tank. The pressure in an overfilled tank - 1997 Mercury Tracer | Owner's Manual - Page 155
when you refuel, your vehicle can be operated on non-California fuels. However, even though your engine will perform adequately on other gasolines, the performance of the emission control devices and systems may be adversely affected. Repair of damage caused by using a fuel that your vehicle was not - 1997 Mercury Tracer | Owner's Manual - Page 156
sometimes knocks lightly. However, if it knocks heavily under most driving conditions on the recommended octane fuel, see your dealer or a qualified service technician to prevent any engine damage. Fuel Quality If you are experiencing starting, rough idle or hesitation problems, try a different - 1997 Mercury Tracer | Owner's Manual - Page 157
ABOUT THE EMISSION CONTROL SYSTEM For more information on your vehicle's emission control system, see the Vehicle Emission Control Information Decal located on the inside left side of the engine compartment. The catalytic converter enables the vehicle's emission control system to operate properly - 1997 Mercury Tracer | Owner's Manual - Page 158
permitted to intentionally remove an emission control device or prevent it from working. Do not make any unauthorized changes to the vehicle or engine. Changes that cause more unburned fuel to reach the exhaust system can increase the temperature of the engine or exhaust system. When your vehicle - 1997 Mercury Tracer | Owner's Manual - Page 159
system. If the vehicle's powertrain system or battery has just been serviced, the OBD II system is reset to a not ready for I/M testing condition. To ready the OBD II system Before completing the above driving modes, the engine must be warmed up and at operating temperature. Once started, the vehicle - 1997 Mercury Tracer | Owner's Manual - Page 160
Maintenance and care EXTERIOR LAMPS REPLACING THE EXTERIOR BULBS Check the operation of the following lamps frequently: • headlamps • foglamps (if equipped) • high-mount brakelamp • license plate lamp • tail lamps/backup lamps • interior overhead lamp 160 - 1997 Mercury Tracer | Owner's Manual - Page 161
/ backup lamp assembly for the sedan model only. The lamp assembly for the wagon is similar, although the bulb replacement process differs. For more information, lamp assemblies Do not remove lamp bulbs unless they may be replaced immediately with new ones. If a bulb is removed for an extended period - 1997 Mercury Tracer | Owner's Manual - Page 162
the rear). 5. Disconnect the electrical connector and remove the bulb by pulling it straight out. 6. Replace the bulb by pushing a new one straight and lock the ring by rotating it clockwise until it snaps. 8. Reconnect electrical connector. 9. Replace the housing protective dust shield and lock the - 1997 Mercury Tracer | Owner's Manual - Page 163
Maintenance and care Foglamps (if equipped) To change the foglamp bulbs: 1. Disconnect the electrical connector from the back of the foglamp assembly. 2. Twist, then pull the bulb from the foglamp assembly and twist in a replacement bulb. 3. Connect the electrical connector to the back of the - 1997 Mercury Tracer | Owner's Manual - Page 164
(sedan) The high-mount brakelamp is located on the rear of your vehicle. The brakelamp will be mounted with two fastener clips and an assembly cover on the package tray. 1. Remove the push pins and cover from the package tray. 2. Detach the socket from the housing and remove the bulb. 3. Replace - 1997 Mercury Tracer | Owner's Manual - Page 165
screws. License plate lamps To change the license plate lamp bulbs: 1. Carefully remove screws and pull the license plate lamp assembly from the rear bumper. 2. Carefully pull the lamp lens from the assembly. 3. Remove the bulb to be replaced and install a new bulb. 4. Replace the lamp lens, the - 1997 Mercury Tracer | Owner's Manual - Page 166
Maintenance and care • Sedan • Wagon 166 - 1997 Mercury Tracer | Owner's Manual - Page 167
Tail lamps / Backup lamps (sedan) The tail lamp assemblies and the backup bulb assemblies are located in the same portion of the vehicle rear, one just below the other. Follow the same steps to replace either bulb. 1. Open the trunk lid to expose the tail lamp assembly. Remove the two screws from - 1997 Mercury Tracer | Owner's Manual - Page 168
and gently hit the lens to engage the clips. Replace the screws. Tail lamps/Backup lamps (wagon) To replace the tail lamp bulbs: 1. Open the liftgate to expose the tail lamp assembly. Remove the lens screws and pull the lens aside. 2. Remove the socket that contains the burned out bulb by rotating - 1997 Mercury Tracer | Owner's Manual - Page 169
is located behind a similar-looking interior panel directly opposite the right panel. Both access panels are directly below the rear side windows. To replace the backup lamp bulbs: 1. Open the liftgate and lean inside the vehicle. Access the backup bulb assemblies by carefully pulling open the - 1997 Mercury Tracer | Owner's Manual - Page 170
remove it and secure a new bulb. 4. Replace the bulb assembly in the interior recess and replace of the ceiling of the vehicle. To replace the bulbs: 1. Remove the lamp lens by applying pressure to off. 2. Pull the bulb to remove it and secure a new bulb. 3. Replace the lamp lens by applying pressure - 1997 Mercury Tracer | Owner's Manual - Page 171
turns off the interior overhead lamp. If the door is left open, closed, and then left open again, the timer will automatically reset. The battery saver control system is not activated when the headlamps are left on. A warning chime will sound when the engine is turned off to draw your attention to - 1997 Mercury Tracer | Owner's Manual - Page 172
lamp (if equipped) PRNDL illumination Heater control nomenclature High beam indicator Instrument panel gauge (cluster) Sport cluster w/ tachometer Turn signal indicator Upshift indicator (if equipped) Warning lights - all 1 2 1 1 1 1 4 2 1 (1 each) 12V/5W 12V/10W 5W - 1997 Mercury Tracer | Owner's Manual - Page 173
Maintenance and care Function Anti-theft LED Number of bulbs 1 LED Trade number See your dealer to order replacement assembly, service part #F57Z13B765-A Aiming the headlamps Your vehicle is equipped with a variable headlamp aiming device (VHAD) on each headlamp reflector extension and headlamp - 1997 Mercury Tracer | Owner's Manual - Page 174
Maintenance and care Adjusting the horizontal aim 1. With the hood open, locate the horizontal indicator and adjusting screw. 2. Use a 4 mm wrench to turn the horizontal adjusting screw until the reference mark on the reflector extension aligns with the ''O'' reference mark on the horizontal - 1997 Mercury Tracer | Owner's Manual - Page 175
car remove deposits left by snow, salt, and water. Wax the body paintwork of your vehicle several times a year. This will help to retain the glossy paintwork finish and water droplets will run off more easily. Remove any after dealer accessories, such as antennae, before entering a commercial car - 1997 Mercury Tracer | Owner's Manual - Page 176
exterior lacquer touch-up paint, AL81-XXXX-B or ALBZ-19500-XXXXA. XXXX indicates the code, meeting Ford specification ESR-M2P100-C. Follow the application instructions on the product. Be sure to remove aggressive particles such as bird droppings, tree resins, insect remains, tar spots, and road salt - 1997 Mercury Tracer | Owner's Manual - Page 177
help protect the driver from windshield reflection. Cleaning the exterior lamps engine. The high pressure fluid could penetrate sealed parts and cause damage. • In order to avoid cracking the engine block or fuel injection pump, do not spray these components with cold water. • The alternator and air - 1997 Mercury Tracer | Owner's Manual - Page 178
may be machine washed and air dried. Cleaning and maintaining the safety belts Clean the safety belts with a mild soap solution recommended for cleaning upholstery or carpets. Do not bleach or dye the belts; this may weaken the belt webbing. Check the safety belt system periodically to ensure there - 1997 Mercury Tracer | Owner's Manual - Page 179
). • To avoid overspill from the filler neck, stop fueling at the second automatic shut off. • For more information on fueling your vehicle, refer to Choosing the right fuel in the Maintenance and care chapter. Ford part number - 2.0 liter SPI engine F7CX-9601-AA BX-58C FG-862 FL400-A EV-229 AGSF-34 - 1997 Mercury Tracer | Owner's Manual - Page 180
filler cap Engine coolant ¼ automatic transaxle ¼ manual transaxle LUBRICANT SPECIFICATIONS Item Ford part name Brake master cylinder Ford High Performance DOT 3 Motor Vehicle Brake Fluid CV Joint Grease - High Temperature Silicone Lubricant (tube) (aerosol) Ford Premium Cooling System Fluid - 1997 Mercury Tracer | Owner's Manual - Page 181
-Life Grease Ultra-Clear Windshield Washer Concentrate Ford part number XO-5W-30 Ford specification WSS-M2C153-F Hinges and latches F5AZ-19G209-AA ESR-M1C159-A and ESB-M1C93A E8AZ-19A501-B E6AZ-19582-AA N/A ESW-M2C33-F Lock cylinders Power steering pump Automatic and manual transaxle XT-2-BDX - 1997 Mercury Tracer | Owner's Manual - Page 182
Capacities and specifications ENGINE DATA Engine 2.0 liter; 121 CID; 4 cylinder (in-line); compression ratio 9.2:1; grade Firing order / Injection timing Spark plug gap Ignition system Valve clearances cold inlet exhaust VEHICLE DIMENSIONS Dimensions - cm Sedan (inches) 1 Wagon 439.1 cm (172.9 in) - 1997 Mercury Tracer | Owner's Manual - Page 183
Capacities and specifications 3 5 2 3 5 2 183 - 1997 Mercury Tracer | Owner's Manual - Page 184
Capacities and specifications 4 1 4 1 184 - 1997 Mercury Tracer | Owner's Manual - Page 185
engine compartment. This plate bears technical information on your vehicle and identifies various components. 12- FORD doors • front and rear bumper • left and right rear quarter panels • decklid • liftgate • engine compartment • transaxle Engine number The engine number is stamped on the engine - 1997 Mercury Tracer | Owner's Manual - Page 186
defect existing in a group of vehicles, it may order a recall and remedy campaign. However, NHTSA cannot become involved in individual problems between you, your dealer, or Ford Motor Company. To contact NHTSA, you may either call the Auto Safety Hotline toll-free at 1-800-424-9393 (202-366-0123 in - 1997 Mercury Tracer | Owner's Manual - Page 187
...62,63 disposal ...63 driver air bag ...64 indicator light ...7,64 operation ...63 tone generator ...64 wearing safety belts ...64 Air cleaner filter ...145 replacing ...146 Air conditioning manual heating and air conditioning system ...19 Anti-lock brake system (ABS) ...93 noise ...93 see also - 1997 Mercury Tracer | Owner's Manual - Page 188
...106 low fuel warning light ...7 safety information relating to automotive fuels ...153 Fuel pump shut-off switch ..43,107 starting after a collision ...43 Fuse panels engine compartment ...113 instrument panel ...111 Fuses ...109 charts ...111,113 checking and replacing ...109 circuit breakers - 1997 Mercury Tracer | Owner's Manual - Page 189
Index Lights, warning and indicator ...6 air bag ...7,64 anti-lock brakes (ABS) ...9 anti-theft ...9 brake ...8 charging system ...9 checkcoolant ...10 high beam ...9 liftgate ajar ...10 low fuel ...7 oil pressure ...9 safety belt ...8 service engine soon ...7 turn signal indicator ...9 upshift - 1997 Mercury Tracer | Owner's Manual - Page 190
(see Climate control) ...18,19,23 Warning chimes ...10 headlamps on ...11 key in ignition ...11 safety belt ...10 Washer fluid ...134 reservoir ...135 windshield ...30 Windows one-touch down ...35 power windows, operating ...34 Windshield washing ...30 Windshield washer fluid and wipers checking and - 1997 Mercury Tracer | Owner's Manual - Page 191
- 1997 Mercury Tracer | Owner's Manual - Page 192
oil UNLEADED FUEL ONLY - Octane 87 48.0 L (12.7 gallons) Use only engine oil displaying the American Petroleum Institute Certification Mark. SAE-5W30 is preferred. Refer to Tire Pressure Decal on passenger's door pillar. Pull handle under the left side of the instrument panel. Tire size & pressure
-
 1
1 -
 2
2 -
 3
3 -
 4
4 -
 5
5 -
 6
6 -
 7
7 -
8
-
9
-
10
-
11
-
12
-
13
-
14
-
15
-
16
-
17
-
18
-
19
-
20
-
21
-
22
-
23
-
24
-
25
-
26
-
27
-
28
-
29
-
30
-
31
-
32
-
33
-
34
-
35
-
36
-
37
-
38
-
39
-
40
-
41
-
42
-
43
-
44
-
45
-
46
-
47
-
48
-
49
-
50
-
51
-
52
-
53
-
54
-
55
-
56
-
57
-
58
-
59
-
60
-
61
-
62
-
63
-
64
-
65
-
66
-
67
-
68
-
69
-
70
-
71
-
72
-
73
-
74
-
75
-
76
-
77
-
78
-
79
-
80
-
81
-
82
-
83
-
84
-
85
-
86
-
87
-
88
-
89
-
90
-
91
-
92
-
93
-
94
-
95
-
96
-
97
-
98
-
99
-
100
-
101
-
102
-
103
-
104
-
105
-
106
-
107
-
108
-
109
-
110
-
111
-
112
-
113
-
114
-
115
-
116
-
117
-
118
-
119
-
120
-
121
-
122
-
123
-
124
-
125
-
126
-
127
-
128
-
129
-
130
-
131
-
132
-
133
-
134
-
135
-
136
-
137
-
138
-
139
-
140
-
141
-
142
-
143
-
144
-
145
-
146
-
147
-
148
-
149
-
150
-
151
-
152
-
153
-
154
-
155
-
156
-
157
-
158
-
159
-
160
-
161
-
162
-
163
-
164
-
165
-
166
-
167
-
168
-
169
-
170
-
171
-
172
-
173
-
174
-
175
-
176
-
177
-
178
-
179
-
180
-
181
-
182
-
183
-
184
-
185
-
186
-
187
-
188
-
189
-
190
-
191
-
192
 |
 |

BEFORE DRIVING
Introduction
2
Instrumentation
4
Controls and Features
15
Seating and Safety restraints
53
STARTING AND DRIVING
Starting
85
Driving
93
Roadside Emergencies
107
SERVICING
Maintenance and Care
124
Capacities and Specifications
179
Reporting Safety Defects
186
Index
187
Contents
1