3Com 3226 Getting Started
3Com 3226 - SuperStack 3 Switch Manual
 |
UPC - 662705470511
View all 3Com 3226 manuals
Add to My Manuals
Save this manual to your list of manuals |
3Com 3226 manual content summary:
- 3Com 3226 | Getting Started - Page 1
SuperStack® 3 Switch 3226 and Switch 3250 Getting Started Guide 3CR17500-91 3CR17501-91 http://www.3com.com/ Part No. DUA1750-0AAA01 Published December 2003 - 3Com 3226 | Getting Started - Page 2
is any software on removable media Guide. Unless otherwise indicated, 3Com registered trademarks are registered in the United States and may or may not be registered in other countries. 3Com, SuperStack, and the 3Com logo are registered trademarks of 3Com Open 3Com processes allow for the recovery - 3Com 3226 | Getting Started - Page 3
10 1 INTRODUCING THE SUPERSTACK 3 SWITCH 3226 AND SWITCH 3250 About the Switch 12 Summary of Hardware Features 12 Switch - Front View Detail 13 10BASE-T/ 100BASE-TX Ports 13 10BASE-T/ 100BASE-TX/ 1000BASE-T Ports 14 SFP Ports 14 LEDs 14 Console Port (Switch 3226) 15 Switch - Rear View Detail - 3Com 3226 | Getting Started - Page 4
IP Information 36 Using 3Com Network Supervisor 36 Connecting to the Console Port 36 Methods of Managing a Switch 39 Command Line Interface Management 39 Web Interface Management 39 SNMP Management 40 Setting Up Command Line Interface Management 40 CLI Management via the Console Port 40 CLI - 3Com 3226 | Getting Started - Page 5
60 C TECHNICAL SPECIFICATIONS SuperStack 3 Switch 3226 and Switch 3250 61 D OBTAINING SUPPORT FOR YOUR PRODUCT Register Your Product to Gain Service Benefits 63 Purchase Value-Added Services 63 Troubleshoot Online 63 Access Software Downloads 64 Contact Us 64 Telephone Technical Support and Repair - 3Com 3226 | Getting Started - Page 6
- 3Com 3226 | Getting Started - Page 7
all the information you need to install and use the following switches in their default state. ■ SuperStack® 3 Switch 3226 (3CR17500-91) ■ SuperStack® 3 Switch 3250 (3CR17501-91) All procedures described in this guide apply to both models except where stated. Where a procedure or description - 3Com 3226 | Getting Started - Page 8
your password, use the following syntax: system password Commands In this example, you must supply a password for . The word "enter" in this guide, you must type something, and then press Return or Enter. Do not press Return or Enter when an instruction simply says "type." If - 3Com 3226 | Getting Started - Page 9
the Switch. ■ SuperStack 3 Switch Management Quick Reference Guide This guide contains: ■ a list of the features supported by the Switch. ■ a summary of the Web interface and command line interface commands for the Switch. ■ SuperStack 3 Switch Management Interface Reference Guide This guide - 3Com 3226 | Getting Started - Page 10
(if appropriate) Example: ■ Superstack® 3 Switch 3226 and Switch 3250 Getting Started Guide ■ Part Number DUA1750-0AAA01 ■ Page 21 Please note that we can only respond to comments and questions about 3Com product documentation at this e-mail address. Questions related to technical support or sales - 3Com 3226 | Getting Started - Page 11
THE SUPERSTACK 3 SWITCH 3226 AND SWITCH 3250 This chapter contains introductory information about the Switch 3226 and Switch 3250 and how they can be used in your network. It covers summaries of hardware and software features and also the following topics: ■ About the Switch ■ Switch - Front - 3Com 3226 | Getting Started - Page 12
-26 on the Switch 3226, 49-50 on the Switch 3250). The corresponding 10/100/1000 port is disabled when an SFP module is present. Summary of Hardware Features Table 3 summarizes the hardware features that are supported by the Switch. Table 3 Hardware features Feature MAC Addresses Auto-negotiation - 3Com 3226 | Getting Started - Page 13
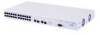
13 Switch - Front View Detail Figure 1 Switch 3226 - front view Figure 2 Switch 3250 sockets. 10BASE-T/ 100BASE-TX Ports The Switch has 24 or 48 auto-negotiating 10BASE-T/ These ports automatically provide the appropriate connection. The default state for 10/100 Mbps ports is auto-negotiation - 3Com 3226 | Getting Started - Page 14
14 CHAPTER 1: INTRODUCING THE SUPERSTACK 3 SWITCH 3226 AND SWITCH 3250 and manually enable or disable flow control Switch 3226, 49-50 on the Switch 3250). The corresponding 10/100/1000 port is disabled when an SFP module is present. SFP Ports The two SFP (Small Form Factor Pluggable) ports support - 3Com 3226 | Getting Started - Page 15
is not receiving power or there is a fault with the Power Supply Unit. Console Port (Switch 3226) The console port allows you to connect a terminal and perform remote or local out-of-band management. The console port uses a standard null modem cable and is set to auto-baud, 8 data bits, no parity - 3Com 3226 | Getting Started - Page 16
Socket to connect the Switch to a SuperStack 3 Advanced Redundant Power System. See "Connecting a Redundant Power System" on page 24. Console Port (Switch 3250) The console port allows you to connect a terminal and perform remote or local out-of-band management. The console port uses a standard - 3Com 3226 | Getting Started - Page 17
If you initialize a Switch unit by selecting System > Control > Initialize in the Web interface or by entering system control initialize in the Command Line Interface, the following settings are retained to allow you to connect to and manage the Switch: ■ IP Address ■ Subnet Mask ■ Default Gateway - 3Com 3226 | Getting Started - Page 18
18 CHAPTER 1: INTRODUCING THE SUPERSTACK 3 SWITCH 3226 AND SWITCH 3250 - 3Com 3226 | Getting Started - Page 19
out any maintenance procedures, you must read the safety information provided in Appendix A of this guide. AVERTISSEMENT: Consignes de sécurité. Avant d'installer ou d'enlever tout composant du Switch ou d'entamer une procédure de maintenance, lisez les informations relatives à la sécurité qui se - 3Com 3226 | Getting Started - Page 20
2: INSTALLING THE SWITCH Package Contents ■ Switch unit ■ CD-ROM ■ Getting Started Guide (this guide) ■ Management Quick Reference Guide ■ Release Notes the case of the Switch. ■ Air flow is not restricted around the Switch or through the vents in the side of the Switch. 3Com recommends that you - 3Com 3226 | Getting Started - Page 21
fit in most standard 19-inch racks. CAUTION: Disconnect all cables from the Switch before continuing. Remove all self adhesive pads from the underside of the Switch if they have been fitted. To rack-mount your Switch: 1 Place the Switch the right way up on a hard flat surface, with the front facing - 3Com 3226 | Getting Started - Page 22
easily accessible position. The unit information label shows the following: ■ The 3Com product name of the Switch ■ The 3Com 3C number of the Switch ■ The unique MAC address (Ethernet address) of the Switch ■ The serial number of the Switch You may need this information for fault reporting purposes. - 3Com 3226 | Getting Started - Page 23
3Com Switch and Hub units, the smaller units must be positioned at the top. If you are placing Switch units Switch is powered-up and operating normally. The Switch is starting up or the Switch software is being upgraded. The Switch is reporting a fault (see Chapter 4, "Problem Solving"). The Switch - 3Com 3226 | Getting Started - Page 24
User Guide. CAUTION: The Switch can only use a SuperStack Advanced Redundant Power System output. CAUTION: The Switch has no ON/OFF switch; the you need to use a standard straight-through cable. See Table 7. 3Com recommends that you use Category 5 twisted pair cable - the maximum segment length for this - 3Com 3226 | Getting Started - Page 25
SFP (SX) ■ 3CSFP92 SFP (LX) To access the latest list of approved SFP transceivers for the Switch on the 3Com Corporation World Wide Web site, enter this URL into your internet browser: http://www.3com.com Inserting an SFP To be recognized as valid, the SFP transceiver must have the following - 3Com 3226 | Getting Started - Page 26
to multimode fiber using a conditioned launch cable. ■ Fiber LC connector If the SFP transceiver is faulty, it will not operate within the Switch. See "Solving Hardware Problems" on page 47. Use of non-3Com SFPs is not recommended. If the SFP transceiver is invalid it will not be recognized by the - 3Com 3226 | Getting Started - Page 27
appropriate Gigabit Ethernet connection. 7 Check the Module Active LEDs on the front of the Switch to ensure that it is operating correctly. Refer to "LEDs" on page 14 for more information. Removing an SFP If you wish to remove a 3Com transceiver (it is not necessary to Transceiver power-down your - 3Com 3226 | Getting Started - Page 28
28 CHAPTER 2: INSTALLING THE SWITCH - 3Com 3226 | Getting Started - Page 29
topics: ■ Setting Up Overview ■ Manually Configuring IP Information ■ Viewing Automatically Configured IP Information ■ Methods of Managing a Switch ■ Setting Up Command Line Interface Management ■ Setting Up Web Interface Management ■ Setting Up SNMP Management ■ Default Users and Passwords - 3Com 3226 | Getting Started - Page 30
set up and ready for management when it is in its default state. The whole setup process is summarized in Figure 7. Detailed procedural steps are contained in the sections that follow. In brief, you need to: ■ Configure IP information manually for your Switch or view the automatically configured - 3Com 3226 | Getting Started - Page 31
not allow you to allocate static IP addresses. (Static IP addresses are necessary to ensure that the Switch is always allocated the same IP information.) For most installations, 3Com recommends that you configure the Switch IP information manually. This makes management simpler and more reliable as - 3Com 3226 | Getting Started - Page 32
"Methods of Managing a Switch" on page 39. For detailed information about the specific web interface operations and command line interface commands and problem solving, refer to the "Switch Management Interface Reference Guide" on the CD-ROM that is supplied with the Switch or on the 3Com Web site. - 3Com 3226 | Getting Started - Page 33
software. ■ A suitable cable: ■ A standard null modem cable - if you are connecting directly to the console port, or You can find pin-out diagrams for both cables in Appendix B on page 59. ■ You need to have the following so that you can manually set up the Switch with IP information: ■ IP address - 3Com 3226 | Getting Started - Page 34
flow control Refer to the documentation that accompanies the terminal emulation software for more information. Setting Up the Switch with IP Information You are now ready to manually set up the Switch with IP information using the command line interface. 1 The command line interface login sequence - 3Com 3226 | Getting Started - Page 35
Manually Configuring IP Information 35 If you have not logged onto the Switch before, you will be prompted to enter a new password. 3Com recommends that you change your password from its default blank setting. 2 At the login and password prompts, enter admin as your user name and enter your - 3Com 3226 | Getting Started - Page 36
so that you know what IP address the Switch will be given. Refer to the documentation that accompanies your DHCP server. Connecting to the Console Port Alternatively, you can view the automatically configured IP information via the command line interface (CLI) through a connection to the - 3Com 3226 | Getting Started - Page 37
workstation. 2 Open your terminal emulation software and configure the COM port settings to which you have connected the cable. The settings should be set to match the default settings for the Switch, which are: ■ 19,200 baud ■ 8 data bits ■ no parity ■ 1 stop bit ■ no hardware flow control Refer to - 3Com 3226 | Getting Started - Page 38
have not yet set a password). If you have logged on correctly, the top-level menu of the command line interface is displayed as shown in the example in Figure 11. Figure 11 Example top-level command line interface menu Menu options 3Com SuperStack 3 Switch 3226 bridge - Administer bridge-wide - 3Com 3226 | Getting Started - Page 39
12 CLI management via the console port Workstation (with terminal emulation software installed) Switch Standard Null Modem Cable Console Port Connection Figure 13 CLI management over the network Refer to "Setting Up Command Line Interface Management" on page 40. Web Interface Each Switch has - 3Com 3226 | Getting Started - Page 40
management over the network Refer to "Setting Up SNMP Management" on page 43. Setting Up Command Line Interface Management This section describes how you can set up command line interface management using a local console port connection or over the network. CLI Management via To manage a Switch - 3Com 3226 | Getting Started - Page 41
you wish to manage in the following format: telnet xxx.xxx.xxx.xxx (where xxx.xxx.xxx.xxx is the IP address of the Switch) If opening a Telnet session via third party software you will need to enter the IP address in the format suitable for that software. 5 At the login and password prompts, enter - 3Com 3226 | Getting Started - Page 42
Style Sheets must be enabled on your browser. These features are enabled on a browser by default. You will only need to enable them if you have changed your browser settings. Web Management To manage a Switch using the web interface over an IP network: Over the Network 1 Check that you have the - 3Com 3226 | Getting Started - Page 43
do this using the Web management interface - refer to the command line interface section of the "Switch Management Interface Reference Guide" for more information. Default Users and Passwords If you intend to manage the Switch using the web interface or the command line interface, or to change the - 3Com 3226 | Getting Started - Page 44
Default Passwords You can change the default passwords using either: ■ The gettingStarted command on the CLI, or ■ The Security > Device > User > Modify operation on the web interface. For more information about default users and passwords, refer to the "Switch Management Interface Reference Guide - 3Com 3226 | Getting Started - Page 45
Indicated by LEDs ■ Solving Hardware Problems ■ Solving Communication Problems ■ Solving Software Upgrade Problems If you experience a problem that is not listed here, it may be included in the Support section of the Switch Management Interface Reference Guide on the CD-ROM that accompanies your - 3Com 3226 | Getting Started - Page 46
LED is flashing Green/Yellow. This could be due to loop back failure. If a port fails the Switch passes its Power On Self Test and continues to operate normally. ■ An internal fan has malfunctioned. If a fan has stopped spinning, power off the unit and check the air vents for obstructions. ■ The - 3Com 3226 | Getting Started - Page 47
-over or straight). Auto-negotiation problems will occur with fiber if: fan has failed in the Switch, a warning message will be generated in the following way: ■ RMON Trap - If configured, an RMON trap is generated and sent to the management workstation. For further information about RMON, refer - 3Com 3226 | Getting Started - Page 48
communication problems with the Switch, ensure that: ■ The Switch IP address has been configured as described in Chapter 3. ■ If the Switch is separated from your management application by a router, ensure that the default gateway IP address within the Switch is the same as the IP address of - 3Com 3226 | Getting Started - Page 49
line interface. For details on these options, refer to the Management Interface Reference Guide supplied in HTML format on the CD-ROM that accompanies your Switch. If you have problems with your software upgrade, refer to the Problem Solving section in the Management Interface Reference Guide. - 3Com 3226 | Getting Started - Page 50
50 CHAPTER 4: PROBLEM SOLVING - 3Com 3226 | Getting Started - Page 51
You must read the following safety information before carrying out any installation or removal of components, or any maintenance procedures on the Switch. WARNING: Warnings contain directions that you must follow for your personal safety. Follow all directions carefully. You must read the following - 3Com 3226 | Getting Started - Page 52
it is used: U.S.A. and Canada United Kingdom only Europe only: Denmark Switzerland ■ The cord set must be UL-approved and CSA certified. ■ The minimum specification for the flexible cord is: No. 18 AWG Type SV or SJ 3-conductor ■ The cord set must have a rated current capacity of at least 10A - 3Com 3226 | Getting Started - Page 53
connection point labelled Neutral, connected directly to earth (ground). †Impédance à la terre. WARNING: U.K. only: If connecting a modem to the console port of the Switch, only use a modem which is suitable for connection to the telecommunications system. WARNING: RJ-45 Ports. These are shielded RJ - 3Com 3226 | Getting Started - Page 54
L'installation et la dépose de ce groupe doivent être confiés à un personnel qualifié. AVERTISSEMENT: Si vous entassez l'unité Switch avec les unités SuperStack 3 Hub, l'unité Switch doit être installée en dessous des unités Hub plus étroites. AVERTISSEMENT: Vous devez mettre l'appareil à la terre - 3Com 3226 | Getting Started - Page 55
L'information de Sécurité Importante 55 AVERTISSEMENT: La prise secteur doit se trouver à proximité de l'appareil et son accès doit être facile. Vous ne pouvez mettre l'appareil hors circuit qu'en débranchant son cordon électrique au niveau de cette prise. AVERTISSEMENT: L'appareil fonctionne à une - 3Com 3226 | Getting Started - Page 56
und der Ausbau des Geräts darf nur durch Fachpersonal erfolgen. VORSICHT: Wenn die Switch Einheit in einer Stapel mit anderen SuperStack 3 Hub Einheiten eingebaut werden soll, muß die Switch Einheit unter die schmaleren Hub Einheiten eingebaut werden. VORSICHT: Das Gerät muß geerdet sein - 3Com 3226 | Getting Started - Page 57
Wichtige Sicherheitsinformationen 57 öffentlichem Telefonnetzwerk gebraucht werden. Nur RJ-45-Datenanscluße, Telefonnetzsysteme or Netztelefone an diese Steckdosen anschließen. Entweder geschützte oder ungeschützte Buchsen dürfen an diese Datensteckdosen angeschlossen werden. VORSICHT: - 3Com 3226 | Getting Started - Page 58
58 APPENDIX A: SAFETY INFORMATION - 3Com 3226 | Getting Started - Page 59
B PIN-OUTS Null Modem Cable 9-pin to RS-232 25-pin PC-AT Serial Cable 9-pin to 9-pin - 3Com 3226 | Getting Started - Page 60
60 APPENDIX B: PIN-OUTS RJ-45 Pin Assignments Pin assignments are identical for 10BASE-T and 100BASE-TX RJ-45 connectors. Table 10 Pin assignments Pin Number 10BASE-T/100BASE-TX Ports configured as MDI 1 Transmit Data + 2 Transmit Data - 3 Receive Data + 4 Not assigned 5 Not assigned - 3Com 3226 | Getting Started - Page 61
SPECIFICATIONS SuperStack 3 Switch 3226 and Switch SuperStack 3 Switch 3250: Height: 43.4 mm (1.7 in.) Width: 440 mm (17.3 in.) Depth: 331 mm (13.0 in.) Weight: 4.1 kg (approx) 0 ° to 40 °C (32 ° to 104 °F) -40 ° to +70 °C (-40 ° to 158 °F) 10-95% relative humidity, non-condensing EN60068 to 3Com - 3Com 3226 | Getting Started - Page 62
62 APPENDIX C: TECHNICAL SPECIFICATIONS Current Rating Standards Supported 2.0 A (amps)(maximum) SNMP SNMP protocol (RFC 1157) MIB-II (RFC 1213) Bridge MIB (RFC 1493) RMON MIB II (RFC 2021) Remote Monitoring MIB (RFC 1757) MAU MIB (RFC 2239) Terminal Emulation Telnet (RFC 854) Protocols Used for - 3Com 3226 | Getting Started - Page 63
or extend warranty benefits, contact 3Com or your authorized 3Com reseller. Value-added services can include 24x7 telephone technical support, software upgrades, onsite assistance or advance hardware replacement. Experienced engineers are available to manage your installation with minimal disruption - 3Com 3226 | Getting Started - Page 64
need to apply for a user name and password. A link to software downloads can be found at http://eSupport.3com.com/, or under the Product Support heading at http://www.3com.com/ Software Upgrades are the software releases that follow the software version included with your original product. In order - 3Com 3226 | Getting Started - Page 65
time users will need to apply for a user name and password. Telephone numbers are correct at the time of publication. Find a current directory of support telephone numbers posted on the 3Com web site at http://csoweb4.3com.com/contactus/ Country Telephone Number Country Telephone Number Asia - 3Com 3226 | Getting Started - Page 66
speakers, enter the URL: http://lat.3com.com/lat/support/form.html Portuguese speakers, enter the URL: http://lat.3com.com/br/support/form.html English speakers in Latin America should send e-mail to: [email protected] US and Canada Telephone Technical Support and Repair 1 800 876 3266 - 3Com 3226 | Getting Started - Page 67
Switch 19 prerequisites 20 IP addressing registered 49 IP configuration 31 L LEDs 14 logging in as a default user 43 M MAC address of the Switch 22 management methods 39 preparing for 32 setting up 29, 30 manual setup console port 33 MDI configuration 24 MDIX configuration 24 P passwords of default - 3Com 3226 | Getting Started - Page 68
the Switch 22 serial port. See console port Simple Network Management Protocol. See SNMP SNMP 43 SNMP management 40 setting up 43 socket power 16 specifications, system 61 straight-through configuration 24 Switch 3C number 22 automatic setup 36 console port 15, 16 dimensions 61 Ethernet address 22 - 3Com 3226 | Getting Started - Page 69
and used in accordance with the instructions, may cause harmful interference to radio How to Identify and Resolve Radio-TV Interference Problems This booklet is available from the U.S. Government must only insert a 3Com approved SFP transceiver into the Switch. These are listed in the " - 3Com 3226 | Getting Started - Page 70
-
 1
1 -
 2
2 -
 3
3 -
 4
4 -
 5
5 -
 6
6 -
 7
7 -
8
-
9
-
10
-
11
-
12
-
13
-
14
-
15
-
16
-
17
-
18
-
19
-
20
-
21
-
22
-
23
-
24
-
25
-
26
-
27
-
28
-
29
-
30
-
31
-
32
-
33
-
34
-
35
-
36
-
37
-
38
-
39
-
40
-
41
-
42
-
43
-
44
-
45
-
46
-
47
-
48
-
49
-
50
-
51
-
52
-
53
-
54
-
55
-
56
-
57
-
58
-
59
-
60
-
61
-
62
-
63
-
64
-
65
-
66
-
67
-
68
-
69
-
70
 |
 |

Part No. DUA1750-0AAA01
Published December 2003
SuperStack
®
3
Switch 3226 and Switch 3250
Getting Started Guide
3CR17500-91
3CR17501-91