3M SCP716W Installation Guide
3M SCP716W Manual
 |
View all 3M SCP716W manuals
Add to My Manuals
Save this manual to your list of manuals |
3M SCP716W manual content summary:
- 3M SCP716W | Installation Guide - Page 1
3M™ SCP700 Series Mobile Stand Assembly/Installation Guide 9532-999-013-03 Model 78-6969-9999-0 3M Mobile Interactive Solutions Division 3M Austin Center Austin, TX 78726-9000 Phone: (800) 328-1371 www.mmm.com/meetings 78-6971-1445-8 Rev. C - 3M SCP716W | Installation Guide - Page 2
Installation...8 Shelf Assembly (Optional 9 Support Pole Installation 10 Attaching the Back Support Assembly and Back Plate 10 Upper and Lower Horizontal Support Arm Installation 11 Install Mobile Cart Stabilizer 12 Attach Hanger to Projection Board 13 Projector Installation...14 Route Control - 3M SCP716W | Installation Guide - Page 3
software problems, interaction with non-3M products, or service other than by a 3M Authorized Service INSTRUCTIONS CONTAINED IN THE APPROPRIATE 3M PRODUCT MANUAL OR FAILURE TO USE THE 3M PRODUCT IN ACCORDANCE WITH 3M support, please call or write your local 3M office or a 3M Authorized Service - 3M SCP716W | Installation Guide - Page 4
SCPxxx series projectors Screen maximum size is 96 inches diagonal and maximum total weight on cart is 145 lbs. including board, wall mount, projector, and shelf contents. Use in any other application has not been evaluated by 3M and may lead to an unsafe condition. It is expected that all users be - 3M SCP716W | Installation Guide - Page 5
. -- Do not exceed a maximum screen size of 96 inches. -- Do not exceed a maximum total weight on cart of 145 lbs. including board, wall mount, projector, and shelf contents. • Read, understand and follow all safety information contained in the Assembly/Installation Guide prior to use. • To reduce - 3M SCP716W | Installation Guide - Page 6
Assembly and Installation Guide Parts List 3M™ SCP700 Series Mobile Stand This cart is stop the installation and contact 3M (800-328-1371). Gas Shock (Qty 1) Back Support (Qty 1) Back Plate (Qty 1) Horizontal Support Arms (Qty 2) Base (Qty 1) 72" Support Poles (Qty 2) Adjustable Brackets - 3M SCP716W | Installation Guide - Page 7
Mobile Stand. These installation instructions will direct you in how to assemble and utilize your 3M SCP700 Series Mobile Stand. SCP712 and Folding Wall Mount (not included) FRONT The following actions must be done prior to moving the SCP700 Series Mobile Stand: The projector must be in the stowed - 3M SCP716W | Installation Guide - Page 8
Assembly and Installation Guide Caster Wheel Installation 3M™ SCP700 Series Mobile Stand The locking casters and/or marred during the assembly. Shock Bracket Gas Shock Threaded Tip Mounting Point Step 1. Remove the back plate support from the packaging and place it on a flat surface. Step 2. - 3M SCP716W | Installation Guide - Page 9
3M™ SCP700 Series Mobile Stand Shelf Assembly (Optional) Shelf Brass Washer Shelf Pole Assembly and Installation Guide Step 1. Unpack the The mounting holes for the set screws are located on the left hand side of the support assembly. Shelf Allen Wrench (5/32 in.) Support Assembly Set Screw © 3M - 3M SCP716W | Installation Guide - Page 10
mounting points. Step 4. Once the support poles are seated firmly, install and tighten the two (2) M10 x 35mm set screws found on the bottom rear of the base columns to secure the support poles to the base. 3M™ SCP700 Series Mobile Stand Support Model SCP716, B=Model SCP712, C=Model SCP715/717/740. - 3M SCP716W | Installation Guide - Page 11
3M™ SCP700 Series Mobile Stand Assembly and Installation Guide Upper and Lower Horizontal Support Arm Installation Back Plate Mounting Points M6 x 10 Screw Step 1. Position Upper Hanger Arm against back support assembly. Step 2. Using 4 screws M6 x 10mm, align mounting holes, insert screws, and - 3M SCP716W | Installation Guide - Page 12
Guide Install Center Stabilizer Legs Installation Instructions: 9533-021-E03-00 Visit 3M web site at http://www.mmm.com.com/meetings 3M™ set screws into the rear mounting points of the stabilizer legs. The sets screws will go inside the cable port on the back of the support poles. Tighten the M8 - 3M SCP716W | Installation Guide - Page 13
fit projection board. Assembly and Installation Guide Step 2. Tighten bracket lock screw. To fit larger boards, you may need to separate the bracket. Push bracket flat against the back of the board, then tighten screw. Step 3. Adjust stand to lowest position. Push down on the lower back support - 3M SCP716W | Installation Guide - Page 14
and Installation Guide Projector Installation Folding Wall Mount 1 3 2 3M™ SCP700 Series Mobile Stand Legend 1 - Wall Mount Plate Keyhole Slot 2 - Projector Mounting Plate Leveling Screw 3 - Projector Back Plate Mounting Hole 4 - Folding Wall Mount hanging screw locations 5 - Mounting Screws M5 - 3M SCP716W | Installation Guide - Page 15
Guide Step 4. Using a Phillips (+) screwdriver, remove the three screws holding the cover to the base. Route Control Cable Required with optional 3M attach using cable ties. Step 3. Hang the folding wall mount base on the mounting screws. Attaching to the Stand Step 1. Lower the whiteboard stand - 3M SCP716W | Installation Guide - Page 16
Assembly and Installation Guide Attaching to the Stand, continued Step 6. Install the long mounting screws M5 x 35mm through the leveling screws and tighten securely. Route Cables in Stand 3M™ SCP700 Series Mobile Stand Power Audio Step 1. Route cables through stand as shown. Step 2. Connect - 3M SCP716W | Installation Guide - Page 17
3M™ SCP700 Series Mobile Stand Attach the Projector Assembly and Installation Guide Step 1. Place the projector top-down in the packaging insert. Step 2. Remove the three covers from the mounting screw holes. Step 3. Using two screws and the thumbscrew, attach the mounting bracket to the end of - 3M SCP716W | Installation Guide - Page 18
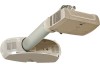
Assembly and Installation Guide Assemble the Arm Extension 3M™ SCP700 Series Mobile Stand Step 1. Lift the assembly and feed the bundled cables through the open end arm retainer. Step 4. Pull the cable bundle through the hole at the end of the arm extension. 18 © 3M 2010. All Rights Reserved. - 3M SCP716W | Installation Guide - Page 19
3M™ SCP700 Series Mobile Stand A/C Power Service Computer/ Component Control Step 5. Connect the cables to the projector according to the Quick Start Guide. Assembly and Installation Guide The optional I/O module attaches to back of stand using M3 x 16 mm screws. See page 11. Audio Power - 3M SCP716W | Installation Guide - Page 20
Assembly and Installation Guide Technical Specification All measurements are in inches [mm]. 3M™ SCP700 Series Mobile Stand 31.50 800 53.73 1365 95.65 95.64 2429 2429 51.00 1295 31.68 35.50 805 902 7.39 188 20 © 3M 2010. All Rights Reserved. - 3M SCP716W | Installation Guide - Page 21
3M™ SCP700 Series Mobile Stand Assembly and Installation Guide Intentionally blank © 3M 2010. All Rights Reserved. 21 - 3M SCP716W | Installation Guide - Page 22
[email protected]
-
 1
1 -
 2
2 -
 3
3 -
 4
4 -
 5
5 -
 6
6 -
 7
7 -
8
-
9
-
10
-
11
-
12
-
13
-
14
-
15
-
16
-
17
-
18
-
19
-
20
-
21
-
22
 |
 |

3M Austin Center
Austin, TX
78726-9000
Phone: (800) 328-1371
www.mmm.com/meetings
3M
™
SCP700 Series Mobile Stand
Assembly/Installation Guide
3M Mobile Interactive Solutions Division
Model 78-6969-9999-0
9532-999-013-03
78-6971-1445-8 Rev. C