AIWA BMZ-K2 Operating Instructions
AIWA BMZ-K2 Manual
 |
View all AIWA BMZ-K2 manuals
Add to My Manuals
Save this manual to your list of manuals |
AIWA BMZ-K2 manual content summary:
- AIWA BMZ-K2 | Operating Instructions - Page 1
Mini Hi-Fi Component System BMZ-K1/BMZ-K2 4-246-647-01 030407AMI-BI-SE - AIWA BMZ-K2 | Operating Instructions - Page 2
apparatus. Trade name: SONY Model No.: BMZ-K1/BMZ-K2 Responsible Party: Sony Electronics Inc. Address: of important operating and maintenance (servicing) instructions in the literature accompanying the modifications not expressly approved in this manual could void your authority to operate - AIWA BMZ-K2 | Operating Instructions - Page 3
any further. • The AC power cord must be changed only at a qualified service shop. On placement • Place the unit in a location with adequate ventilation to If you have any questions or problems concerning your stereo system, please consult your nearest Aiwa dealer. TABLE OF CONTENTS PREPARATIONS 4 - AIWA BMZ-K2 | Operating Instructions - Page 4
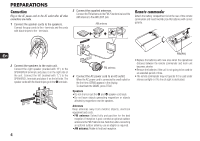
PREPARATIONS Connection Plug in the AC power cord to the AC outlet after all other connections are made. 1 Connect the speaker cords to the speakers. Connect the gray cords to the + terminals and the cords with black stripes to the - terminals. 3 Connect the supplied antennas. Connect the FM - AIWA BMZ-K2 | Operating Instructions - Page 5
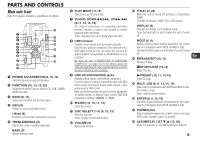
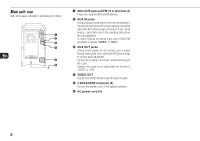
reverse playback when held down. Tuner: manually tunes up or down within the band to VIDEO jack). Refer also to the operating instructions of your equipment. To switch function to external PHONES jack Plug in optional headphones set with a stereo mini plug (∅3.5 mm). Speaker output is canceled. - AIWA BMZ-K2 | Operating Instructions - Page 6
equipment using an optional connecting cable with RCA phono plugs (red plug to R jack, white plug to L jack). Refer also to the operating instructions for your equipment. To switch function to external input, press FUNCTION repeatedly to display "VIDEO" or "AUX". 3 AUX OUT jacks Analog sound signals - AIWA BMZ-K2 | Operating Instructions - Page 7
take on these functions when pressed with SHIFT held down. BAND (8, 15) SPECTRUM (8) Changes the spectrum analyser display. TUNER MODE (15) Switches between stereo or monaural FM reception. GEQ (9) 3 c/d (10, 11, 13, 14) Starts CD play. s (10-13) a (10, 15) f/g (10, 15) r/tPRESET (8-11, 13, 15, 16 - AIWA BMZ-K2 | Operating Instructions - Page 8
Turning the unit off Press POWER 6STANDBY/ON again. The unit goes into standby. ECO ON: 0.25 W ECO OFF: 20 W BMZ-K2 ECO ON: 0.25 W ECO mode ECO OFF: 24 W Reduces power consumption in standby mode with the following operations. Press MODE on the main unit when - AIWA BMZ-K2 | Operating Instructions - Page 9
settings: HEAVY, VOCAL, SALSA, TECHNO, HIP HOP USER and GEQ OFF. •USER is a customized curve (see "Setting a curve manually") To cancel equalization, select "GEQ OFF". Setting a curve manually 1 Press GEQ repeatedly to display "USER". 2 Turn TREBLE/MIDDLE and BASS to adjust the sound level. On the - AIWA BMZ-K2 | Operating Instructions - Page 10
unit. Moreover, if you insert the disc of that size forcibly, you may not be able to eject it. In addition, this unit does not support the CD adaptor. •Discs with non-standard shapes (e.g., heart, square, star) cannot be played on this unit. Attempting to do so may damage the unit - AIWA BMZ-K2 | Operating Instructions - Page 11
To display the remaining playback time Press DISPLAY on the remote during playback. The display changes in the following order. Track number being played and elapsed playing time. Remaining time of current track. Remaining time of current disc* Clock display * During programmed playback, remaining - AIWA BMZ-K2 | Operating Instructions - Page 12
To clear the entire program Press s in stop mode. To add a track to the program Repeat steps 2 and 3 before starting playback. The track is added to the end of the program. To cancel programed play In stop mode, press PLAY MODE repeatedly until "PGM" disappears. •The program content is retained even - AIWA BMZ-K2 | Operating Instructions - Page 13
MP3-CD OPERATIONS FUNCTION PLAY MODE f/r, t/g zEJECT TITLE DISPLAY 1-0/10,+10 a,s,c MULTI JOG r ALBUMM PLAY MODE ALBUM/ PLAY LIST DISPLAY i,k DISC SELECT (1-5) FUNCTION DISC SKIP t c/d,f,g, a,s ALBUMN REPEAT Playback This unit plays back MP3-CDs: discs recorded with MP3 tracks (files). - AIWA BMZ-K2 | Operating Instructions - Page 14
audio data compressed using MPEG1/2, the audio layer-3 file-coding scheme. In this manual, CDs, CD-R discs and CD-RW discs are all referred to as "discs of recorded tracks and the complexity of the album tree. •This unit supports a multi-session discs; however, for a multi-session disc mixed with - AIWA BMZ-K2 | Operating Instructions - Page 15
The unit searches for a station and stops at reception. To stop the search manually, press f or g. •Auto search may not stop at stations with weak is displayed. To cancel, repeat the above so that "STEREO" is displayed. Tip: When FM stereo reception is poor, switching to monaural reduces noise. To - AIWA BMZ-K2 | Operating Instructions - Page 16
TIMER OPERATIONS POWER 6STANDBY/ON r,t POWER MULTI JOG r ENTER CLOCK/TIMER SET CLEAR t ENTER CLOCK/TIMER SELECT En Sleep timer Turns off the unit automatically after a specified time. Press SLEEP on the remote. "SLEEP" flashes in the display. With each press, the timer duration changes as - AIWA BMZ-K2 | Operating Instructions - Page 17
Notes • The timer playback performs every day at the specified time unless you cancel it. •You cannot set the same time for timer-on time and timeroff time. "SET NG" is displayed if you do that. In this case, reset the time. •The timer playback will not begin unless the unit is turned off first. En - AIWA BMZ-K2 | Operating Instructions - Page 18
Manual" in the supplied CD-ROM. Before Starting the Installation Before installing the software on the supplied BMZ marks are not used in this Installation Guide. Installing the USB Driver First, . 9 Complete the installation by following the instructions on the screen. If your operating system - AIWA BMZ-K2 | Operating Instructions - Page 19
> "USB Audio Device" •"Universal Serial Bus controllers" > "AIWA BMZ USB- Device" •"Human Interface Devices" > "HID-compliant consumer control on the Installation Guide screen. 2 Read the license agreement, and click "I Agree". 3 Complete the installation by following the instructions on the screen. - AIWA BMZ-K2 | Operating Instructions - Page 20
list of programs that can be removed automatically. 3 Click the program you want to remove. 4 Click "Change/Remove" (or "Add/Remove"). 5 Follow the instructions that appear on the screen to remove the program selected in step 3. Adjust the volume When playing back with the Winamp, it is possible - AIWA BMZ-K2 | Operating Instructions - Page 21
supports BMZ Troubleshooting If your unit fails to perform properly, check the following guide and the relevant sections of the Operating Instructions. First check that the AC power cord and the speakers are connected correctly and firmly. Should any problem persist, consult your nearest Aiwa - AIWA BMZ-K2 | Operating Instructions - Page 22
display •Reset the unit. (See "Resetting the unit".) There is severe hum or noise. •A TV or VCR is placed too close to the stereo system. Move the stereo system away from the TV or VCR. En The clock indication does not show the correct time. •A power interruption occurred. Set the clock and - AIWA BMZ-K2 | Operating Instructions - Page 23
(14 lbs 11 oz) net per speaker SX-BK2 Approx. 7.6 kg (16 lbs 13 oz) GENERAL Power requirements 120 V AC, 60 Hz Power consumption BMZ-K1: 120 W BMZ-K2: 145 W Power consumption in standby mode CX-BK1 with ECO mode on: 0.25 W with ECO mode off: 20 W CX-BK2 with ECO mode on - AIWA BMZ-K2 | Operating Instructions - Page 24
Sony Corporation Printed in Malaysia http://www.aiwa.com
-
 1
1 -
 2
2 -
 3
3 -
 4
4 -
 5
5 -
 6
6 -
 7
7 -
8
-
9
-
10
-
11
-
12
-
13
-
14
-
15
-
16
-
17
-
18
-
19
-
20
-
21
-
22
-
23
-
24
 |
 |

Mini Hi-Fi Component System
4-246-647-01
030407AMI-BI-SE
BMZ-K1/BMZ-K2