ASRock 2Core1333-2.66G Quick Installation Guide
ASRock 2Core1333-2.66G Manual
 |
View all ASRock 2Core1333-2.66G manuals
Add to My Manuals
Save this manual to your list of manuals |
ASRock 2Core1333-2.66G manual content summary:
- ASRock 2Core1333-2.66G | Quick Installation Guide - Page 1
purchaser for backup purpose, without written consent of ASRock Inc. Products and corporate names appearing in this guide may or may not be registered trademarks or ASRock Website: http://www.asrock.com Published July 2007 Copyright©2007 ASRock INC. All rights reserved. 1 ASRock 2Core1333-2.66G - ASRock 2Core1333-2.66G | Quick Installation Guide - Page 2
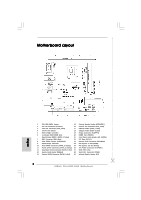
) 27 BIOS FWH Chip 13 System Panel Header (PANEL1) 28 Serial Port Connector (COM1) 14 Primary SATAII Connector (SATAII_1; Red) 29 Infrared Module Header (IR1) 2 ASRock 2Core1333-2.66G Motherboard - ASRock 2Core1333-2.66G | Quick Installation Guide - Page 3
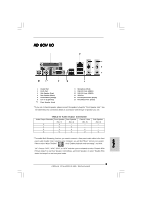
"Realtek HDA Primary output" to use Rear Speaker, Central/Bass, and Front Speaker, or select "Realtek HDA Audio 2nd output" to use front panel audio. 3 ASRock 2Core1333-2.66G Motherboard English - ASRock 2Core1333-2.66G | Quick Installation Guide - Page 4
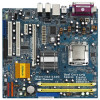
With Selected Dual Core CPU Operating at FSB1333 / 2.66GHz (Micro ATX Form Factor: 9.6-in x 9.0-in, 24.4 cm x 22.9 cm) ASRock 2Core1333-2.66G Quick Installation Guide ASRock 2Core1333-2.66G Support CD One 80-conductor Ultra ATA 66/100 IDE Ribbon Cable One Ribbon Cable for a 3.5-in Floppy Drive One - ASRock 2Core1333-2.66G | Quick Installation Guide - Page 5
Audio Codec) - Realtek PCIE x1 LAN 8101E - Speed: 10/100 Ethernet - Supports Wake-On-LAN HD 8CH I/O - 1 x PS/2 Mouse Port - 1 x PS/2 Keyboard Port - 1 x VGA Port - 1 x Parallel Port (ECP/EPP Support) - 4 x Ready-to-Use USB 2.0 Ports - 1 x RJ-45 LAN Port 5 ASRock 2Core1333-2.66G Motherboard English - ASRock 2Core1333-2.66G | Quick Installation Guide - Page 6
- 4Mb AMI BIOS - AMI Legal BIOS - Supports "Plug and Play" - ACPI 1.1 Compliance Wake Up Events - Supports jumperfree - AMBIOS 2.3.1 Support - Drivers, Utilities, AntiVirus Software (Trial Version) responsible for possible damage caused by overclocking. English 6 ASRock 2Core1333-2.66G Motherboard - ASRock 2Core1333-2.66G | Quick Installation Guide - Page 7
This motherboard supports Dual Channel Memory Technology. Before you implement Dual Channel Memory Technology, make sure to read the installation guide of memory modules 64-bit driver and related information. ASRock website http://www.asrock.com English 7 ASRock 2Core1333-2.66G Motherboard - ASRock 2Core1333-2.66G | Quick Installation Guide - Page 8
motherboard, please refer to Premium Discrete requirement at http://www.asrock.com * After June 1, 2007, all Windows® VistaTM systems are required to meet above minimum hardware requirements in order to qualify for Windows® VistaTM Premium 2007 logo. English 8 ASRock 2Core1333-2.66G Motherboard - ASRock 2Core1333-2.66G | Quick Installation Guide - Page 9
If the stickers are damaged, removed or bear the word "VOID", ASRock is not responsible for the after service of this CPU. ASRock CPU Sticker English In the future, you may adopt other compatible Intel is found. Otherwise, the CPU will be seriously damaged. 9 ASRock 2Core1333-2.66G Motherboard - ASRock 2Core1333-2.66G | Quick Installation Guide - Page 10
orient keys. Step 3. Remove PnP Cap (Pick and Place Cap): Use your left hand index finger and thumb to support the load plate edge, engage PnP cap with right hand thumb and peel the cap from the socket while pressing on center of PnP cap to assist in removal. 10 ASRock 2Core1333-2.66G Motherboard - ASRock 2Core1333-2.66G | Quick Installation Guide - Page 11
2. This cap must be placed if returning the motherboard for after service. Step 4. Close the socket: Step 4-1. Rotate the load plate Heatsink For proper installation, please kindly refer to the instruction manuals of your CPU fan and heatsink. Below is an ASRock 2Core1333-2.66G Motherboard English - ASRock 2Core1333-2.66G | Quick Installation Guide - Page 12
2.3 Installation of Memory Modules (DIMM) 2Core1333-2.66G motherboard provides two 240-pin DDRII (Double Data Rate) DIMM slots, and supports Dual Channel Memory Technology. For dual channel configuration, you in place and the DIMM is properly seated. 12 ASRock 2Core1333-2.66G Motherboard English - ASRock 2Core1333-2.66G | Quick Installation Guide - Page 13
with the slot and press firmly until the card is completely seated on the slot. Step 4. Fasten the card to the chassis with screws. 13 ASRock 2Core1333-2.66G Motherboard English - ASRock 2Core1333-2.66G | Quick Installation Guide - Page 14
unplug the power cord from the power supply. After waiting for 15 seconds, use a jumper cap to short 2 pins on CLRCMOS1 for 5 seconds. English 14 ASRock 2Core1333-2.66G Motherboard - ASRock 2Core1333-2.66G | Quick Installation Guide - Page 15
-conductor ATA 66/100 cable Note: Please refer to the instruction of your IDE device vendor for the details. Serial ATAII SATAII_1 SATAII_4 SATAII_2 These Serial ATAII (SATAII) connectors support SATAII or SATA hard disk for internal storage devices ASRock 2Core1333-2.66G Motherboard English - ASRock 2Core1333-2.66G | Quick Installation Guide - Page 16
High Definition Audio supports Jack Sensing, but the panel wire on the chassis must support HDA to function correctly. Please follow the instruction in our manual and chassis manual to install your Front Panel Control option from [Auto] to [Enabled]. 16 ASRock 2Core1333-2.66G Motherboard English - ASRock 2Core1333-2.66G | Quick Installation Guide - Page 17
match the black wire to the ground pin. Though this motherboard provides 4-Pin CPU fan (Quiet Fan) support, the 3-Pin CPU fan still can work successfully even without the fan speed control function. If you plan so will cause the failure to power up. 17 ASRock 2Core1333-2.66G Motherboard English - ASRock 2Core1333-2.66G | Quick Installation Guide - Page 18
Serial port Header (9-pin COM1) (see p.2 No. 28) This COM1 header supports a serial port module. English 18 ASRock 2Core1333-2.66G Motherboard - ASRock 2Core1333-2.66G | Quick Installation Guide - Page 19
.hitachigst.com/hdd/support/download.htm The above examples are just for your reference. For different SATAII hard disk products of different vendors, the jumper pin setting methods may not be the same. Please visit the vendors' website for the updates. 19 ASRock 2Core1333-2.66G Motherboard English - ASRock 2Core1333-2.66G | Quick Installation Guide - Page 20
cable to the SATA / SATAII hard disk. 2.9 Driver Installation Guide To install the drivers to your system, please insert the support CD to your optical drive first. Then, the drivers compatible to risk before you apply Untied Overclocking Technology. 20 ASRock 2Core1333-2.66G Motherboard English - ASRock 2Core1333-2.66G | Quick Installation Guide - Page 21
Setup, please refer to the User Manual (PDF file) contained in the Support CD. 4. Software Support CD information This motherboard supports various Microsoft® Windows® operating systems: EXE" from the BIN folder in the Support CD to display the menus. 21 ASRock 2Core1333-2.66G Motherboard English - ASRock 2Core1333-2.66G | Quick Installation Guide - Page 22
die mit FSB1333 / 2,66 GHz getaktet ist (Micro ATX-Formfaktor: 24.4 cm x 22.9 cm; 9.6 Zoll x 9.0 Zoll) ASRock 2Core1333-2.66G Schnellinstallationsanleitung ASRock 2Core1333-2.66G_ Support-CD Ein 80-adriges Ultra-ATA 66/100 IDE-Flachbandkabel Ein Flachbandkabel für ein 3,5-Zoll-Diskettenlaufwerk Ein - ASRock 2Core1333-2.66G | Quick Installation Guide - Page 23
- Max. 4GB (siehe VORSICHT 5) - Schrittloser CPU-Frequenz-Kontrolle (siehe VORSICHT 6) - ASRock U-COP (siehe VORSICHT 7) - Boot Failure Guard (B.F.G. - Systemstartfehlerschutz) - 1 x PCI HD 8CH I/O - 1 x PS/2-Mausanschluss - 1 x PS/2-Tastaturanschluss Deutsch 23 ASRock 2Core1333-2.66G Motherboard - ASRock 2Core1333-2.66G | Quick Installation Guide - Page 24
and Play" - ACPI 1.1-Weckfunktionen - JumperFree-Modus - SMBIOS 2.3.1 Support-CD - Treiber, Dienstprogramme, Antivirussoftware (Probeversion) Hardware Monitor - Ü / VistaTM / VistaTM 64-Bit (siehe VORSICHT 12) Zertifizierungen - FCC, CE, WHQL Deutsch 24 ASRock 2Core1333-2.66G Motherboard - ASRock 2Core1333-2.66G | Quick Installation Guide - Page 25
Kühlkörper zu sprühen. 8. Die Maximalspeichergröße ist von den Chipshändler definiert und umgetauscht. Bitte überprüfen Sie Intel® website für die neuliche Information. 25 ASRock 2Core1333-2.66G Motherboard Deutsch - ASRock 2Core1333-2.66G | Quick Installation Guide - Page 26
Internetseiten nach: http://www.asrock.com * Nach dem ersten Juni, 2007 sind , all Windows® VistaTM Systems dafür erforderlich, mit der Minimalforderung der obengenannte Hardware übereinzustimmen, um Windows® VistaTM Premium 2007 logo.zu befähigen. 26 ASRock 2Core1333-2.66G Motherboard Deutsch - ASRock 2Core1333-2.66G | Quick Installation Guide - Page 27
einer ausgesuchten Dual Core-CPU, FSB 1333 / 2,66 GHz geliefert. Bitte entfernen Sie nicht die ASRock-CPU-Aufkleber an beiden Seiten des CPU-Sockels auf dem Motherboard. Falls die Aufkleber beschädigt den Sockel, dies kann die CPU schwer beschädigen. 27 ASRock 2Core1333-2.66G Motherboard Deutsch - ASRock 2Core1333-2.66G | Quick Installation Guide - Page 28
zwei Orientierungskerben der CPU mit den beiden Markierungen des Sockels aus. Schritt 2-3. Drücken Sie die CPU vorsichtig in vertikaler Richtung in den Sockel. 28 ASRock 2Core1333-2.66G Motherboard - ASRock 2Core1333-2.66G | Quick Installation Guide - Page 29
(IHS). Schritt 4-2. Drücken Sie leicht auf die Ladeplatte und schließen Sie den Ladehebel. Schritt 4-3. Sichern Sie Ladehebel und Ladeplatte mithilfe des Hebelverschlusses. 29 ASRock 2Core1333-2.66G Motherboard Deutsch - ASRock 2Core1333-2.66G | Quick Installation Guide - Page 30
des Motherboards. Schritt 6. Befestigen Sie überschüssiges Kabel mit Band, um eine Störung des Lüfters oder Kontakt mit anderen Teilen zu vermeiden. Deutsch 30 ASRock 2Core1333-2.66G Motherboard - ASRock 2Core1333-2.66G | Quick Installation Guide - Page 31
2.3 Installation der Speichermodule (DIMM) Das 2Core1333-2.66G Motherboard bietet zwei 240polige DDRII (Double Data Rate) DIMM-Steckplätze und unterstützt Zweikanal-Speichertechnologie. zwingen, führt dies zu dauerhaften Schäden am Mainboard und am DIMM-Modul. 31 ASRock 2Core1333-2.66G Motherboard - ASRock 2Core1333-2.66G | Quick Installation Guide - Page 32
PCI Express-Slots): Es stehen 2 PCI-, 1 HDMR- und 2 PCI Express-Slot auf dem 2Core1333-2.66G Motherboard zur Verfügung. PCI-Slots: PCI-Slots werden zur Installation von Erweiterungskarten mit dem 32bit Sie die Karte mit der Schraube aus Schritt 2. Deutsch 32 ASRock 2Core1333-2.66G Motherboard - ASRock 2Core1333-2.66G | Quick Installation Guide - Page 33
Default-Werte wiederherzustellen, schalten Sie den Computer aus, ziehen Sie den Netzstecker und überbrücken Sie 2-pin von CLRCMOS1 mithilfe des Jumpers für 5 Sekunden. Deutsch 33 ASRock 2Core1333-2.66G Motherboard - ASRock 2Core1333-2.66G | Quick Installation Guide - Page 34
ATA- (SATA-) Datenkabel (Option) Sie können beide Enden des SATA-Datenkabels entweder mit der SATA / SATAIIFestplatte oder dem SATAII-Anschluss am Mainboard verbinden. Deutsch 34 ASRock 2Core1333-2.66G Motherboard - ASRock 2Core1333-2.66G | Quick Installation Guide - Page 35
Interface zu einem Audio-Panel auf der Vorderseite Ihres Gehäuses, ermöglicht Ihnen eine bequeme Anschlussmöglichkeit und Kontrolle über Audio-Geräte. 35 ASRock 2Core1333-2.66G Motherboard - ASRock 2Core1333-2.66G | Quick Installation Guide - Page 36
an. CPU-Lüfteranschluss Verbinden Sie das CPU - (4-pin CPU_FAN1) Lüfterkabel mit diesem (siehe S.2 - No. 3) Anschluss und passen Sie den 1 2 3 4 schwarzen Draht dem Erdungsstift an. 36 ASRock 2Core1333-2.66G Motherboard - ASRock 2Core1333-2.66G | Quick Installation Guide - Page 37
kann. Andernfalls reicht der Strom nicht aus, das System zu starten. Dieser COM-AnschlussHeader wird verwendet, um ein COM-Anschlussmodul zu unterstützen. Deutsch 37 ASRock 2Core1333-2.66G Motherboard - ASRock 2Core1333-2.66G | Quick Installation Guide - Page 38
Internetseite von HITACHI finden Sie entsprechende Details: http://www.hitachigst.com/hdd/support/download.htm Die Beispiele oben dienen lediglich Ihrer Referenz. Die Steckbrü und ergänzende Informationen finden Sie auf der Internetseite des Herstellers. 38 ASRock 2Core1333-2.66G Motherboard Deutsch - ASRock 2Core1333-2.66G | Quick Installation Guide - Page 39
komplett in den Steckplatz eingeschoben ist. 2. Installieren Sie die HDMR-Kartentreiber von der Unterstützungs-CD in Ihrem System. 3. Starten Sie Ihren Computer neu. 39 ASRock 2Core1333-2.66G Motherboard Deutsch - ASRock 2Core1333-2.66G | Quick Installation Guide - Page 40
stabileren Übertaktungsumgebung arbeiten kann. Beziehen Sie sich auf die Warnung vor möglichen Overclocking-Risiken auf Seite 25, bevor Sie die Untied Overclocking-Technologie anwenden. 40 ASRock 2Core1333-2.66G Motherboard Deutsch - ASRock 2Core1333-2.66G | Quick Installation Guide - Page 41
-Verzeichnis der Support-CD, um die Menüs aufzurufen. Das Setup-Programm soll es Ihnen so leicht wie möglich machen. Es ist menügesteuert, d.h. Sie können in den verschiedenen Untermenüs Ihre Auswahl treffen und die Programme werden dann automatisch installiert. 41 ASRock 2Core1333-2.66G Motherboard - ASRock 2Core1333-2.66G | Quick Installation Guide - Page 42
Dual Core fonctionnant avec un FSB1333 / 2.66GHz (Facteur de forme Micro ATX : 9.6 pouces x 9.0 pouces, 24.4 cm x 22.9 cm) Guide d'installation rapide ASRock 2Core1333-2.66G CD de soutien ASRock 2Core1333-2.66G Un câble ruban IDE Ultra ATA 66/100 80 conducteurs Un câble ruban pour un lecteur de - ASRock 2Core1333-2.66G | Quick Installation Guide - Page 43
haute définition de première qualité CH Windows® VistaTM (codec audio ALC888) LAN - Realtek PCIE x1 LAN 8101E - Vitesse: 10/100 Ethernet - Support du Wake-On-LAN Panneau arrière HD 8CH I/O E/S - 1 x port souris PS/2 - 1 x port clavier PS/2 43 ASRock 2Core1333-2.66G Motherboard Français - ASRock 2Core1333-2.66G | Quick Installation Guide - Page 44
SATAII, prennent en charge un taux de transfert de données pouvant aller jusqu'à 3.0Go/s (Ne supporte pas les fonctions "RAID" et "Hot-Plug" (Connexion à chaud)) (voir ATTENTION 10) - 1 VistaTM / VistaTM 64-bit (voir ATTENTION 12) - FCC, CE, WHQL Français 44 ASRock 2Core1333-2.66G Motherboard - ASRock 2Core1333-2.66G | Quick Installation Guide - Page 45
la page 59 pour plus d'informations. 3. Cette carte mère supporte la Technologie de Mémoire à Canal Double. Avant d'intégrer la Mémoire à Canal Double, assurez- vous de bien lire le guide d'installation des modules mémoire en page 51 pour réaliser une ASRock 2Core1333-2.66G Motherboard Français - ASRock 2Core1333-2.66G | Quick Installation Guide - Page 46
re supporte les SATAII, veuillez lire le «Guide d'Installation du disque dur asrock.com * Apres Juin 1,2007, tous les Windows® VistaTM systems sont demandes de mettre au dessus de exigence du hardware minimum pour qualifier pour Windows® VistaTM Premium 2007 logo. Français 46 ASRock 2Core1333-2.66G - ASRock 2Core1333-2.66G | Quick Installation Guide - Page 47
) veuillez suivre les étapes ci-dessous. ASRock vous rappelle que dans la mesure ou vous choisissez un autre CPU sur cette carte mère, nous ne sommes pas responsable Vue d'ensemble du socket 775 broches de l'utilisation ultérieure du CPU fourni. Français 47 ASRock 2Core1333-2.66G Motherboard - ASRock 2Core1333-2.66G | Quick Installation Guide - Page 48
noires. Etape 2-2. Orientez le paquet avec le dissipateur thermique intégré (IHS) vers le haut. Repérez la broche 1 et les deux encoches d'orientation. 48 ASRock 2Core1333-2.66G Motherboard Ligne noire Ligne noire Français - ASRock 2Core1333-2.66G | Quick Installation Guide - Page 49
le capuchon PnP. 2. Ce capuchon doit être mis en place si vous renvoyez la carte mère pour service après vente. Français Etape 4. Refermez le socle : Etape 4-1. Faites pivoter la plaque de chargement sur sous la languette de retenue du levier de chargement. 49 ASRock 2Core1333-2.66G Motherboard - ASRock 2Core1333-2.66G | Quick Installation Guide - Page 50
dissipateur thermique Pour une installation correcte, veuillez vous reporter aux manuels d'instructions de votre ventilateur de processeur et de votre dissipateur thermique. L'exemple ventilateur ou n'entrera pas en contact avec les autres composants. 50 ASRock 2Core1333-2.66G Motherboard Français - ASRock 2Core1333-2.66G | Quick Installation Guide - Page 51
2.3 Installation des modules mémoire (DIMM) La carte mère 2Core1333-2.66G possède deux emplacements DIMM DDRII (Double Débit de données) 240 broches, et prend en mauvaise orientation cela provoquera des dommages irrémédiables à la carte mère et au module DIMM. 51 ASRock 2Core1333-2.66G Motherboard - ASRock 2Core1333-2.66G | Quick Installation Guide - Page 52
Express) Il y a 2 slots PCI, 1 slot HDMR et 2 slots PCI Express sur les cartes mères 2Core13332.66G. Slots PCI: Les slots PCI sont utilisés pour installer des cartes d'extension dotées d'une interface PCI 32 bits sur le châssis à l'aide d'une vis. Français 52 ASRock 2Core1333-2.66G Motherboard - ASRock 2Core1333-2.66G | Quick Installation Guide - Page 53
. Puis placez un cavalier sur les pins CLRCMOS1 pendant 5 secondes. N'oubliez pas de retirer le cavalier avant après avoir restauré le CMOS. Français 53 ASRock 2Core1333-2.66G Motherboard - ASRock 2Core1333-2.66G | Quick Installation Guide - Page 54
noir vers le disque dur Câble ATA 66/100 80 conducteurs Note: Veuillez vous reporter aux instructions du fabricant de votre IDE périphérique pour les détails. Connecteurs Série ATAII (SATAII_1: SATAIIou au connecteur SATAII sur la carte mère. 54 ASRock 2Core1333-2.66G Motherboard Français - ASRock 2Core1333-2.66G | Quick Installation Guide - Page 55
ports USB 2.0. En-tête du module infrarouge (5-pin IR1) (voir p.2 No. 29) Cet en-tête supporte un module infrarouge optionnel de transfert et de réception sans fil. Connecteurs audio internes (CD1 br. 4) ( contrôle commodes de périphériques audio. 55 ASRock 2Core1333-2.66G Motherboard Français - ASRock 2Core1333-2.66G | Quick Installation Guide - Page 56
de panneau sur le châssis doit prendre en charge le HDA pour fonctionner correctement. Veuillez suivre les instructions dans notre manuel et le manuel de châssis afin installer votre système. 2. Si vous utilisez d'UC sur ce connecteur et brancher le fil 56 ASRock 2Core1333-2.66G Motherboard - ASRock 2Core1333-2.66G | Quick Installation Guide - Page 57
ien que cette carte mère offre un support de (Ventilateur silencieux) ventilateur de CPU à 4 broches , le ventilateur de CPU à 3 broches peut bien fonctionner même sans la -tête de port COM est utilisée pour prendre en charge un module de port COM. Français 57 ASRock 2Core1333-2.66G Motherboard - ASRock 2Core1333-2.66G | Quick Installation Guide - Page 58
lire attentivement le présent guide d'installation du disque dur SATAII fonction SATAII, veuillez suivre les instructions ci-dessous avec les différents de détails. http://www.hitachigst.com/hdd/support/download.htm Les exemples donnés précédemment ne ASRock 2Core1333-2.66G Motherboard Français - ASRock 2Core1333-2.66G | Quick Installation Guide - Page 59
Connectez l'autre extrémité du câble de données SATA au disque dur SATA / SATAII. 2.9 Guide d'installation des pilotes Pour installer les pilotes sur votre système, veuillez d'abord insérer le CD dans rer sous un environnement de surcadençage plus stable. 59 ASRock 2Core1333-2.66G Motherboard - ASRock 2Core1333-2.66G | Quick Installation Guide - Page 60
sur le BIOS, veuillez consulter le Guide de l'utilisateur (fichier PDF) dans le CD technique. 4. Informations sur le CD de support Cette carte mère supporte divers systèmes d'exploitation Microsoft® Windows double-cliquez dessus pour afficher les menus. 60 ASRock 2Core1333-2.66G Motherboard Français - ASRock 2Core1333-2.66G | Quick Installation Guide - Page 61
si possono anche trovare le più recenti schede VGA e gli elenchi di CPU supportate. ASRock website http://www.asrock.com 1.1 Contenuto della confezione Scheda madre ASRock 2Core1333-2.66G fornita con CPU Dual Core funzionante a FSB1333 / 2.66GHz (Micro ATX Form Factor: 9.6-in x 9.0-in, 24.4 cm - ASRock 2Core1333-2.66G | Quick Installation Guide - Page 62
ATTENZIONE 5) Booster ibrido - Stepless control per frequenza del processore (vedi ATTENZIONE 6) - ASRock U-COP (vedi ATTENZIONE 7) - Boot Failure Guard (B.F.G.) Slot di - 1 x slot PS/2 per mouse - 1 x porta PS/2 per tastiera - 1 x Porta VGA 62 ASRock 2Core1333-2.66G Motherboard Italiano - ASRock 2Core1333-2.66G | Quick Installation Guide - Page 63
, +3.3V, Vcore Compatibi- - Microsoft® Windows® 2000 / XP / XP 64 bit / VistaTM / lità SO VistaTM 64 bit (vedi ATTENZIONE 12) Certificazioni- FCC, CE, WHQL Italiano 63 ASRock 2Core1333-2.66G Motherboard - ASRock 2Core1333-2.66G | Quick Installation Guide - Page 64
della memoria condivisa viene stabilita dal venditore del chipset ed e' soggetta a modificazioni. Prego fare riferimento al sito internet Intel® per le ultime informazioni. Italiano 64 ASRock 2Core1333-2.66G Motherboard - ASRock 2Core1333-2.66G | Quick Installation Guide - Page 65
la sortie audio, cette carte mère supporte les modes 2canaux, 4-canaux, 6-canaux asrock.com * Dopo il 1 Giugno 2007, tutti i sistemi Windows® VistaTM vengono richiesti di essere in accordo ai requisiti minimi del sistema per Windows® VistaTM Premium 2007 logo. Italiano 65 ASRock 2Core1333-2.66G - ASRock 2Core1333-2.66G | Quick Installation Guide - Page 66
2,66GHz. Non rimuovere gli adesivi ASRock CPU sui lati della presa CPU di questa scheda madre. Nel caso in cui gli adesivi vengano danneggiati, rimossi o riportino la dicitura "VUOTO", ASRock non fornirà assistenza per il prodotto. Adesivo ASRock CPU Italiano 66 ASRock 2Core1333-2.66G Motherboard - ASRock 2Core1333-2.66G | Quick Installation Guide - Page 67
775-LAND seguire le istruzioni in basso. Se si usano altre CPU con questa scheda madre, ASRock ricorda che non sarà responsabile per l'assistenza della CPU fornita in dotazione. Vista del socket bordi segnati con linee nere. Linea nera Linea nera Italiano 67 ASRock 2Core1333-2.66G Motherboard - ASRock 2Core1333-2.66G | Quick Installation Guide - Page 68
la presa: Fase 4-1. Ruotare la piastra di carico sull'IHS. Fase 4-2. Bloccare la leva di carico mentre si preme leggermente sulla piastra di carico. 68 ASRock 2Core1333-2.66G Motherboard - ASRock 2Core1333-2.66G | Quick Installation Guide - Page 69
cavo in eccesso con fascette per assicurare che il cavo non interferisca con il funzionamento della ventola o che venga a contatto con gli altri componenti. 69 ASRock 2Core1333-2.66G Motherboard Italiano - ASRock 2Core1333-2.66G | Quick Installation Guide - Page 70
2.3 Installazione dei moduli di memoria (DIMM) La motherboard 2Core1333-2.66G dispone di due slot DIMM DDRII (Double Data Rate) a 240 pin e supporta la tecnologia i fermagli di ritegno alle due estremità e fino ad installare correttamente la DIMM nella sua sede. ASRock 2Core1333-2.66G Motherboard - ASRock 2Core1333-2.66G | Quick Installation Guide - Page 71
) Esistono 2 slot PCI, 1 slot HDMR e 2 slot PCI Express su entrambe le schede madri 2Core1333-2.66G. Slot PCI: Sono utilizzati per installare schede di espansione con Interfaccia PCI a 32-bit. Slot HDMR 4. Agganciare la scheda allo chassis con le viti. 71 ASRock 2Core1333-2.66G Motherboard Italiano - ASRock 2Core1333-2.66G | Quick Installation Guide - Page 72
. Per pulire I parametri di sistema e resettare ai parametri di default, spegnere il computer e scollegare l'alimentatore, poi collegare il jumper sul CLRCMOS1 per 5 secondi. Italiano 72 ASRock 2Core1333-2.66G Motherboard - ASRock 2Core1333-2.66G | Quick Installation Guide - Page 73
Serial ATA (SATA) (Opzionale) Entrambe le estremità del cavo dati SATA possono collegarsi all'hard disk SATA / SATAII o al connettore SATAII sulla scheda madre. 73 ASRock 2Core1333-2.66G Motherboard Italiano - ASRock 2Core1333-2.66G | Quick Installation Guide - Page 74
-ROM, DVD - ROM,TV tuner, o schede MPEG. È un'interfaccia per il cavo del pannello audio. Che consente connessione facile e controllo dei dispositivi audio. Italiano 74 ASRock 2Core1333-2.66G Motherboard - ASRock 2Core1333-2.66G | Quick Installation Guide - Page 75
) per far sì che questa operi in modo corretto. Attenersi alle istruzioni del nostro manuale e del manuale del telaio per installare il sistema. 2. Se si utilizza un pannello audio AC'97 questo connettore e far combaciare il filo nero al pin terra. Italiano 75 ASRock 2Core1333-2.66G Motherboard - ASRock 2Core1333-2.66G | Quick Installation Guide - Page 76
che possa fornire energia sufficiente. In caso contrario l'unità non si avvia. Questo collettore porta COM è utilizzato per supportare il modulo porta COM. Italiano 76 ASRock 2Core1333-2.66G Motherboard - ASRock 2Core1333-2.66G | Quick Installation Guide - Page 77
.com/hdd/support/download.htm Gli esempi di cui sopra sono solo per riferimento. Per dischi rigidi SATAII di diversi produttori, i metodi di impostazione dei pin del jumper possono non essere gli stessi. Visitare i siti web dei produttori per gli aggiornamenti. 77 ASRock 2Core1333-2.66G Motherboard - ASRock 2Core1333-2.66G | Quick Installation Guide - Page 78
" durante l'overclocking, ma i bus PCI / PCIE sono nella modalità fissata in modo tale che l'FSB posa operare sotto un più stabile ambiente di overclocking. 78 ASRock 2Core1333-2.66G Motherboard Italiano - ASRock 2Core1333-2.66G | Quick Installation Guide - Page 79
del sistema. Per informazioni più dettagliate circa il Setup del BIOS, fare riferimento al Manuale dell'Utente (PDF file) contenuto nel cd di supporto. 4. Software di supporto e informazioni di supporto e cliccare due volte per visualizzare i menù. 79 ASRock 2Core1333-2.66G Motherboard Italiano - ASRock 2Core1333-2.66G | Quick Installation Guide - Page 80
manual, la versión actualizada estará disponible en el website de ASRock sin previo aviso. También encontrará las listas de las últimas tarjetas VGA y CPU soportadas en la página web de ASRock. Website de ASRock http://www.asrock.com 1.1 Contenido de la caja Placa base ASRock 2Core1333-2.66G con - ASRock 2Core1333-2.66G | Quick Installation Guide - Page 81
- Max. 4GB (ver ATENCIÓN 5) - Stepless control de frecuencia de CPU (vea ATENCIÓN 6) - ASRock U-COP (vea ATENCIÓN 7) - Protección de Falla de Inicio (B.F.G..) - 1 x ranuras PCI Express x16 PS/2 - 1 x puerto VGA - 1 x puerto paralelo: soporta ECP/EPP 81 ASRock 2Core1333-2.66G Motherboard Español - ASRock 2Core1333-2.66G | Quick Installation Guide - Page 82
, +3.3V, Vcore - En conformidad con Microsoft® Windows® 2000 / XP / XP 64 bits / VistaTM / VistaTM 64 bits (vea ATENCIÓN 12) - FCC, CE, WHQL Español 82 ASRock 2Core1333-2.66G Motherboard - ASRock 2Core1333-2.66G | Quick Installation Guide - Page 83
máximo es definido por el vendedor del chipset y está conforme al cambio. Por favor compruebe el Web site de Intel® para la información más última. 83 ASRock 2Core1333-2.66G Motherboard Español - ASRock 2Core1333-2.66G | Quick Installation Guide - Page 84
en Premium Discrete en http://www.asrock.com * Después del 1 de Junio de 2007, todos los sistemas de Windows® VistaTM son requieridos para satisfacer los requisitos del hardware mínimos para calificar el logo de Windows® VistaTM Premium 2007. Español 84 ASRock 2Core1333-2.66G Motherboard - ASRock 2Core1333-2.66G | Quick Installation Guide - Page 85
ón de la (Matriz de contacto) CPU Intel 775-LAND, siga los pasos siguientes. ASRock le recuerda que si utiliza otra CPU en esta placa base, no se hace responsable del servicio postventa de la CPU incluida. Introducción al socket de 775 agujas Español 85 ASRock 2Core1333-2.66G Motherboard - ASRock 2Core1333-2.66G | Quick Installation Guide - Page 86
agujas Para insertarla correctamente, asegúrese de que las dos muescas de orientación de la CPU coinciden con las teclas de alineación del socket. 86 ASRock 2Core1333-2.66G Motherboard - ASRock 2Core1333-2.66G | Quick Installation Guide - Page 87
2.2 Instalación del ventilador y el disipador de la CPU Para una correcta instalación, consulte los manuales de instrucciones del ventilador y el disipador de la CPU. A continuación se ofrece un ejemplo para del IHS de la superficie del socket. Español 87 ASRock 2Core1333-2.66G Motherboard - ASRock 2Core1333-2.66G | Quick Installation Guide - Page 88
un lazo para asegurarse de que el cable no interfiere en el funcionamiento del ventilador y tampoco entra en contacto con otros componentes. Español 88 ASRock 2Core1333-2.66G Motherboard - ASRock 2Core1333-2.66G | Quick Installation Guide - Page 89
2.3 Instalación de Memoria La placa base 2Core1333-2.66G proporciona dos ranuras DIMM DDRII (Double Data Rate, es decir, Tasa doble de datos) de 240 contactos con una orientación incorrecta, provocará daños permanentes en la placa base y en la DIMM. 89 ASRock 2Core1333-2.66G Motherboard Español - ASRock 2Core1333-2.66G | Quick Installation Guide - Page 90
) Hay 2 ranuras PCI, 1 ranura HDMR y 2 ranura PCI Express sobre las placas mardres 2Core1333-2.66G. Ranuras PCI: Para instalar tarjetas de expansión que tienen 32-bit Interface PCI. Ranura HDMR: en la ranura. Paso 4. Asegure la tarjeta con tornillos. 90 ASRock 2Core1333-2.66G Motherboard Español - ASRock 2Core1333-2.66G | Quick Installation Guide - Page 91
y desconecte el cable de la fuente de electricidad, ponga en cortocircuito los pins de CLRCMOS1 por más que 5 segundos usando un jumper cap. Español 91 ASRock 2Core1333-2.66G Motherboard - ASRock 2Core1333-2.66G | Quick Installation Guide - Page 92
de serie ATA (SATA) (Opcional) Ambos extremos del cable pueden conectarse al disco duro SATA / SATAII o la conexión de la placa base. Español 92 ASRock 2Core1333-2.66G Motherboard - ASRock 2Core1333-2.66G | Quick Installation Guide - Page 93
, TV tuner, o tarjeta MPEG. Este es una interface para cable de audio de panel frontal que permite conexión y control conveniente de apparatos de Audio. 93 ASRock 2Core1333-2.66G Motherboard Español - ASRock 2Core1333-2.66G | Quick Installation Guide - Page 94
en el chasis debe soportar HDA para operar correctamente. Por favor, siga las instrucciones en nuestro manual y en el manual de chasis para instalar su sistema. 2. Si utiliza el panel de sonido AC'97, instá el cable negro con el conector de tierra. Español 94 ASRock 2Core1333-2.66G Motherboard - ASRock 2Core1333-2.66G | Quick Installation Guide - Page 95
electricidad. De lo contrario no se podrá encender. Este cabezal del puerto COM se utiliza para admitir un módulo de puerto COM. Español 95 ASRock 2Core1333-2.66G Motherboard - ASRock 2Core1333-2.66G | Quick Installation Guide - Page 96
Por favor visite el sitio Web de Hitachi para detalles. http://www.hitachigst.com/hdd/support/download.htm Los ejemplos anteriores son sólo para referencia. Para diferentes productos de disco duro Web de los proveedores para obtener las actualizaciones. 96 ASRock 2Core1333-2.66G Motherboard Español - ASRock 2Core1333-2.66G | Quick Installation Guide - Page 97
asentada en la ranura. 2. Instale el controlador de la tarjeta HDMR (que encontrará en nuestro CD de soporte) en el sistema. 3. Reinicie el equipo. 97 ASRock 2Core1333-2.66G Motherboard Español - ASRock 2Core1333-2.66G | Quick Installation Guide - Page 98
información sobre el posible riesgo que se asume al aumentar la velocidad del reloj antes de aplicar la tecnología de aumento de velocidad liberada. 98 ASRock 2Core1333-2.66G Motherboard Español - ASRock 2Core1333-2.66G | Quick Installation Guide - Page 99
de configuración de la BIOS, consulte el Manual del usuario (archivo PDF), que se encuentra en el CD de soporte. 4.Información de Software Support CD Esta placa-base soporta diversos tipos de en el archivo "ASSETUP.EXE" para iniciar la instalación. 99 ASRock 2Core1333-2.66G Motherboard Español
-
 1
1 -
 2
2 -
 3
3 -
 4
4 -
 5
5 -
 6
6 -
 7
7 -
8
-
9
-
10
-
11
-
12
-
13
-
14
-
15
-
16
-
17
-
18
-
19
-
20
-
21
-
22
-
23
-
24
-
25
-
26
-
27
-
28
-
29
-
30
-
31
-
32
-
33
-
34
-
35
-
36
-
37
-
38
-
39
-
40
-
41
-
42
-
43
-
44
-
45
-
46
-
47
-
48
-
49
-
50
-
51
-
52
-
53
-
54
-
55
-
56
-
57
-
58
-
59
-
60
-
61
-
62
-
63
-
64
-
65
-
66
-
67
-
68
-
69
-
70
-
71
-
72
-
73
-
74
-
75
-
76
-
77
-
78
-
79
-
80
-
81
-
82
-
83
-
84
-
85
-
86
-
87
-
88
-
89
-
90
-
91
-
92
-
93
-
94
-
95
-
96
-
97
-
98
-
99
 |
 |
1
ASRock
2Core1333-2.66G
Motherboard
English
English
English
English
English
Copyright Notice:
Copyright Notice:
Copyright Notice:
Copyright Notice:
Copyright Notice:
No part of this installation guide may be reproduced, transcribed, transmitted, or trans-
lated in any language, in any form or by any means, except duplication of documen-
tation by the purchaser for backup purpose, without written consent of ASRock Inc.
Products and corporate names appearing in this guide may or may not be registered
trademarks or copyrights of their respective companies, and are used only for identifica-
tion or explanation and to the owners’ benefit, without intent to infringe.
Disclaimer:
Disclaimer:
Disclaimer:
Disclaimer:
Disclaimer:
Specifications and information contained in this guide are furnished for informational
use only and subject to change without notice, and should not be constructed as a
commitment by ASRock. ASRock assumes no responsibility for any errors or omissions
that may appear in this guide.
With respect to the contents of this guide, ASRock does not provide warranty of any kind,
either expressed or implied, including but not limited to the implied warranties or
conditions of merchantability or fitness for a particular purpose. In no event shall
ASRock, its directors, officers, employees, or agents be liable for any indirect, special,
incidental, or consequential damages (including damages for loss of profits, loss of
business, loss of data, interruption of business and the like), even if ASRock has been
advised of the possibility of such damages arising from any defect or error in the guide
or product.
This device complies with Part 15 of the FCC Rules. Operation is subject to the
following two conditions:
(1)
this device may not cause harmful interference, and
(2)
this device must accept any interference received, including interference that
may cause undesired operation.
Published July 2007
Copyright
©
2007 ASRock INC. All rights reserved.
CALIFORNIA, USA ONLY
The Lithium battery adopted on this motherboard contains Perchlorate, a toxic
substance controlled in Perchlorate Best Management Practices (BMP) regulations
passed by the California Legislature. When you discard the Lithium battery in
California, USA, please follow the related regulations in advance.
“Perchlorate Material-special handling may apply, see
www
.dtsc.ca.gov/hazardouswa
ste/perchlorate”
ASRock Website: http://www.asrock.com