ASRock 760GM-GS3 Quick Installation Guide
ASRock 760GM-GS3 Manual
 |
View all ASRock 760GM-GS3 manuals
Add to My Manuals
Save this manual to your list of manuals |
ASRock 760GM-GS3 manual content summary:
- ASRock 760GM-GS3 | Quick Installation Guide - Page 1
guide are furnished for informational use only and subject to change without notice, and should not be constructed as a commitment by ASRock. ASRock ASRock Website: http://www.asrock.com Published September 2010 Copyright©2010 ASRock INC. All rights reserved. 1 ASRock 760GM-GS3 / 760GM-S3 Motherboard - ASRock 760GM-GS3 | Quick Installation Guide - Page 2
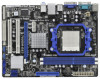
Motherboard Layout (7680GM-GS3 / 760GM-S3) English 1 PS2_USB_PW1 Jumper 15 System Panel Header (PANEL1, White) 2 ATX 12V Power Connector (ATX12V1) 16 Secondary SATAII Connector 3 CPU Heatsink Retention Module (SATAII_2 (PORT 1)) 4 AM3 CPU Socket ) 2 ASRock 760GM-GS3 / 760GM-S3 Motherboard - ASRock 760GM-GS3 | Quick Installation Guide - Page 3
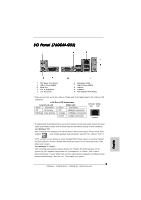
LED next to the LAN port. Please refer to the table below for the LAN port LED indications. LAN Port LED Indications Activity/ below steps for the software setting of Multi-Streaming. For Windows® XP: After restarting your computer, you will find ASRock 760GM-GS3 / 760GM-S3 Motherboard English - ASRock 760GM-GS3 | Quick Installation Guide - Page 4
LED next to the LAN port. Please refer to the table below for the LAN port LED indications. LAN Port LED Indications Activity/ below steps for the software setting of Multi-Streaming. For Windows® XP: After restarting your computer, you will find ASRock 760GM-GS3 / 760GM-S3 Motherboard English - ASRock 760GM-GS3 | Quick Installation Guide - Page 5
ASRock 760GM-GS3 / 760GM-S3 Motherboard (Micro ATX Form Factor: 9.6-in x 7.2-in, 24.4 cm x 18.3 cm) ASRock 760GM-GS3 / 760GM-S3 Quick Installation Guide ASRock 760GM-GS3 / 760GM-S3 Support CD 2 x Serial ATA (SATA) Data Cables (Optional) 1 x I/O Panel Shield 5 ASRock 760GM-GS3 / 760GM-S3 Motherboard - ASRock 760GM-GS3 | Quick Installation Guide - Page 6
CPU Chipset Memory Expansion Slot Graphics Audio LAN Rear Panel I/O - Micro ATX Form Factor: 9.6-in x 7.2-in, 24.4 cm x 18.3 cm - Support for Socket AM3 processors: AMD PhenomTM II X6 / X4 / X3 / X2 (except 920 / 940) / Athlon II X4 / X3 / X2 / Sempron processors - Six-Core CPU Ready - Supports AMD - ASRock 760GM-GS3 | Quick Installation Guide - Page 7
) - 8Mb AMI BIOS - AMI Legal BIOS - Supports "Plug and Play" - ACPI 1.1 Compliance Wake Up Events - Supports jumperfree - SMBIOS 2.3.1 Support - CPU, VCCM, NB Voltage Multi-adjustment - Drivers, Utilities, AntiVirus Software (Trial Version), AMD OverDriveTM Utility, ASRock Software Suite (CyberLink - ASRock 760GM-GS3 | Quick Installation Guide - Page 8
1800/1600MHz memory speed is supported depends on the AM3 CPU you adopt. If you want to adopt DDR3 1800/1600 memory module on this motherboard, please refer to the memory support list on our website for the compatible memory modules. ASRock website http://www.asrock.com 4. Due to the operating - ASRock 760GM-GS3 | Quick Installation Guide - Page 9
exciting motion controlled games. Also, please do not forget to pay attention to ASRock official website regularly, we will continuously provide you the most up-do-date supported games! ASRock website: http://www.asrock.com/Feature/Aiwi/index.asp 9 ASRock 760GM-GS3 / 760GM-S3 Motherboard English - ASRock 760GM-GS3 | Quick Installation Guide - Page 10
ASRock APP Charger allows you to quickly charge many Apple devices simultaneously and even supports continuous charging when your PC enters into Standby mode (S1), Suspend to RAM (S3), hibernation mode (S4) or power off (S5). With APP Charger driver 10 ASRock 760GM-GS3 / 760GM-S3 Motherboard English - ASRock 760GM-GS3 | Quick Installation Guide - Page 11
, place it on a grounded antistatic pad or in the bag that comes with the component. 5. When placing screws into the screw holes to secure the motherboard to the chassis, please do not over-tighten the screws! Doing so may damage the motherboard. 11 ASRock 760GM-GS3 / 760GM-S3 Motherboard English - ASRock 760GM-GS3 | Quick Installation Guide - Page 12
are securely fastened and in good contact with each other. Then connect the CPU fan to the CPU FAN connector (CPU_FAN1, see Page 2, No. 6). For proper installation, please kindly refer to the instruction manuals of the CPU fan and the heatsink. English 12 ASRock 760GM-GS3 / 760GM-S3 Motherboard - ASRock 760GM-GS3 | Quick Installation Guide - Page 13
Memory Modules (DIMM) 760GM-GS3 / 760GM-S3 motherboard provides two 240-pin DDR3 (Double Data Rate 3) DIMM slots, and supports Dual Channel Memory before adding or removing DIMMs or the system components. Step 1. Step 2. Unlock a DIMM slot by pressing the retaining clips outward. Align a DIMM - ASRock 760GM-GS3 | Quick Installation Guide - Page 14
motherboard. PCI slots: PCI slots are used to install expansion cards that have the 32-bit PCI interface. PCIE slots: PCIE1 (PCIE x1 slot; Blue) is used for PCI Express cards with x1 lane width cards, such as Gigabit LAN to the chassis with screws. 14 ASRock 760GM-GS3 / 760GM-S3 Motherboard English - ASRock 760GM-GS3 | Quick Installation Guide - Page 15
monitor will always be Primary, and all additional monitors will be designated as Secondary. C. Select the display icon identified by the number 2. D. Click "Extend my Windows desktop onto this monitor". 15 ASRock 760GM-GS3 / 760GM-S3 Motherboard English - ASRock 760GM-GS3 | Quick Installation Guide - Page 16
for the diaplay icon identified by the number one, two and three. For Windows® 7 / 7 64-bit / VistaTM / VistaTM 64-bit OS: the desktop onto this monitor". C. Click "OK" to save your change. D. Repeat steps A through C for the display icon identified by ASRock 760GM-GS3 / 760GM-S3 Motherboard English - ASRock 760GM-GS3 | Quick Installation Guide - Page 17
5 seconds. However, please do not clear the CMOS right after you update the BIOS. If you need to clear the CMOS when you just finish updating the BIOS, you must boot up the system first, and then shut it down before you do the clearCMOS action. English 17 ASRock 760GM-GS3 / 760GM-S3 Motherboard - ASRock 760GM-GS3 | Quick Installation Guide - Page 18
Serial ATAII (SATAII) connectors support SATAII or SATA hard disk for internal storage SATA) Data Cable (Optional) Either end of the SATA data cable can be connected to the SATA / SATAII hard disk or the SATAII connector on this motherboard. English 18 ASRock 760GM-GS3 / 760GM-S3 Motherboard - ASRock 760GM-GS3 | Quick Installation Guide - Page 19
the front mic. For Windows® XP / XP 64-bit OS: Select "Mixer". Select "Recorder". Then click "FrontMic". For Windows® 7 / 7 64-bit / VistaTM / VistaTM 64-bit OS: Go to the "FrontMic" Tab in the Realtek Control panel. Adjust "Recording Volume". 19 ASRock 760GM-GS3 / 760GM-S3 Motherboard English - ASRock 760GM-GS3 | Quick Installation Guide - Page 20
24-pin ATX power connector, 12 24 it can still work if you adopt a traditional 20-pin ATX power supply. To use the 20-pin ATX power supply, please plug your power supply along with Pin 1 and Pin 13. 20-Pin ATX Power Supply Installation 1 13 20 ASRock 760GM-GS3 / 760GM-S3 Motherboard English - ASRock 760GM-GS3 | Quick Installation Guide - Page 21
NCQ and Hot Plug functions (IDE mode) STEP 1: Set up BIOS. A. Enter BIOS SETUP UTILITY Advanced screen Storage Configuration. B. Set the "SATA Operation Mode" option to [IDE]. STEP 2: Install Windows® XP / XP 64-bit OS on your system. English 21 ASRock 760GM-GS3 / 760GM-S3 Motherboard - ASRock 760GM-GS3 | Quick Installation Guide - Page 22
Up BIOS. A. Enter BIOS SETUP UTILITY Advanced screen Storage Configuration. B. Set the "SATA Operation Mode" option to [AHCI]. STEP 2: Install Windows® 7 / 7 64-bit / VistaTM / VistaTM 64-bit OS on your system. 2.11 Untied Overclocking Technology This motherboard supports Untied Overclocking - ASRock 760GM-GS3 | Quick Installation Guide - Page 23
about BIOS Setup, please refer to the User Manual (PDF file) contained in the Support CD. 4. Software Support CD information This motherboard supports various Microsoft® Windows® from the "BIN" folder in the Support CD to display the menus. 23 ASRock 760GM-GS3 / 760GM-S3 Motherboard English - ASRock 760GM-GS3 | Quick Installation Guide - Page 24
760GM-GS3 / 760GM-S3 Motherboard (Micro ATX-Formfaktor: 24.4 cm x 18.3 cm; 9.6 Zoll x 7.2 Zoll) ASRock 760GM-GS3 / 760GM-S3 Schnellinstallationsanleitung ASRock 760GM-GS3 / 760GM-S3 Support-CD Zwei Seriell-ATA- (SATA) Datenkabel (Option) Ein I/O Shield 24 ASRock 760GM-GS3 / 760GM-S3 Motherboard - ASRock 760GM-GS3 | Quick Installation Guide - Page 25
ätze Onboard-VGA Audio LAN - Micro ATX-Formfaktor: 24.4 cm x 18.3 cm; 9.6 Zoll x 7.2 Zoll - Unterstützung von Socket AM3-Prozessoren: AMD PhenomTM II X6 / X4 / X3 / X2 (außer 920 / 940) / Athlon X4 / X3 / X2 / Sempron-Prozessor - Sechs-Kern-CPU-bereit - Unterstützt AMD OverDriveTM mit ACC-Funktion - ASRock 760GM-GS3 | Quick Installation Guide - Page 26
- Sofortstart - ASRock Instant Flash (siehe VORSICHT 9) - ASRock OC DNA (siehe VORSICHT 10) - ASRock AIWI (siehe VORSICHT 11) - ASRock APP Charger (siehe VORSICHT 12) - Hybrid Booster: - Schrittloser CPU-Frequenz-Kontrolle (siehe VORSICHT 13) 26 ASRock 760GM-GS3 / 760GM-S3 Motherboard - ASRock 760GM-GS3 | Quick Installation Guide - Page 27
-Einschränkungen kann die tatsächliche Speichergröße weniger als 4 GB betragen, da unter Windows® 7 / Vista™ / XP etwas Speicher zur Nutzung durch das System reserviert wird. Unter Windows® OS mit 64-Bit-CPU besteht diese Einschränkung nicht. 27 ASRock 760GM-GS3 / 760GM-S3 Motherboard Deutsch - ASRock 760GM-GS3 | Quick Installation Guide - Page 28
im Betriebssystem zu speichern und vereinfacht den komplizierten Aufzeichnungsvorgang von Übertaktungseinstellungen. Mit OC DNA können Sie Ihre Übertaktungseinstellungen als Profil abspeichern und Ihren Freunden 28 ASRock 760GM-GS3 / 760GM-S3 Motherboard Deutsch - ASRock 760GM-GS3 | Quick Installation Guide - Page 29
/index.asp 13. Obwohl dieses Motherboard stufenlose Steuerung bietet, wird Overclocking nicht empfohlen. Frequenzen, die von den empfohlenen CPU-Busfrequenzen abweichen, können Instabilität des Systems verursachen oder die CPU beschädigen. 29 ASRock 760GM-GS3 / 760GM-S3 Motherboard Deutsch - ASRock 760GM-GS3 | Quick Installation Guide - Page 30
Bevor Sie das System neu starten, prüfen Sie bitte, ob der CPU-Lüfter am Motherboard richtig funktioniert, und stecken Sie bitte den Stromkabelstecker aus und dann wieder ein wir Ihnen, weitere Details beim Hersteller der Stromversorgung abzufragen. 30 ASRock 760GM-GS3 / 760GM-S3 Motherboard Deutsch - ASRock 760GM-GS3 | Quick Installation Guide - Page 31
, den Jumper wieder zu entfernen, nachdem das CMOS gelöscht wurde. Wenn Sie den CMOS-Inhalt gleich nach dem Aktualisieren des BIOS löschen müssen, müssen Sie zuerst das System starten und dann wieder ausschalten, bevor Sie den CMOS-Inhalt löschen. Deutsch 31 ASRock 760GM-GS3 / 760GM-S3 Motherboard - ASRock 760GM-GS3 | Quick Installation Guide - Page 32
ermöglicht eine Datenübertragungsrate bis 3,0 Gb/s. Serial ATA- (SATA-) Datenkabel (Option) SJedes Ende des SATA Datenkabels kann an die SATA / SATAII Festplatte oder das SATAII Verbindungsstück auf dieser Hauptplatine angeschlossen werden. Deutsch 32 ASRock 760GM-GS3 / 760GM-S3 Motherboard - ASRock 760GM-GS3 | Quick Installation Guide - Page 33
vier üblichen USB 2.0-Ports an den I/O-Anschlüssen befinden sich zwei USB 2.0-Anschlussleisten am Motherboard. Pro USB 2.0Anschlussleiste werden zwei USB 2.0-Ports unterstützt. Druckerport-Anschlussleiste (25-pol. das Mikrofon an der Vorderseite. 33 ASRock 760GM-GS3 / 760GM-S3 Motherboard Deutsch - ASRock 760GM-GS3 | Quick Installation Guide - Page 34
Mikrofon). Bei den Betriebssystemen Windows® 7 / 7 64 CPU-Lüfter an den CPU-Lüferanschluss dieses Motherboards anschließen möchten, verbinden Sie ihn bitte mit den Pins 1 - 3. Pins 1-3 anschließen Lüfter mit dreipoligem Anschluss installieren Deutsch 34 ASRock 760GM-GS3 / 760GM-S3 Motherboard - ASRock 760GM-GS3 | Quick Installation Guide - Page 35
pol. ATX-Netzteils 1 13 Beachten Sie bitte, dass Sie eine Stromversorgung mit ATX 12Volt-Stecker mit diesem Anschluss verbinden müssen, damit ausreichend Strom geliefert werden kann. Andernfalls reicht der Strom nicht aus, das System zu starten. Deutsch 35 ASRock 760GM-GS3 / 760GM-S3 Motherboard - ASRock 760GM-GS3 | Quick Installation Guide - Page 36
der Support-CD, um die Menüs aufzurufen. Das Setup-Programm soll es Ihnen so leicht wie möglich machen. Es ist menügesteuert, d.h. Sie können in den verschiedenen Untermenüs Ihre Auswahl treffen und die Programme werden dann automatisch installiert. 36 ASRock 760GM-GS3 / 760GM-S3 Motherboard - ASRock 760GM-GS3 | Quick Installation Guide - Page 37
-GS3 / 760GM-S3 (Facteur de forme Micro ATX: 9.6 pouces x 7.2 pouces, 24.4 cm x 18.3 cm) Guide d'installation rapide ASRock 760GM-GS3 / 760GM-S3 CD de soutien ASRock 760GM-GS3 / 760GM-S3 Deux câble de données Serial ATA (SATA) (Optionnelle) Un écran I/O 37 ASRock 760GM-GS3 / 760GM-S3 Motherboard - ASRock 760GM-GS3 | Quick Installation Guide - Page 38
@ 60Hz Audio - 5.1 Son haute définition de CH (codec audio Realtek ALC662) LAN - 760GM-GS3 Realtek PCIE x1 Gigabit LAN RTL8111E, vitesse 10/100/1000 Mb/s - 760GM-S3 Realtek PCIEx1 LAN 8105EL, vitesse 10/100 Mb/s - Support du Wake-On-LAN 38 ASRock 760GM-GS3 / 760GM-S3 Motherboard Français - ASRock 760GM-GS3 | Quick Installation Guide - Page 39
d'énergie intelligent (voir ATTENTION 8) - l'Instant Boot - ASRock Instant Flash (voir ATTENTION 9) - ASRock OC DNA (voir ATTENTION 10) - ASRock AIWI (voir ATTENTION 11) - Chargeur ASRock APP (voir ATTENTION 12) - L'accélérateur hybride: Français 39 ASRock 760GM-GS3 / 760GM-S3 Motherboard - ASRock 760GM-GS3 | Quick Installation Guide - Page 40
ASRock http://www.asrock.com 4. Du fait des limites du système d'exploitation, la taille mémoire réelle réservée au système pourra être inférieure à 4 Go sous Windows® 7 / VistaTM / XP. Avec Windows® OS avec CPU 64 bits, il n'y a pas ce genre de limitation. 40 ASRock 760GM-GS3 / 760GM-S3 Motherboard - ASRock 760GM-GS3 | Quick Installation Guide - Page 41
seguida, poderá actualizar o BIOS com apenas alguns cliques sem ter de utilizar outra disquete ou outro complicado utilitário de flash. Note que a unidade flash USB ou a unidade de disco rígido devem utilizar o sistema de ficheiros FAT32/16/ 12. 41 ASRock 760GM-GS3 / 760GM-S3 Motherboard Français - ASRock 760GM-GS3 | Quick Installation Guide - Page 42
over clocking. Les fréquences autres que les fréquences de bus d'UC recommandées risquent de déstabiliser le système ou d'endommager l'UC. 42 ASRock 760GM-GS3 / 760GM-S3 Motherboard Français - ASRock 760GM-GS3 | Quick Installation Guide - Page 43
liorer la dissipation de la chaleur, n'oubliez pas de mettre de la pâte thermique entre le CPU le dissipateur lors de l'installation du PC. 15. EuP, qui signifie Energy Using Product (Produit votre fournisseur de courant pour plus de détails. 43 ASRock 760GM-GS3 / 760GM-S3 Motherboard Français - ASRock 760GM-GS3 | Quick Installation Guide - Page 44
après avoir mis le BIOS à jour. Si vous avez besoin d'effacer la CMOS lorsque vous avez fini de mettre le BIOS à jour, vous devez d'abord initialiser le système, puis le mettre hors tension avant de procéder à l'opération d'effacement de la CMOS. Français 44 ASRock 760GM-GS3 / 760GM-S3 Motherboard - ASRock 760GM-GS3 | Quick Installation Guide - Page 45
80 conducteurs Note: Veuillez vous reporter aux instructions du fabricant de votre IDE périphérique SATA) (en option) Toute cote du cable de data SATA peut etre connecte au disque dur SATA / SATAII ou au connecteur SATAII sur la carte mere. Français 45 ASRock 760GM-GS3 / 760GM-S3 Motherboard - ASRock 760GM-GS3 | Quick Installation Guide - Page 46
correctement. Veuillez suivre les instructions dans notre manuel et le micro avant. Pour les systèmes d'exploitation Windows® XP / XP 64 bits : Sélectionnez "Mixer". Sélectionnez "Recorder" (Enregistreur). Puis cliquez sur "FrontMic" (Micro avant). 46 ASRock 760GM-GS3 / 760GM-S3 Motherboard - ASRock 760GM-GS3 | Quick Installation Guide - Page 47
du ventilateur. Si vous prévoyez de connecter le ventilateur de CPU à 3 broches au connecteur du ventilateur de CPU sur cette carte mère, veuillez le connecter aux broches 1-3. Installation de ventilateur à 3 broches Broches 1-3 connectées Français 47 ASRock 760GM-GS3 / 760GM-S3 Motherboard - ASRock 760GM-GS3 | Quick Installation Guide - Page 48
(voir p.2 fig. 2) Veuillez noter qu'il est nécessaire de connecter une unité d'alimentation électrique avec prise ATX 12V sur ce connecteur afin d'avoir une alimentation suffisante. Faute de quoi, il ne sera pas possible de mettre sous tension. Français 48 ASRock 760GM-GS3 / 760GM-S3 Motherboard - ASRock 760GM-GS3 | Quick Installation Guide - Page 49
le BIOS, veuillez consulter le Guide de l'utilisateur (fichier PDF) dans le CD technique. 3. Informations sur le CD de support Cette carte mère supporte divers systèmes d'exploitation Microsoft® Windows®: 7 -cliquez dessus pour afficher les menus. 49 ASRock 760GM-GS3 / 760GM-S3 Motherboard Français - ASRock 760GM-GS3 | Quick Installation Guide - Page 50
madre ASRock 760GM-GS3 / 760GM-S3 (Micro ATX Form Factor: 9.6-in x 7.2-in, 24.4 cm x 18.3 cm) Guida di installazione rapida ASRock 760GM-GS3 / 760GM-S3 CD di supporto ASRock 760GM-GS3 / 760GM-S3 Due cavo dati Serial ATA (SATA) (Opzionale) Un I/O Shield 50 ASRock 760GM-GS3 / 760GM-S3 Motherboard - ASRock 760GM-GS3 | Quick Installation Guide - Page 51
- 760GM-GS3 Realtek PCIE x1 Gigabit LAN RTL8111E, velocità 10/100/1000 Mb/s - 760GM-S3 Realtek PCIEx1 LAN 8105EL, velocità 10/100 Mb/s - Supporta Wake-On-LAN Pannello I/O Panel posteriore I/O - 1 x porta PS/2 per mouse - 1 x porta PS/2 per tastiera 51 ASRock 760GM-GS3 / 760GM-S3 Motherboard - ASRock 760GM-GS3 | Quick Installation Guide - Page 52
) - Booster ibrido: - Stepless control per frequenza del processore (vedi ATTENZIONE 13) - ASRock U-COP (vedi ATTENZIONE 14) - Boot Failure Guard (B.F.G.) Monitor- - Sensore per la temperatura del processore aggio - Sensore temperatura scheda madre 52 ASRock 760GM-GS3 / 760GM-S3 Motherboard - ASRock 760GM-GS3 | Quick Installation Guide - Page 53
del disco rigido SATAII" a pagina 25 del "Manuale utente" nel CD in dotazione in modo da poter predisporre il disco rigido SATAII per la modalità SATAII. È anche possibile connettere il disco rigido SATA direttamente al connettore SATAII. 53 ASRock 760GM-GS3 / 760GM-S3 Motherboard Italiano - ASRock 760GM-GS3 | Quick Installation Guide - Page 54
ASRock: http://www.asrock.com 9. ASRock Instant Flash è una utilità Flash BIOS integrata nella Flash ROM. Questo comodo strumento d'aggiornamento del BIOS permette di aggiornare il sistema BIOS senza accedere a sistemi operativi come MSDOS or Windows ASRock 760GM-GS3 / 760GM-S3 Motherboard Italiano - ASRock 760GM-GS3 | Quick Installation Guide - Page 55
dispositivi Apple, come iPhone/iPod/iPad Touch, ASRock ha preparato una soluzione meravigliosa: ASRock APP Charger. Basta installare il driver APP Charger per caricare l'iPhone più rapidamente di verificare ulteriori dettagli con il produttore. 55 ASRock 760GM-GS3 / 760GM-S3 Motherboard Italiano - ASRock 760GM-GS3 | Quick Installation Guide - Page 56
cancellare la CMOS subito dopo aver aggiornato il BIOS. Se è necessario cancellare la CMOS una volta completato l'aggiornamento del BIOS, è necessario riavviare prima il sistema, e poi spegnerlo prima di procedere alla cancellazione della CMOS. Italiano 56 ASRock 760GM-GS3 / 760GM-S3 Motherboard - ASRock 760GM-GS3 | Quick Installation Guide - Page 57
permette velocità di trasferimento dati fino a 3.0 Gb/s. Cavi dati Serial ATA (SATA) (Opzionale) Una o altra estremità del cavo di dati SATA può essere collegata al disco rigido SATA / SATAII o al connettore di SATAII su questa cartolina base. Italiano 57 ASRock 760GM-GS3 / 760GM-S3 Motherboard - ASRock 760GM-GS3 | Quick Installation Guide - Page 58
è necessario collegarli per il pannello audio AC'97. E. Per attivare il microfono frontale. Sistema operativo Windows® XP / XP 64-bit: Selezionare "Mixer". Selezionare "Recorder" (Registratore). Poi, fare clic su "FrontMic" (Microfono frontale). 58 ASRock 760GM-GS3 / 760GM-S3 Motherboard Italiano - ASRock 760GM-GS3 | Quick Installation Guide - Page 59
Sistema operativo Windows® 7 / di un supporto per ventola CPU a 4 piedini (ventola silenziosa), la ventola CPU a 3 piedini è in ATX (24-pin ATXPWR1) (vedi p.2 item 7) 12 24 Collegare la sorgente d'alimentazione ATX a questo collettore. 1 13 Italiano 59 ASRock 760GM-GS3 / 760GM-S3 Motherboard - ASRock 760GM-GS3 | Quick Installation Guide - Page 60
) (vedi p.2 item 2) Installazione dell'alimentatore ATX a 20 pin 1 13 È necessario collegare una alimentazione con spinotto da 12V ATX a questo connettore in modo che possa fornire energia sufficiente. In caso contrario l'unità non si avvia. Italiano 60 ASRock 760GM-GS3 / 760GM-S3 Motherboard - ASRock 760GM-GS3 | Quick Installation Guide - Page 61
Test (POST) della Setup utility del BIOS; altrimenti, POST continua con i suoi test di routine. Per entrare il BIOS Setup del BIOS, fare riferimento al Manuale dell' a corredo della scheda madre contiene i driver e utilità necessari a potenziare le ASRock 760GM-GS3 / 760GM-S3 Motherboard Italiano - ASRock 760GM-GS3 | Quick Installation Guide - Page 62
ASRock 760GM-GS3 / 760GM-S3 (Factor forma Micro ATX: 24,4 cm x 18,3 cm, 9,6" x 7,2") Guía de instalación rápida de ASRock 760GM-GS3 / 760GM-S3 CD de soporte de ASRock 760GM-GS3 / 760GM-S3 Dos Cable de Datos Serial ATA (SATA) (Opcional) Una protección I/O 62 ASRock 760GM-GS3 / 760GM-S3 Motherboard - ASRock 760GM-GS3 | Quick Installation Guide - Page 63
PCIE x1 Gigabit LAN RTL8111E, velocidad 10/100/1000 Mb/s - 760GM-S3 Realtek PCIEx1 LAN 8105EL, velocidad 10/100 Mb/s - Soporta Wake-On-LAN Entrada/Salida I/O Panel de Panel - 1 x puerto de ratón PS/2 Trasero - 1 x puerto de teclado PS/2 63 ASRock 760GM-GS3 / 760GM-S3 Motherboard Español - ASRock 760GM-GS3 | Quick Installation Guide - Page 64
DNA (vea ATENCIÓN 10) - ASRock AIWI (vea ATENCIÓN 11) - ASRock APP Charger (vea ATENCIÓN 12) - Amplificador Híbrido: - Stepless control de frecuencia de CPU (vea ATENCIÓN 13) - ASRock U-COP (vea ATENCIÓN 14) - Protección de Falla de Inicio (B.F.G..) 64 ASRock 760GM-GS3 / 760GM-S3 Motherboard - ASRock 760GM-GS3 | Quick Installation Guide - Page 65
BIOS AM3 asrock.com 4. Debido a las limitaciones del sistema, el tamaño real de la memoria debe ser inferior a 4GB para que el sistema pueda funcionar bajo Windows® 7 / VistaTM / XP. Para equipos con Windows® OS con CPU de 64-bit, no existe dicha limitación. 65 ASRock 760GM-GS3 / 760GM-S3 Motherboard - ASRock 760GM-GS3 | Quick Installation Guide - Page 66
de la memoria compartido máximo es definido por el vendedor del chipset y está conforme al cambio. Por favor compruebe el Web site de AMD para la información más última. 6. Antes de instalar un disco de grabación de la configuración de aceleración. 66 ASRock 760GM-GS3 / 760GM-S3 Motherboard Español - ASRock 760GM-GS3 | Quick Installation Guide - Page 67
la disipación de calor, acuérdese de aplicar thermal grease entre el procesador y el disipador de calor cuando usted instala el sistema de PC. 67 ASRock 760GM-GS3 / 760GM-S3 Motherboard Español - ASRock 760GM-GS3 | Quick Installation Guide - Page 68
una fuente de alimentación que cumpla la directiva EuP, le recomendamos que consulte con el fabricante de la fuente de alimentación para obtener más detalles. 68 ASRock 760GM-GS3 / 760GM-S3 Motherboard Español - ASRock 760GM-GS3 | Quick Installation Guide - Page 69
de quitar el jumper cap después de limpiar el COMS. Si necesita borrar la CMOS cuando acabe de finalizar la actualización de la BIOS, debe arrancar primero el sistema y, a continuación, apagarlo antes de realizar la acción de borrado de CMOS. Español 69 ASRock 760GM-GS3 / 760GM-S3 Motherboard - ASRock 760GM-GS3 | Quick Installation Guide - Page 70
Serie ATA (SATAII) soportan HDDs SATA o SATAII para dispositivos de SATA) (Opcional) Cualquier extremo del cable de los datos de SATA puede ser conectado con el disco duro de SATA / SATAII o el conectador de SATAII en esta placa base. Español 70 ASRock 760GM-GS3 / 760GM-S3 Motherboard - ASRock 760GM-GS3 | Quick Installation Guide - Page 71
al panel de sonido AC'97. E. Activación del micrófono frontal. En sistemas operativos Windows® XP / XP 64-bit: Seleccione "Mixer" (Mezclador). Seleccione "Recorder" (Grabadora). A continuación, haga clic en "FrontMic" (Micrófono frontal). 71 ASRock 760GM-GS3 / 760GM-S3 Motherboard Español - ASRock 760GM-GS3 | Quick Installation Guide - Page 72
En sistemas operativos Windows® 7 / 7 64-bit / VistaTM / VistaTM 64-bit masa. Conector del ventilador de la CPU 1 2 3 (4-pin CPU_FAN1) 4 (vea p.2, No. 6) Conecte el cable del ventilador de la CPU a este conector y haga coincidir 3 contactos Español 72 ASRock 760GM-GS3 / 760GM-S3 Motherboard - ASRock 760GM-GS3 | Quick Installation Guide - Page 73
de ATX 12V power (4-pin ATX12V1) (vea p.2, No. 2) Tenga en cuenta que es necesario conectar este conector a una toma de corriente con el enchufe ATX 12V, de modo que proporcione suficiente electricidad. De lo contrario no se podrá encender. Español 73 ASRock 760GM-GS3 / 760GM-S3 Motherboard - ASRock 760GM-GS3 | Quick Installation Guide - Page 74
detallada sobre como configurar la BIOS, por favor refiérase al Manual del Usuario (archivo PDF) contenido en el CD. 3.Información de Software Support CD Esta placa-base soporta y doblepulse en el archivo ASSETUP.EXE para iniciar la instalación. 74 ASRock 760GM-GS3 / 760GM-S3 Motherboard Español - ASRock 760GM-GS3 | Quick Installation Guide - Page 75
. . ASRock. ASRock ( - Micro ATX: 9,6 x 7,2 / 24,4 x 18,3 ) ASRock ASRock Serial ATA (SATA) ( ) - I/O 75 ASRock 760GM-GS3 / 760GM-S3 Motherboard - ASRock 760GM-GS3 | Quick Installation Guide - Page 76
- Micro ATX: 9,6 x 7,2 / 24,4 x 18,3 76 ASRock 760GM-GS3 / 760GM-S3 Motherboard - ASRock 760GM-GS3 | Quick Installation Guide - Page 77
Hot-Plug 77 ASRock 760GM-GS3 / 760GM-S3 Motherboard - ASRock 760GM-GS3 | Quick Installation Guide - Page 78
78 ASRock 760GM-GS3 / 760GM-S3 Motherboard - ASRock 760GM-GS3 | Quick Installation Guide - Page 79
79 ASRock 760GM-GS3 / 760GM-S3 Motherboard - ASRock 760GM-GS3 | Quick Installation Guide - Page 80
80 ASRock 760GM-GS3 / 760GM-S3 Motherboard - ASRock 760GM-GS3 | Quick Installation Guide - Page 81
CMOS Short Open CMOS 81 ASRock 760GM-GS3 / 760GM-S3 Motherboard - ASRock 760GM-GS3 | Quick Installation Guide - Page 82
la banda roja debe quedar en el mismo lado que el contacto 1 IDE SATAII_3 SATAII_4 (PORT 2) (PORT 3) SATAII_1 SATAII_2 (PORT 0) (PORT 1) 82 ASRock 760GM-GS3 / 760GM-S3 Motherboard - ASRock 760GM-GS3 | Quick Installation Guide - Page 83
83 ASRock 760GM-GS3 / 760GM-S3 Motherboard - ASRock 760GM-GS3 | Quick Installation Guide - Page 84
(9- PANEL1) 1 2 3 4 84 ASRock 760GM-GS3 / 760GM-S3 Motherboard - ASRock 760GM-GS3 | Quick Installation Guide - Page 85
AT X 12 24 1 13 ATX. 12 24 12V-AT X 1 13 , ATX 12 , . . 85 ASRock 760GM-GS3 / 760GM-S3 Motherboard - ASRock 760GM-GS3 | Quick Installation Guide - Page 86
F POST 3 BIOS Setup Power-On-Self-Test - POST BIOS Setup POST Ctrl> + + - ASRock 760GM-GS3 | Quick Installation Guide - Page 87
760GM-GS3 / 760GM-S3 (Formato Micro ATX: 9,6 pol. x 7,2 pol., 24,4 cm x 18,3 cm) Guia de instalação rápida da ASRock 760GM-GS3 / 760GM-S3 CD de suporte da placa ASRock 760GM-GS3 / 760GM-S3 Dois cabo de dados ATA Serial (SATA) (Opcional) Uma proteção I/O 87 ASRock 760GM-GS3 / 760GM-S3 Motherboard - ASRock 760GM-GS3 | Quick Installation Guide - Page 88
x1 Gigabit LAN RTL8111E, velocidade 10/100/1000 Mb/s - 760GM-S3 Realtek PCIEx1 LAN 8105EL, velocidade 10/100 Mb/s - Suporta Wake-On-LAN Entrada/Saída I/O Panel pelo painel - 1 x porta para mouse PS/2 traseiro 88 - 1 x porta para teclado PS/2 ASRock 760GM-GS3 / 760GM-S3 Motherboard Portugu - ASRock 760GM-GS3 | Quick Installation Guide - Page 89
- Instant Boot - ASRock Instant Flash (veja o AVISO 9) - ASRock OC DNA (veja o AVISO 10) Português - ASRock AIWI (veja o AVISO 11) - ASRock APP Charger (veja o AVISO 12) - Booster híbrido: - Frequência da CPU com controle contínuo (veja o AVISO 13) 89 ASRock 760GM-GS3 / 760GM-S3 Motherboard - ASRock 760GM-GS3 | Quick Installation Guide - Page 90
BIOS, à aplicação da tecnologia Untied Overclocking ou à utilização de ferramentas de overclocking de terceiros. O overclocking MHz depende da CPU AM3 que adoptar. Windows® 7 / VistaTM / XP. No caso da CPU de 64 bits do Windows® OS, esta limitação não existe. 90 ASRock 760GM-GS3 / 760GM-S3 Motherboard - ASRock 760GM-GS3 | Quick Installation Guide - Page 91
da frequência do processador) no sistema operativo e simplifica o complexo processo de gravação das definições de "overclocking". Com OC DNA, pode guardar as suas definições OC como perfil e partilhá-las com os seus amigos! Depois, os seus amigos 91 ASRock 760GM-GS3 / 760GM-S3 Motherboard Português - ASRock 760GM-GS3 | Quick Installation Guide - Page 92
diferentes das recomendadas para a CPU podem provocar instabilidade do sistema ou danos à CPU. 14. Assim que se detecta um superaquecimento na CPU, o sistema se desliga automaticamente ão, isto é, a eficiência energética de reserva de 5V 92 ASRock 760GM-GS3 / 760GM-S3 Motherboard Português - ASRock 760GM-GS3 | Quick Installation Guide - Page 93
um jumper. Por favor lembrese de remover o jumper depois de limpar o COMS. Se precisar limpar o CMOS ao concluir a atualização do BIOS, deverá reiniciar o sistema primeiro e, em seguida, desligá-lo antes de executar a ação de limpeza o CMOS. Português 93 ASRock 760GM-GS3 / 760GM-S3 Motherboard - ASRock 760GM-GS3 | Quick Installation Guide - Page 94
interface SATAII permite uma taxa de transferência de dados de até 3.0 Gb/s. Cabo de dados ATA (SATA) (opcional) Tanto a saída do cabo de Serial dados SATA pode ser conectado ao disco rígido SATA / SATAII quanto o conector SATAII na placa mãe. Português 94 ASRock 760GM-GS3 / 760GM-S3 Motherboard - ASRock 760GM-GS3 | Quick Installation Guide - Page 95
Windows® XP / XP 64-bit OS: Clique em "Mixer". Clique em "Recorder". Clique em "FrontMic". Para Windows® 7 / 7 64-bit / VistaTM / VistaTM 64-bit OS: Vá ao separador "FrontMic" (Microfone Frontal) no painel de controlo Realtek. Clique em "Recording Volume". 95 ASRock 760GM-GS3 / 760GM-S3 Motherboard - ASRock 760GM-GS3 | Quick Installation Guide - Page 96
CPU nesta placa-mãe, por favor, ligue-a aos pinos 1-3. Pinos 1-3 ligados Instalação de Ventoinha de 3 pinos Conector de força do ATX (ATXPWR1 de 24 pinos) (veja a folha 2, No. 7) 12 24 1 13 Ligue a fonte de alimentação ATX neste conector. Português 96 ASRock 760GM-GS3 / 760GM-S3 Motherboard - ASRock 760GM-GS3 | Quick Installation Guide - Page 97
1 13 Conector ATX 12 V (ATX12V1 de 4 pinos ) (veja a folha 2, No. 2) Note que é necessário ligar uma fonte de alimentação com conector ATX 12V neste conector para fornecer alimentação suficiente. Do contrário, haverá falhas de funcionamento. Português 97 ASRock 760GM-GS3 / 760GM-S3 Motherboard - ASRock 760GM-GS3 | Quick Installation Guide - Page 98
da BIOS; caso contrário o POST continua com suas rotinas de teste. Caso você queira entrar nas configurações da BIOS após informações mais detalhadas sobre a configuração da BIOS, consulte o manual do usuário (em pdf) contido no CD pasta "BIN". 98 ASRock 760GM-GS3 / 760GM-S3 Motherboard Português - ASRock 760GM-GS3 | Quick Installation Guide - Page 99
Türkçe 99 ASRock 760GM-GS3 / 760GM-S3 Motherboard - ASRock 760GM-GS3 | Quick Installation Guide - Page 100
Türkçe 100 ASRock 760GM-GS3 / 760GM-S3 Motherboard - ASRock 760GM-GS3 | Quick Installation Guide - Page 101
ASRock 760GM-GS3 / 760GM-S3 Motherboard 101 Türkçe - ASRock 760GM-GS3 | Quick Installation Guide - Page 102
Türkçe 102 ASRock 760GM-GS3 / 760GM-S3 Motherboard - ASRock 760GM-GS3 | Quick Installation Guide - Page 103
ASRock 760GM-GS3 / 760GM-S3 Motherboard 103 Türkçe - ASRock 760GM-GS3 | Quick Installation Guide - Page 104
Türkçe 104 ASRock 760GM-GS3 / 760GM-S3 Motherboard - ASRock 760GM-GS3 | Quick Installation Guide - Page 105
Short Open Default Clear CMOS Türkçe ASRock 760GM-GS3 / 760GM-S3 Motherboard 105 - ASRock 760GM-GS3 | Quick Installation Guide - Page 106
SATAII_3 SATAII_4 (PORT 2) (PORT 3) SATAII_1 SATAII_2 (PORT 0) (PORT 1) Türkçe 106 ASRock 760GM-GS3 / 760GM-S3 Motherboard - ASRock 760GM-GS3 | Quick Installation Guide - Page 107
ASRock 760GM-GS3 / 760GM-S3 Motherboard 107 Türkçe - ASRock 760GM-GS3 | Quick Installation Guide - Page 108
1 2 3 4 Türkçe 12 24 1 13 12 24 108 1 13 ASRock 760GM-GS3 / 760GM-S3 Motherboard - ASRock 760GM-GS3 | Quick Installation Guide - Page 109
ASRock 760GM-GS3 / 760GM-S3 Motherboard 109 Türkçe - ASRock 760GM-GS3 | Quick Installation Guide - Page 110
Türkçe 110 ASRock 760GM-GS3 / 760GM-S3 Motherboard - ASRock 760GM-GS3 | Quick Installation Guide - Page 111
ASRock 760GM-GS3 / 760GM-S3 Motherboard 111 - ASRock 760GM-GS3 | Quick Installation Guide - Page 112
'' 112 ASRock 760GM-GS3 / 760GM-S3 Motherboard - ASRock 760GM-GS3 | Quick Installation Guide - Page 113
ASRock 760GM-GS3 / 760GM-S3 Motherboard 113 - ASRock 760GM-GS3 | Quick Installation Guide - Page 114
® " " ® " " " ® ® " 114 ASRock 760GM-GS3 / 760GM-S3 Motherboard - ASRock 760GM-GS3 | Quick Installation Guide - Page 115
® ASRock 760GM-GS3 / 760GM-S3 Motherboard 115 - ASRock 760GM-GS3 | Quick Installation Guide - Page 116
116 ASRock 760GM-GS3 / 760GM-S3 Motherboard - ASRock 760GM-GS3 | Quick Installation Guide - Page 117
"" "" "" "" ASRock 760GM-GS3 / 760GM-S3 Motherboard 117 - ASRock 760GM-GS3 | Quick Installation Guide - Page 118
SATAII_3 SATAII_4 (PORT 2) (PORT 3) SATAII_1 SATAII_2 (PORT 0) (PORT 1) 118 ASRock 760GM-GS3 / 760GM-S3 Motherboard - ASRock 760GM-GS3 | Quick Installation Guide - Page 119
® " " " " " " ASRock 760GM-GS3 / 760GM-S3 Motherboard 119 - ASRock 760GM-GS3 | Quick Installation Guide - Page 120
® " " " " 1 2 3 4 12 24 1 13 120 ASRock 760GM-GS3 / 760GM-S3 Motherboard - ASRock 760GM-GS3 | Quick Installation Guide - Page 121
12 24 1 13 ASRock 760GM-GS3 / 760GM-S3 Motherboard 121 - ASRock 760GM-GS3 | Quick Installation Guide - Page 122
" " \\ " " 122 ASRock 760GM-GS3 / 760GM-S3 Motherboard - ASRock 760GM-GS3 | Quick Installation Guide - Page 123
ASRock 760GM-GS3 / 760GM-S3 Motherboard 123 - ASRock 760GM-GS3 | Quick Installation Guide - Page 124
'' 124 ASRock 760GM-GS3 / 760GM-S3 Motherboard - ASRock 760GM-GS3 | Quick Installation Guide - Page 125
ASRock 760GM-GS3 / 760GM-S3 Motherboard 125 - ASRock 760GM-GS3 | Quick Installation Guide - Page 126
® ® ® " " ® ® 126 ASRock 760GM-GS3 / 760GM-S3 Motherboard - ASRock 760GM-GS3 | Quick Installation Guide - Page 127
® ® - ASRock 760GM-GS3 / 760GM-S3 Motherboard 127 - ASRock 760GM-GS3 | Quick Installation Guide - Page 128
128 ASRock 760GM-GS3 / 760GM-S3 Motherboard - ASRock 760GM-GS3 | Quick Installation Guide - Page 129
ASRock 760GM-GS3 / 760GM-S3 Motherboard 129 - ASRock 760GM-GS3 | Quick Installation Guide - Page 130
SATAII_3 SATAII_4 (PORT 2) (PORT 3) SATAII_1 SATAII_2 (PORT 0) (PORT 1) 130 ASRock 760GM-GS3 / 760GM-S3 Motherboard - ASRock 760GM-GS3 | Quick Installation Guide - Page 131
® " " " ® " " " " " " " ASRock 760GM-GS3 / 760GM-S3 Motherboard 131 - ASRock 760GM-GS3 | Quick Installation Guide - Page 132
1 2 3 4 12 24 1 13 12 24 132 1 13 ASRock 760GM-GS3 / 760GM-S3 Motherboard - ASRock 760GM-GS3 | Quick Installation Guide - Page 133
ASRock 760GM-GS3 / 760GM-S3 Motherboard 133 - ASRock 760GM-GS3 | Quick Installation Guide - Page 134
® ® TM TM 134 ASRock 760GM-GS3 / 760GM-S3 Motherboard - ASRock 760GM-GS3 | Quick Installation Guide - Page 135
ASRock 760GM-GS3 / 760GM-S3 Motherboard 135 - ASRock 760GM-GS3 | Quick Installation Guide - Page 136
'' ™ 136 ASRock 760GM-GS3 / 760GM-S3 Motherboard - ASRock 760GM-GS3 | Quick Installation Guide - Page 137
® ® ASRock 760GM-GS3 / 760GM-S3 Motherboard 137 - ASRock 760GM-GS3 | Quick Installation Guide - Page 138
® ® ® ® 138 ASRock 760GM-GS3 / 760GM-S3 Motherboard - ASRock 760GM-GS3 | Quick Installation Guide - Page 139
® ASRock 760GM-GS3 / 760GM-S3 Motherboard 139 - ASRock 760GM-GS3 | Quick Installation Guide - Page 140
140 ASRock 760GM-GS3 / 760GM-S3 Motherboard - ASRock 760GM-GS3 | Quick Installation Guide - Page 141
SATAII_3 SATAII_4 (PORT 2) (PORT 3) SATAII_1 SATAII_2 (PORT 0) (PORT 1) ASRock 760GM-GS3 / 760GM-S3 Motherboard 141 - ASRock 760GM-GS3 | Quick Installation Guide - Page 142
® ® 1 2 3 4 142 ASRock 760GM-GS3 / 760GM-S3 Motherboard - ASRock 760GM-GS3 | Quick Installation Guide - Page 143
12 24 1 13 12 24 1 13 ASRock 760GM-GS3 / 760GM-S3 Motherboard 143 - ASRock 760GM-GS3 | Quick Installation Guide - Page 144
® ® 144 ASRock 760GM-GS3 / 760GM-S3 Motherboard - ASRock 760GM-GS3 | Quick Installation Guide - Page 145
X O O O X O O O O: X: O O O O ASRock 760GM-GS3 / 760GM-S3 Motherboard 145 - ASRock 760GM-GS3 | Quick Installation Guide - Page 146
146 ASRock 760GM-GS3 / 760GM-S3 Motherboard - ASRock 760GM-GS3 | Quick Installation Guide - Page 147
ASRock 760GM-GS3 / 760GM-S3 Motherboard 147 - ASRock 760GM-GS3 | Quick Installation Guide - Page 148
148 ASRock 760GM-GS3 / 760GM-S3 Motherboard - ASRock 760GM-GS3 | Quick Installation Guide - Page 149
® ® ® ® ® ASRock 760GM-GS3 / 760GM-S3 Motherboard 149 - ASRock 760GM-GS3 | Quick Installation Guide - Page 150
® ® 150 ASRock 760GM-GS3 / 760GM-S3 Motherboard - ASRock 760GM-GS3 | Quick Installation Guide - Page 151
ASRock 760GM-GS3 / 760GM-S3 Motherboard 151 - ASRock 760GM-GS3 | Quick Installation Guide - Page 152
SATAII_3 SATAII_4 (PORT 2) (PORT 3) SATAII_1 SATAII_2 (PORT 0) (PORT 1) 152 ASRock 760GM-GS3 / 760GM-S3 Motherboard - ASRock 760GM-GS3 | Quick Installation Guide - Page 153
® ® 1 2 3 4 ASRock 760GM-GS3 / 760GM-S3 Motherboard 153 - ASRock 760GM-GS3 | Quick Installation Guide - Page 154
12 24 1 13 12 24 1 13 154 ASRock 760GM-GS3 / 760GM-S3 Motherboard - ASRock 760GM-GS3 | Quick Installation Guide - Page 155
® ® ® ASRock 760GM-GS3 / 760GM-S3 Motherboard 155
-
 1
1 -
 2
2 -
 3
3 -
 4
4 -
 5
5 -
 6
6 -
 7
7 -
8
-
9
-
10
-
11
-
12
-
13
-
14
-
15
-
16
-
17
-
18
-
19
-
20
-
21
-
22
-
23
-
24
-
25
-
26
-
27
-
28
-
29
-
30
-
31
-
32
-
33
-
34
-
35
-
36
-
37
-
38
-
39
-
40
-
41
-
42
-
43
-
44
-
45
-
46
-
47
-
48
-
49
-
50
-
51
-
52
-
53
-
54
-
55
-
56
-
57
-
58
-
59
-
60
-
61
-
62
-
63
-
64
-
65
-
66
-
67
-
68
-
69
-
70
-
71
-
72
-
73
-
74
-
75
-
76
-
77
-
78
-
79
-
80
-
81
-
82
-
83
-
84
-
85
-
86
-
87
-
88
-
89
-
90
-
91
-
92
-
93
-
94
-
95
-
96
-
97
-
98
-
99
-
100
-
101
-
102
-
103
-
104
-
105
-
106
-
107
-
108
-
109
-
110
-
111
-
112
-
113
-
114
-
115
-
116
-
117
-
118
-
119
-
120
-
121
-
122
-
123
-
124
-
125
-
126
-
127
-
128
-
129
-
130
-
131
-
132
-
133
-
134
-
135
-
136
-
137
-
138
-
139
-
140
-
141
-
142
-
143
-
144
-
145
-
146
-
147
-
148
-
149
-
150
-
151
-
152
-
153
-
154
-
155
 |
 |
1
ASRock
760GM-GS3 / 760GM-S3
Motherboard
English
English
English
English
English
Copyright Notice:
Copyright Notice:
Copyright Notice:
Copyright Notice:
Copyright Notice:
No part of this installation guide may be reproduced, transcribed, transmitted, or trans-
lated in any language, in any form or by any means, except duplication of documen-
tation by the purchaser for backup purpose, without written consent of ASRock Inc.
Products and corporate names appearing in this guide may or may not be registered
trademarks or copyrights of their respective companies, and are used only for identifica-
tion or explanation and to the owners’ benefit, without intent to infringe.
Disclaimer:
Disclaimer:
Disclaimer:
Disclaimer:
Disclaimer:
Specifications and information contained in this guide are furnished for informational
use only and subject to change without notice, and should not be constructed as a
commitment by ASRock. ASRock assumes no responsibility for any errors or omissions
that may appear in this guide.
With respect to the contents of this guide, ASRock does not provide warranty of any kind,
either expressed or implied, including but not limited to the implied warranties or
conditions of merchantability or fitness for a particular purpose. In no event shall
ASRock, its directors, officers, employees, or agents be liable for any indirect, special,
incidental, or consequential damages (including damages for loss of profits, loss of
business, loss of data, interruption of business and the like), even if ASRock has been
advised of the possibility of such damages arising from any defect or error in the guide
or product.
This device complies with Part 15 of the FCC Rules. Operation is subject to the
following two conditions:
(1)
this device may not cause harmful interference, and
(2)
this device must accept any interference received, including interference that
may cause undesired operation.
Published September 2010
Copyright
©
2010 ASRock INC. All rights reserved.
CALIFORNIA, USA ONLY
The Lithium battery adopted on this motherboard contains Perchlorate, a toxic
substance controlled in Perchlorate Best Management Practices (BMP) regulations
passed by the California Legislature. When you discard the Lithium battery in
California, USA, please follow the related regulations in advance.
“Perchlorate Material-special handling may apply, see
www
.dtsc.ca.gov/hazardouswa
ste/perchlorate”
ASRock Website: http://www.asrock.com