ASRock 939A790GMH Quick Installation Guide
ASRock 939A790GMH Manual
 |
View all ASRock 939A790GMH manuals
Add to My Manuals
Save this manual to your list of manuals |
ASRock 939A790GMH manual content summary:
- ASRock 939A790GMH | Quick Installation Guide - Page 1
for backup purpose, without written consent of ASRock Inc. Products and corporate names appearing in this guide may or may not be registered trademarks or ASRock Website: http://www.asrock.com Published July 2010 Copyright©2010 ASRock INC. All rights reserved. 1 ASRock 939A790GMH Motherboard - ASRock 939A790GMH | Quick Installation Guide - Page 2
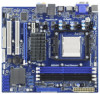
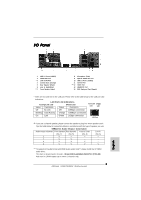
Motherboard Layout English 1 PS2_USB_PW1 Jumper 19 Third SATAII Connector (SATAII_3 (PORT 2)) 2 ATX 12V Power Connector (ATX12V1) 20 Secondary SATAII Connector 3 CPU Heatsink Retention Module (SATAII_2 (PORT 1)) 4 939-Pin CPU Socket 21 Primary SATAII Connector 5 CPU Fan Connector (CPU_FAN1 - ASRock 939A790GMH | Quick Installation Guide - Page 3
8 V V V V *** To support AC3 audio format with HDMI Audio under VistaTM, please install the XP HDMI audio driver. The driver is located under the path: ..\Drivers\NB Audio\REALTEK\XP64_XP(R1.68) And note for LPCM support up to stereo 2 channels only. 3 ASRock 939A790GMH Motherboard English - ASRock 939A790GMH | Quick Installation Guide - Page 4
design conforming to ASRock's commitment to quality and endurance. In this manual, chapter 1 and 2 contain introduction of the motherboard and step-by-step guide to the hardware installation. Chapter 3 and 4 contain the configuration guide to BIOS setup and information of the Support CD. Because the - ASRock 939A790GMH | Quick Installation Guide - Page 5
- Socket 939 for AMD AthlonTM 64FX / 64X2 / 64 processors - Supports AMD's Cool 'n' QuietTM Technology - FSB 1000 MHz (2.0 GT/s) - Supports Untied Overclocking Technology (see CAUTION 1) - Supports Hyper-Transport Technology - Northbridge: AMD 790GX - Southbridge: AMD SB750 - Dual Channel DDR Memory - ASRock 939A790GMH | Quick Installation Guide - Page 6
- 8Mb AMI BIOS - AMI Legal BIOS - Supports "Plug and Play" - ACPI 1.1 Compliance Wake Up Events - SMBIOS 2.3.1 Support - VCCM, NB Voltage Multi-adjustment - Drivers, Utilities, AntiVirus Software (Trial Version), ASRock Software Suite (CyberLink DVD Suite - OEM and Trial; Creative Sound Blaster X-Fi - ASRock 939A790GMH | Quick Installation Guide - Page 7
This motherboard supports Untied Overclocking Technology. Please read "Untied Overclocking Technology" on page 27 for details. 2. This motherboard supports Dual Channel Memory Technology. Before you implement Dual Channel Memory Technology, make sure to read the installation guide of memory modules - ASRock 939A790GMH | Quick Installation Guide - Page 8
the exciting motion controlled games. Also, please do not forget to pay attention to ASRock official website regularly, we will continuously provide you the most up-do-date supported games! ASRock website: http://www.asrock.com/Feature/Aiwi/index.asp 8 ASRock 939A790GMH Motherboard English - ASRock 939A790GMH | Quick Installation Guide - Page 9
driver, it makes your iPhone charged much quickly from your computer and up to 40% faster than before. ASRock APP Charger allows you to quickly charge many Apple devices simultaneously and even supports with the power supply manufacturer for more details. 9 ASRock 939A790GMH Motherboard English - ASRock 939A790GMH | Quick Installation Guide - Page 10
wall socket before touching any component. 2. To avoid damaging the motherboard components due to static electricity, NEVER place your motherboard the motherboard to the chassis, please do not over-tighten the screws! Doing so may damage the motherboard. 10 ASRock 939A790GMH Motherboard English - ASRock 939A790GMH | Quick Installation Guide - Page 11
the heatsink are securely fastened and in good contact with each other. Then connect the CPU fan to the CPU FAN connector (CPU_FAN1, see Page 2, No. 5). For proper installation, please kindly refer to the instruction manuals of the CPU fan and the heatsink. English 11 ASRock 939A790GMH Motherboard - ASRock 939A790GMH | Quick Installation Guide - Page 12
unable to activate the Dual Channel Memory Technology. 3. If a pair of memory modules is NOT installed in the same Dual Channel, for example, installing a pair of memory modules in DDR1 and DDR3, it is unable to activate the Dual Channel Memory Technology . English 12 ASRock 939A790GMH Motherboard - ASRock 939A790GMH | Quick Installation Guide - Page 13
cause permanent damage to the motherboard and the DIMM if you force the DIMM into the slot at incorrect orientation. Step 3. Firmly insert the DIMM into the slot until the retaining clips at both ends fully snap back in place and the DIMM is properly seated. 13 ASRock 939A790GMH Motherboard English - ASRock 939A790GMH | Quick Installation Guide - Page 14
Slots (PCI and PCI Express Slots) There are 2 PCI slots and 2 PCI Express slots on this motherboard. PCI slots: PCI slots are used to install expansion cards that have the 32-bit PCI interface. on the slot. Step 4. Fasten the card to the chassis with screws. 14 ASRock 939A790GMH Motherboard English - ASRock 939A790GMH | Quick Installation Guide - Page 15
and restart your computer. Then you can start to use multi monitor function on this motherboard. When you playback HDCP-protected video from Blu-ray (BD) or HD-DVD disc, the content will be displayed only in one of the three monitors instead of all monitors. 15 ASRock 939A790GMH Motherboard English - ASRock 939A790GMH | Quick Installation Guide - Page 16
memory. If you do not adjust the BIOS setup, the default value of "Share Memory", [Auto], will disable VGA/D-Sub function when the add-on VGA card is inserted to this motherboard. 4. Install the onboard VGA driver "Apply" or "OK" to apply these new values. 16 ASRock 939A790GMH Motherboard English - ASRock 939A790GMH | Quick Installation Guide - Page 17
to the increase in manufacturers employing HDCP in their equipment, it is highly recommended that the HDTV or LCD monitor you purchase is compatible. 17 ASRock 939A790GMH Motherboard English - ASRock 939A790GMH | Quick Installation Guide - Page 18
Install the onboard VGA driver from our support CD to your system for both the onboard VGA and the discrete graphics card. Step 6. Restart your computer. Then you will find "ATI Catalyst Control Center" on your Windows® taskbar. English ATI Catalyst Control Center 18 ASRock 939A790GMH Motherboard - ASRock 939A790GMH | Quick Installation Guide - Page 19
used only for identification or explanation and to the owners' benefit, without intent to infringe. * For further information of ATITM Hybrid CrossFireXTM technology, please check AMD website for up dates and details. 19 ASRock 939A790GMH Motherboard English - ASRock 939A790GMH | Quick Installation Guide - Page 20
CLRCMOS1 for 5 seconds. However, please do not clear the CMOS right after you update the BIOS. If you need to clear the CMOS when you just finish updating the BIOS, you must boot up the system first, and then shut it down before you do the clearCMOS action. English 20 ASRock 939A790GMH Motherboard - ASRock 939A790GMH | Quick Installation Guide - Page 21
motherboard connect the black end to the IDE devices 80-conductor ATA 66/100/133 cable Note: Please refer to the instruction connectors support SATAII motherboard. SATAII_1 (PORT 0) SATAII_2 (PORT 1) SATAII_3 (PORT 2) SATAII_4 (PORT 3) SATAII_5 (PORT 4) English 21 ASRock 939A790GMH Motherboard - ASRock 939A790GMH | Quick Installation Guide - Page 22
headers on this motherboard. Each USB 2.0 header can support two USB 2.0 sound sources such as a CD-ROM, DVD-ROM, TV tuner card, or MPEG card. This is an interface for the front panel audio cable that allows convenient connection and control of audio devices. 22 ASRock 939A790GMH Motherboard - ASRock 939A790GMH | Quick Installation Guide - Page 23
the chassis must support HDA to function correctly. Please follow the instruction in our manual and chassis manual to install your to connect them for AC'97 audio panel. E. Enter BIOS Setup Utility. Enter Advanced Settings, and then select Chipset Configuration ASRock 939A790GMH Motherboard - ASRock 939A790GMH | Quick Installation Guide - Page 24
(4-pin ATX12V1) (see p.2 No. 2) Serial port Header (9-pin COM1) (see p.2 No.27) Please connect an ATX 12V power supply to this connector. This COM1 header supports a serial port module. English 24 ASRock 939A790GMH Motherboard - ASRock 939A790GMH | Quick Installation Guide - Page 25
HDDs without NCQ and Hot Plug functions (IDE mode) STEP 1: Set up BIOS. A. Enter BIOS SETUP UTILITY Advanced screen Storage Configuration. B. Set the "SATA Operation Mode" option to [IDE]. STEP 2: Install Windows® XP / XP 64-bit OS on your system. English 25 ASRock 939A790GMH Motherboard - ASRock 939A790GMH | Quick Installation Guide - Page 26
Plug functions (AHCI mode) STEP 1: Set Up BIOS. A. Enter BIOS SETUP UTILITY Advanced screen Storage Configuration. B. Set the "SATA Operation Mode" option to [AHCI]. STEP 2: Install Windows® 7 / 7 64-bit / VistaTM / VistaTM 64-bit OS on your system. English 26 ASRock 939A790GMH Motherboard - ASRock 939A790GMH | Quick Installation Guide - Page 27
This motherboard supports Untied Overclocking Technology, which means during overclocking, FSB enjoys better margin due to fixed PCI / PCIE buses. Before you enable Untied Overclocking function, please enter "Overclock Mode" option of BIOS setup to set the selection from [Auto] to [CPU, PCIE - ASRock 939A790GMH | Quick Installation Guide - Page 28
your computer. If the Main Menu does not appear automatically, locate and double-click on the file "ASSETUP.EXE" from the "BIN" folder in the Support CD to display the menus. 28 ASRock 939A790GMH Motherboard English - ASRock 939A790GMH | Quick Installation Guide - Page 29
benötigen, besuchen Sie bitte unsere Webseite: www.asrock.com/support/index.asp 1.1 Kartoninhalt ASRock 939A790GMH Motherboard (Micro ATX-Formfaktor: 24.4 cm x 21.8 cm; 9.6 Zoll x 8.6 Zoll) ASRock 939A790GMH Schnellinstallationsanleitung ASRock 939A790GMH Support-CD Ein 80-adriges Ultra-ATA 66/100 - ASRock 939A790GMH | Quick Installation Guide - Page 30
ützt HDCP-Funktion mit DVI- und HDMI-Ports - Unterstutzt 1080p Blu-ray (BD) / HD-DVD-Wiedergabe mit DVI- und HDMI-Ports - 7.1 CH HD Audio (Realtek ALC888 Audio Codec) - PCIE x1 Gigabit LAN 10/100/1000 Mb/s - Realtek RTL8111DL - Unterstützt Wake-On-LAN 30 ASRock 939A790GMH Motherboard Deutsch - ASRock 939A790GMH | Quick Installation Guide - Page 31
(CyberLink DVD Suite und Creative Sound Blaster X-Fi MB) (OEM- und Testversion) - ASRock OC Tuner (siehe VORSICHT 7) - Intelligent Energy Saver (Intelligente Energiesparfunktion) (siehe VORSICHT 8) - Sofortstart - ASRock Instant Flash (siehe VORSICHT 9) 31 ASRock 939A790GMH Motherboard Deutsch - ASRock 939A790GMH | Quick Installation Guide - Page 32
asrock.com WARNUNG Beachten Sie bitte, dass Overclocking, einschließlich der Einstellung im BIOS, Anwenden der Untied Overclocking-Technologie oder Verwenden von Overclocking reserviert wird. Unter Windows® OS mit 64-Bit-CPU besteht diese Einschränkung nicht. 32 ASRock 939A790GMH Motherboard Deutsch - ASRock 939A790GMH | Quick Installation Guide - Page 33
Support CPU BIOS mit nur wenigen Klickvorgängen ohne Bereitstellung einer zusätzlichen Diskette oder eines anderen komplizierten Flash-Programms aktualisieren. Achten Sie darauf, dass das USB-Flash-Laufwerk oder die Festplatte das Dateisystem FAT32/16/12 benutzen muss. 33 ASRock 939A790GMH Motherboard - ASRock 939A790GMH | Quick Installation Guide - Page 34
Tiefschlafmodus (S4) aufruft oder ausgeschaltet wird (S5). Nach der Installation des APP Charger-Treibers können Sie im Handumdrehen das großartigste Ladeerlebnis überhaupt genießen. ASRock-Webseite: http:// www.asrock.com/Feature/AppCharger/index.asp 34 ASRock 939A790GMH Motherboard Deutsch - ASRock 939A790GMH | Quick Installation Guide - Page 35
Motherboard stufenlose Steuerung bietet, wird Overclocking nicht empfohlen. Frequenzen, die von den empfohlenen CPU-Busfrequenzen abweichen, können Instabilität des Systems verursachen oder die CPU beschädigen. 14. Wird eine Überhitzung der CPU abzufragen. 35 ASRock 939A790GMH Motherboard Deutsch - ASRock 939A790GMH | Quick Installation Guide - Page 36
Sie nicht, den Jumper wieder zu entfernen, nachdem das CMOS gelöscht wurde. Wenn Sie den CMOS-Inhalt gleich nach dem Aktualisieren des BIOS löschen müssen, müssen Sie zuerst das System starten und dann wieder ausschalten, bevor Sie den CMOS-Inhalt löschen. Deutsch 36 ASRock 939A790GMH Motherboard - ASRock 939A790GMH | Quick Installation Guide - Page 37
(blau) (39-pin IDE1, siehe S.2, No. 9) Blauer Anschluss Schwarzer Anschluss zum Motherboard zur Festplatte 80-adriges ATA 66/100/133 Kabel Hinweis: Details entnehmen Sie bitte den oder das SATAII Verbindungsstück auf dieser Hauptplatine angeschlossen werden. 37 ASRock 939A790GMH Motherboard - ASRock 939A790GMH | Quick Installation Guide - Page 38
den vier üblichen USB 2.0-Ports an den I/O-Anschlüssen befinden sich drei USB 2.0-Anschlussleisten am Motherboard. Pro USB 2.0Anschlussleiste werden zwei USB 2.0-Ports unterstützt. Druckerport-Anschlussleiste (25-pol. LPT1 Kontrolle über Audio-Geräte. 38 ASRock 939A790GMH Motherboard Deutsch - ASRock 939A790GMH | Quick Installation Guide - Page 39
ssen nicht an die AC'97-Audioleiste angeschlossen werden. E. Rufen Sie das BIOS-Setup-Dienstprogramm auf. Wechseln Sie zu Erweiterte Einstellungen und wählen Sie Chipset- 23) Dieser Anschluss ist für die verschiedenen Funktionen der Gehäusefront. Deutsch 39 ASRock 939A790GMH Motherboard - ASRock 939A790GMH | Quick Installation Guide - Page 40
angeschlossen werden; auch ohne Geschwindigkeitsregulierung. Wenn Sie einen dreipoligen CPU-Lüfter an den CPU-Lüferanschluss dieses Motherboards anschließen möchten, verbinden Sie ihn bitte mit den 13 ein. Installation eines 20-pol. ATX-Netzteils 1 13 Deutsch 40 ASRock 939A790GMH Motherboard - ASRock 939A790GMH | Quick Installation Guide - Page 41
kann. Andernfalls reicht der Strom nicht aus, das System zu starten. Dieser COM-AnschlussHeader wird verwendet, um ein COM-Anschlussmodul zu unterstützen. Deutsch 41 ASRock 939A790GMH Motherboard - ASRock 939A790GMH | Quick Installation Guide - Page 42
der Support-CD, um die Menüs aufzurufen. Das Setup-Programm soll es Ihnen so leicht wie möglich machen. Es ist menügesteuert, d.h. Sie können in den verschiedenen Untermenüs Ihre Auswahl treffen und die Programme werden dann automatisch installiert. 42 ASRock 939A790GMH Motherboard Deutsch - ASRock 939A790GMH | Quick Installation Guide - Page 43
Micro ATX: 9.6 pouces x 8.6 pouces, 24.4 cm x 21.8 cm) Guide d'installation rapide ASRock 939A790GMH CD de soutien ASRock 939A790GMH Un câble ruban IDE Ultra ATA 66/100/133 80 conducteurs Deux câble de données Serial ATA (SATA) (Optionnelle) Un écran I/O 43 ASRock 939A790GMH Motherboard Français - ASRock 939A790GMH | Quick Installation Guide - Page 44
résistant pour alimentation de processeur CPU - Socket 939 prenant en charge le processeur AMD AthlonTM 64FX / 64X2 / 64 - Supporte la technologie Cool 'n' Quiet™ d'AMD - FSB 1000 MHz (2.0 GT/s) - Prend en charge la technologie Untied Overclocking (voir ATTENTION 1) - Prise en charge - ASRock 939A790GMH | Quick Installation Guide - Page 45
(Version d'essai), Suite logicielle ASRock (CyberLink DVD Suite et Creative Sound Blaster X-Fi MB) (Version OEM et d'essai) Caractéristique - Tuner ASRock OC (voir ATTENTION 7) unique - Économiseur d'énergie intelligent (voir ATTENTION 8) - l'Instant Boot 45 ASRock 939A790GMH Motherboard - ASRock 939A790GMH | Quick Installation Guide - Page 46
overclocking, y compris ajuster les réglages du BIOS, appliquer la technologie Untied Overclocking, ou utiliser des outils de tiers pour l'overclocking. L'overclocking / VistaTM / XP. Avec Windows® OS avec CPU 64 bits, il n'y a pas ce genre de limitation. Français 46 ASRock 939A790GMH Motherboard - ASRock 939A790GMH | Quick Installation Guide - Page 47
rígido, em seguida, poderá actualizar o BIOS com apenas alguns cliques sem ter de utilizar outra disquete ou outro complicado utilitário de flash. Note que a unidade flash USB ou a unidade de disco rígido devem utilizar o sistema de ficheiros FAT32/16/ 12. 47 ASRock 939A790GMH Motherboard Français - ASRock 939A790GMH | Quick Installation Guide - Page 48
over clocking. Les fréquences autres que les fréquences de bus d'UC recommandées risquent de déstabiliser le système ou d'endommager l'UC. 48 ASRock 939A790GMH Motherboard Français - ASRock 939A790GMH | Quick Installation Guide - Page 49
éliorer la dissipation de la chaleur, n'oubliez pas de mettre de la pâte thermique entre le CPU le dissipateur lors de l'installation du PC. 15. EuP, qui signifie Energy Using Product (Produit de consulter votre fournisseur de courant pour plus de détails. 49 ASRock 939A790GMH Motherboard Français - ASRock 939A790GMH | Quick Installation Guide - Page 50
de suite après avoir mis le BIOS à jour. Si vous avez besoin d'effacer la CMOS lorsque vous avez fini de mettre le BIOS à jour, vous devez d'abord initialiser le système, puis le mettre hors tension avant de procéder à l'opération d'effacement de la CMOS. Français 50 ASRock 939A790GMH Motherboard - ASRock 939A790GMH | Quick Installation Guide - Page 51
vers le disque dur Câble ATA 66/100/133 80 conducteurs Note: Veuillez vous reporter aux instructions du fabricant de votre IDE périphérique pour les détails. Connecteurs Série ATAII (SATAII_1 (PORT SATAII_3 (PORT 2) SATAII_4 (PORT 3) SATAII_5 (PORT 4) Français 51 ASRock 939A790GMH Motherboard - ASRock 939A790GMH | Quick Installation Guide - Page 52
fig. 28) Connecteur audio panneau avant (HD_AUDIO1 br. 9) (voir p.2 fig. 29) Cet en-tête supporte un module infrarouge optionnel de transfert et de réception sans fil. Ils vous permettent de gérer des entrées contrôle commodes de périphériques audio. 52 ASRock 939A790GMH Motherboard Français - ASRock 939A790GMH | Quick Installation Guide - Page 53
en charge le HDA pour fonctionner correctement. Veuillez suivre les instructions dans notre manuel et le manuel de châssis afin panneau audio AC'97. E. Entrer dans l'utilitaire de configuration du BIOS. Saisir les Paramètres avancés puis sélectionner Configuration du jeu ASRock 939A790GMH Motherboard - ASRock 939A790GMH | Quick Installation Guide - Page 54
broche de terre. ien que cette carte mère offre un support de (Ventilateur silencieux) ventilateur de CPU à 4 broches , le ventilateur de CPU à 3 broches peut bien fonctionner même sans la fonction 20-Installation de l'alimentation électrique ATX 1 13 Français 54 ASRock 939A790GMH Motherboard - ASRock 939A790GMH | Quick Installation Guide - Page 55
détaillées sur le BIOS, veuillez consulter le Guide de l'utilisateur (fichier PDF) dans le CD technique. 3. Informations sur le CD de support Cette carte mère supporte divers systèmes d'exploitation BIN et double-cliquez dessus pour afficher les menus. 55 ASRock 939A790GMH Motherboard Français - ASRock 939A790GMH | Quick Installation Guide - Page 56
di CPU supportate. ASRock website http://www.asrock.com Se si necessita dell'assistenza tecnica per questa scheda madre, visitare il nostro sito per informazioni specifiche sul modello che si sta usando. www.asrock.com/support/index.asp 1.1 Contenuto della confezione Scheda madre ASRock 939A790GMH - ASRock 939A790GMH | Quick Installation Guide - Page 57
CPU Processore - Presa 939 che supporta processore AMD AthlonTM 64FX / 64X2 / 64 - Supporto tecnologia AMD Cool 'n' QuietTM - FSB 1000 MHz (2.0 GT/s) - Supporta la tecnologia overclocking "slegata" (vedi ATTENZIONE 1) - Supporta la tecnologia Hyper-Transport Chipset - Northbridge: AMD 790GX - ASRock 939A790GMH | Quick Installation Guide - Page 58
legal BIOS - Supporta "Plug and Play" - Compatibile con ACPI 1.1 wake up events - Supporta SMBIOS 2.3.1 - Regolazione multi-voltaggio VCCM, NB CD di - Driver, utilità, software antivirus (Versione dimostrativa), supporto Suite software ASRock (Suite CyberLink DVD e Creative Sound Italiano - ASRock 939A790GMH | Quick Installation Guide - Page 59
velocita per la ventola del CPU/Chassis/ Alimentazione - Ventola CPU silenziosa - Voltaggio: + BIOS, l'applicazione della tecnologia Untied Overclocking Technology, oppure l'uso di strumenti di overclocking forniti da terzi. L'overclocking overclocking. Italiano 59 ASRock 939A790GMH Motherboard - ASRock 939A790GMH | Quick Installation Guide - Page 60
opzione Cool 'n' Quiet nella configurazione avanzata del BIOS. Si prega di visitare il nostro sito Internet per le procedure di funzionamento dell'Intelligent Energy Saver (Risparmio intelligente dell'energia). Sito Internet di ASRock: http://www.asrock.com 60 ASRock 939A790GMH Motherboard Italiano - ASRock 939A790GMH | Quick Installation Guide - Page 61
di overclocking nel sistema operativo e semplifica la complicata procedura di registrazione delle impostazioni di overclocking. Con driver APP Charger si otterranno prodigi e comodità mai avuti prima. Sito ASRock: http://www.asrock.com/Feature/AppCharger/index.asp 61 ASRock 939A790GMH Motherboard - ASRock 939A790GMH | Quick Installation Guide - Page 62
motherboard offre il controllo stepless, non si consiglia di effettuare l'overclocking. L'uso di frequenze diverse da quelle raccomandate per il bus CPU possono provocare l'instabilità del sistema o danneggiare la CPU ulteriori dettagli con il produttore. 62 ASRock 939A790GMH Motherboard Italiano - ASRock 939A790GMH | Quick Installation Guide - Page 63
jumper. Non cancellare la CMOS subito dopo aver aggiornato il BIOS. Se è necessario cancellare la CMOS una volta completato l'aggiornamento del BIOS, è necessario riavviare prima il sistema, e poi spegnerlo prima di procedere alla cancellazione della CMOS. Italiano 63 ASRock 939A790GMH Motherboard - ASRock 939A790GMH | Quick Installation Guide - Page 64
) Una o altra estremità del cavo di dati SATA può essere collegata al disco rigido SATA / SATAII o al connettore di SATAII su questa cartolina base. 64 ASRock 939A790GMH Motherboard - ASRock 939A790GMH | Quick Installation Guide - Page 65
CD-ROM, DVD ROM,TV tuner, o schede MPEG. È un'interfaccia per il cavo del pannello audio. Che consente (9connessione facile e controllo dei dispositivi audio. 65 ASRock 939A790GMH Motherboard Italiano - ASRock 939A790GMH | Quick Installation Guide - Page 66
in modo corretto. Attenersi alle istruzioni del nostro manuale e del manuale del telaio per installare il sistema. 2. Se audio AC'97. E. Entrare nel programma di impostazione BIOS. Entrare su Impostazioni avanzate, quindi selezionare Configurazione chipset 66 ASRock 939A790GMH Motherboard - ASRock 939A790GMH | Quick Installation Guide - Page 67
ai corrispondenti connettori facendo combaciare il cavo nero col pin di terra. Collegare il cavo della ventolina CPU a questo connettore e far combaciare il filo nero al pin terra. Sebbene la presente scheda madre sufficiente. In caso contrario l'unità non si avvia. 67 ASRock 939A790GMH Motherboard - ASRock 939A790GMH | Quick Installation Guide - Page 68
BIOS La Flash Memory sulla scheda madre contiene le Setup Utility. Quando si avvia il computer, premi durante il Power-On-Self-Test (POST) della Setup utility del BIOS; altrimenti, POST continua con i suoi test di routine. Per entrare il BIOS contiene i driver e ASRock 939A790GMH Motherboard - ASRock 939A790GMH | Quick Installation Guide - Page 69
de modelo específico de su placa. www.asrock.com/support/index.asp 1.1 Contenido de la caja Placa base ASRock 939A790GMH (Factor forma Micro ATX: 24,4 cm x 21,8 cm, 9,6" x 8,6") Guía de instalación rápida de ASRock 939A790GMH CD de soporte de ASRock 939A790GMH Una cinta de datos IDE de conducción 80 - ASRock 939A790GMH | Quick Installation Guide - Page 70
ón de Blu-rayo de 1080p (BD) / HD-DVD con puertos DVI y HDMI - Sonido HD de 7.1 Canales (Códec de sonido ALC888) - PCIE x1 Gigabit LAN 10/100/1000 Mb/s - Realtek RTL8111DL - Soporta Wake-On-LAN I/O Panel - 1 x puerto de teclado PS/2 - 1 x puerto VGA/D-Sub ASRock 939A790GMH Motherboard Español - ASRock 939A790GMH | Quick Installation Guide - Page 71
X-Fi MB) (OEM y versión de prueba) - Sintonizador de ASRock OC (vea ATENCIÓN 7) - Administrador de energía inteligente (vea ATENCIÓN 8) - Instant Boot - ASRock Instant Flash (vea ATENCIÓN 9) - ASRock OC DNA (vea ATENCIÓN 10) - ASRock AIWI (vea ATENCIÓN 11) 71 ASRock 939A790GMH Motherboard Español - ASRock 939A790GMH | Quick Installation Guide - Page 72
la velocidad del reloj, incluido el ajuste del BIOS, aplicando la tecnología de aumento de velocidad liberada . Por favor lea "Tecnología de Forzado de Reloj (Overclocking) no relacionado" en la página 27 para obtener detalles CPU de 64-bit, no existe dicha limitación. 72 ASRock 939A790GMH Motherboard - ASRock 939A790GMH | Quick Installation Guide - Page 73
AMD Manual CPU BIOS con sólo pulsar un par de botones, sin necesidad de preparar un disco flexible adicional ni utilizar complicadas utilidades de programación. Recuerde que la unidad flash USB o disco duro utilizado debe disponer del sistema de archivos FAT32/16/12. 73 ASRock 939A790GMH Motherboard - ASRock 939A790GMH | Quick Installation Guide - Page 74
www.asrock.com/Feature/AppCharger/index. asp 13. Aunque esta placa base ofrece un control complete, no es recomendable forzar la velocidad. Las frecuencias de bus de la CPU distintas a las recomendadas pueden causar inestabilidad en el sistema o dañar la CPU. 74 ASRock 939A790GMH Motherboard Espa - ASRock 939A790GMH | Quick Installation Guide - Page 75
va a apagarse automaticamente. Antes de reanudar el sistema, compruebe si el ventilador de la CPU de la placa base funciona apropiadamente y desconecte el cable de alimentación, a continuación, vuelva de la fuente de alimentación para obtener más detalles. 75 ASRock 939A790GMH Motherboard Español - ASRock 939A790GMH | Quick Installation Guide - Page 76
acuérdase de quitar el jumper cap después de limpiar el COMS. Si necesita borrar la CMOS cuando acabe de finalizar la actualización de la BIOS, debe arrancar primero el sistema y, a continuación, apagarlo antes de realizar la acción de borrado de CMOS. Español 76 ASRock 939A790GMH Motherboard - ASRock 939A790GMH | Quick Installation Guide - Page 77
cable de los datos de SATA puede ser conectado con el disco duro de SATA / SATAII o el conectador de SATAII en esta placa base. 77 ASRock 939A790GMH Motherboard - ASRock 939A790GMH | Quick Installation Guide - Page 78
, TV tuner, o tarjeta MPEG. Este es una interface para cable de audio de panel frontal que permite conexión y control conveniente de apparatos de Audio. 78 ASRock 939A790GMH Motherboard Español - ASRock 939A790GMH | Quick Installation Guide - Page 79
operar correctamente. Por favor, siga las instrucciones en nuestro manual y en el manual de chasis para instalar su sistema. 2. Si utiliza AC'97. E. Entre en la Utilidad de configuración del BIOS Entre en Configuración avanzada y, a continuación, seleccione Configuración ASRock 939A790GMH Motherboard - ASRock 939A790GMH | Quick Installation Guide - Page 80
(vea p.2, N. 13) Conector del ventilador de la CPU (4-pin CPU_FAN1) (vea p.2, No. 5) 1 2 3 4 Conecte el cable del ventilador de la CPU a este conector y haga coincidir el cable negro con el con el enchufe ATX 12V, de modo que proporcione suficiente 80 ASRock 939A790GMH Motherboard Español - ASRock 939A790GMH | Quick Installation Guide - Page 81
utiliza para admitir un módulo de puerto COM. 2. BIOS Información El Flash Memory de la placa madre deposita SETUP Utility. Durante el Power-Up (POST BIOS, por favor refiérase al Manual del Usuario (archivo PDF) contenido en el CD. 3. Información de Software Support ASRock 939A790GMH Motherboard - ASRock 939A790GMH | Quick Installation Guide - Page 82
. . ASRock. (80- ASRock Micro ATX: 9,6 x 8,6 / 24,4 x 21,8 ) ASRock ASRock IDE Ultra ATA 66/100/133 Serial ATA (SATA) ( ) - I/O 82 ASRock 939A790GMH Motherboard - ASRock 939A790GMH | Quick Installation Guide - Page 83
- Micro ATX: 9,6 x 8,6 / 24,4 x 21,8 83 ASRock 939A790GMH Motherboard - ASRock 939A790GMH | Quick Installation Guide - Page 84
HotPlug 84 ASRock 939A790GMH Motherboard - ASRock 939A790GMH | Quick Installation Guide - Page 85
85 ASRock 939A790GMH Motherboard - ASRock 939A790GMH | Quick Installation Guide - Page 86
86 ASRock 939A790GMH Motherboard - ASRock 939A790GMH | Quick Installation Guide - Page 87
87 ASRock 939A790GMH Motherboard - ASRock 939A790GMH | Quick Installation Guide - Page 88
CMOS Short Open CMOS 88 ASRock 939A790GMH Motherboard - ASRock 939A790GMH | Quick Installation Guide - Page 89
la banda roja debe quedar en el mismo lado que el contacto 1 IDE 89 ASRock 939A790GMH Motherboard SATAII_1 (PORT 0) SATAII_2 (PORT 1) SATAII_3 (PORT 2) SATAII_4 (PORT 3) SATAII_5 (PORT 4) - ASRock 939A790GMH | Quick Installation Guide - Page 90
(5- IR1) CD1 90 ASRock 939A790GMH Motherboard - ASRock 939A790GMH | Quick Installation Guide - Page 91
91 ASRock 939A790GMH Motherboard - ASRock 939A790GMH | Quick Installation Guide - Page 92
(9PANEL1) 1 2 3 4 ATX 12 24 1 13 ATX. 12 24 1 13 92 ASRock 939A790GMH Motherboard - ASRock 939A790GMH | Quick Installation Guide - Page 93
12V-ATX COM- , ATX 12 , . . F POST 3 BIOS Setup Power-On-Self-Test - POST BIOS Setup POST Ctrl> + + - ASRock 939A790GMH | Quick Installation Guide - Page 94
acerca do modelo que está a utilizar. www.asrock.com/support/index.asp 1.1 Este pacote contém Placa-mãe ASRock 939A790GMH (Formato Micro ATX: 9,6 pol. x 8,6 pol., 24,4 cm x 21,8 cm) Guia de instalação rápida da ASRock 939A790GMH CD de suporte da placa ASRock 939A790GMH Um cabo-fita IDE Ultra ATA 66 - ASRock 939A790GMH | Quick Installation Guide - Page 95
da CPU - Soquete de 939 compatível com processador AMD AthlonTM 64FX / 64X2 / 64 - Suporta a tecnologia AMD Cool 'n' QuietTM - FSB de 1000 MHz (2,0 GT/s) - Suporta a tecnologia Untied Overclocking (veja o AVISO 1) - Suporta a tecnologia Hyper-Transport - North Bridge: AMD 790Gx - South Bridge: AMD - ASRock 939A790GMH | Quick Installation Guide - Page 96
software antivírus (Experimentacao Versao), conjunto de programas da ASRock (CyberLink DVD Suite e Creative Sound Blaster X-Fi MB) (OEM e versão de demonstração) - Sintonizador ASRock OC (veja o AVISO 7) - Poupança de Energia Inteligente (veja o AVISO 8) - Instant Boot ASRock 939A790GMH Motherboard - ASRock 939A790GMH | Quick Installation Guide - Page 97
definições do BIOS, à aplicação da tecnologia Untied Overclocking ou à utilização de ferramentas de overclocking de terceiros. O overclocking pode afectar a estabilidade Windows® 7 / VistaTM / XP. No caso da CPU de 64 bits do Windows® OS, esta limitação não existe. 97 ASRock 939A790GMH Motherboard - ASRock 939A790GMH | Quick Installation Guide - Page 98
de pouvoir mettre à jour votre BIOS en quelques clics seulement, sans préparer de disquette supplémentaire ni d'autre utilitaire flash compliqué. Veuillez noter que le lecteur flash USB ou le disque dur doit utiliser le système de fichiers FAT32/16/12. 98 ASRock 939A790GMH Motherboard Português - ASRock 939A790GMH | Quick Installation Guide - Page 99
sistema operativo e simplifica o complexo processo de gravação das definições de "overclocking". Com OC DNA, pode guardar as suas definições OC como perfil e diferentes das recomendadas para a CPU podem provocar instabilidade do sistema ou danos à CPU. 99 ASRock 939A790GMH Motherboard Português - ASRock 939A790GMH | Quick Installation Guide - Page 100
desliga automaticamente e o botão de energia do chassis fica inativo. Cheque o ventilador da CPU na placa-mãe, para verificar se está funcionando corretamente antes de religar o sistema. Para com o fabricante da fonte de alimentação para mais detalhes. Português 100 ASRock 939A790GMH Motherboard - ASRock 939A790GMH | Quick Installation Guide - Page 101
CMOS usando um jumper. Por favor lembrese de remover o jumper depois de limpar o COMS. Se precisar limpar o CMOS ao concluir a atualização do BIOS, deverá reiniciar o sistema primeiro e, em seguida, desligá-lo antes de executar a ação de limpeza o CMOS. Português ASRock 939A790GMH Motherboard 101 - ASRock 939A790GMH | Quick Installation Guide - Page 102
(SATA) (opcional) 102 Tanto a saída do cabo de Serial dados SATA pode ser conectado ao disco rígido SATA / SATAII quanto o conector SATAII na placa mãe. ASRock 939A790GMH Motherboard Português - ASRock 939A790GMH | Quick Installation Guide - Page 103
9 pinos) (veja a folha 2, No. 29) Esta é uma interface para o cabo de áudio no painel frontal, que permite uma conexão e controle convenientes dos dispositivos de áudio. ASRock 939A790GMH Motherboard 103 Português - ASRock 939A790GMH | Quick Installation Guide - Page 104
funcionar correctamente. Siga s instruções que aparecem no manual e no manual do chassis para instalar o sistema. 2. Se utilizar painel de áudio AC'97. E. Entre no utilitário de configuração do BIOS. Vá até à opção Definições avançadas e escolha Configuração do ASRock 939A790GMH Motherboard - ASRock 939A790GMH | Quick Installation Guide - Page 105
controlo de velocidade da ventoinha. Se pretender ligar uma ventoinha de 3 pinos para CPU ao conector de ventoinha do CPU nesta placa-mãe, por favor, ligue-a aos pinos 1-3. Pinos 1-3 ligados Instalação de suficiente. Do contrário, haverá falhas de funcionamento. ASRock 939A790GMH Motherboard 105 - ASRock 939A790GMH | Quick Installation Guide - Page 106
BIOS; caso contrário o POST continua com suas rotinas de teste. Caso você queira entrar nas configurações da BIOS configuração da BIOS, consulte o manual do usuá CD de instalação que acompanha a placa Mãe contem: drivers e utilitários necessários para um melhor desempenho ASRock 939A790GMH Motherboard - ASRock 939A790GMH | Quick Installation Guide - Page 107
ASRock 939A790GMH Motherboard 107 Türkçe - ASRock 939A790GMH | Quick Installation Guide - Page 108
Türkçe 108 ASRock 939A790GMH Motherboard - ASRock 939A790GMH | Quick Installation Guide - Page 109
ASRock 939A790GMH Motherboard 109 Türkçe - ASRock 939A790GMH | Quick Installation Guide - Page 110
Türkçe 110 ASRock 939A790GMH Motherboard - ASRock 939A790GMH | Quick Installation Guide - Page 111
ASRock 939A790GMH Motherboard 111 Türkçe - ASRock 939A790GMH | Quick Installation Guide - Page 112
Türkçe 112 ASRock 939A790GMH Motherboard - ASRock 939A790GMH | Quick Installation Guide - Page 113
Short Open Default Clear CMOS Türkçe ASRock 939A790GMH Motherboard 113 - ASRock 939A790GMH | Quick Installation Guide - Page 114
Türkçe 114 ASRock 939A790GMH Motherboard SATAII_1 (PORT 0) SATAII_2 (PORT 1) SATAII_3 (PORT 2) SATAII_4 (PORT 3) SATAII_5 (PORT 4) - ASRock 939A790GMH | Quick Installation Guide - Page 115
CD1 Türkçe ASRock 939A790GMH Motherboard 115 - ASRock 939A790GMH | Quick Installation Guide - Page 116
Türkçe 116 ASRock 939A790GMH Motherboard - ASRock 939A790GMH | Quick Installation Guide - Page 117
1 2 3 4 12 24 1 13 12 24 1 13 Türkçe ASRock 939A790GMH Motherboard 117 - ASRock 939A790GMH | Quick Installation Guide - Page 118
Türkçe 118 ASRock 939A790GMH Motherboard - ASRock 939A790GMH | Quick Installation Guide - Page 119
ASRock 939A790GMH Motherboard 119 - ASRock 939A790GMH | Quick Installation Guide - Page 120
120 ASRock 939A790GMH Motherboard - ASRock 939A790GMH | Quick Installation Guide - Page 121
ASRock 939A790GMH Motherboard 121 - ASRock 939A790GMH | Quick Installation Guide - Page 122
® ® ® ® ® 122 ASRock 939A790GMH Motherboard - ASRock 939A790GMH | Quick Installation Guide - Page 123
® ® ASRock 939A790GMH Motherboard 123 - ASRock 939A790GMH | Quick Installation Guide - Page 124
124 ASRock 939A790GMH Motherboard - ASRock 939A790GMH | Quick Installation Guide - Page 125
ASRock 939A790GMH Motherboard SATAII_1 (PORT 0) SATAII_2 (PORT 1) SATAII_3 (PORT 2) SATAII_4 (PORT 3) SATAII_5 (PORT 4) 125 - ASRock 939A790GMH | Quick Installation Guide - Page 126
CD1 126 ASRock 939A790GMH Motherboard - ASRock 939A790GMH | Quick Installation Guide - Page 127
® ® ® ® ® ASRock 939A790GMH Motherboard 127 - ASRock 939A790GMH | Quick Installation Guide - Page 128
1 2 3 4 12 24 1 13 12 24 1 13 128 ASRock 939A790GMH Motherboard - ASRock 939A790GMH | Quick Installation Guide - Page 129
® ® ® ASRock 939A790GMH Motherboard 129
-
 1
1 -
 2
2 -
 3
3 -
 4
4 -
 5
5 -
 6
6 -
 7
7 -
8
-
9
-
10
-
11
-
12
-
13
-
14
-
15
-
16
-
17
-
18
-
19
-
20
-
21
-
22
-
23
-
24
-
25
-
26
-
27
-
28
-
29
-
30
-
31
-
32
-
33
-
34
-
35
-
36
-
37
-
38
-
39
-
40
-
41
-
42
-
43
-
44
-
45
-
46
-
47
-
48
-
49
-
50
-
51
-
52
-
53
-
54
-
55
-
56
-
57
-
58
-
59
-
60
-
61
-
62
-
63
-
64
-
65
-
66
-
67
-
68
-
69
-
70
-
71
-
72
-
73
-
74
-
75
-
76
-
77
-
78
-
79
-
80
-
81
-
82
-
83
-
84
-
85
-
86
-
87
-
88
-
89
-
90
-
91
-
92
-
93
-
94
-
95
-
96
-
97
-
98
-
99
-
100
-
101
-
102
-
103
-
104
-
105
-
106
-
107
-
108
-
109
-
110
-
111
-
112
-
113
-
114
-
115
-
116
-
117
-
118
-
119
-
120
-
121
-
122
-
123
-
124
-
125
-
126
-
127
-
128
-
129
 |
 |
1
ASRock
939A790GMH
Motherboard
English
English
English
English
English
Copyright Notice:
Copyright Notice:
Copyright Notice:
Copyright Notice:
Copyright Notice:
No part of this installation guide may be reproduced, transcribed, transmitted, or trans-
lated in any language, in any form or by any means, except duplication of documen-
tation by the purchaser for backup purpose, without written consent of ASRock Inc.
Products and corporate names appearing in this guide may or may not be registered
trademarks or copyrights of their respective companies, and are used only for identifica-
tion or explanation and to the owners’ benefit, without intent to infringe.
Disclaimer:
Disclaimer:
Disclaimer:
Disclaimer:
Disclaimer:
Specifications and information contained in this guide are furnished for informational
use only and subject to change without notice, and should not be constructed as a
commitment by ASRock. ASRock assumes no responsibility for any errors or omissions
that may appear in this guide.
With respect to the contents of this guide, ASRock does not provide warranty of any kind,
either expressed or implied, including but not limited to the implied warranties or
conditions of merchantability or fitness for a particular purpose. In no event shall
ASRock, its directors, officers, employees, or agents be liable for any indirect, special,
incidental, or consequential damages (including damages for loss of profits, loss of
business, loss of data, interruption of business and the like), even if ASRock has been
advised of the possibility of such damages arising from any defect or error in the guide
or product.
This device complies with Part 15 of the FCC Rules. Operation is subject to the
following two conditions:
(1)
this device may not cause harmful interference, and
(2)
this device must accept any interference received, including interference that
may cause undesired operation.
Published July 2010
Copyright
©
2010 ASRock INC. All rights reserved.
CALIFORNIA, USA ONLY
The Lithium battery adopted on this motherboard contains Perchlorate, a toxic
substance controlled in Perchlorate Best Management Practices (BMP) regulations
passed by the California Legislature. When you discard the Lithium battery in
California, USA, please follow the related regulations in advance.
“Perchlorate Material-special handling may apply, see
www
.dtsc.ca.gov/hazardouswa
ste/perchlorate”
ASRock Website: http://www.asrock.com