ASRock 970 Pro2 User Manual
ASRock 970 Pro2 Manual
 |
View all ASRock 970 Pro2 manuals
Add to My Manuals
Save this manual to your list of manuals |
ASRock 970 Pro2 manual content summary:
- ASRock 970 Pro2 | User Manual - Page 1
970 Pro2 User Manual Version 1.0 Published August 2012 Copyright©2012 ASRock INC. All rights reserved. 1 - ASRock 970 Pro2 | User Manual - Page 2
consent of ASRock Inc. Products and corporate names appearing in this manual may or may ASRock. ASRock assumes no responsibility for any errors or omissions that may appear in this manual. With respect to the contents of this manual, ASRock does not provide on this motherboard contains Perchlorate, - ASRock 970 Pro2 | User Manual - Page 3
5 1.2 Specifications 6 1.3 Unique Features 9 1.4 Motherboard Layout 12 1.5 I/O Panel 13 2. Installation 14 HDDs 25 2.9 SATA / SATA2 HDD Hot Plug Feature and Operation Operation Guide 26 2.10 Driver Installation Guide 28 2.11 Installing Windows® 7 / 7 64-bit / VistaTM / - ASRock 970 Pro2 | User Manual - Page 4
32 3.1.1 BIOS Menu Bar 32 3.1.2 Navigation Keys 33 3.2 Main Screen 33 3.3 OC Tweaker Screen 34 3.4 Advanced Screen 38 3.8 Exit Screen 51 4. Software Support 52 4.1 Install Operating System 52 4.2 Support CD Information 52 4.2.1 Running Support CD 52 4.2.2 Drivers Menu 52 - ASRock 970 Pro2 | User Manual - Page 5
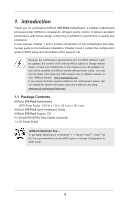
specific information about the model you are using. www.asrock.com/support/index.asp 1.1 Package Contents ASRock 970 Pro2 Motherboard (ATX Form Factor: 12.0-in x 7.5-in, 30.5 cm x 19.1 cm) ASRock 970 Pro2 Quick Installation Guide ASRock 970 Pro2 Support CD 2 x Serial ATA (SATA) Data Cables (Optional - ASRock 970 Pro2 | User Manual - Page 6
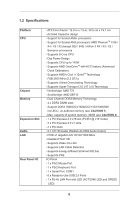
Memory Expansion Slot Audio LAN Rear Panel I/O - ATX Form Factor: 12.0-in x 7.5-in, 30.5 cm x 19.1 cm - All Solid Capacitor design - Support for Socket AM3+ processors - Support for Socket AM3 processors: AMD PhenomTM II X6 / X4 / X3 / X2 (except 920 / 940) / Athlon II X4 / X3 / X2 / Sempron - ASRock 970 Pro2 | User Manual - Page 7
Supports jumperfree - SMBIOS 2.3.1 Support - CPU, VCCM, NB Voltage Multi-adjustment Support CD - Drivers, Utilities, AntiVirus Software (Trial Version), AMD OverDriveTM Utility, CyberLink MediaEspresso 6.5 Trial, ASRock product information, please visit our website: http://www.asrock.com 7 - ASRock 970 Pro2 | User Manual - Page 8
+ CPU you adopt. If you want to adopt DDR3 1866/1600 memory module on this motherboard, please refer to the memory support list on our website for the compatible memory modules. ASRock website: http://www.asrock.com 2. Due to the operating system limitation, the actual memory size may be less than - ASRock 970 Pro2 | User Manual - Page 9
use Intelligent Energy Saver function, please enable Cool 'n' Quiet option in the BIOS setup in advance. ASRock Instant Boot ASRock Instant Boot allows you to turn on your PC in just a few seconds, provides a much more efficient way to save energy, time, money, and improves system running speed for - ASRock 970 Pro2 | User Manual - Page 10
of. OC DNA, an exclusive utility developed by ASRock, provides a convenient way for the user to record on the same motherboard. ASRock APP Charger If you desire a faster, less before. ASRock APP Charger allows you to quickly charge many Apple devices simultaneously and even supports continuous - ASRock 970 Pro2 | User Manual - Page 11
time of previously visited websites, making web surfing faster than ever. And it also boosts the speed of Adobe Photoshop 5 times faster. Another advantage of ASRock XFast RAM is that it reduces the frequency of accessing your SSDs or HDDs in order to extend their lifespan. 11 - ASRock 970 Pro2 | User Manual - Page 12
1.3 Motherboard Layout 1 2 Support 8-Core CPU 30.5cm (12.0-in) COM1 SOCKET AM3b 36 35 34 33 32 31 30 29 28 USB 2.0 T: USB2 B: USB3 USB 2.0 T: USB0 B: USB1 USB 2.0 T: USB0 Top: RJ-45 B: USB1 Top: LINE IN Center: FRONT Bottom: MIC IN CMOS BATTERY CLRCMOS1 1 PCIE1 AMD 770 Chipset 970 Pro2 - ASRock 970 Pro2 | User Manual - Page 13
1.4 I/O Panel 1 10 9 1 PS/2 Mouse Port (Green) * 2 LAN RJ-45 Port 3 Line In (Light Blue) ** 4 Front Speaker (Lime) 5 Microphone (Pink) 2 3 4 5 8 7 6 6 USB 2.0 Ports (USB01) 7 USB 2.0 Port (USB01) 8 USB 2.0 Ports (USB23) 9 Serial Port: COM1 10 PS/2 Keyboard Port (Purple) * There are two LED - ASRock 970 Pro2 | User Manual - Page 14
the power is switched off or the power cord is detached from the power supply. Failure to do so may cause severe damage to the motherboard, peripherals, and/or components. 1. Unplug the power cord from the wall socket before touching any component. 2. To avoid damaging the - ASRock 970 Pro2 | User Manual - Page 15
Lever Triangle 2.2 Installation of CPU Fan and Heatsink After you install the CPU into this motherboard, it is necessary to install a larger heatsink and cooling fan to dissipate heat. You For proper installation, please kindly refer to the instruction manuals of the CPU fan and the heatsink. 15 - ASRock 970 Pro2 | User Manual - Page 16
2.3 Installation of Memory Modules (DIMM) This motherboard provides four 240-pin DDR3 (Double Data Rate 3) DIMM slots, and supports Dual Channel Memory Technology. For dual channel configuration, you always need to install identical (the same brand, speed, size and chip-type) DDR3 DIMM pair - ASRock 970 Pro2 | User Manual - Page 17
matches the break on the slot. notch break notch break The DIMM only fits in one correct orientation. It will cause permanent damage to the motherboard and the DIMM if you force the DIMM into the slot at incorrect orientation. Step 3. Firmly insert the DIMM into the slot until the retaining - ASRock 970 Pro2 | User Manual - Page 18
the expansion card and make necessary hardware settings for the card before you start the installation. Step 2. Remove the system unit cover (if your motherboard is already installed in a chassis). Step 3. Remove the bracket facing the slot that you intend to use. Keep the screws for later use. Step - ASRock 970 Pro2 | User Manual - Page 19
, and then shut it down before you do the clear-CMOS ac- tion. Please be noted that the password, date, time, user default profile, 1394 GUID and MAC address will be cleared only if the CMOS battery is removed. 19 - ASRock 970 Pro2 | User Manual - Page 20
end to the motherboard connect the black end to the IDE devices 80-conductor ATA 66/100/133 cable Note: Please refer to the instruction of your IDE (PORT 1) (PORT 3) These six Serial ATA2 (SATA2) connectors support SATA data cables for internal storage devices. The current SATA2 interface - ASRock 970 Pro2 | User Manual - Page 21
. Besides six default USB 2.0 ports on the I/O panel, there are three USB 2.0 headers on this motherboard. Each USB 2.0 header can support two USB 2.0 ports. This header supports an optional wireless transmitting and receiving infrared module. This connector allows you to receive stereo audio input - ASRock 970 Pro2 | User Manual - Page 22
Jack Sensing, but the panel wire on the chassis must support HDA to function correctly. Please follow the instruction in our manual and chassis manual to install your system. 2. If you use AC'97 audio panel, please install it to the front panel audio header as below: A. Connect Mic_IN (MIC) - ASRock 970 Pro2 | User Manual - Page 23
design may differ by chassis. A front panel module mainly consists of power switch, reset switch, power LED connector and match the black wire to the ground pin. Though this motherboard provides 4-Pin CPU fan (Quiet Fan) support, the 3-Pin CPU fan still can work successfully even without the fan - ASRock 970 Pro2 | User Manual - Page 24
ATX Power Connector (24-pin ATXPWR1) (see p.12 No. 9) 12 24 Please connect an ATX power supply to this connector. 1 13 Though this motherboard provides 24-pin ATX power connector, 12 24 it can still work if you adopt a traditional 20-pin ATX power supply. To use the 20-pin - ASRock 970 Pro2 | User Manual - Page 25
Hot Plug and Hot Swap Functions for Serial ATA2 (SATA2) Hard HDDs This motherboard supports Hot Plug and Hot Swap functions for SATA2 in RAID / AHCI mode. AMD SB710 chipset provides hardware support for Advanced Host controller Interface (AHCI), a new programming interface for SATA host controllers - ASRock 970 Pro2 | User Manual - Page 26
some SATA / SATA2 HDDs provide both SATA 15-pin power support information of our motherboard is indicated in the product spec on our website: www.asrock.com 2. Make sure your SATA / SATA2 HDD can support Hot Plug function from your dealer or HDD user manual. The SATA / SATA2 HDD, which cannot support - ASRock 970 Pro2 | User Manual - Page 27
cable to (White) to the power supply 1x4-pin cable. the motherboard's SATA2 connector. SATA power cable 1x4-pin power connector (White) Step attention, before you process the Hot Unplug: Please do follow below instruction sequence to process the Hot Unplug, improper procedure will cause the SATA - ASRock 970 Pro2 | User Manual - Page 28
Guide To install the drivers to your system, please insert the support CD to your optical drive first. Then, the drivers compatible to your system can be auto-detected and listed on the support SATA / SATA2 Driver Diskette. A. Insert the ASRock Support CD into your optical drive to boot your system - ASRock 970 Pro2 | User Manual - Page 29
configure RAID function, you need to check the RAID installation guide in the Support CD for proper configuration. Please refer to the BIOS RAID installation guide part of the document in the following path in the Support CD: .. \ RAID Installation Guide STEP 4: Install Windows® XP / XP 64-bit OS on - ASRock 970 Pro2 | User Manual - Page 30
2.12 Installing Windows® 7 / 7 64-bit / VistaTM / VistaTM 64-bit / XP / XP 64-bit Without RAID Functions If you want to install Windows® 7 / 7 64-bit / VistaTM / VistaTM 64-bit / XP / XP 64bit OS on your SATA / SATA2 HDDs without RAID functions, please follow below procedures according to the OS you - ASRock 970 Pro2 | User Manual - Page 31
This motherboard supports Untied Overclocking Technology, which means during overclocking, FSB enjoys better margin due to fixed PCI / PCIE buses. Before you enable Untied Overclocking function, please enter "Overclock Mode" option of BIOS setup to set the selection from [Auto] to [Manual - ASRock 970 Pro2 | User Manual - Page 32
the BIOS SETUP UTILITY to configure your system. The SPI Memory on the motherboard stores the BIOS SETUP UTILITY. You may run the BIOS SETUP UTILITY when The top of the screen has a menu bar with the following selections: Main To set up the system time/date information OC Tweaker To set up - ASRock 970 Pro2 | User Manual - Page 33
Screen When you enter the BIOS SETUP UTILITY, the Main screen will appear and display the system overview. BIOS SETUP UTILITY Main OC Tweaker Advanced H/W Monitor System Overview System Time System Date [17:00:09] [Tue 08/28/2012] BIOS Version : 970 Pro2 P1.00 Processor Type : AMD FX(tm)-8150 - ASRock 970 Pro2 | User Manual - Page 34
BIOS SETUP UTILITY Main OC Tweaker [Auto] Overclocking may cause damage to your CPU and motherboard. It should be done at your own risk and expense Configuration options: [Auto] and [Manual]. The default value is [Auto]. only when the processor you adopt supports this feature. Use this to select - ASRock 970 Pro2 | User Manual - Page 35
stability. BIOS SETUP UTILITY Main OC Tweaker Advanced H/W Monitor Turbo Core Technology AMD C-State Support AMD APM Processor Maximum Frequency North x31.5 6300 MHZ x31.0 6200 MHz 1.5500 V [Manual] Overclocking may cause damage to your CPU and motherboard. It should be done at your own risk and - ASRock 970 Pro2 | User Manual - Page 36
DDR3_1600]. DRAM Frequency If [Auto] is selected, the motherboard will detect the memory module(s) inserted and assigns appropriate frequency to change CAS Latency (CL) Auto/Manual setting. The default is [Auto]. TRCD Use this item to change TRCD Auto/Manual setting. The default is [Auto]. TRP - ASRock 970 Pro2 | User Manual - Page 37
The default is [Auto]. TWR Use this item to change TWR Auto/Manual setting. The default is [Auto]. TRFC Use this item to change TRFC Auto/Manual setting. The default is [Auto]. TRRD Use this item to change TRRD Auto/Manual setting. The default is [Auto]. TWTR Use this item to change TWTR - ASRock 970 Pro2 | User Manual - Page 38
Configuration, ACPI Configuration, Storage Configuration, PCPPnP Configuration, Floppy Configuration, Super IO Configuration and USB Configuration. BIOS SETUP UTILITY Main OC Tweaker Advanced H/W Monitor Boot Security Exit Advanced Settings Options for CPU WARNING : Setting wrong values in below - ASRock 970 Pro2 | User Manual - Page 39
utilize the additional hardware capabilities provided by AMD-V. The default value is [Enabled]. Configuration options: [Enabled] and [Disabled]. Enhance Halt State (C1E) All processors support the Halt State (C1). The C1 state is supported through the native processor instructions HLT and MWAIT and - ASRock 970 Pro2 | User Manual - Page 40
3.4.2 Chipset Configuration BIOS SETUP UTILITY Advanced Chipset Settings Onboard HD Audio Front Panel Onboard Lan Primary Graphics Adapter [Auto] [Auto] [Enabled] [PCI] +F1 F9 F10 ESC Select Screen Select Item Change Option General Help Load Defaults Save and Exit Exit v02.54 (C) Copyright - ASRock 970 Pro2 | User Manual - Page 41
. Check Ready Bit Use this item to enable or disable the feature Check Ready Bit. Away Mode Support Use this item to enable or disable Away Mode support under Windows® XP Media Center OS. The default value is [Disabled]. Restore on AC/Power Loss This allows you to set the power state - ASRock 970 Pro2 | User Manual - Page 42
ACPI HPET table Use this item to enable or disable ACPI HPET Table. The default value is [Enabled]. Please set this option to [Enabled] if you plan to use this motherboard to submit Windows® VistaTM certification. 42 - ASRock 970 Pro2 | User Manual - Page 43
3.4.4 Storage Configuration BIOS SETUP UTILITY Advanced Storage Configuration Onboard SATA Controller SATA Operation Mode SATA IDE Combined Mode IDE1 Master IDE1 Slave SATAII_1 SATAII_2 SATAII_3 SATAII_4 SATAII_5 SATAII_6 [Enabled] [AHCI] [Enabled] [Hard Disk] [Not Detected] [Not Detected] [Not - ASRock 970 Pro2 | User Manual - Page 44
3.4.5 PCIPnP Configuration BIOS SETUP UTILITY Advanced Advanced PCI / PnP Settings PCI Latency Timer PCI IDE BusMaster [32] [Enabled] Value in units of PCI clocks for PCI device latency timer register. +F1 F9 F10 ESC Select Screen Select Item Change Option General Help Load Defaults Save and - ASRock 970 Pro2 | User Manual - Page 45
3.4.6 Floppy Configuration In this section, you may configure the type of your floppy drive. BIOS SETUP UTILITY Advanced Floppy Configuration Floppy A [1.44 MB 312"] Select the type of floppy drive connected to the system. +F1 F9 F10 ESC Select Screen Select Item Change Option General Help - ASRock 970 Pro2 | User Manual - Page 46
3.4.7 Super IO Configuration BIOS SETUP UTILITY Advanced Configure Super IO Chipset OnBoard Floppy Controller Serial Port Address Infrared Port Address [Disabled] [3F8 / IRQ4] [Disabled] Allow BIOS to Enable or Disable Floppy Controller. +F1 F9 F10 ESC Select Screen Select Item Change Option - ASRock 970 Pro2 | User Manual - Page 47
]. The default value is [Enabled]. Please refer to below descriptions for the details of these four options: [Enabled] - Enables support for legacy USB. [Auto] - Enables legacy support if USB devices are connected. [Disabled] - USB devices are not allowed to use under legacy OS and BIOS setup when - ASRock 970 Pro2 | User Manual - Page 48
of the CPU temperature, motherboard temperature, CPU fan speed, chassis fan speed, and the critical voltage. BIOS SETUP UTILITY Main OC Tweaker Advanced H/W Monitor the chassis fan 1 speed. Confi guration options: [Full On], [Manual Mode] and [Automatic Mode]. The default is value [Full On]. 48 - ASRock 970 Pro2 | User Manual - Page 49
it will display the available devices on your system for you to configure the boot settings and the boot priority. BIOS SETUP UTILITY Main OC Tweaker Advanced H/W Monitor Boot Security Exit Boot Settings Boot Settings Configuration Configure Settings during System Boot. 1st Boot Device 2nd Boot - ASRock 970 Pro2 | User Manual - Page 50
or change the supervisor/user password for the system. For the user password, you may also clear it. BIOS SETUP UTILITY Main OC Tweaker Advanced H/W Monitor Boot Security Exit Security Settings Supervisor Password : Not Installed User Password : Not Installed Change Supervisor Password Change - ASRock 970 Pro2 | User Manual - Page 51
3.8 Exit Screen BIOS SETUP UTILITY Main OC Tweaker Advanced H/W Monitor Boot Security Exit Exit Options Save Changes and Exit Discard Changes and Exit Discard Changes Load BIOS Defaults Load Performance Setup - ASRock 970 Pro2 | User Manual - Page 52
and useful utilities that enhance the motherboard features. 4.2.1 Running The Support CD To begin using the support CD, insert the CD into your CD-ROM drive. The CD automatically displays the Main Menu if "AUTORUN" is enabled in your computer. If the Main Menu did not appear automatically, locate
-
 1
1 -
 2
2 -
 3
3 -
 4
4 -
 5
5 -
 6
6 -
 7
7 -
8
-
9
-
10
-
11
-
12
-
13
-
14
-
15
-
16
-
17
-
18
-
19
-
20
-
21
-
22
-
23
-
24
-
25
-
26
-
27
-
28
-
29
-
30
-
31
-
32
-
33
-
34
-
35
-
36
-
37
-
38
-
39
-
40
-
41
-
42
-
43
-
44
-
45
-
46
-
47
-
48
-
49
-
50
-
51
-
52
 |
 |

1
970 Pro2
User Manual
Version 1.0
Published August 2012
Copyright©2012 ASRock INC. All rights reserved.