ASRock ConRoe945G-DVI Quick Installation Guide
ASRock ConRoe945G-DVI Manual
 |
View all ASRock ConRoe945G-DVI manuals
Add to My Manuals
Save this manual to your list of manuals |
ASRock ConRoe945G-DVI manual content summary:
- ASRock ConRoe945G-DVI | Quick Installation Guide - Page 1
for backup purpose, without written consent of ASRock Inc. Products and corporate names appearing in this guide may or may not be registered trademarks or ASRock Website: http://www.asrock.com Published November 2006 Copyright©2006 ASRock INC. All rights reserved. 1 ASRock ConRoe945G-DVI Motherboard - ASRock ConRoe945G-DVI | Quick Installation Guide - Page 2
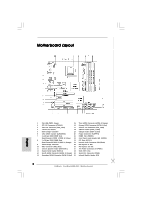
Header (SPEAKER 1) 27 ATX Power Connector (ATXPWR1) 12 System Panel Header (PANEL1) 28 BIOS FWH Chip 13 Fourth SATAII Connector (SATAII_4; Orange) 29 Serial Port Connector (COM1) 14 Secondary SATAII Connector (SATAII_2; Red) 30 Infrared Module Header (IR1) 2 ASRock ConRoe945G-DVI Motherboard - ASRock ConRoe945G-DVI | Quick Installation Guide - Page 3
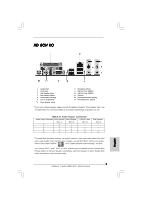
below for connection details in accordance with the type of speaker you use. TABLE for Audio Output Connection Audio Output Channels Front Speaker Rear Speaker Central / Bass (No. 7) (No. 4) ( "Realtek HDA Audio 2nd output" to use front panel audio. 3 ASRock ConRoe945G-DVI Motherboard English - ASRock ConRoe945G-DVI | Quick Installation Guide - Page 4
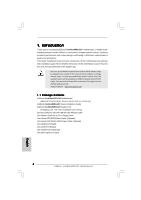
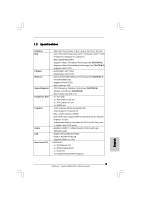
CPU support lists on ASRock website as well. ASRock website http://www.asrock.com 1.1 Package Contents ASRock ConRoe945G-DVI Motherboard (Micro ATX Form Factor: 9.6-in x 9.6-in, 24.4 cm x 24.4 cm) ASRock ConRoe945G-DVI Quick Installation Guide ASRock ConRoe945G-DVI Support CD (including LGA 775 CPU - ASRock ConRoe945G-DVI | Quick Installation Guide - Page 5
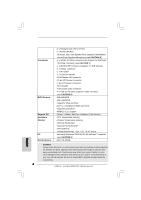
Platform CPU Chipset Memory Hybrid Booster Expansion Slot Graphics Audio LAN Rear Panel I/O - Micro ATX Form Factor: 9.6-in x 9.6-in, 24.4 cm x 24.4 cm - LGA 775 for Intel® Dual Core CoreTM 2 Extreme / CoreTM 2 Duo / Pentium® D / Pentium® 4 / Celeron® D - FSB 1066/800/533 MHz - Supports Hyper - ASRock ConRoe945G-DVI | Quick Installation Guide - Page 6
the thirdparty overclocking tools. Overclocking may affect your system stability, or even cause damage to the components and devices of your system. It should be done at your own risk and expense. We are not responsible for possible damage caused by overclocking. 6 ASRock ConRoe945G-DVI Motherboard - ASRock ConRoe945G-DVI | Quick Installation Guide - Page 7
64-bit / XP SP1 or SP2 / 2000 SP4. 9. Microsoft® Windows® VistaTM driver is not ready yet. We will update it to our website in the future. Please visit our website for Microsoft® Windows® VistaTM driver and related information. ASRock website http://www.asrock.com 7 ASRock ConRoe945G-DVI Motherboard - ASRock ConRoe945G-DVI | Quick Installation Guide - Page 8
to submit Windows® VistaTM Premium or Basic logo, the shared memory size of onboard VGA can be adjusted up to 128MB. * If you plan to use external graphics card on this motherboard, please refer to Premium Discrete requirement at http://www.asrock.com English 8 ASRock ConRoe945G-DVI Motherboard - ASRock ConRoe945G-DVI | Quick Installation Guide - Page 9
you insert the 775-LAND CPU into the socket, please check if the CPU surface is unclean or if there is any bent pin on the socket. Do not force to insert the CPU into the socket if above situation is found. Otherwise, the CPU will be seriously damaged. 9 ASRock ConRoe945G-DVI Motherboard English - ASRock ConRoe945G-DVI | Quick Installation Guide - Page 10
100 degrees. Step 2. Insert the 775-LAND CPU: Step 2-1. Hold the CPU by the edges where are marked with support the load plate edge, engage PnP cap with right hand thumb and peel the cap from the socket while pressing on center of PnP cap to assist in removal. 10 ASRock ConRoe945G-DVI Motherboard - ASRock ConRoe945G-DVI | Quick Installation Guide - Page 11
, the heatsink cannot be secured on the motherboard. Step 5. Step 6. Connect fan header with the CPU fan connector on the motherboard. Secure excess cable with tie-wrap to ensure cable does not interfere with fan operation or contact other components. 11 ASRock ConRoe945G-DVI Motherboard English - ASRock ConRoe945G-DVI | Quick Installation Guide - Page 12
example, installing a pair of memory modules in DDRII_1 and DDRII_2, it is unable to activate the Dual Channel Memory Technology . 4. It is not allowed to install a DDR memory module into DDRII slot; otherwise, this motherboard and DIMM may be damaged. English 12 ASRock ConRoe945G-DVI Motherboard - ASRock ConRoe945G-DVI | Quick Installation Guide - Page 13
permanent damage to the motherboard and the DIMM if you force the DIMM into the slot at incorrect orientation. Step 3. Firmly insert the DIMM into the slot until the retaining clips at both ends fully snap back in place and the DIMM is properly seated. 13 ASRock ConRoe945G-DVI Motherboard English - ASRock ConRoe945G-DVI | Quick Installation Guide - Page 14
monitor to the VGA/D-Sub port on the I/O panel and connecting the DVID input monitor to our DVI Graphics-SI card inserted to PCIE1 (PCIE x16 slot) on this motherboard. Please refer to the below procedures for proper installation of DVI Graphics-SI card. 14 ASRock ConRoe945G-DVI Motherboard English - ASRock ConRoe945G-DVI | Quick Installation Guide - Page 15
with this motherboard after your system boots. If you haven't installed Intel® VGA driver yet, please install Intel® VGA driver from our support CD to your system and restart your computer. Then you can start to use DVI-D output function with this motherboard. 15 ASRock ConRoe945G-DVI Motherboard - ASRock ConRoe945G-DVI | Quick Installation Guide - Page 16
unplug the power cord from the power supply. After waiting for 15 seconds, use a jumper cap to short 2 pins on CLRCMOS1 for 5 seconds. English 16 ASRock ConRoe945G-DVI Motherboard - ASRock ConRoe945G-DVI | Quick Installation Guide - Page 17
to the power connector on each drive. Then connect the white end of SATA power cable to the power connector of the power supply. 17 ASRock ConRoe945G-DVI Motherboard English - ASRock ConRoe945G-DVI | Quick Installation Guide - Page 18
and OUT_RET are for HD audio panel only. You don't need to connect them for AC'97 audio panel. E. Enter BIOS Setup Utility. Enter Advanced Settings, and then select Chipset Configuration. Set the Front Panel Control option from [Auto] to [Enabled]. 18 ASRock ConRoe945G-DVI Motherboard English - ASRock ConRoe945G-DVI | Quick Installation Guide - Page 19
Windows system. Click the icon on the lower right hand taskbar to enter Realtek HD Audio Manager. Click "Audio the black wire to the ground pin. Please connect a CPU fan cable to this connector and match the black wire supports a serial port module. English 19 ASRock ConRoe945G-DVI Motherboard - ASRock ConRoe945G-DVI | Quick Installation Guide - Page 20
.hitachigst.com/hdd/support/download.htm The above examples are just for your reference. For different SATAII hard disk products of different vendors, the jumper pin setting methods may not be the same. Please visit the vendors' website for the updates. 20 ASRock ConRoe945G-DVI Motherboard English - ASRock ConRoe945G-DVI | Quick Installation Guide - Page 21
overclocking, but PCI / PCIE buses are in the fixed mode so that FSB can operate under a more stable overclocking environment. Please refer to the warning on page 6 for the possible overclocking risk before you apply Untied Overclocking Technology. 21 ASRock ConRoe945G-DVI Motherboard English - ASRock ConRoe945G-DVI | Quick Installation Guide - Page 22
risks of CPU and motherboard damages caused by any improper handling. To see this Live Demo, you can run Microsoft® Media Player® to play the file. You may find this Live Demo in the motherboard's Support CD through the following path: ..\ MPEGAV \ LGA775INST.DAT 22 ASRock ConRoe945G-DVI Motherboard - ASRock ConRoe945G-DVI | Quick Installation Guide - Page 23
23 ASRock ConRoe945G-DVI Motherboard - ASRock ConRoe945G-DVI | Quick Installation Guide - Page 24
® ® ® ® ® ® ® 24 ASRock ConRoe945G-DVI Motherboard - ASRock ConRoe945G-DVI | Quick Installation Guide - Page 25
® ® 25 ASRock ConRoe945G-DVI Motherboard - ASRock ConRoe945G-DVI | Quick Installation Guide - Page 26
® ® ® ® ® 26 ASRock ConRoe945G-DVI Motherboard - ASRock ConRoe945G-DVI | Quick Installation Guide - Page 27
® ® ® ® 27 ASRock ConRoe945G-DVI Motherboard - ASRock ConRoe945G-DVI | Quick Installation Guide - Page 28
28 ASRock ConRoe945G-DVI Motherboard - ASRock ConRoe945G-DVI | Quick Installation Guide - Page 29
29 ASRock ConRoe945G-DVI Motherboard - ASRock ConRoe945G-DVI | Quick Installation Guide - Page 30
30 ASRock ConRoe945G-DVI Motherboard - ASRock ConRoe945G-DVI | Quick Installation Guide - Page 31
DDRII_1 DDRII_2 DDRII_3 DDRII_4 ( )( )( )( ) (1) - - (2) - - (3) 31 ASRock ConRoe945G-DVI Motherboard - ASRock ConRoe945G-DVI | Quick Installation Guide - Page 32
32 ASRock ConRoe945G-DVI Motherboard - ASRock ConRoe945G-DVI | Quick Installation Guide - Page 33
33 ASRock ConRoe945G-DVI Motherboard - ASRock ConRoe945G-DVI | Quick Installation Guide - Page 34
® ® ® 34 ASRock ConRoe945G-DVI Motherboard - ASRock ConRoe945G-DVI | Quick Installation Guide - Page 35
35 ASRock ConRoe945G-DVI Motherboard - ASRock ConRoe945G-DVI | Quick Installation Guide - Page 36
SATAII_3 SATAII_4 SATAII_1 SATAII_2 36 ASRock ConRoe945G-DVI Motherboard - ASRock ConRoe945G-DVI | Quick Installation Guide - Page 37
CD1 37 ASRock ConRoe945G-DVI Motherboard - ASRock ConRoe945G-DVI | Quick Installation Guide - Page 38
38 ASRock ConRoe945G-DVI Motherboard - ASRock ConRoe945G-DVI | Quick Installation Guide - Page 39
39 ASRock ConRoe945G-DVI Motherboard - ASRock ConRoe945G-DVI | Quick Installation Guide - Page 40
® 40 ASRock ConRoe945G-DVI Motherboard - ASRock ConRoe945G-DVI | Quick Installation Guide - Page 41
® ® "LGA 775 CPU Installation Live Demo" 41 ASRock ConRoe945G-DVI Motherboard - ASRock ConRoe945G-DVI | Quick Installation Guide - Page 42
-Website aufgelistet. ASRock-Website: http://www.asrock.com 1.1 Kartoninhalt ASRock ConRoe945G-DVI Motherboard (Micro ATX-Formfaktor: 24.4 cm x 24.4 cm; 9.6 Zoll x 9.6 Zoll) ASRock ConRoe945G-DVI Schnellinstallationsanleitung ASRock ConRoe945G-DVI_ Support-CD (einschl. LGA 775 CPU Installation Live - ASRock ConRoe945G-DVI | Quick Installation Guide - Page 43
Booster Erweiterungssteckplätze Onboard-VGA Audio LAN E/A-Anschlüsse an der Rückseite - Micro ATX-Formfaktor: 24.4 cm x 24.4 cm; 9.6 Zoll x 9.6 Zoll - LGA 775 für Intel® Dual Core CoreTM 2 Extreme- / CoreTM 2 Duo- / Pentium® D- / Pentium® 4- / Celeron® D-Prozessoren - FSB 1066/800/533 MHz - Unterst - ASRock ConRoe945G-DVI | Quick Installation Guide - Page 44
äte Ihres Systems beschädigen. Es geschieht dann auf eigene Gefahr und auf Ihre Kosten. Wir übernehmen keine Verantwortung für mögliche Schäden, die aufgrund von Overclocking verursacht wurden. 44 ASRock ConRoe945G-DVI Motherboard - ASRock ConRoe945G-DVI | Quick Installation Guide - Page 45
® Windows® VistaTM ist noch nicht einsatzbereit. Sie können ihn bald von unserer Internetseite abrufen. Auf unserer Internetseite finden Sie Angaben zum Microsoft® Windows® VistaTM Treiber sowie weitere Informationen. ASRock-Internetseite: http://www.asrock.com 45 ASRock ConRoe945G-DVI Motherboard - ASRock ConRoe945G-DVI | Quick Installation Guide - Page 46
der integrierten VGAKarte auf bis zu 128 MB eingestellt werden. * Sofern Sie eine externe Grafikkarte mit diesem Motherboard verwenden möchten, lesen Sie bitte unter Premium Discrete-Anforderungen auf unseren Internetseiten nach: http://www.asrock.com Deutsch 46 ASRock ConRoe945G-DVI Motherboard - ASRock ConRoe945G-DVI | Quick Installation Guide - Page 47
) 775-Pin Sockel Übersicht Bevor Sie die 775-Pin CPU in den Sockel sitzen, prüfen Sie bitte, ob die CPU-Oberfläche sauber ist und keine der Kontakte verbogen sind. Setzen Sie die CPU nicht mit Gewalt in den Sockel, dies kann die CPU schwer beschädigen. Deutsch 47 ASRock ConRoe945G-DVI Motherboard - ASRock ConRoe945G-DVI | Quick Installation Guide - Page 48
775-Pin Sockel 775-Pin CPU Um die CPU ordnungsgemäß einsetzen zu können, richten Sie die zwei Orientierungskerben der CPU mit den beiden Markierungen des Sockels aus. Schritt 2-3. Drücken Sie die CPU vorsichtig in vertikaler Richtung in den Sockel. 48 ASRock ConRoe945G-DVI Motherboard - ASRock ConRoe945G-DVI | Quick Installation Guide - Page 49
Schritt 2-4. Prüfen Sie, dass die CPU ordnungsgemäß im Sockel sitzt und die Orientierungskerben einwandfrei in den entsprechenden Auskerbungen sitzen. en Sie den Ladehebel. Schritt 4-3. Sichern Sie Ladehebel und Ladeplatte mithilfe des Hebelverschlusses. 49 ASRock ConRoe945G-DVI Motherboard Deutsch - ASRock ConRoe945G-DVI | Quick Installation Guide - Page 50
den 775-Pin CPU. Motherboard befestigt. Schritt 5. Schließen Sie den Lüfter an den CPULüfteranschluss des Motherboards. Schritt 6. Befestigen Sie überschüssiges Kabel mit Band, um eine Störung des Lüfters oder Kontakt mit anderen Teilen zu vermeiden. Deutsch 50 ASRock ConRoe945G-DVI Motherboard - ASRock ConRoe945G-DVI | Quick Installation Guide - Page 51
2.3 Installation der Speichermodule (DIMM) Die Motherboards ConRoe945G-DVI bieten vier 240-pol. DDRII (Double Data Rate II) DIMM-Steckpl zulässig, DDR in einen DDRII Steckplatz zu installieren; andernfalls könnten Motherboard und DIMMs beschädigt werden. Deutsch 51 ASRock ConRoe945G-DVI Motherboard - ASRock ConRoe945G-DVI | Quick Installation Guide - Page 52
in die Steckplätze, so dass die Halteklammern an beiden Enden des Moduls einschnappen und das DIMM-Modul fest an Ort und Stelle sitzt. 52 ASRock ConRoe945G-DVI Motherboard - ASRock ConRoe945G-DVI | Quick Installation Guide - Page 53
die zusätzliche PCI Express-VGA-Karte in PCIE1 (PCIE x16-Steckplatz) und setzen Sie die BIOS-Option "Internal Graphics Mode Select" (Wahl des internen Grafikmodus) auf [Enabled] (Aktiviert), wird 4: Befestigen Sie die Karte mit der Schraube aus Schritt 2. 53 ASRock ConRoe945G-DVI Motherboard Deutsch - ASRock ConRoe945G-DVI | Quick Installation Guide - Page 54
auf Seite 53 angegeben. DVI Graphics-SI-Karte Schritt 2: Verbinden Sie den DVI-D-Anschluss des DVI-D-Eingangsmonitors mit dem DVI-D-Ausgang der DVI Graphics-SI-Karte, die in PCIE1 (PCIE x16Steckplatz) auf diesem Motherboard eingefügt ist. Deutsch 54 ASRock ConRoe945G-DVI Motherboard - ASRock ConRoe945G-DVI | Quick Installation Guide - Page 55
den Intel® VGA-Treiber noch nicht installiert, dann installieren Sie bitte den Intel® VGA-Treiber von unserer Support-CD auf Ihrem System und starten Sie Ihren Computer neu. Hiernach können Sie die DVI-DAusgangsfunktion mit diesem Motherboard verwenden. Deutsch 55 ASRock ConRoe945G-DVI Motherboard - ASRock ConRoe945G-DVI | Quick Installation Guide - Page 56
Default-Werte wiederherzustellen, schalten Sie den Computer aus, ziehen Sie den Netzstecker und überbrücken Sie 2-pin von CLRCMOS1 mithilfe des Jumpers für 5 Sekunden. Deutsch 56 ASRock ConRoe945G-DVI Motherboard - ASRock ConRoe945G-DVI | Quick Installation Guide - Page 57
Header und Anschlüsse. Wenn Sie Jumperkappen auf Header und Anschlüsse setzen, wird das Motherboard unreparierbar beschädigt! Anschluss für das Floppy-Laufwerk (33-Pin FLOPPY1) (siehe S.2 - oder dem SATAII-Anschluss am Mainboard verbinden. Deutsch 57 ASRock ConRoe945G-DVI Motherboard - ASRock ConRoe945G-DVI | Quick Installation Guide - Page 58
, wie z. B. CD1 CD-ROM, DVD-ROM, TV-Tuner oder MPEG-Karten mit Ihrem System zu verbinden. Dieses Interface zu einem Audio-Panel auf der Vorderseite Ihres Gehäuses, ermöglicht Ihnen eine bequeme Anschlussmöglichkeit und Kontrolle über Audio-Geräte. 58 ASRock ConRoe945G-DVI Motherboard Deutsch - ASRock ConRoe945G-DVI | Quick Installation Guide - Page 59
mit diesem Anschluss und passen Sie den schwarzen Draht dem Erdungsstift an. CPU-Lüfteranschluss Verbinden Sie das CPU - (4-pin CPU_FAN1) Lüfterkabel mit diesem (siehe S.2 - No. 3) Anschluss und passen Sie den schwarzen Draht dem Erdungsstift an. 59 ASRock ConRoe945G-DVI Motherboard - ASRock ConRoe945G-DVI | Quick Installation Guide - Page 60
kann. Andernfalls reicht der Strom nicht aus, das System zu starten. Dieser COM-AnschlussHeader wird verwendet, um ein COM-Anschlussmodul zu unterstützen. Deutsch 60 ASRock ConRoe945G-DVI Motherboard - ASRock ConRoe945G-DVI | Quick Installation Guide - Page 61
download.htm Die Beispiele oben dienen lediglich Ihrer Referenz. Die Steckbrückeneinstellungen können bei unterschiedlichen SATA II Festplatten verschiedener Hersteller abweichen. Aktualisierungen und ergänzende Informationen finden Sie auf der Internetseite des Herstellers. 61 ASRock ConRoe945G-DVI - ASRock ConRoe945G-DVI | Quick Installation Guide - Page 62
Option "Overclock Mode" (Übertaktungsmodus) im BIOS von [Auto] auf [CPU, PCIE, Async.] um. Dadurch wird der CPU-FSB beim Übertakten entkoppelt, PCI-/PCIEBusse werden jedoch fixiert, so dass der FSB in einer stabileren Übertaktungsumgebung arbeiten kann. 62 ASRock ConRoe945G-DVI Motherboard Deutsch - ASRock ConRoe945G-DVI | Quick Installation Guide - Page 63
der CPU oder Motherboards durch unsachgemäße Handhabung zu verringern. Öffnen Sie die Datei mit Microsoft Media Player, um das Live-Demo anzusehen. Sie finden das Live-Demo auf der Motherboard Support-CD in folgendem Verzeichnis: ..\ MPEGAV \ LGA775INST.DAT 63 ASRock ConRoe945G-DVI Motherboard - ASRock ConRoe945G-DVI | Quick Installation Guide - Page 64
24.4 cm) Guide d'installation rapide ASRock ConRoe945G-DVI CD de soutien ASRock ConRoe945G-DVI (avec Démo vidéo d'installation de processeur LGA 775) Un câble 8CH I/O Un support pour port COM Une carte HDMR (en option) Une carte vidéo DVI Graphics-SI 64 ASRock ConRoe945G-DVI Motherboard Français - ASRock ConRoe945G-DVI | Quick Installation Guide - Page 65
Format CPU Chipsets Mémoire L'accélérateur hybride Slot d'extension VGA sur carte Audio LAN Panneau arrière E/S - Facteur de forme Micro ATX : 9.6 pouces x 9.6 pouces, 24.4 cm x 24.4 cm - LGA 775 pour Intel® Dual Core CoreTM 2 Extreme / CoreTM 2 Duo / Pentium® D / Pentium® 4 / Celeron® D - FSB 1066 - ASRock ConRoe945G-DVI | Quick Installation Guide - Page 66
mère - Tachéomètre ventilateur CPU - Tachéomètre ventilateur châssis - Ventilateur silencieux d'unité centrale - Monitoring de la tension: +12V, +5V, +3.3V, Vcore - Microsoft® Windows® 2000 / XP / XP 64-bit / VistaTM (voir ATTENTION 9) - FCC, CE, WHQL Français 66 ASRock ConRoe945G-DVI Motherboard - ASRock ConRoe945G-DVI | Quick Installation Guide - Page 67
® Windows® VistaTM ne sont pas encore prêts. Nous les mettrons à jour sur notre site Web dans l'avenir. Veuillez visiter notre site Web pour obtenir les pilotes de Microsoft® Windows® VistaTM et l'information relative. Site Web de ASRock : http://www.asrock.com 67 ASRock ConRoe945G-DVI Motherboard - ASRock ConRoe945G-DVI | Quick Installation Guide - Page 68
VGA intégré avec une mémoire système de 512Mo et que vous désirez soumettre le logo de Windows® VistaTM Basic, veuillez régler la taille de la mémoire partagée de VGA intégré sur 64Mo. référer aux exigences Premium Discrete sur http://www.asrock.com Français 68 ASRock ConRoe945G-DVI Motherboard - ASRock ConRoe945G-DVI | Quick Installation Guide - Page 69
composant, placez-le sur un support antistatique ou dans son sachet d'origine. 5. Lorsque vous placez les vis dans les orifices pour vis pour fixer la carte mère sur le châssis, ne serrez pas trop les vis ! Vous risquez sinon d'endommager la carte mère. 69 ASRock ConRoe945G-DVI Motherboard Français - ASRock ConRoe945G-DVI | Quick Installation Guide - Page 70
le processeur 775 broches : Etape 2-1. Tenez le processeur par ses bords là où se trouvent des lignes noires. Etape 2-2. Orientez le paquet avec le dissipateur thermique intégré (IHS) vers le haut. Repérez la broche 1 et les deux encoches d'orientation. 70 ASRock ConRoe945G-DVI Motherboard Ligne - ASRock ConRoe945G-DVI | Quick Installation Guide - Page 71
775 broches Socket 775 broches Pour une insertion correcte, veuillez vérifier que vous faites bien correspondre les deux encoches d'orientation sur le processeur avec les deux détrompeurs du socket chargement sous la languette de retenue du levier de chargement. 71 ASRock ConRoe945G-DVI Motherboard - ASRock ConRoe945G-DVI | Quick Installation Guide - Page 72
reporter aux manuels d'instructions de votre ventilateur du dissipateur thermique pour un processeur 775 broches. (Appliquez le matériau mère) Etape 2. Placez le dissipateur thermique sur le socket. Vérifiez que les câbles du ventilateur sont orientés ASRock ConRoe945G-DVI Motherboard Français - ASRock ConRoe945G-DVI | Quick Installation Guide - Page 73
modules m émoire [DIMM] La carte mère ConRoe945G-DVI dispose de quatre emplacements DIMM DDRII (Double Data Rate II) de 240-broches, et supporte la Technologie de Mémoire à Canal Double. Pour le slot DDRII; la carte mère et les DIMM pourraient être endommagés. 73 ASRock ConRoe945G-DVI Motherboard - ASRock ConRoe945G-DVI | Quick Installation Guide - Page 74
jusqu'à ce que les clips de maintien situés aux deux extrémités se ferment complètement et que le module DIMM soit inséré correctement. 74 ASRock ConRoe945G-DVI Motherboard - ASRock ConRoe945G-DVI | Quick Installation Guide - Page 75
DVI Graphics-SI. PCIE2 (emplacement PCIE x1) est utilisé pour les cartes PCI Express avec cartes graphiques de largeur x1 voies, telles que les cartes Gigabit LAN x16) et que vous réglez l'option du BIOS « Internal Graphics Mode Select » (Sélection de la ASRock ConRoe945G-DVI Motherboard Français - ASRock ConRoe945G-DVI | Quick Installation Guide - Page 76
2. Branchez le moniteur à connexion DVI-D sur la sortie DVI-D de la carte DVI Graphics-SI installée sur le connecteur PCIE1 (connecteur PCIE x16) de la carte mère. Français Connecteur DVI-D du moniteur Connecteur de sortie DVI-D de la carte DVI Graphics-SI 76 ASRock ConRoe945G-DVI Motherboard - ASRock ConRoe945G-DVI | Quick Installation Guide - Page 77
au prochain redémarrage du système. Si vous n'avez pas encore installé sur votre système le pilote VGA de Intel® à partir de notre CD puis redémarrez l'ordinateur. Vous pouvez commencer à utiliser la sortie DVI-D de la carte mère. Français 77 ASRock ConRoe945G-DVI Motherboard - ASRock ConRoe945G-DVI | Quick Installation Guide - Page 78
. Puis placez un cavalier sur les pins CLRCMOS1 pendant 5 secondes. N'oubliez pas de retirer le cavalier avant après avoir restauré le CMOS. Français 78 ASRock ConRoe945G-DVI Motherboard - ASRock ConRoe945G-DVI | Quick Installation Guide - Page 79
noir vers le disque dur Câble ATA 66/100 80 conducteurs Note: Veuillez vous reporter aux instructions du fabricant de votre IDE périphérique pour les détails. Connecteurs Série ATAII (SATAII_1: SATAIIou au connecteur SATAII sur la carte mère. 79 ASRock ConRoe945G-DVI Motherboard Français - ASRock ConRoe945G-DVI | Quick Installation Guide - Page 80
permettent de gérer des entrées audio à partir de sources CD1 stéréo comme un CD-ROM, DVD-ROM, un tuner TV ou une carte MPEG. C'est une interface pour un câble audio en façade qui permet le branchement et le contrôle commodes de périphériques audio. 80 ASRock ConRoe945G-DVI Motherboard Français - ASRock ConRoe945G-DVI | Quick Installation Guide - Page 81
audio AC'97. E. Entrer dans l'utilitaire de configuration du BIOS. Saisir les Paramètres avancés puis sélectionner Configuration du jeu de puces. Définir l'option panneau de commande de [Auto] à [Activé]. F. Entrer dans le système Windows et brancher le fil 81 ASRock ConRoe945G-DVI Motherboard - ASRock ConRoe945G-DVI | Quick Installation Guide - Page 82
ATX 12V sur ce connecteur. Cette en-tête de port COM est utilisée pour prendre en charge un module de port COM. Français 82 ASRock ConRoe945G-DVI Motherboard - ASRock ConRoe945G-DVI | Quick Installation Guide - Page 83
lire attentivement le présent guide d'installation du disque dur SATAII fonction SATAII, veuillez suivre les instructions ci-dessous avec les différents de détails. http://www.hitachigst.com/hdd/support/download.htm Les exemples donnés précédemment ne ASRock ConRoe945G-DVI Motherboard Français - ASRock ConRoe945G-DVI | Quick Installation Guide - Page 84
du BIOS pour établir la sélection de [Auto] à [CPU, PCIE, Async.]. Par conséquent, le CPU FSB n'est pas lié durant le surcadençage, mais les bus PCI / PCIE sont en mode fixé de sorte que FSB peut opérer sous un environnement de surcadençage plus stable. 84 ASRock ConRoe945G-DVI Motherboard - ASRock ConRoe945G-DVI | Quick Installation Guide - Page 85
. Pour voir cette Démo vidéo, vous pouvez exécuter le Lecteur multimédia Microsoft pour lire le fichier. Vous trouverez cette Démo vidéo dans le CD d'assistance de la carte mère sur le chemin d'accès suivant : ..\ MPEGAV \ LGA775INST.DAT 85 ASRock ConRoe945G-DVI Motherboard Français - ASRock ConRoe945G-DVI | Quick Installation Guide - Page 86
ATX Form Factor: 9.6-in x 9.6-in, 24.4 cm x 24.4 cm) Guida di installazione rapida ASRock ConRoe945G-DVI CD di supporto ASRock ConRoe945G-DVI (compreso il demo installazione CPU LGA 775 ) Un cavo IDE 80-pin Ultra ATA 66/100 Un cavo per floppy drive a 1,44 Mb Un cavo dati Serial ATA (SATA) (Opzionale - ASRock ConRoe945G-DVI | Quick Installation Guide - Page 87
x 24.4 cm Processore - LGA 775 per Intel® Dual Core CoreTM 2 Extreme / CoreTM 2 Duo / Pentium® D / Pentium® 4 / Celeron® D - FSB 1066/800/533 MHz - Supporto tecnologia Hyper Threading (vedi ATTENZIONE 1) - Supporta la tecnologia overclocking "slegata" (vedi ATTENZIONE 2) - Supporto CPU EM64T - ASRock ConRoe945G-DVI | Quick Installation Guide - Page 88
- Indicatore di velocità per la ventola di raffreddamento - Ventola CPU silenziosa - Voltaggio: +12V, +5V, +3.3V, Vcore Compatibi- - Microsoft® Windows® 2000 / XP / XP 64 bit / VistaTM lità SO (vedi ATTENZIONE 9) Certificazioni- FCC, CE, WHQL Italiano 88 ASRock ConRoe945G-DVI Motherboard - ASRock ConRoe945G-DVI | Quick Installation Guide - Page 89
. 9. Il driver Microsoft® Windows® VistaTM non è ancora pronto. Vi terremo aggiornati in futuro sul nostro sito web. Si prega di visitare il nostro sito web per il driver Microsoft® Windows® VistaTM ed informazioni relative. Sito web ASRock: http://www.asrock.com 89 ASRock ConRoe945G-DVI Motherboard - ASRock ConRoe945G-DVI | Quick Installation Guide - Page 90
inviare il logo Windows® VistaTM Premium e Basic devono osservare la tabella di seguito sui requisiti hardware minimi. Utilizzare CPU, memoria e VGA raccomandati. CPU Memoria Celeron D , consultare i requisiti Premium Discrete su http://www.asrock.com Italiano 90 ASRock ConRoe945G-DVI Motherboard - ASRock ConRoe945G-DVI | Quick Installation Guide - Page 91
componente. 5. Nell'usare i giraviti per fissare la scheda madre al telaio non serrare eccessivamente le viti! Altrimenti si rischia di danneggiare la scheda madre. 91 ASRock ConRoe945G-DVI Motherboard Italiano - ASRock ConRoe945G-DVI | Quick Installation Guide - Page 92
135 gradi la leva di carico per aprirla completamente. Fase 1-3. Ruotare di circa 100 gradi la piastra di carico per aprirla completamente. Fase 2. Inserire la CPU 775-Pin: Fase 2-1. Tenere la CPU dai bordi segnati con linee nere. Linea nera Linea nera Italiano 92 ASRock ConRoe945G-DVI Motherboard - ASRock ConRoe945G-DVI | Quick Installation Guide - Page 93
di orientamento Pin1 Dente di Tacca di allineamento orientamento Tacca di allineamento CPU da 775-Pin Socket da 775-Pin Per il corretto inserimento, verificare di far combaciare i due denti leva di carico mentre si preme leggermente sulla piastra di carico. 93 ASRock ConRoe945G-DVI Motherboard - ASRock ConRoe945G-DVI | Quick Installation Guide - Page 94
della ventola al connettore ventola della CPU sulla scheda madre. Fase 6. fissare il cavo in eccesso con fascette per assicurare che il cavo non interferisca con il funzionamento della ventola o che venga a contatto con gli altri componenti. 94 ASRock ConRoe945G-DVI Motherboard Italiano - ASRock ConRoe945G-DVI | Quick Installation Guide - Page 95
se si installa una coppia di moduli di memoria su DDRII_1 e DDII_2, è impossibile attivare la tecnologia Dual Channel Memory. 4. Non è consentito installare la DDR nello slot DDRII, altrimenti si possono danneggiare questa scheda madre e la DIMM. Italiano 95 ASRock ConRoe945G-DVI Motherboard - ASRock ConRoe945G-DVI | Quick Installation Guide - Page 96
DIMM nello slot fino a far scattare completamente in posizione i fermagli di ritegno alle due estremità e fino ad installare correttamente la DIMM nella sua sede. 96 ASRock ConRoe945G-DVI Motherboard - ASRock ConRoe945G-DVI | Quick Installation Guide - Page 97
LAN, SATA 2, ecc. 1. Se si aggiunge una scheda PCI Express VGA al PCIE1 (16 slot PCIE), la VGA della scheda madre viene disattivata. Se si installa la PCI Express VGA su PCIE1 (16 PCIE) e si setta l'opzione nel BIOS la scheda allo chassis con le viti. 97 ASRock ConRoe945G-DVI Motherboard Italiano - ASRock ConRoe945G-DVI | Quick Installation Guide - Page 98
corretta della scheda grafica SI DVI. Step 1. Installare la scheda grafica SI DVI in PCIE1 (16 slot PCIE). Consultare le procedure per l'installazione delle schede di espansione a pagina 97 per avere maggiori informazioni. Scheda grafica SI DVI 98 ASRock ConRoe945G-DVI Motherboard Italiano - ASRock ConRoe945G-DVI | Quick Installation Guide - Page 99
la scheda madre, dopo l'avvio del sistema. Se non è stato ancora installato il driver Intel® VGA, installarlo dal CD e riavviare il computer. Una volta eseguita questa operazione è possibile a utilizzare le funzioni DVI-D con questa scheda madre. Italiano 99 ASRock ConRoe945G-DVI Motherboard - ASRock ConRoe945G-DVI | Quick Installation Guide - Page 100
. Per pulire I parametri di sistema e resettare ai parametri di default, spegnere il computer e scollegare l'alimentatore, poi collegare il jumper sul CLRCMOS1 per 5 secondi. Italiano 100 ASRock ConRoe945G-DVI Motherboard - ASRock ConRoe945G-DVI | Quick Installation Guide - Page 101
/s. Cavi dati Serial ATA (SATA) Entrambe le estremità del cavo dati SATA possono collegarsi all'hard disk SATA / SATAII o al connettore SATAII sulla scheda madre. ASRock ConRoe945G-DVI Motherboard 101 Italiano - ASRock ConRoe945G-DVI | Quick Installation Guide - Page 102
senza fili. Permettono di ricevere input CD1 stereo audio da fonti di suono come CD-ROM, DVD - ROM,TV tuner, o schede MPEG. È un'interfaccia per il cavo del pannello audio. Che consente connessione facile e controllo dei dispositivi audio. Italiano 102 ASRock ConRoe945G-DVI Motherboard - ASRock ConRoe945G-DVI | Quick Installation Guide - Page 103
CPU_FAN1) (vedi p.2 Nr. 3) Collegare il cavo della ventolina CPU a questo connettore e far combaciare il filo nero al pin terra. Connettore alimentazione ATX (20-pin ATXPWR1) (vedi p.2 Nr. 27) Collegare la sorgente d'alimentazione ATX a questo connettore. ASRock ConRoe945G-DVI Motherboard 103 - ASRock ConRoe945G-DVI | Quick Installation Guide - Page 104
che possa fornire energia sufficiente. In caso contrario l'unità non si avvia. Questo collettore porta COM è utilizzato per supportare il modulo porta COM. Italiano 104 ASRock ConRoe945G-DVI Motherboard - ASRock ConRoe945G-DVI | Quick Installation Guide - Page 105
/support/download.htm Gli esempi di cui sopra sono solo per riferimento. Per dischi rigidi SATAII di diversi produttori, i metodi di impostazione dei pin del jumper possono non essere gli stessi. Visitare i siti web dei produttori per gli aggiornamenti. Italiano ASRock ConRoe945G-DVI Motherboard - ASRock ConRoe945G-DVI | Quick Installation Guide - Page 106
BIOS per impostare la selezione da [Auto] a [CPU, PCIE, Async.]. A questo punto, la CPU FSB è "libera" durante l'overclocking, ma i bus PCI / PCIE sono nella modalità fissata in modo tale che l'FSB posa operare sotto un più stabile ambiente di overclocking. 106 ASRock ConRoe945G-DVI Motherboard - ASRock ConRoe945G-DVI | Quick Installation Guide - Page 107
scheda madre derivanti da trattamenti errati. Per vedere questo Demo è necessario eseguire Microsoft Media Player per poter riprodurre il file. Il demo si trova nel CD di supporto della scheda madre, al seguente indirizzo: ..\ MPEGAV \ LGA775INST.DAT Italiano ASRock ConRoe945G-DVI Motherboard 107 - ASRock ConRoe945G-DVI | Quick Installation Guide - Page 108
manual de usuario incluido en el CD de soporte. Porque las especificaciones de la placa madre y el software de BIOS podrían ser actualizados, el contenido de este manual rápida de ASRock ConRoe945G-DVI CD de soporte de ASRock ConRoe945G-DVI (incluye la Demo de instalación de la CPU LGA 775) Una cinta - ASRock ConRoe945G-DVI | Quick Installation Guide - Page 109
Híbrido Ranuras de Expansión VGA OnBoard Audio LAN Entrada/Salida de Panel Trasero - Factor forma Micro ATX: 24,4 cm x 24,4 cm, 9,6" x 9,6" - LGA 775 para Intel® Dual Core CoreTM 2 Extreme / CoreTM 2 Duo / Pentium® D / Pentium® 4 / Celeron® D - FSB 1066/800/533 MHz - Admite tecnología Hyper - ASRock ConRoe945G-DVI | Quick Installation Guide - Page 110
- Taquímetros de los ventiladores del procesador y del chasis - Ventilador silencioso para procesador - Monitor de Voltaje: +12V, +5V, +3.3V, Vcore - En conformidad con Microsoft® Windows® 2000 / XP / XP 64 bits / VistaTM (vea ATENCIÓN 9) - FCC, CE, WHQL 110 ASRock ConRoe945G-DVI Motherboard - ASRock ConRoe945G-DVI | Quick Installation Guide - Page 111
BIOS Manual del Usuario en el soporte CD CPU Para salida de audio, este placa Windows® VistaTM / XP 64 bits / XP SP1; SP2/2000 SP4. 9. El controlador para Microsoft® Windows Windows® VistaTM y otra información relacionada. Página web de ASRock: http://www.asrock.com ASRock ConRoe945G-DVI Motherboard - ASRock ConRoe945G-DVI | Quick Installation Guide - Page 112
de Windows® VistaTM Premium y Basic, el tamaño de memoria compartida de la tarjeta VGA en placa podrá ajustarse a 128 MB. * Si piensa utilizar una tarjeta gráfica externa en esta placa base, consulte los requisitos en Premium Discrete en http://www.asrock.com Español 112 ASRock ConRoe945G-DVI - ASRock ConRoe945G-DVI | Quick Installation Guide - Page 113
775 agujas en el socket, compruebe que la superficie de la CPU se encuentra limpia y no hay ninguna aguja torcida en el socket. No introduzca la CPU en el socket por la fuerza si se produce la situación anterior. Si lo hace, puede producir daños graves en la CPU. ASRock ConRoe945G-DVI Motherboard - ASRock ConRoe945G-DVI | Quick Installation Guide - Page 114
CPU coinciden con las teclas de alineación del socket. 114 Step 2-3. Coloque con cuidado la CPU en el socket con un movimiento totalmente vertical. Step 2-4. Compruebe que la CPU se encuentra en el socket y la orientación coincide con la indicada por las muescas. ASRock ConRoe945G-DVI Motherboard - ASRock ConRoe945G-DVI | Quick Installation Guide - Page 115
la CPU. A continuación se ofrece un ejemplo para ilustrar la instalación del disipador para la CPU de 775 agujas. Paso 1. Aplique el material termal de interfaz en el centro del IHS de la superficie del socket. (Aplique el material termal de interfaz) Español ASRock ConRoe945G-DVI Motherboard - ASRock ConRoe945G-DVI | Quick Installation Guide - Page 116
cabezal del ventilador con el conector del ventilador de la CPU en la placa madre. Fije el cable que sobre con un lazo para asegurarse de que el cable no interfiere en el funcionamiento del ventilador y tampoco entra en contacto con otros componentes. Español 116 ASRock ConRoe945G-DVI Motherboard - ASRock ConRoe945G-DVI | Quick Installation Guide - Page 117
2.3 Instalación de Memoria La placa ConRoe945G-DVI ofrece cuatro ranuras DIMM DDRII de 240 pines, y soporta Tecnología de Memoria de Doble Canal. Para la la ranura DDRII; si lo hace, esta placa base y los módulos DIMM pueden resultar dañados. Español ASRock ConRoe945G-DVI Motherboard 117 - ASRock ConRoe945G-DVI | Quick Installation Guide - Page 118
de la ranura hasta que los clips de sujeción de ambos lados queden completamente introducidos en su sitio y la DIMM se haya asentado apropiadamente. 118 ASRock ConRoe945G-DVI Motherboard - ASRock ConRoe945G-DVI | Quick Installation Guide - Page 119
una anchura de 1 carriles, como por ejemplo, para tarjetas Gigabit LAN, SATA 2, etc. 1. Si instala la tarjeta complemento VGA PCI en PCIE1 (ranura PCIE x16) y ajusta la opción de la BIOS «Internal Graphics Mode Select» (Selección del modo gráfico interno) en ASRock ConRoe945G-DVI Motherboard 119 - ASRock ConRoe945G-DVI | Quick Installation Guide - Page 120
una instalación adecuada de la tarjeta gráfica SI DVI. Paso 1. Instale la tarjeta gráfica SI DVI en PCIE1 (ranura PCIE x16). Consulte los procedimientos de instalación de la tarjeta en la página 119 para obtener más detalles. Tarjeta gráfica SI DVI Español 120 ASRock ConRoe945G-DVI Motherboard - ASRock ConRoe945G-DVI | Quick Installation Guide - Page 121
el sistema. Si no ha instalado aún el controlador Intel® VGA, instale el controlador Intel® VGA desde nuestro CD de soporte en su sistema y reinicie el equipo. A continuación, puede comenzar a utilizar la función de salida DVI-D con esta placa base. Español ASRock ConRoe945G-DVI Motherboard 121 - ASRock ConRoe945G-DVI | Quick Installation Guide - Page 122
y desconecte el cable de la fuente de electricidad, ponga en cortocircuito los pins de CLRCMOS1 por más que 5 segundos usando un jumper cap. Español 122 ASRock ConRoe945G-DVI Motherboard - ASRock ConRoe945G-DVI | Quick Installation Guide - Page 123
de datos de serie ATA (SATA) Ambos extremos del cable pueden conectarse al disco duro SATA / SATAII o la conexión de la placa base. Español ASRock ConRoe945G-DVI Motherboard 123 - ASRock ConRoe945G-DVI | Quick Installation Guide - Page 124
ón wireless opcional. Permite recepción de input audio de fuente sónica como CDCD1 ROM, DVD-ROM, TV tuner, o tarjeta MPEG. Este es una interface para cable de audio de panel frontal que permite conexión y control conveniente de apparatos de Audio. 124 ASRock ConRoe945G-DVI Motherboard Español - ASRock ConRoe945G-DVI | Quick Installation Guide - Page 125
) (vea p.2, N. 3) Conecte el cable del ventilador de la CPU a este conector y haga coincidir el cable negro con el conector de tierra. Cabezal de alimentación ATX Conecte la fuente de (20-pin ATXPWR1) (vea p.2, N. 27) alimentación ATX a su cabezal. ASRock ConRoe945G-DVI Motherboard 125 - ASRock ConRoe945G-DVI | Quick Installation Guide - Page 126
patillas 3 y 4 están en corto, se activará SATA 1.5Gb/s. Por otro lado, si desea activar SATAII 3.0Gb/s, por favor retire los puentes de las patillas 3 y 4. 126 ASRock ConRoe945G-DVI Motherboard Español - ASRock ConRoe945G-DVI | Quick Installation Guide - Page 127
para detalles. http://www.hitachigst.com/hdd/support/download.htm Los ejemplos anteriores son sólo para CD compatibles. Siga el orden de arriba a abajo para instalar los controladores requeridos. Los controladores que instale pueden funcionar correctamente. Español ASRock ConRoe945G-DVI Motherboard - ASRock ConRoe945G-DVI | Quick Installation Guide - Page 128
Reloj (Overclocking) no relacionado, por favor entre a la opción de "Modo de Forzado de Reloj" de la configuración de BIOS para establecer la selección de [Auto] a [CPU, PCIE, Async.]. Por lo tanto, FSB de CPU no ía de aumento de velocidad liberada. Español 128 ASRock ConRoe945G-DVI Motherboard - ASRock ConRoe945G-DVI | Quick Installation Guide - Page 129
BIOS, consulte el Manual del usuario (archivo PDF), que se encuentra en el CD de soporte. 4.Información de Software Support CD Esta placa-base soporta diversos tipos de sistema operativo Windows®: 2000 / XP / XP 64 bits / VistaTM El CD de instalación que acompaña la placa-base trae todos los drivers
-
 1
1 -
 2
2 -
 3
3 -
 4
4 -
 5
5 -
 6
6 -
 7
7 -
8
-
9
-
10
-
11
-
12
-
13
-
14
-
15
-
16
-
17
-
18
-
19
-
20
-
21
-
22
-
23
-
24
-
25
-
26
-
27
-
28
-
29
-
30
-
31
-
32
-
33
-
34
-
35
-
36
-
37
-
38
-
39
-
40
-
41
-
42
-
43
-
44
-
45
-
46
-
47
-
48
-
49
-
50
-
51
-
52
-
53
-
54
-
55
-
56
-
57
-
58
-
59
-
60
-
61
-
62
-
63
-
64
-
65
-
66
-
67
-
68
-
69
-
70
-
71
-
72
-
73
-
74
-
75
-
76
-
77
-
78
-
79
-
80
-
81
-
82
-
83
-
84
-
85
-
86
-
87
-
88
-
89
-
90
-
91
-
92
-
93
-
94
-
95
-
96
-
97
-
98
-
99
-
100
-
101
-
102
-
103
-
104
-
105
-
106
-
107
-
108
-
109
-
110
-
111
-
112
-
113
-
114
-
115
-
116
-
117
-
118
-
119
-
120
-
121
-
122
-
123
-
124
-
125
-
126
-
127
-
128
-
129
 |
 |

1
ASRock
ConRoe945G-DVI
Motherboard
English
English
English
English
English
Copyright Notice:
Copyright Notice:
Copyright Notice:
Copyright Notice:
Copyright Notice:
No part of this installation guide may be reproduced, transcribed, transmitted, or trans-
lated in any language, in any form or by any means, except duplication of documen-
tation by the purchaser for backup purpose, without written consent of ASRock Inc.
Products and corporate names appearing in this guide may or may not be registered
trademarks or copyrights of their respective companies, and are used only for identifica-
tion or explanation and to the owners’ benefit, without intent to infringe.
Disclaimer:
Disclaimer:
Disclaimer:
Disclaimer:
Disclaimer:
Specifications and information contained in this guide are furnished for informational
use only and subject to change without notice, and should not be constructed as a
commitment by ASRock. ASRock assumes no responsibility for any errors or omissions
that may appear in this guide.
With respect to the contents of this guide, ASRock does not provide warranty of any kind,
either expressed or implied, including but not limited to the implied warranties or
conditions of merchantability or fitness for a particular purpose. In no event shall
ASRock, its directors, officers, employees, or agents be liable for any indirect, special,
incidental, or consequential damages (including damages for loss of profits, loss of
business, loss of data, interruption of business and the like), even if ASRock has been
advised of the possibility of such damages arising from any defect or error in the guide
or product.
This device complies with Part 15 of the FCC Rules. Operation is subject to the
following two conditions:
(1)
this device may not cause harmful interference, and
(2)
this device must accept any interference received, including interference that
may cause undesired operation.
Published November 2006
Copyright
©
2006 ASRock INC. All rights reserved.
CALIFORNIA, USA ONLY
The Lithium battery adopted on this motherboard contains Perchlorate, a toxic
substance controlled in Perchlorate Best Management Practices (BMP) regulations
passed by the California Legislature. When you discard the Lithium battery in
California, USA, please follow the related regulations in advance.
“Perchlorate Material-special handling may apply, see
www
.dtsc.ca.gov/hazardouswa
ste/perchlorate”
ASRock Website: http://www.asrock.com