ASRock K8NF3-VSTA Quick Installation Guide
ASRock K8NF3-VSTA Manual
 |
View all ASRock K8NF3-VSTA manuals
Add to My Manuals
Save this manual to your list of manuals |
ASRock K8NF3-VSTA manual content summary:
- ASRock K8NF3-VSTA | Quick Installation Guide - Page 1
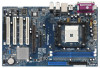
for backup purpose, without written consent of ASRock Inc. Products and corporate names appearing in this guide may or may not be registered trademarks or ASRock Website: http://www.asrock.com Published January 2007 Copyright©2007 ASRock INC. All rights reserved. 1 ASRock K8NF3-VSTA Motherboard - ASRock K8NF3-VSTA | Quick Installation Guide - Page 2
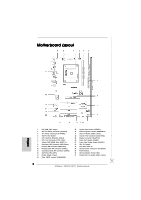
) 19 Floppy Connector (FLOPPY1) 20 Game Port Header (GAME1) 21 Front Panel Audio Header (AUDIO1) 22 JR1 JL1 Jumper 23 PCI Slots (PCI1- 4) 24 Internal Audio Connector: CD1 (Black) 25 Flash Memory 26 Infrared Module Header (IR1) 27 Shared USB 2.0 Header (USB2_3, Blue) 2 ASRock K8NF3-VSTA Motherboard - ASRock K8NF3-VSTA | Quick Installation Guide - Page 3
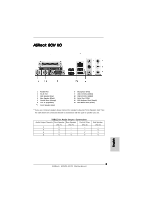
in accordance with the type of speaker you use. TABLE for Audio Output Connection Audio Output Channels Front Speaker Rear Speaker Central / Bass (No. 7) (No. 4) (No. 5) 2 V -- -- 4 V -- -- 6 V -- V 8 V V V Side Speaker (No. 3) -V V V 3 ASRock K8NF3-VSTA Motherboard English - ASRock K8NF3-VSTA | Quick Installation Guide - Page 4
modifications of this manual occur, the updated version will be available on ASRock website without further notice. You may find the latest VGA cards and CPU support lists on ASRock website as well. ASRock website http://www.asrock.com 1.1 Package Contents 1 x ASRock K8NF3-VSTA Motherboard (ATX Form - ASRock K8NF3-VSTA | Quick Installation Guide - Page 5
4 x PCI slots - 1 x AGP 8X slot (see CAUTION 4) - 7.1 CH Windows® VistaTM Premium Level Superior Audio (C-Media CM6501 Audio Codec with UAA architecture) - Realtek PHY RTL8201CL - Speed: 10/100 Ethernet - Supports Wake-On-LAN ASRock 8CH I/O - 1 x PS/2 Mouse Port - 1 x PS/2 Keyboard Port - 1 x Serial - ASRock K8NF3-VSTA | Quick Installation Guide - Page 6
BIOS - AMI Legal BIOS - Supports "Plug and Play" - ACPI 1.1 Compliance Wake Up Events - Supports jumperfree - SMBIOS 2.3.1 Support - Drivers, Utilities, AntiVirus Software (Trial Version) - CPU Temperature Sensing - Chassis Temperature Sensing - CPU . English 6 ASRock K8NF3-VSTA Motherboard - ASRock K8NF3-VSTA | Quick Installation Guide - Page 7
driver keeps on updating now. As long as we have the latest driver, we will update it to our website in the future. Please visit our website for Microsoft® Windows® VistaTM / VistaTM 64-bit driver and related information. ASRock website http://www.asrock.com 7 ASRock K8NF3-VSTA Motherboard English - ASRock K8NF3-VSTA | Quick Installation Guide - Page 8
plan to submit Windows® VistaTM Premium and Basic logo, please follow the below table for minimum hardware requirement. CPU Memory VGA Sempron 2500+ 512MB Single Channel DX9.0 with WDDM Driver with 128bit VGA memory (Premium) with 64bit VGA memory (Basic) English 8 ASRock K8NF3-VSTA Motherboard - ASRock K8NF3-VSTA | Quick Installation Guide - Page 9
wall socket before touching any component. 2. To avoid damaging the motherboard components due to static electricity, NEVER place your motherboard the motherboard to the chassis, please do not over-tighten the screws! Doing so may damage the motherboard. 9 ASRock K8NF3-VSTA Motherboard English - ASRock K8NF3-VSTA | Quick Installation Guide - Page 10
the heatsink are securely fastened and in good contact with each other. Then connect the CPU fan to the CPU FAN connector (CPU_FAN1, see Page 2, No. 6). For proper installation, please kindly refer to the instruction manuals of the CPU fan and the heatsink. English 10 ASRock K8NF3-VSTA Motherboard - ASRock K8NF3-VSTA | Quick Installation Guide - Page 11
cause permanent damage to the motherboard and the DIMM if you force the DIMM into the slot at incorrect orientation. Step 3. Firmly insert the DIMM into the slot until the retaining clips at both ends fully snap back in place and the DIMM is properly seated. 11 ASRock K8NF3-VSTA Motherboard English - ASRock K8NF3-VSTA | Quick Installation Guide - Page 12
AGP Slot) There are 4 PCI slots and 1 AGP slot on K8NF3-VSTA motherboard. PCI Slots: PCI slots are used to install expansion cards that have the 32-bit PCI interface. AGP slot: The AGP slot is used to install a graphics card. The ASRock AGP slot has a special design of clasp that can securely fasten - ASRock K8NF3-VSTA | Quick Installation Guide - Page 13
PS/2 or USB wake up events. Note: the rear panel audio connectors can work. update the BIOS. If you need to clear the CMOS when you just finish updating the BIOS, you must boot up the system first, and then shut it down before you do the clear-CMOS action. English 13 ASRock K8NF3-VSTA Motherboard - ASRock K8NF3-VSTA | Quick Installation Guide - Page 14
cable Note: If you use only one IDE device on this motherboard, please set the IDE device as "Master". Please refer to the instruction of your IDE device vendor for the details. Besides, to to the SATA hard disk or the SATA connector on the motherboard. 14 ASRock K8NF3-VSTA Motherboard English - ASRock K8NF3-VSTA | Quick Installation Guide - Page 15
this motherboard. Each USB 2.0 header can support two USB audio input from sound sources such as a CD-ROM, DVD-ROM, TV tuner card, or MPEG card. This is an interface for front panel audio cable that allows convenient connection and control of audio devices. English 15 ASRock K8NF3-VSTA Motherboard - ASRock K8NF3-VSTA | Quick Installation Guide - Page 16
motherboard provides 4-Pin CPU fan (Quiet Fan) support, the 3-Pin CPU fan still can work successfully even without the fan speed control function. If you plan to connect the 3-Pin CPU fan to the CPU fan connector on this motherboard cause power up failure. English 16 ASRock K8NF3-VSTA Motherboard - ASRock K8NF3-VSTA | Quick Installation Guide - Page 17
Game Port Header (15-pin GAME1) (see p.2 No. 20) Connect a Game cable to this header if the Game port bracket is installed. English 17 ASRock K8NF3-VSTA Motherboard - ASRock K8NF3-VSTA | Quick Installation Guide - Page 18
you with the following driver installation choices: 1. "All in 1 Logo Driver( W/O HotPlug & RAID)": You may choose this item to install all-in-1 logo driver which does not support Hot Plug and RAID functions, but it has passed Microsoft® logo certification. 18 ASRock K8NF3-VSTA Motherboard English - ASRock K8NF3-VSTA | Quick Installation Guide - Page 19
procedures of making a SP4 disk: http://www.microsoft.com/Windows2000/downloads/servicepacks/sp4/ spdeploy.htm#the_integrated_installation_fmay STEP 1: Make a SATA Driver Diskette. A. Insert the ASRock Support CD into your optical drive to boot your system. 19 ASRock K8NF3-VSTA Motherboard - ASRock K8NF3-VSTA | Quick Installation Guide - Page 20
"RAID Utility for Windows Guide" in Windows® environment. Please refer to the document in the Support CD, "Guide to nVidia RAID Utility for Windows", which is located in the folder at the following path: .. \Information\Manual\RAID Utility for Windows Guide English 20 ASRock K8NF3-VSTA Motherboard - ASRock K8NF3-VSTA | Quick Installation Guide - Page 21
Menu automatically if "AUTORUN" is enabled in your computer. If the Main Menu does not appear automatically, locate and double-click on the file "ASSETUP. EXE" from the "BIN" folder in the Support CD to display the menus. 21 ASRock K8NF3-VSTA Motherboard English - ASRock K8NF3-VSTA | Quick Installation Guide - Page 22
22 ASRock K8NF3-VSTA Motherboard - ASRock K8NF3-VSTA | Quick Installation Guide - Page 23
™ '' ™ ® ® 23 ASRock K8NF3-VSTA Motherboard - ASRock K8NF3-VSTA | Quick Installation Guide - Page 24
® ® 24 ASRock K8NF3-VSTA Motherboard - ASRock K8NF3-VSTA | Quick Installation Guide - Page 25
® ® ® ® ® 25 ASRock K8NF3-VSTA Motherboard - ASRock K8NF3-VSTA | Quick Installation Guide - Page 26
® ® 26 ASRock K8NF3-VSTA Motherboard - ASRock K8NF3-VSTA | Quick Installation Guide - Page 27
27 ASRock K8NF3-VSTA Motherboard - ASRock K8NF3-VSTA | Quick Installation Guide - Page 28
28 ASRock K8NF3-VSTA Motherboard - ASRock K8NF3-VSTA | Quick Installation Guide - Page 29
29 ASRock K8NF3-VSTA Motherboard - ASRock K8NF3-VSTA | Quick Installation Guide - Page 30
30 ASRock K8NF3-VSTA Motherboard - ASRock K8NF3-VSTA | Quick Installation Guide - Page 31
31 ASRock K8NF3-VSTA Motherboard - ASRock K8NF3-VSTA | Quick Installation Guide - Page 32
" " SATA2 SATA1 32 ASRock K8NF3-VSTA Motherboard - ASRock K8NF3-VSTA | Quick Installation Guide - Page 33
CD1 33 ASRock K8NF3-VSTA Motherboard - ASRock K8NF3-VSTA | Quick Installation Guide - Page 34
1 2 3 4 ® 34 ASRock K8NF3-VSTA Motherboard - ASRock K8NF3-VSTA | Quick Installation Guide - Page 35
® ® ® ® ® ® ® 35 ASRock K8NF3-VSTA Motherboard - ASRock K8NF3-VSTA | Quick Installation Guide - Page 36
® ® ® ® ® ® ® ® ® ® ® ® ® ® ® ® ® ® ® ® 36 ASRock K8NF3-VSTA Motherboard - ASRock K8NF3-VSTA | Quick Installation Guide - Page 37
® ® ® ® ® ® ® ® ® ® ® ® 37 ASRock K8NF3-VSTA Motherboard - ASRock K8NF3-VSTA | Quick Installation Guide - Page 38
® ® 38 ASRock K8NF3-VSTA Motherboard - ASRock K8NF3-VSTA | Quick Installation Guide - Page 39
X O O O X O O O O: X: O O O O 39 ASRock K8NF3-VSTA Motherboard - ASRock K8NF3-VSTA | Quick Installation Guide - Page 40
ützten CPUs sind auch auf der ASRock-Website aufgelistet. ASRock-Website: http://www.asrock.com 1.1 Kartoninhalt ASRock K8NF3-VSTA Motherboard (ATX-Formfaktor: 30.5 cm x 19.1 cm; 12.0 Zoll x 7.5 Zoll) ASRock K8NF3-VSTA Schnellinstallationsanleitung ASRock K8NF3-VSTA Support-CD Ein 80-adriges Ultra - ASRock K8NF3-VSTA | Quick Installation Guide - Page 41
Windows® VistaTM Premium Level Superior Audio (C-Media CM6501 Audiocodec mit UAA-Architektur) - Realtek PHY RTL8201CL - Speed: 10/100 Ethernet - Unterstützt Wake-On-LAN ASRock / Mitte/Bass / Audioeingang/ Lautsprecher vorne / Mikrofon (siehe VORSICHT 5) Deutsch 41 ASRock K8NF3-VSTA Motherboard - ASRock K8NF3-VSTA | Quick Installation Guide - Page 42
CPU-Temperatur - Motherboardtemperaturerkennung - Drehzahlmessung für CPU-Lüfter - Drehzahlmessung für Gehäuselüfter - CPU-Lüftergeräuschdämpfung - Spannungsüberwachung: +12V, +5V, +3.3V, Vcore Betriebssysteme - Unterstützt Microsoft® Windows® 2000 / XP / XP . 42 ASRock K8NF3-VSTA Motherboard - ASRock K8NF3-VSTA | Quick Installation Guide - Page 43
. Sobald wir den neuesten Treiber haben, stellen wir ihn auf unserer Website zur Verfügung. Bitte besuchen Sie unsere Website für den Microsoft® Windows® VistaTM / VistaTM 64-Bit Treiber und verwandte Informationen. ASRock-Website http://www.asrock.com 43 ASRock K8NF3-VSTA Motherboard Deutsch - ASRock K8NF3-VSTA | Quick Installation Guide - Page 44
und BasicLogos vorbereiten möchten, finden die minimalen Hardwarevoraussetzungen in der folgenden Tabelle. CPU Speicher VGA Sempron 2500+ 512 MB, Single Channel DX9.0 mit WDDM-Treiber mit 128 Bit-VGA-Speicher (Premium) mit 64 Bit-VGA-Speicher (Basic) Deutsch 44 ASRock K8NF3-VSTA Motherboard - ASRock K8NF3-VSTA | Quick Installation Guide - Page 45
Unterlage, oder zurück in die Tüte, mit der die Komponente geliefert wurde. 5. Wenn Sie das Motherboard mit den Schrauben an dem Computergehäuse befestigen, überziehen Sie bitte die Schrauben nicht! Das Motherboard kann sonst beschädigt werden. Deutsch 45 ASRock K8NF3-VSTA Motherboard - ASRock K8NF3-VSTA | Quick Installation Guide - Page 46
befestigt sind und einen guten Kontakt zueinander haben. Verbinden Sie dann den CPULüfter mit dem CPU-LÜFTER-Anschluss (CPU_FAN1, siehe Seite 2, Nr. 6). Beziehen Sie sich für eine richtige Installation auf die Handbücher des CPULüfters und des Kühlkörpers. Deutsch 46 ASRock K8NF3-VSTA Motherboard - ASRock K8NF3-VSTA | Quick Installation Guide - Page 47
2.3 Installation der Speichermodule (DIMM) Das K8NF3-VSTA-Motherboard hat zwei 184-pol. DDR- (Double Data Rate) DIMMSteckplätze. Achten Sie darauf, das Netzteil abzustecken, an beiden Enden des Moduls einschnappen und das DIMM-Modul fest an Ort und Stelle sitzt. 47 ASRock K8NF3-VSTA Motherboard - ASRock K8NF3-VSTA | Quick Installation Guide - Page 48
ätze und 1 AGP-Steckplätze am K8NF3-VSTA Motherboard. PCI-Slots: PCI-Slots werden zur Installation von Erweiterungskarten mit dem 32bit PCI-Interface genutzt. AGP-Slot: Der AGP-Steckplatz dient zur Installation einer Grafikkarte. Der ASRock AGP-Steckplatz hat speziell entwickelte Klammern, die - ASRock K8NF3-VSTA | Quick Installation Guide - Page 49
Sie nicht, den Jumper wieder zu entfernen, nachdem das CMOS gelöscht wurde. Wenn Sie den CMOS-Inhalt gleich nach dem Aktualisieren des BIOS löschen müssen, müssen Sie zuerst das System starten und dann wieder ausschalten, bevor Sie den CMOS-Inhalt löschen. 49 ASRock K8NF3-VSTA Motherboard Deutsch - ASRock K8NF3-VSTA | Quick Installation Guide - Page 50
der Anschlussleisten. Wenn Sie die Jumperkappen auf die Anschlüsse setzen, wird das Motherboard permanent beschädigt! Anschluss Anschluss für das Floppy-Laufwerk (33-Pin FLOPPY1) (siehe der SATA-Festplatte oder dem SATA-Anschluss am Mainboard verbinden. 50 ASRock K8NF3-VSTA Motherboard Deutsch - ASRock K8NF3-VSTA | Quick Installation Guide - Page 51
optionales, drahtloses Sendeund Empfangs-Infrarotmodul. Interne Audio-Anschlüsse (4-Pin CD1) (CD1: siehe S.2, Punkt 24) CD1 Diese ermöglichen Ihnen StereoSignalquellen, wie z. B. CD-ROM, DVD-ROM, TV-Tuner oder MPEG-Karten mit Ihrem System zu verbinden. Deutsch 51 ASRock K8NF3-VSTA Motherboard - ASRock K8NF3-VSTA | Quick Installation Guide - Page 52
dieses Motherboards anschließen möchten, verbinden Sie ihn bitte mit den Pins 1 - 3. Pins 1-3 anschließen Lüfter mit dreipoligem Anschluss installieren ATX-Netz-Header (20-pin ATXPWR1) (siehe S.2, Punkt 3) Verbinden Sie die ATXStromversorgung mit diesem Header. Deutsch 52 ASRock K8NF3-VSTA - ASRock K8NF3-VSTA | Quick Installation Guide - Page 53
2: Verbinden Sie das SATA-Netzkabel mit der SATA-Festplatte. SCHRITT 3: Schließen Sie ein Ende des SATA-Datenkabels am SATA-Anschluss des Motherboards an. SCHRITT 4: Schließen Sie das andere Ende des SATA-Datenkabels an die SATA- e Festplatte an. Deutsch 53 ASRock K8NF3-VSTA Motherboard - ASRock K8NF3-VSTA | Quick Installation Guide - Page 54
Treiber verfügbar ist, finden Sie diesen demnächst auf unserer Internetseite. Auf unserer Internetseite finden Sie Angaben zum Microsoft® Windows® VistaTM-/ VistaTM 64-bit-Treiber sowie weitere Informationen. ASRock-Internetseite: http:// www.asrock.com 54 ASRock K8NF3-VSTA Motherboard Deutsch - ASRock K8NF3-VSTA | Quick Installation Guide - Page 55
(Startlaufwerk) erscheint. Bitte wählen Sie das CD-ROM-Laufwerk als Boot-Laufwerk. C. Die Meldung „Generate Serial ATA driver diskette [Y/N]?" [Serial ATA-Treiberdiskette erstellen [Y/N]?] bestätigen Sie mit . D. Daraufhin werden die Meldungen 55 ASRock K8NF3-VSTA Motherboard Deutsch - ASRock K8NF3-VSTA | Quick Installation Guide - Page 56
unter Windows® über das "RAIDDienstprogramm für Windows" fest. Bitte lesen Sie das Dokument auf der SupportCD "Anleitung zum Nvidia RAID-Dienstprogramm für Windows", das Sie in folgendem Pfad finden: .. \Information\Manual\RAID Utility for Windows Guide Deutsch 56 ASRock K8NF3-VSTA Motherboard - ASRock K8NF3-VSTA | Quick Installation Guide - Page 57
Sie bitte die Option "Overclock Mode" (Übertaktungsmodus) im BIOS von [Auto] auf [CPU, AGP, Async.] um. Dadurch wird der CPU-FSB beim Übertakten entkoppelt, AGP / PCIBusse werden jedoch Seite 42, bevor Sie die Untied Overclocking-Technologie anwenden. 57 ASRock K8NF3-VSTA Motherboard Deutsch - ASRock K8NF3-VSTA | Quick Installation Guide - Page 58
der Support-CD, um die Menüs aufzurufen. Das Setup-Programm soll es Ihnen so leicht wie möglich machen. Es ist menügesteuert, d.h. Sie können in den verschiedenen Untermenüs Ihre Auswahl treffen und die Programme werden dann automatisch installiert. 58 ASRock K8NF3-VSTA Motherboard Deutsch - ASRock K8NF3-VSTA | Quick Installation Guide - Page 59
des cartes VGA et CPU également sur le site Web ASRock. Site web ASRock, http://www.asrock.com 1.1 Contenu du paquet Carte mère ASRock K8NF3-VSTA (Facteur de forme ATX: 12.0 pouces x 7.5 pouces, 30.5 cm x 19.1 cm) Guide d'installation rapide ASRock K8NF3-VSTA CD de soutien ASRock K8NF3-VSTA Un câble - ASRock K8NF3-VSTA | Quick Installation Guide - Page 60
- 4 x slots PCI - 1 x slot AGP 8X (voir ATTENTION 4) - 7.1 CH Windows® VistaTM Premium Level Superior Audio (codec audio C-Media CM6501 avec architecture UAA) - Realtek PHY RTL8201CL - Vitesse: 10/100 Ethernet - Support du Wake-On-LAN ASRock 8CH I/O - 1 x port souris PS/2 - 1 x port clavier PS - ASRock K8NF3-VSTA | Quick Installation Guide - Page 61
audio internes - Connecteur audio panneau avant - 2 x En-tête USB 2.0 (Prend en charge 4 ports USB 2.0 ; 2 sont partagés avec les ports USB23 du panneau E/S) (voir ATTENTION 6) - 4Mb BIOS AMI - BIOS AMI - Support des dommages possibles causés par l'overclocking. 61 ASRock K8NF3-VSTA Motherboard - ASRock K8NF3-VSTA | Quick Installation Guide - Page 62
jour. Dès que nous aurons un nouveau pilote, nous mettrons à jour notre site Web à l'avenir. Veuillez visite notre site Web pour obtenir le pilote Microsoft® Windows® VistaTM / VistaTM 64-bits et les informations liées. Site Web ASRock http://www.asrock.com 62 ASRock K8NF3-VSTA Motherboard Français - ASRock K8NF3-VSTA | Quick Installation Guide - Page 63
de Windows® sont invités à respecter le tableau suivant relatif au matériel minimal requis. Unité centrale Mémoire Adaptateur VGA Sempron 2500+ 512 Mo Canal simple DX9.0 avec pilote WDDM avec mémoire VGA 128bits (Premium) avec mémoire VGA 64bits (Basic) Français 63 ASRock K8NF3-VSTA Motherboard - ASRock K8NF3-VSTA | Quick Installation Guide - Page 64
de composant, placez-le sur un support antistatique ou dans son sachet d'origine. 5. Lorsque vous placez les vis dans les orifices pour vis pour fixer la carte mère sur le châssis, ne serrez pas trop les vis ! Vous risquez sinon d'endommager la carte mère. 64 ASRock K8NF3-VSTA Motherboard Français - ASRock K8NF3-VSTA | Quick Installation Guide - Page 65
un avec l'autre. Ensuite, connectez le ventilateur du CPU à la prise du VENTILATEUR DU CPU (CPU_FAN1, reportez-vous en page 2, No. 6). Pour une bonne installation, veuillez vous référer aux manuels d'instruction sur le ventilateur du CPU et le dissipateur. Français 65 ASRock K8NF3-VSTA Motherboard - ASRock K8NF3-VSTA | Quick Installation Guide - Page 66
2.3 Installation des modules mémoire (DIMM) La carte mère K8NF3-VSTA propose deux emplacements DIMM DDR (Double Débit de données) à 184 broches. Ayez bien le soin de dé és aux deux extrémités se ferment complètement et que le module DIMM soit inséré correctement. 66 ASRock K8NF3-VSTA Motherboard - ASRock K8NF3-VSTA | Quick Installation Guide - Page 67
et appuyez fermement jusqu'à l'insertion complète de la carte dans son emplacement. Etape 4. Fixez la carte sur le châssis à l'aide d'une vis. 67 ASRock K8NF3-VSTA Motherboard Français - ASRock K8NF3-VSTA | Quick Installation Guide - Page 68
les connecteurs audio des panneaux BIOS à jour. Si vous avez besoin d'effacer la CMOS lorsque vous avez fini de mettre le BIOS à jour, vous devez d'abord initialiser le système, puis le mettre hors tension avant de procéder à l'opération d'effacement de la 68 CMOS. ASRock K8NF3-VSTA Motherboard - ASRock K8NF3-VSTA | Quick Installation Guide - Page 69
carte mère, veuillez configurer le périphérique IDE comme "Maître". Veuillez vous reporter aux instructions du fabricant de votre IDE périphérique pour les détails. En outre, pour optimiser la taux transferts de données pouvant aller jusqu'à 1,5 Go/s. Français 69 ASRock K8NF3-VSTA Motherboard - ASRock K8NF3-VSTA | Quick Installation Guide - Page 70
module en option d'émission/réception sans fil infrarouge. Connecteurs audio internes Ils vous permettent de gérer des (CD1 br. 4) entrées audio à partir de sources (CD1: voir p.2 fig. 24) stéréo comme un CD-ROM, CD1 DVD-ROM, un tuner TV ou une 70 carte MPEG. ASRock K8NF3-VSTA Motherboard - ASRock K8NF3-VSTA | Quick Installation Guide - Page 71
interface pour un câble audio en façade qui permet le branchement et le contrôle commodes de périphériques audio. Ce connecteur offre plusieurs mère offre un support de (Ventilateur silencieux) ventilateur de CPU à 4 broches , le ventilateur de CPU à 3 broches ais 71 ASRock K8NF3-VSTA Motherboard - ASRock K8NF3-VSTA | Quick Installation Guide - Page 72
il ne sera pas possible de mettre sous tension. Connectez un câble jeux sur ce connecteur si le support pour port jeux est installée. 2.7 Installation des Disques Durs Serial ATA (SATA) Cette carte mère adopte du câble de données SATA au disque dur SATA. Français 72 ASRock K8NF3-VSTA Motherboard - ASRock K8NF3-VSTA | Quick Installation Guide - Page 73
le pilote le plus récent, nous le mettrons à jour sur notre site Web à l'avenir. Veuillez consultez notre site Web pour le pilote Microsoft® Windows® VistaTM / VistaTM 64 bits et l'information associée. Le site Web d'ASRock se trouve à http://www.asrock.com 73 ASRock K8NF3-VSTA Motherboard Français - ASRock K8NF3-VSTA | Quick Installation Guide - Page 74
périphérique de démarrage. C. Lorsque vous voyez s'afficher sur l'écran le message "Generate Serial ATA driver diskette [Y/N]?" (Voulez-vous générer une disquette de pilotage Série ATA [Y/N]?), appuyez sur . D. Vous voyez alors s'afficher les messages 74 ASRock K8NF3-VSTA Motherboard Français - ASRock K8NF3-VSTA | Quick Installation Guide - Page 75
l'environnement Windows®. Veuillez vous référer au document qui se trouve sur le CD d'assistance, "Guide à l'utilitaire nVidia RAID pour Windows" qui se trouve dans le dossier selon le chemin suivant: .. \ Information\Manual\RAID Utility for Windows Guide 75 ASRock K8NF3-VSTA Motherboard Français - ASRock K8NF3-VSTA | Quick Installation Guide - Page 76
s'affiche automatiquement si "AUTORUN" est activé dans votre ordinateur. Si le Menu principal n'apparaît pas automatiquement, localisez dans le CD technique le fichier "ASSETUP.EXE" dans le dossier BIN et double-cliquez dessus pour afficher les menus. 76 ASRock K8NF3-VSTA Motherboard Français - ASRock K8NF3-VSTA | Quick Installation Guide - Page 77
rapida ASRock K8NF3-VSTA CD di supporto ASRock K8NF3-VSTA Un cavo IDE 80-pin Ultra ATA 66/100/133 Un cavo per floppy drive a 1,44 Mb Un cavo dati Serial ATA (SATA) (Opzionale) Un cavo alimentatore HDD Serial ATA (SATA) (Opzionale) Un ASRock 8CH I/O Shield 77 ASRock K8NF3-VSTA Motherboard Italiano - ASRock K8NF3-VSTA | Quick Installation Guide - Page 78
1 x slot AGP 8X (vedi ATTENZIONE 4) Audio - Audio superiore di livello Premium 7.1 canali Windows® VistaTM (Codec Audio C-Media CM6501 con architettura UAA) LAN - Realtek PHY RTL8201CL - Velocità: 10/100 Ethernet - Supporta Wake-On-LAN Pannello ASRock 8CH I/O posteriore I/O - 1 x porta PS - ASRock K8NF3-VSTA | Quick Installation Guide - Page 79
velocità per la ventola di raffreddamento - Ventola CPU silenziosa - Voltaggio: +12V, +5V, +3.3V, Vcore Compatibi- - Microsoft® Windows® 2000 / XP / XP 64 bit / VistaTM / VistaTM lità SO responsabili per possibili danni provocati dall'overclocking. Italiano 79 ASRock K8NF3-VSTA Motherboard - ASRock K8NF3-VSTA | Quick Installation Guide - Page 80
. Fintanto che saremo in possesso del driver più recente, terremo aggiornata la versione sul nostro sito. Visitare il nostro sito per il driver Microsoft® Windows® VistaTM / VistaTM 64-bit e relative informazioni. Sito ASRock http://www.asrock.com 80 ASRock K8NF3-VSTA Motherboard Italiano - ASRock K8NF3-VSTA | Quick Installation Guide - Page 81
inviare il logo Windows® VistaTM Premium e Basic devono osservare la tabella di seguito sui requisiti hardware minimi. CPU Memoria VGA Sempron 2500+ 512MB ad un canale DX9.0 con driver WDDM Con memoria VGA 128bit (Premium) Con memoria VGA 64bit (Basic) Italiano 81 ASRock K8NF3-VSTA Motherboard - ASRock K8NF3-VSTA | Quick Installation Guide - Page 82
componente. 5. Nell'usare i giraviti per fissare la scheda madre al telaio non serrare eccessivamente le viti! Altrimenti si rischia di danneggiare la scheda madre. 82 ASRock K8NF3-VSTA Motherboard Italiano - ASRock K8NF3-VSTA | Quick Installation Guide - Page 83
tra i due. Quindi collegare la ventolina CPU al connettore CPU FAN (CPU_FAN1, fare riferimento a pagina 2, Numero 6). Per eseguire un'installazione appropriata, fare riferimento al manuale d'istruzioni della ventolina CPU e del dispersore di calore. Italiano 83 ASRock K8NF3-VSTA Motherboard - ASRock K8NF3-VSTA | Quick Installation Guide - Page 84
2.3 Installazione dei moduli di memoria (DIMM) La motherboard K8NF3-VSTA mette a disposizione due slot DIMM DDR (Double Data Rate) da 184 pin. Scollegare l'alimentazione elettrica prima alle due estremità e fino ad installare correttamente la DIMM nella sua sede. 84 ASRock K8NF3-VSTA Motherboard - ASRock K8NF3-VSTA | Quick Installation Guide - Page 85
della scheda con lo slot e premere con decisione finché la scheda è completamente inserita nello slot. Step 4. Agganciare la scheda allo chassis con le viti. 85 ASRock K8NF3-VSTA Motherboard Italiano - ASRock K8NF3-VSTA | Quick Installation Guide - Page 86
/2 o USB wake up events. i connettori audio del pannello BIOS. Se è necessario cancellare la CMOS una volta completato l'aggiornamento del BIOS, è necessario riavviare prima il sistema, e poi spegnerlo prima di procedere alla cancellazione della CMOS. Italiano 86 ASRock K8NF3-VSTA Motherboard - ASRock K8NF3-VSTA | Quick Installation Guide - Page 87
dati Serial ATA (SATA) Entrambe le estremità del cavo (Opzionale) dati SATA possono collegarsi all'hard disk SATA o al connettore SATA sulla scheda madre. 87 ASRock K8NF3-VSTA Motherboard Italiano - ASRock K8NF3-VSTA | Quick Installation Guide - Page 88
supporta una wireless opzionale che trasmette e riceve moduli infrarossi. Connettori audio interni (4-pin CD1) (CD1: vedi p.2 item 24) CD1 Permettono di ricevere input stereo audio da fonti di suono come CD-ROM, DVD ROM,TV tuner, o schede MPEG. Italiano 88 ASRock K8NF3-VSTA Motherboard - ASRock K8NF3-VSTA | Quick Installation Guide - Page 89
ventola CPU su questa scheda madre, collegarla ai piedini 1-3. Piedini 1-3 collegati Installazione della ventola a 3 piedini Collettore alimentazione ATX (20-pin ATXPWR1) (vedi p.2 item 3) Collegare la sorgente d'alimentazione ATX a questo collettore. Italiano 89 ASRock K8NF3-VSTA Motherboard - ASRock K8NF3-VSTA | Quick Installation Guide - Page 90
per una configurazione RAID, è detta "collegamento a caldo" l'azione d'inserimento e rimozione dei dischi rigidi SATA mentre il sistema è ancora acceso ed in condizione di funzionamento. 90 ASRock K8NF3-VSTA Motherboard Italiano - ASRock K8NF3-VSTA | Quick Installation Guide - Page 91
. Fintanto che saremo in possesso del driver più recente, terremo aggiornata la versione sul nostro sito. Visitare il nostro sito per il driver Microsoft® Windows® VistaTM / VistaTM 64-bit e relative informazioni. Sito ASRock http://www.asrock.com 91 ASRock K8NF3-VSTA Motherboard Italiano - ASRock K8NF3-VSTA | Quick Installation Guide - Page 92
boot. Scegliere CD-ROM come dispositivo di boot . C. Quando sullo schermo compare il messaggio: "Generate Serial ATA driver diskette [Y/N]?" (Vuoi creare un dischetto di driver Serial ATA [Y/N]?), premere . D. Di seguito ci sarà questo messaggio: 92 ASRock K8NF3-VSTA Motherboard - ASRock K8NF3-VSTA | Quick Installation Guide - Page 93
di Windows alle utilità RAID" in ambiente Windows®. Fare riferimento al documento nel CD di supporto, "Guida all'utilità nVidia RAID per Windows" che si trova nella cartella nel seguente percorso: .. \ Information\Manual\RAID Utility for Windows Guide Italiano 93 ASRock K8NF3-VSTA Motherboard - ASRock K8NF3-VSTA | Quick Installation Guide - Page 94
. Se la funzione "AUTORUN" è attivata nel computer, apparirà automaticamente il Menù principale. Se il Menù principale non appare automaticamente, posizionarsi sul file ASSETUP.EXE nel CESTINO del CD di supporto e cliccare due volte per visualizzare i menù. 94 ASRock K8NF3-VSTA Motherboard Italiano - ASRock K8NF3-VSTA | Quick Installation Guide - Page 95
este manual, la versión actualizada estará disponible en el website de ASRock sin previo aviso. También encontrará las listas de las últimas tarjetas VGA y CPU soportadas en la página web de ASRock. Website de ASRock http://www.asrock.com 1.1 Contenido de la caja Placa base ASRock K8NF3-VSTA (Factor - ASRock K8NF3-VSTA | Quick Installation Guide - Page 96
ranuras PCI - 1 x ranuras AGP 8X (vea ATENCIÓN 4) - Audio de calidad superior de 7.1 canales Windows® VistaTM Premium (códec de audio C-Media CM6501 con arquitectura UAA) - Realtek PHY RTL8201CL - Velocidad: 10/100 Ethernet - Soporta Wake-On-LAN ASRock 8CH I/O - 1 x puerto de ratón PS/2 - 1 x puerto - ASRock K8NF3-VSTA | Quick Installation Guide - Page 97
los ventiladores del procesador y del chasis - Ventilador silencioso para procesador - Monitor de Voltaje: +12V, +5V, +3.3V, Vcore - En conformidad con Microsoft® Windows® 2000 / XP / XP 64 bits / VistaTM / VistaTM 64 bits (vea ATENCIÓN 7) - FCC, CE, WHQL Español 97 ASRock K8NF3-VSTA Motherboard - ASRock K8NF3-VSTA | Quick Installation Guide - Page 98
BIOS CPU Para salida de audio, este placa Windows® VistaTM 64 bits / VistaTM / XP 64 bits / XP SP1; SP2/2000 SP4. 7. El controlador para Microsoft® Windows Windows® VistaTM / VistaTM 64 bits así como la información relacionada. Sitio Web de ASRock: http://www.asrock.com 98 ASRock K8NF3-VSTA Motherboard - ASRock K8NF3-VSTA | Quick Installation Guide - Page 99
adquieran nuestra placa base y pretendan someterla al logotipo de Windows® VistaTM Premium y Basic, consulte la tabla siguiente para MB de un solo canal DX9.0 con controlador WDDM con memoria VGA de 128 bit (Premium) con memoria VGA de 64 bit (Basic) Español 99 ASRock K8NF3-VSTA Motherboard - ASRock K8NF3-VSTA | Quick Installation Guide - Page 100
en sus agujeros para fijar la placa madre en el chasis, no los apriete demasiado. Eso podría dañar la placa madre. Español 100 ASRock K8NF3-VSTA Motherboard - ASRock K8NF3-VSTA | Quick Installation Guide - Page 101
y hacen buen contacto entre sí. Conecte entonces el ventilador de la CPU al conector CPU FAN (CPU_FAN1, consulte Página 2, N. 6). Para realizar la instalación correctamente, consulte el manual de instrucciones del ventilador de la CPU y el radiador. Español ASRock K8NF3-VSTA Motherboard 101 - ASRock K8NF3-VSTA | Quick Installation Guide - Page 102
2.3 Instalación de Memoria La placa base K8NF3-VSTA proporciona dos zócalos DIMM DDR (Doble velocidad de datos) de 184 contactos Asegúrese de desconectar la de ambos lados queden completamente introducidos en su sitio y la DIMM se haya asentado apropiadamente. 102 ASRock K8NF3-VSTA Motherboard - ASRock K8NF3-VSTA | Quick Installation Guide - Page 103
utilizar. Paso 3. Encaje el conector de la tarjeta a la ranura. Empuje firmemente la tarjeta en la ranura. Paso 4. Asegure la tarjeta con tornillos. Español ASRock K8NF3-VSTA Motherboard 103 - ASRock K8NF3-VSTA | Quick Installation Guide - Page 104
(standby) para PS/2 o USB wake up events. Atención: Para elegir JL1 son cortos, los conectores de audio del panel frontal y los del BIOS, debe arrancar primero el sistema y, a continuación, apagarlo antes de realizar la acción de borrado de CMOS. Español 104 ASRock K8NF3-VSTA Motherboard - ASRock K8NF3-VSTA | Quick Installation Guide - Page 105
1.5 Gb/s. Cable de datos de serie ATA (SATA) (Opcional) Ambos extremos del cable pueden conectarse al disco duro SATA o la conexión de la placa base. ASRock K8NF3-VSTA Motherboard 105 Español - ASRock K8NF3-VSTA | Quick Installation Guide - Page 106
AUDIO1) (vea p.2, No. 21) CD1 Permite recepción de input audio de fuente sónica como CD-ROM, DVD-ROM, TV tuner, o tarjeta MPEG. Este es una interface para cable de audio de panel frontal que permite conexión y control conveniente de apparatos de Audio. Español 106 ASRock K8NF3-VSTA Motherboard - ASRock K8NF3-VSTA | Quick Installation Guide - Page 107
el cable negro con el conector de tierra. Conector del ventilador Conecte el cable del ventilador de la CPU de la CPU a este conector y (4-pin CPU_FAN1) haga coincidir el cable negro (vea p.2, No. 6) 1 electricidad. De lo contrario no se podrá encender. ASRock K8NF3-VSTA Motherboard 107 - ASRock K8NF3-VSTA | Quick Installation Guide - Page 108
disco duro SATA. 2.8 Función de conexión y cambio en caliente para HDDs SATA La placa base K8NF3-VSTA soporta la función de conexión en caliente para Dispositivos SATA. NOTA ¿Qué es la función de sistema está conectado y en condiciones de funcionamiento. 108 ASRock K8NF3-VSTA Motherboard Español - ASRock K8NF3-VSTA | Quick Installation Guide - Page 109
del logotipo de Microsoft®. 2. "All in 1 Non-Logo Driver" (W/ HotPlug & RAID): Puede escoger esta opción para instalar BIOS. Puede comenzar a instalar Windows® 2000, Windows® XP, Windows® XP 64 bits, Windows® VistaTM, Windows® VistaTM 64 bits en su sistema directamente. ASRock K8NF3-VSTA Motherboard - ASRock K8NF3-VSTA | Quick Installation Guide - Page 110
comenzará a formatear el disquete y copiar controladores SATA en el disquete. PASO 2: Configure BIOS. A. Entre a la Utilidad de configuración de BIOS pantalla de Avanzada Configuración IDE. B. Cambie la opción de "Modo de Operación SATA" a [RAID]. Español 110 ASRock K8NF3-VSTA Motherboard - ASRock K8NF3-VSTA | Quick Installation Guide - Page 111
Manual\RAID Installation Guide PASO 4: Instale el sistema operativo Windows® 2000 / Windows® XP / Windows® XP 64 bits en su sistema. Después de los pasos 1, 2, 3, puede comenzar a instalar Windows® 2000 / Windows® XP / Windows® XP de velocidad liberada. Español ASRock K8NF3-VSTA Motherboard 111 - ASRock K8NF3-VSTA | Quick Installation Guide - Page 112
BIOS, por favor refiérase al Manual del Usuario (archivo PDF) contenido en el CD. 4.Información de Software Support CD Esta placa-base soporta diversos tipos de sistema operativo Windows®: 2000 / XP / XP el archivo ASSETUP.EXE para iniciar la instalación. Español 112 ASRock K8NF3-VSTA Motherboard
-
 1
1 -
 2
2 -
 3
3 -
 4
4 -
 5
5 -
 6
6 -
 7
7 -
8
-
9
-
10
-
11
-
12
-
13
-
14
-
15
-
16
-
17
-
18
-
19
-
20
-
21
-
22
-
23
-
24
-
25
-
26
-
27
-
28
-
29
-
30
-
31
-
32
-
33
-
34
-
35
-
36
-
37
-
38
-
39
-
40
-
41
-
42
-
43
-
44
-
45
-
46
-
47
-
48
-
49
-
50
-
51
-
52
-
53
-
54
-
55
-
56
-
57
-
58
-
59
-
60
-
61
-
62
-
63
-
64
-
65
-
66
-
67
-
68
-
69
-
70
-
71
-
72
-
73
-
74
-
75
-
76
-
77
-
78
-
79
-
80
-
81
-
82
-
83
-
84
-
85
-
86
-
87
-
88
-
89
-
90
-
91
-
92
-
93
-
94
-
95
-
96
-
97
-
98
-
99
-
100
-
101
-
102
-
103
-
104
-
105
-
106
-
107
-
108
-
109
-
110
-
111
-
112
 |
 |

1
ASRock
K8NF3-VSTA
Motherboard
English
English
English
English
English
Copyright Notice:
Copyright Notice:
Copyright Notice:
Copyright Notice:
Copyright Notice:
No part of this installation guide may be reproduced, transcribed, transmitted, or trans-
lated in any language, in any form or by any means, except duplication of documen-
tation by the purchaser for backup purpose, without written consent of ASRock Inc.
Products and corporate names appearing in this guide may or may not be registered
trademarks or copyrights of their respective companies, and are used only for identifica-
tion or explanation and to the owners’ benefit, without intent to infringe.
Disclaimer:
Disclaimer:
Disclaimer:
Disclaimer:
Disclaimer:
Specifications and information contained in this guide are furnished for informational
use only and subject to change without notice, and should not be constructed as a
commitment by ASRock. ASRock assumes no responsibility for any errors or omissions
that may appear in this guide.
With respect to the contents of this guide, ASRock does not provide warranty of any kind,
either expressed or implied, including but not limited to the implied warranties or
conditions of merchantability or fitness for a particular purpose. In no event shall
ASRock, its directors, officers, employees, or agents be liable for any indirect, special,
incidental, or consequential damages (including damages for loss of profits, loss of
business, loss of data, interruption of business and the like), even if ASRock has been
advised of the possibility of such damages arising from any defect or error in the guide
or product.
This device complies with Part 15 of the FCC Rules. Operation is subject to the
following two conditions:
(1)
this device may not cause harmful interference, and
(2)
this device must accept any interference received, including interference that
may cause undesired operation.
Published January 2007
Copyright
©
2007 ASRock INC. All rights reserved.
CALIFORNIA, USA ONLY
The Lithium battery adopted on this motherboard contains Perchlorate, a toxic
substance controlled in Perchlorate Best Management Practices (BMP) regulations
passed by the California Legislature. When you discard the Lithium battery in
California, USA, please follow the related regulations in advance.
“Perchlorate Material-special handling may apply, see
www
.dtsc.ca.gov/hazardouswa
ste/perchlorate”
ASRock Website: http://www.asrock.com