ASRock X570 Pro4 RAID Installation Guide
ASRock X570 Pro4 Manual
 |
View all ASRock X570 Pro4 manuals
Add to My Manuals
Save this manual to your list of manuals |
ASRock X570 Pro4 manual content summary:
- ASRock X570 Pro4 | RAID Installation Guide - Page 1
AMD RAID Installation Guide 1. AMD BIOS RAID Installation Guide ...2 1.1 Introduction to RAID...2 1.2 RAID Configurations Precautions 4 1.3 Legacy RAID ROM Configuration (for AMD X570, X470, B450, X370, B350, A320 and A300 Chipsets)...5 1.4 UEFI RAID Configuration (for AMD X399, X570, X470, B450, - ASRock X570 Pro4 | RAID Installation Guide - Page 2
1. AMD BIOS RAID Installation Guide AMD BIOS RAID Installation Guide is an instruction for you to configure RAID functions by using the onboard FastBuild BIOS utility under BIOS environment. After you make a SATA driver diskette, press or to enter BIOS setup to set the option to RAID mode - ASRock X570 Pro4 | RAID Installation Guide - Page 3
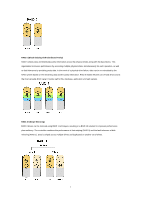
RAID 5 (Block Striping with Distributed Parity) RAID 5 stripes data and distributes parity information across the physical drives along with the data blocks. This organization increases performance by accessing multiple physical drives simultaneously for each operation, as well as fault tolerance by - ASRock X570 Pro4 | RAID Installation Guide - Page 4
RAID, the system will ask if you want to "Clear Disk Data" or not. It is recommended to select "Yes", and then your future data building will operate under a clean environment. 4 - ASRock X570 Pro4 | RAID Installation Guide - Page 5
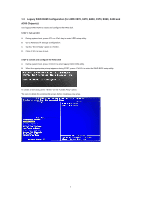
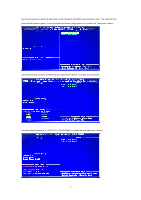
1.3 Legacy RAID ROM Configuration (for AMD X570, X470, B450, X370, B350, A320 and A300 Chipsets) Use RAID ROM utility. B. When the appropriate prompt appears during POST, press to enter the RAID BIOS setup utility. To create a new array, press on the "Create Array" option. *Be - ASRock X570 Pro4 | RAID Installation Guide - Page 6
Use the arrow keys to select the hard drives to be included in the RAID array and press . The selected hard drives will be shown in green. To use all of the hard drives, simply press to select all. Then press . Use the arrow keys to select a RAID level you want. Press to - ASRock X570 Pro4 | RAID Installation Guide - Page 7
Select a caching mode and press to proceed. Press to confirm and then press to return to the previous screen. When completed, you will see the new array on the main screen. Press to exit the RAID BIOS utility. 7 - ASRock X570 Pro4 | RAID Installation Guide - Page 8
. C. Plug a USB drive into one of the USB port. D. Insert the Support CD into the DVD-ROM drive. E. Go to Tools Easy RAID Installer F. Follow instructions to finish the driver copy process. STEP 3.2: Download driver from ASRock's website A. Please download the "SATA Floppy Imaged driver" from - ASRock X570 Pro4 | RAID Installation Guide - Page 9
C. For 32bit OS, the driver is under /I386 directory. For 64bit OS, the driver is under /AMD64 directly. Please select the correct driver for your Windows version (Windows 10). D. Select "AMD-RAID Bottom Device" and then click . E. Click again to find the driver inside your USB flash - ASRock X570 Pro4 | RAID Installation Guide - Page 10
H. Select "AMD-RAID Config Device" and then click . I. After RAID driver is loaded, the RAID disk will show up. J. Please follow Windows installation instruction to finish the process. 10 - ASRock X570 Pro4 | RAID Installation Guide - Page 11
1.4 UEFI RAID Configuration (for AMD X399, X570, X470, B450, X370, B350, A320 and A300 Chipsets) Set up a to . D. Click to save to exit. E. (This step is only for NVMe RAID on X399 / X570 chipset): Go to AdvancedAMD PBS and set "NVMe RAID mode" to . Then click to save to - ASRock X570 Pro4 | RAID Installation Guide - Page 12
G. Click to save your changes and exit, and then enter the BIOS Setup again. H. After saving the previously changed settings via F10 and rebooting the system, "RAIDXpert2 Configuration Utility" submenu becomes available. I. Go to AdvancedRAIDXpert2 Configuration - ASRock X570 Pro4 | RAID Installation Guide - Page 13
J. Go to AdvancedRAIDXpert2 Configuration Utility Array ManagementCreate Array Select "RAID Level" and then "Select Physical Disks". Change "Select Media Type" to "SSD" or leave at "BOTH". Select Check AllApply Changes 13 - ASRock X570 Pro4 | RAID Installation Guide - Page 14
. C. Plug a USB drive into one of the USB port. D. Insert the Support CD into the DVD-ROM drive. E. Go to Tools Easy RAID Installer F. Follow instructions to finish the driver copy process. STEP 2.2: Download driver from ASRock's website A. Please download the "SATA Floppy Imaged driver" from - ASRock X570 Pro4 | RAID Installation Guide - Page 15
UEFI device. Please select this to boot from. If the system restarts at this point, then please open the F11 boot menu again. A. During Windows installation process, when Disk selection page show up, please click . B. Click to find the driver inside your USB flash drive. Three - ASRock X570 Pro4 | RAID Installation Guide - Page 16
C. Select "AMD-RAID Bottom Device" and then click . D. Load the second driver. E. Select "AMD-RAID Bottom Device" and then click . 16 - ASRock X570 Pro4 | RAID Installation Guide - Page 17
F. After RAID driver is loaded, the RAID disk will show up. Load the Third driver. G. Select "AMD-RAID Bottom Device" and then click . H. Select unallocated space and then click . 17 - ASRock X570 Pro4 | RAID Installation Guide - Page 18
I. Please follow Windows installation instruction to finish the process. 18 - ASRock X570 Pro4 | RAID Installation Guide - Page 19
J. Go to Boot menu and set "Boot Option #1" to . 19 - ASRock X570 Pro4 | RAID Installation Guide - Page 20
2. AMD Windows RAID Installation Guide Using RAIDXpert2 to Create RAID Array in Windows 1. Execute RAIDXpert2 in the Windows Programs menu. 20 - ASRock X570 Pro4 | RAID Installation Guide - Page 21
2. When the login screen appears, type "admin" in the Login ID field. Type "admin" again in the Password field. 3. Create new username and password. Then log in to RAIDXpert with new username & password. 21 - ASRock X570 Pro4 | RAID Installation Guide - Page 22
4. Be sure to delete the existing disk arrays before creating a new array. 5. To create array, Click on Array → Create. 22 - ASRock X570 Pro4 | RAID Installation Guide - Page 23
6. Select the disks to be included in the RAID array. Select Array Type Enter Array Name & Array Size. Then click Create to create a RAID array. 7. Check if the array is created successfully. 23 - ASRock X570 Pro4 | RAID Installation Guide - Page 24
8. In Disk Management, create partition and initialize the disk as GPT. 24
-
 1
1 -
 2
2 -
 3
3 -
 4
4 -
 5
5 -
 6
6 -
 7
7 -
8
-
9
-
10
-
11
-
12
-
13
-
14
-
15
-
16
-
17
-
18
-
19
-
20
-
21
-
22
-
23
-
24
 |
 |

1
AMD RAID Installation Guide
1. AMD BIOS RAID Installation Guide
........................................................................................................
2
1.1
Introduction to RAID
.................................................................................................................
2
1.2
RAID Configurations Precautions
............................................................................................
4
1.3
Legacy RAID ROM Configuration (for AMD X570, X470, B450, X370, B350, A320 and A300
Chipsets)
..................................................................................................................................
5
1.4
UEFI RAID Configuration (for AMD X399, X570, X470, B450, X370, B350, A320 and A300
Chipsets)
................................................................................................................................
11
2.
AMD Windows RAID Installation Guide
...........................................................................................
20