Acer AW2000h-AW175hq F1 Acer AW2000h-AW17xhx Service Guide - Page 40
Hard disk drive removal and installation
 |
View all Acer AW2000h-AW175hq F1 manuals
Add to My Manuals
Save this manual to your list of manuals |
Page 40 highlights
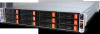
Hard disk drive removal and installation The system has four drive bays. Follow these steps: 1. Remove the hard disk drive carrier. a. Unlock the HDD carrier latch b. Slide the HDD carrier latch to trelease the lever. c. Pull the lever and slide the carrier from the chassis. 2. Replace the hard disk drive in the carrier. a. Remove the four screws (1) that secure the hard disk drive or dummy drive to the carrier; then remove the hard disk drive or dummy drive (2). b. Install a new hard disk drive into the carrier and secure it with four screws. 3. Install the hard disk drive carrier. a. Slide the HDD carrier into the drive bay completely. b. Use the lever to push the HDD carrier until it locks into place; then close the HDD carrier lever. 34 Chapter 7