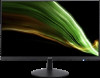
Acer E1 User Manual
Acer E1 Manual
 |
View all Acer E1 manuals
Add to My Manuals
Save this manual to your list of manuals |
Acer E1 manual content summary:
- Acer E1 | User Manual - Page 1
Aspire E1-472 / E1-422 User's Manual - Acer E1 | User Manual - Page 2
E1-472 / E1-422 User's Manual This revision: 04/2013 AcerCloud frees you to enjoy your digital life anytime, anywhere! This computer comes with AcerCloud pre-installed. AcerCloud is a personal cloud service website: www.acer.com/acercloud Model number: Serial number: Date of purchase: Place of - Acer E1 | User Manual - Page 3
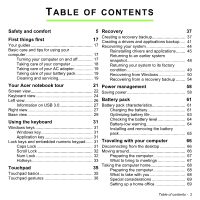
backup 37 Creating a drivers and applications backup..... 41 Your guides 17 Recovering your system 44 Basic care and tips for using 19 Recovering from Windows 50 Cleaning and servicing 19 Recovering from a recovery backup ........ 54 Your Acer notebook tour 21 Power management 58 Screen - Acer E1 | User Manual - Page 4
with the computer 70 Frequently asked questions 83 Preparing the computer 70 Requesting service 85 What to take with you 70 Troubleshooting 87 Special considerations 70 Troubleshooting tips 87 Traveling internationally with the computer...... 71 Error messages 87 Preparing the - Acer E1 | User Manual - Page 5
carefully. Keep this document for future reference. Follow all warnings and instructions marked on the product. Turning the product off before cleaning Unplug this product from the wall outlet before cleaning. Do not use liquid cleaners or - Acer E1 | User Manual - Page 6
on power cord requirements, contact an authorized reseller or service provider. Protecting your hearing - Warning! Permanent hearing volume for prolonged periods of time. To protect your hearing, follow these instructions. - Increase the volume gradually until you can hear clearly and comfortably. - Acer E1 | User Manual - Page 7
- Do not increase the volume to block out noisy surroundings. - Decrease the volume if you can't hear people speaking near you. Bundled dummy cards - Note: Information in this section may not apply to your computer. Your computer shipped with plastic dummies installed in the card slots. Dummies - Acer E1 | User Manual - Page 8
The product has been dropped or the case has been damaged. - The product exhibits a distinct change in performance, indicating a need for service. - The product does not operate normally after following the operating instructions. - Note: Adjust only those controls that are covered by the operating - Acer E1 | User Manual - Page 9
. Dispose of batteries according to local regulations. Please recycle when possible. Do not dispose as household waste. - Note: Please refer to www.acer.com for battery shipping documents. Replacing the battery pack The computer uses lithium batteries. Replace the battery with the same type as that - Acer E1 | User Manual - Page 10
external RF energy or if you have any questions. Switch off your device in health care facilities when any regulations posted in these areas instruct you to do so. Hospitals or health care facilities may be using equipment that could be sensitive to external RF transmissions. Pacemakers. Pacemaker - Acer E1 | User Manual - Page 11
a potentially explosive atmosphere and obey all signs and instructions. Potentially explosive atmospheres include areas where you would normally Switch off the device at refueling points such as near gas pumps at service stations. Observe restrictions on the use of radio equipment in fuel depots, - Acer E1 | User Manual - Page 12
out through your mobile phone or other telephone call system. DISPOSAL INSTRUCTIONS Do not throw this electronic device into the trash when discarding. acer-group.com/public/ Sustainability Mercury advisory For bulb-inside projectors or electronic products containing a non-LEDbacklit-LCD/CRT monitor - Acer E1 | User Manual - Page 13
by the U.S. Environmental Protection Agency. Acer is committed to offering products and services worldwide that help customers save money, conserve - Note: Information in this section may not apply to your computer. Acer ENERGY STAR qualified products: - produce less heat and reduce cooling loads in - Acer E1 | User Manual - Page 14
Avoid tensing your muscles or shrugging your shoulders. - Install the external display, keyboard and mouse properly and within comfortable reach. - If you view your monitor more than your documents, place the display at the center of your desk to minimize neck strain. Taking care of your vision Long - Acer E1 | User Manual - Page 15
- Keep your display clean. - Keep your head at a higher level than the top edge of the display so your eyes point downward when looking at the middle of the display. - Adjust the display brightness and/or contrast to a comfortable level for enhanced text readability and graphics clarity. - Eliminate - Acer E1 | User Manual - Page 16
computer. CAUTION: This appliance contains a laser system and is classified as a "CLASS 1 LASER PRODUCT." In case of any trouble with this device, please contact your nearest AUTHORIZED service station. To prevent direct exposure to the laser beam, do not try to open the enclosure. CLASS 1 LASER - Acer E1 | User Manual - Page 17
computer can help you to be more productive, please refer to the User's Manual. This guide contains detailed information on such subjects as system utilities, data recovery, expansion options and troubleshooting. In addition it contains general regulations and safety notices for your notebook. It - Acer E1 | User Manual - Page 18
If you need to power down the computer for a short while, but don't want to completely shut it down, you can put it into Hibernate by pressing the power button. You can also put the computer in sleep mode by pressing the sleep hotkey + . Note: If you cannot power off the computer normally, - Acer E1 | User Manual - Page 19
replacing batteries. • Do not tamper with batteries. Keep them away from children. • Dispose of used batteries according to local regulations. Recycle if possible. Cleaning and servicing When cleaning the computer, follow these steps: First things first - 19 - Acer E1 | User Manual - Page 20
1. Turn off the computer and remove the battery pack. 2. Disconnect the AC adapter. 3. Use a soft, moist cloth. Do not use liquid or aerosol cleaners. If either of the following occurs: • The computer has been dropped or the body has been damaged; • The computer does not operate normally Please - Acer E1 | User Manual - Page 21
YOUR ACER NOTEBOOK TOUR After setting up your computer as illustrated in the setup poster, let us show you around your new Acer computer. Aspire E1-472 / E1-422 Your Acer notebook tour - 21 - Acer E1 | User Manual - Page 22
Screen view 1 3 2 4 5 # Icon Item 1 Webcam 2 Screen 3 Microphone Description Web camera for video communication. A light next to the webcam indicates that the webcam is active. Displays computer output. 22 - Your Acer notebook tour - Acer E1 | User Manual - Page 23
is blue when plugged in. HDD indicator Indicates when the hard disk drive is active. Communication Indicates the computer's wireless indicator connectivity device status. Your Acer notebook tour - 23 - Acer E1 | User Manual - Page 24
For entering data into your computer. See "Using the keyboard" on page 31. 3 Touchpad Touch-sensitive pointing device which functions like a computer mouse. 24 - Your Acer notebook tour - Acer E1 | User Manual - Page 25
# Icon Item Description 4 Click buttons (left and right) The left and right side of the button function as left and right selection buttons. Your Acer notebook tour - 25 - Acer E1 | User Manual - Page 26
port Connects to an Ethernet 10/100/1000based network. External display (VGA) port Connects to a display device (e.g., external monitor, LCD projector). HDMI port Supports high-definition digital video connections. USB port Connects to USB devices. If a port is black it is USB 2.0 compatible - Acer E1 | User Manual - Page 27
ports 2 3 45 6 Description Connect to USB devices. If a port is black it is USB 2.0 compatible, if it is blue it is also USB 3.0 compatible. Your Acer notebook tour - 27 - Acer E1 | User Manual - Page 28
computer is turned off. Carefully insert a straightened paper clip to eject the optical drive tray. DC-in jack Connects to an AC adapter. 28 - Your Acer notebook tour - Acer E1 | User Manual - Page 29
's main memory. Speakers Deliver stereo audio output. Ventilation and cooling fan Allows the computer to stay cool. Do not cover or obstruct the openings. Your Acer notebook tour - 29 - Acer E1 | User Manual - Page 30
# Icon Item Description 5 Battery bay Houses the computer's battery pack. Note: For models with an AMD processor and a single memory module: If you replace the memory module, the new module must go into the same slot occupied by the module that was removed. 30 - Your Acer notebook tour - Acer E1 | User Manual - Page 31
USING THE KEYBOARD Your computer has a compact keyboard with an embedded numeric keypad. Windows keys The keyboard has two keys that perform Windows-specific functions. Windows key Returns to the Start screen. It can also be used with other keys for special functions; please check Windows Help. - Acer E1 | User Manual - Page 32
Scroll Lock When Scroll Lock ( + ) is on, text on the screen moves one line up or down when you press the up or down arrow keys. Scroll Lock does not work with most applications. Num Lock When Num Lock ( + ) is on, the embedded keypad is switched to numeric mode. While Num Lock is - Acer E1 | User Manual - Page 33
. (Network devices vary by configuration.) Sleep Puts the computer in Sleep mode. Switches display output Display toggle between the display screen, external monitor (if connected) and both. Turns the display screen Display off backlight off to save power. Press any key to return. Touchpad - Acer E1 | User Manual - Page 34
Hotkey + + + < > + < > + < > Icon Function Description NumL k Number Lock Turns the embedded numeric keypad on or off. Scr Lk Scroll Lock Turns Scroll Lock on or off. Brightness up Increases the screen brightness. Brightness down Decreases the - Acer E1 | User Manual - Page 35
TOUCHPAD Touchpad basics The touchpad controls the arrow (or 'cursor') on the screen. As you slide your finger across the touchpad, the cursor will follow this movement. Press the left or right side of the button located beneath the touchpad to perform selection and execution functions. These two - Acer E1 | User Manual - Page 36
touchpad gestures that use one or more fingers. Note: Support for touchpad gestures depends on the active application. These allow you to control applications with a few simple gestures, such as: • Swipe in from edge: Access - Acer E1 | User Manual - Page 37
If you are having trouble with your computer, and the frequently asked questions (see page 83) do not help, you can 'recover' your computer - i.e. return it to an earlier state. This section describes the recovery tools available on your computer. Acer provides Acer Recovery Management, which allows - Acer E1 | User Manual - Page 38
of storage after formatting, it is recommended to use a USB drive with a capacity of 32 GB or larger. 1. From Start, type 'Recovery' and then click Acer Recovery Management in the list of apps. 2. Click Create Factory Default Backup. The Recovery Drive window 38 - Recovery - Acer E1 | User Manual - Page 39
opens. Make sure Copy contents from the recovery partition to the recovery drive is selected. This provides the most complete and safest recovery backup. 3. Plug in the USB drive then click Next. Recovery - 39 - Acer E1 | User Manual - Page 40
• Since the recovery backup requires at least 16 GB of storage after formatting, it is recommended to use a USB drive with a capacity of 32 GB or larger. 4. You will be shown the backup progress on the screen. 5. Follow the process until it completes. 6. After creating the recovery backup, you can - Acer E1 | User Manual - Page 41
7. Unplug the USB drive and label it clearly. Important: Write a unique, descriptive label on the backup, such as 'Windows Recovery Backup'. Make sure you keep the backup in a safe place that you will remember. Creating a drivers and applications backup To create a Drivers and Applications Backup, - Acer E1 | User Manual - Page 42
USB storage drive or, if your computer features a DVD recorder, one or more blank recordable DVDs. 1. From Start, type 'Recovery' and then click Acer Recovery Management in the list of apps. 2. Click Create Drivers and Applications Backup. Plug in the USB drive or insert a blank DVD into the optical - Acer E1 | User Manual - Page 43
• If you are using a USB drive, make sure your USB drive has enough capacity before continuing. • If using DVDs, it will also show the number of blank, recordable discs you will need to complete the recovery discs. Make sure that you have the required number of identical, blank discs. Recovery - 43 - Acer E1 | User Manual - Page 44
or two items of software or hardware have stopped working correctly, the problem may be solved by reinstalling the software or the device drivers. To reinstall 45. For instructions on reinstalling software and drivers that were not preinstalled, see that product's documentation or support Web site. - Acer E1 | User Manual - Page 45
problem and you want to reset your system to factory condition, see "Returning your system to its factory condition" on page 49. Reinstalling drivers and applications As a troubleshooting computer, you need to follow that software's installation instructions. • New device drivers - If you need to - Acer E1 | User Manual - Page 46
If you are reinstalling using Windows and the recovery information stored on your computer: • From Start, type 'Recovery' and then click Acer Recovery Management in the list of apps. • Click Reinstall Drivers or Applications. 46 - Recovery - Acer E1 | User Manual - Page 47
• You should see the Contents section of the Acer Resource Center. • Click the install icon for the item you want to install, then follow the onscreen instructions to complete the installation. Repeat this step for each item you want to reinstall. If you are reinstalling from a Drivers and - Acer E1 | User Manual - Page 48
should see the Contents section of the Acer Resource Center. 3. Click the install icon and saves them as restore points. In most cases of hard-toresolve software problems, you can return to one of these restore points to get your system ' and then click Help and Support in the list of 48 - Recovery - Acer E1 | User Manual - Page 49
. This process may take several minutes, and may restart your computer. Returning your system to its factory condition If your computer experiences problems that are not recoverable by other methods, you may need to reinstall everything to return your system to its factory condition. You can - Acer E1 | User Manual - Page 50
were pre-installed on your system. If you can access important files on your hard drive, back them up now. See "Restore Factory Settings with Acer Recovery Management" on page 51. Customized Restore will attempt to retain your files (user data) but will reinstall all software and drivers. Software - Acer E1 | User Manual - Page 51
Restore Factory Settings with Acer Recovery Management 1. Click Restore Factory Settings. Caution: 'Restore Factory Settings' will erase all files on your hard drive. 2. The Reset your PC window opens. Images for reference only. 3. Click Next, then choose how to erase your files: Recovery - 51 - Acer E1 | User Manual - Page 52
computer and press + during startup. A screen appears asking you to choose the keyboard layout. 2. Several options are now presented. Click Troubleshoot. 3. Click either Refresh your PC or Reset your PC. Note: "Refresh your PC" enables you to restore your computer to the default factory - Acer E1 | User Manual - Page 53
Customized Restore with Acer Recovery Management 1. Click Customized Restore (Retain User Data). 2. The Refresh your PC window opens. 3. Click Next, then Refresh. 4. The recovery process begins by restarting your - Acer E1 | User Manual - Page 54
Recovering from a recovery backup To recover from a recovery backup on a USB drive: 1. Find your recovery backup. 2. If your computer does not have a built-in keyboard, make sure a keyboard is attached to your computer. 3. Plug in the USB drive and turn on your computer. 4. If it is not already - Acer E1 | User Manual - Page 55
Troubleshoot and then choose the type of recovery to use: a. Click Advanced then System Restore to start Microsoft System Restore: Microsoft System Restore periodically takes a 'snapshot' of your system settings and saves them as restore points. In most cases of hard-to-resolve software problems - Acer E1 | User Manual - Page 56
Reset your PC from the recovery backup Caution: Reset your PC will erase all files on your hard drive. 1. The Reset your PC window opens. Images for reference only. 2. Click Next. 3. Select the operating system to recover (normally only one option is available). 4. Choose to keep any changes to the - Acer E1 | User Manual - Page 57
drive takes much longer, up to 5 hours, but is much more secure as old files are completely removed. 6. Click Reset. 7. After the recovery has finished, you can start using your computer by repeating the first-start process. Refresh your PC from the recovery backup 1. The Refresh your PC window - Acer E1 | User Manual - Page 58
POWER MANAGEMENT This computer has a built-in power management unit that monitors system activity. System activity refers to any activity involving one or more of from Sleep. Your computer will also not start if it receives an instruction to start over a network (Wake on LAN). 58 - Power management - Acer E1 | User Manual - Page 59
1. Open the Desktop. 2. Click Power Options in the Notification area. 3. Select More Power Options. 4. Select Choose what the power buttons do. 5. To access Shutdown Settings, select Change settings that are currently unavailable. Power management - 59 - Acer E1 | User Manual - Page 60
6. Scroll down and disable Turn on fast startup. 7. Select Save changes. 60 - Power management - Acer E1 | User Manual - Page 61
you long use between charges. Battery pack characteristics The battery is recharged whenever you connect the computer to the AC adapter. Your computer supports charge-in-use, enabling you to recharge the battery while you continue to operate the computer. However, recharging with the computer turned - Acer E1 | User Manual - Page 62
Conditioning a new battery pack Before you use a battery pack for the first time, there is a conditioning process that you should follow: 1. Insert the new battery without turning the computer on. 2. Connect the AC adapter and fully charge the battery. 3. Disconnect the AC adapter. 4. Turn on the - Acer E1 | User Manual - Page 63
• Using the computer on constant AC power with the battery inserted. If you want to use constant AC power, you are advised to remove the battery pack after it is fully charged. • Not discharging and recharging the battery to its extremes, as described above. • Frequent use; the more you use the - Acer E1 | User Manual - Page 64
Checking the battery level The power meter indicates the current battery level. Rest the cursor over the battery/power icon on the taskbar to see the battery's present charge level. Battery-low warning When using battery power pay attention to the power meter. Warning! Connect the AC adapter as - Acer E1 | User Manual - Page 65
Situation Recommended Action The AC adapter or a power outlet is 1. Save all necessary files. unavailable. You 2. Close all applications. have no spare 3. Turn off the computer. battery pack. Installing and removing the battery pack Important: Before removing the battery from the unit, connect - Acer E1 | User Manual - Page 66
Shut down the computer. 4. Close the display cover. 5. Disconnect the cord from the AC adapter. 6. Disconnect the keyboard, pointing device, printer, external monitor and other external devices. 7. Disconnect the Kensington lock if you are using one to secure the computer. Moving around When you are - Acer E1 | User Manual - Page 67
Preparing the computer Before moving the computer, close and latch the display cover to place it in Sleep mode. You can now safely take the computer anywhere you go within the building. To bring the computer out of Sleep mode, open the display; then press and release the power button. If you are - Acer E1 | User Manual - Page 68
to take with you Unless you have some items at home, take the following items with you: • AC adapter and power cord. • The printed Setup Guide. 68 - Traveling with your computer - Acer E1 | User Manual - Page 69
to and from home. If you use your computer at home for significant periods of time, you might also want to add an external keyboard, monitor or mouse. Traveling with your computer - 69 - Acer E1 | User Manual - Page 70
Traveling with the computer When you are moving within a larger distance, for instance, from your office building to a client's office building or traveling locally. Preparing the computer Prepare the computer as if you were taking it home. Make sure that the battery in the computer is charged. - Acer E1 | User Manual - Page 71
Traveling internationally with the computer When you are moving from country to country. Preparing the computer Prepare the computer as you would normally prepare it for traveling. What to bring with you Bring the following items with you: • AC adapter. • Power cords that are appropriate for the - Acer E1 | User Manual - Page 72
purchase a power cord that is compatible with the local AC voltage. Do not use converter kits sold for appliances to power the computer. • If you are using the modem, check if the modem and connector are compatible with the telecommunications system of the country you are traveling in. 72 - - Acer E1 | User Manual - Page 73
SECURING YOUR COMPUTER Your computer is a valuable investment that you need to take care of. Learn how to protect and take care of your computer. Security features include hardware and software locks - a security notch and passwords. Using a computer security lock The computer comes with a - Acer E1 | User Manual - Page 74
security. Important: Do not forget your Supervisor Password! If you forget your password, please get in touch with your dealer or an authorized service center. Entering passwords When a password is set, a password prompt appears in the center of the display screen. • When the Supervisor Password is - Acer E1 | User Manual - Page 75
CONNECTING TO A NETWORK Built-in network feature The built-in network feature allows you to connect your computer to an Ethernet-based network. To use the network feature, connect an Ethernet cable from the Ethernet (RJ-45) port on the chassis of the computer to a network jack or hub on your network - Acer E1 | User Manual - Page 76
the password if required. To turn your computer's wireless connections on or off, press Fn+F3. Otherwise, open Internet Explorer and follow the instructions. Please refer to your ISP or router documentation. Wireless networks A wireless LAN or WLAN is a wireless local area network, which may link - Acer E1 | User Manual - Page 77
to a high speed DSL internet connection. The ISP (Internet Service Provider) you have chosen normally supplies a modem/ router with the subscription to their services. Read carefully the documentation supplied with your Access point/router for detailed setup instructions. Wireless networks - 77 - Acer E1 | User Manual - Page 78
Interface) is an industry-supported, uncompressed, all-digital audio/video interface. HDMI provides an interface between any compatible digital audio/video source, such as a set-top box, DVD player, and A/V receiver and a compatible digital audio and/or video monitor, such as a digital television - Acer E1 | User Manual - Page 79
UNIVERSAL SERIAL BUS (USB) The USB port is a high-speed serial bus which allows you to connect USB peripherals without taking up system resources. Universal Serial Bus (USB) - 79 - Acer E1 | User Manual - Page 80
PLAYING DVD MOVIES When the DVD drive module is installed in the optical drive bay, you can play DVD movies on your computer. 1. Insert a DVD. 2. The DVD movie will automatically play after a few seconds. Important: When you launch the DVD player for the first time, the program asks you to enter - Acer E1 | User Manual - Page 81
Recovering your hard disk does not reset the number of times the region code has been set. Playing DVD movies - 81 - Acer E1 | User Manual - Page 82
computer's BIOS. Your computer is already properly configured and optimized, and you do not need to run this utility. However, if you encounter configuration problems, you may need to run it. To activate the BIOS utility, press during the POST while the computer logo is being displayed. Boot - Acer E1 | User Manual - Page 83
FREQUENTLY ASKED QUESTIONS The following is a list of possible situations that may arise during the use of your computer. Easy solutions are provided for each one. I turned on the power, but the computer does not start or boot up Look at the power indicator: • If it is not lit, no power is being - Acer E1 | User Manual - Page 84
< > (increase) to adjust the brightness level. • The display device might be set to an external monitor. Press the display toggle hotkey + to toggle the display back to the computer. dealer or an authorized service center as the internal keyboard cable may be loose. 84 - Frequently asked - Acer E1 | User Manual - Page 85
on hand, especially when you travel, to receive the benefits from our support centers. Place your proof-ofpurchase in the flap located inside the front have an Acer-authorized ITW service site, you can still get in contact with our offices worldwide. Please visit www.acer.com. Frequently asked questions - Acer E1 | User Manual - Page 86
you call Please have the following information available when you call Acer for online service, and please be at your computer when you call. With your support, we can reduce the amount of time a call takes and help solve your problems efficiently. If there are error messages or beeps reported by - Acer E1 | User Manual - Page 87
to open the computer yourself; contact your dealer or authorized service center for assistance. Troubleshooting tips This computer incorporates an advanced design that delivers onscreen error message reports to help you solve problems. If the system reports an error message or an error symptom - Acer E1 | User Manual - Page 88
. Keyboard interface Contact your dealer or an authorized service error center. Memory size mismatch Press (during POST) to enter the BIOS utility, then press Exit in the BIOS utility to reboot. If you still encounter problems after going through the corrective measures, please contact - Acer E1 | User Manual - Page 89
Tips and hints for using Windows 8 F We know this is a new operating system that will take some getting used to, so we've created a few pointers to help you get started. Three concepts you might want to keep in mind 1. Start The Start button is no longer available; you can launch apps from the - Acer E1 | User Manual - Page 90
do I turn off my computer? Press the Windows key + , click Settings > Power and select the action you'd like to take. Alternatively, from Desktop, click Acer Power Button and select the action you'd like to take. Why is there a new interface? The new interface for Windows 8 is designed to work - Acer E1 | User Manual - Page 91
How do I unlock my computer? Press the any key and click on a user account icon to unlock the computer. If your account has a password set, you will need to enter the password to continue. How do I personalize my computer? You can personalize Start with a different background image or by arranging - Acer E1 | User Manual - Page 92
To change the background, press the Windows key + and click Settings > Change PC settings > Personalize. Click Lock screen at the top of the page and select the image and apps you would like to see on the lock screen. So, how do I close an app? Move the cursor to the top of the screen and click - Acer E1 | User Manual - Page 93
To view the complete list of apps, press the space bar or the Menu key and click All apps. How do I make an app appear on Start? If you're in All apps and you want to make an app appear on Start, you can select the app and right-click on it. Select Pin to Start from the menu that appears at the - Acer E1 | User Manual - Page 94
to get one, press the Windows key + and click Settings > Change PC settings > Users > Switch to a Microsoft account, and follow the onscreen instructions. How do I add a favorite to Internet Explorer? Internet Explorer 10 doesn't have traditional favorites, instead you can pin shortcuts to Start - Acer E1 | User Manual - Page 95
click Settings > Change PC settings > Windows Updates. Click Check for updates now. Where can I get more information? For more information please visit: • Windows 8 tutorials: www.acer.com/windows8-tutorial • Support FAQs: www.acer.com/support Frequently asked questions - 95 - Acer E1 | User Manual - Page 96
installation. This device generates, uses, and can radiate radio frequency energy and, if not installed and used in accordance with the instructions, may cause harmful interference to radio communications. However, there is no guarantee that interference will not occur in a particular installation - Acer E1 | User Manual - Page 97
NOTICES Note: Below regulatory information is for models with wireless LAN and / or Bluetooth only. To prevent radio interference to the licensed service, this device is intended to be operated indoors. This product complies with the radio frequency and safety standards of any country or region - Acer E1 | User Manual - Page 98
Declaration of Conformity for EU countries Hereby, Acer, declares that this computer is in compliance with the essential requirements and other relevant provisions of Directive 1999/5/EC. Wireless operation channels for different domains N. - Acer E1 | User Manual - Page 99
Departments in which the use of the 2400 - 2483.5 MHz band is permitted with an EIRP of less than 100 mW indoors and less than 10 mW outdoors: 01 Ain Orientales 02 Aisne 03 Allier 05 Hautes Alpes 08 Ardennes 09 Ariege 11 Aude 12 Aveyron 16 Charente 24 Dordogne 25 Doubs 26 Drome 32 Gers 36 Indre 37 - Acer E1 | User Manual - Page 100
List of national codes This equipment may be operated in the following countries: Country ISO 3166 Country 2 letter code Austria AT Malta Belgium BE Netherlands Cyprus CY Poland Czech Republic CZ Portugal Denmark DK Slovakia Estonia EE Slovenia Finland FI Spain France FR - Acer E1 | User Manual - Page 101
No 5 (Nov 2001). "To prevent radio interference to the licensed service, this device is intended to be operated indoors and away from et No 5 (Nov 2001). « Pour empêcher que cet appareil cause du brouillage au service faisant l'objet d'une licence, il doit être utilisé a l'intérieur et devrait ê - Acer E1 | User Manual - Page 102
contact during normal operation is minimized as follows: 1. Users are requested to follow the RF safety instructions on wireless option devices that are included in the user's manual of each RF option device. Caution: To comply with FCC RF exposure compliance requirements, a separation distance - Acer E1 | User Manual - Page 103
5 (Nov 2001). "To prevent radio interference to the licensed service, this device is intended to be operated indoors and away from et No 5 (Nov 2001). « Pour empêcher que cet appareil cause du brouillage au service faisant l'objet d'une licence, il doit être utilisé a l'intérieur et devrait ê
-
 1
1 -
 2
2 -
 3
3 -
 4
4 -
 5
5 -
 6
6 -
 7
7 -
8
-
9
-
10
-
11
-
12
-
13
-
14
-
15
-
16
-
17
-
18
-
19
-
20
-
21
-
22
-
23
-
24
-
25
-
26
-
27
-
28
-
29
-
30
-
31
-
32
-
33
-
34
-
35
-
36
-
37
-
38
-
39
-
40
-
41
-
42
-
43
-
44
-
45
-
46
-
47
-
48
-
49
-
50
-
51
-
52
-
53
-
54
-
55
-
56
-
57
-
58
-
59
-
60
-
61
-
62
-
63
-
64
-
65
-
66
-
67
-
68
-
69
-
70
-
71
-
72
-
73
-
74
-
75
-
76
-
77
-
78
-
79
-
80
-
81
-
82
-
83
-
84
-
85
-
86
-
87
-
88
-
89
-
90
-
91
-
92
-
93
-
94
-
95
-
96
-
97
-
98
-
99
-
100
-
101
-
102
-
103
 |
 |

Aspire E1-472 / E1-422
User’s Manual