Adobe 65030089 User Guide - Page 13
Review and collaboration features, Review in Design Editor - acrobat
 |
UPC - 883919170626
View all Adobe 65030089 manuals
Add to My Manuals
Save this manual to your list of manuals |
Page 13 highlights
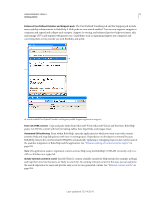
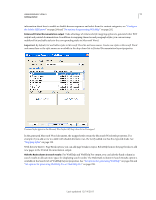
USING ROBOHELP HTML 9 7 Getting started • Modify character and paragraph source styles While importing or linking a document, you can modify the character and paragraph styles defined in the document. In the case of linked documents, style properties modified from within Microsoft Word or FrameMaker and modified from within RoboHelp can now co-exist. In other words, you can modify the style properties that you want to override in RoboHelp and allow other style properties to be modified in Microsoft Word or FrameMaker. RoboHelp 9 maintains two styles sheets to manage the styles of a linked document. A [topic].css file stores the styles defined in the source document. The global CSS file, by default named RHStyleMapping.css, stores the details of modifications and mapped RoboHelp styles. RoboHelp stores each modified style with the style name WD_[original_style_name] (in the case of Microsoft Word) or FM_[original_style_name] (in the case of FrameMaker) in RHStyleMapping.css. Note: RoboHelp hides the [topic].css files from the workspace to ensure that source styles are preserved in this file. • Edit style sheets from within Project Settings While specifying the import settings in the Project Settings dialog box, you can now edit the CSS file you want to use for style mapping. The Edit With option lets you select an editor from a predefined list, which includes RoboHelp CSS Editor and other registered CSS editors. • Import and export of settings from an ISF file You can now import settings from a saved ISF file or export them while importing Microsoft Word and FrameMaker documents. Any changes you make to the settings after importing the ISF file are not saved; the modified settings are used only in the current import process. Enhanced FrameMaker import and linking In RoboHelp 9, FrameMaker document import and linking includes the following additional enhancements: • Support for importing or linking DITA maps and DITA topics You can now import or link DITA maps (.ditamap, .dita, and .xml) and DITA topics (.dita and .xml). For RoboHelp, a DITA map is similar to a FrameMaker book and a Dita topic is similar to a FrameMaker .fm file. RoboHelp 9 also supports Ditaval, which means that you can now create output based on conditions specified in the Ditaval file. See "Apply conditions from a Ditaval file" on page 71. • Enhanced list import in FrameMaker import and linking In RoboHelp 9, list symbols used in unordered lists convert without any distortion. If you select Convert Autonumber To Text, RoboHelp retains the list indentation style of the FrameMaker source document. • Enhanced table import in FrameMaker import and linking Enhancements include the import of table titles as captions, caption style mapping, import of table headers tags when the table style is mapped to [source], and the ability to configure table height and width, row height, and column width. Note: RoboHelp CSS Editor does not support caption editing. However, if you create a caption style with another editor, you can duplicate the caption with RoboHelp CSS Editor to create additional captions. • Better conversion of Math equations, text frames, and freehand curves in FrameMaker import and linking RoboHelp 9 uses Acrobat Distiller to convert FrameMaker Math equations, text frames, and freehand curves to images. Select the Use PDF To Generate Images option in the Conversion Settings dialog box to use this enhancement. See "Image conversion settings" on page 80. Review and collaboration features With RoboHelp 9, collaborate in multiple ways with other authors, SMEs, and end users. Review in Design Editor RoboHelp 9 lets you enable Track Changes in Design Editor and insert comments and changes directly in the project. Take advantage of this capability to implement peer reviews. Multiple reviewers can work sequentially and provide their feedback on the project. After the review ends, you can view and manage the feedback from Review Pane. For step-by-step instructions, see "Review in Design Editor" on page 347 and "Manage comments and changes" on page 350. Last updated 12/14/2011
-
 1
1 -
2
-
3
-
4
-
5
-
6
-
7
-
 8
8 -
 9
9 -
 10
10 -
 11
11 -
 12
12 -
 13
13 -
 14
14 -
 15
15 -
 16
16 -
 17
17 -
 18
18 -
19
-
20
-
21
-
22
-
23
-
24
-
25
-
26
-
27
-
28
-
29
-
30
-
31
-
32
-
33
-
34
-
35
-
36
-
37
-
38
-
39
-
40
-
41
-
42
-
43
-
44
-
45
-
46
-
47
-
48
-
49
-
50
-
51
-
52
-
53
-
54
-
55
-
56
-
57
-
58
-
59
-
60
-
61
-
62
-
63
-
64
-
65
-
66
-
67
-
68
-
69
-
70
-
71
-
72
-
73
-
74
-
75
-
76
-
77
-
78
-
79
-
80
-
81
-
82
-
83
-
84
-
85
-
86
-
87
-
88
-
89
-
90
-
91
-
92
-
93
-
94
-
95
-
96
-
97
-
98
-
99
-
100
-
101
-
102
-
103
-
104
-
105
-
106
-
107
-
108
-
109
-
110
-
111
-
112
-
113
-
114
-
115
-
116
-
117
-
118
-
119
-
120
-
121
-
122
-
123
-
124
-
125
-
126
-
127
-
128
-
129
-
130
-
131
-
132
-
133
-
134
-
135
-
136
-
137
-
138
-
139
-
140
-
141
-
142
-
143
-
144
-
145
-
146
-
147
-
148
-
149
-
150
-
151
-
152
-
153
-
154
-
155
-
156
-
157
-
158
-
159
-
160
-
161
-
162
-
163
-
164
-
165
-
166
-
167
-
168
-
169
-
170
-
171
-
172
-
173
-
174
-
175
-
176
-
177
-
178
-
179
-
180
-
181
-
182
-
183
-
184
-
185
-
186
-
187
-
188
-
189
-
190
-
191
-
192
-
193
-
194
-
195
-
196
-
197
-
198
-
199
-
200
-
201
-
202
-
203
-
204
-
205
-
206
-
207
-
208
-
209
-
210
-
211
-
212
-
213
-
214
-
215
-
216
-
217
-
218
-
219
-
220
-
221
-
222
-
223
-
224
-
225
-
226
-
227
-
228
-
229
-
230
-
231
-
232
-
233
-
234
-
235
-
236
-
237
-
238
-
239
-
240
-
241
-
242
-
243
-
244
-
245
-
246
-
247
-
248
-
249
-
250
-
251
-
252
-
253
-
254
-
255
-
256
-
257
-
258
-
259
-
260
-
261
-
262
-
263
-
264
-
265
-
266
-
267
-
268
-
269
-
270
-
271
-
272
-
273
-
274
-
275
-
276
-
277
-
278
-
279
-
280
-
281
-
282
-
283
-
284
-
285
-
286
-
287
-
288
-
289
-
290
-
291
-
292
-
293
-
294
-
295
-
296
-
297
-
298
-
299
-
300
-
301
-
302
-
303
-
304
-
305
-
306
-
307
-
308
-
309
-
310
-
311
-
312
-
313
-
314
-
315
-
316
-
317
-
318
-
319
-
320
-
321
-
322
-
323
-
324
-
325
-
326
-
327
-
328
-
329
-
330
-
331
-
332
-
333
-
334
-
335
-
336
-
337
-
338
-
339
-
340
-
341
-
342
-
343
-
344
-
345
-
346
-
347
-
348
-
349
-
350
-
351
-
352
-
353
-
354
-
355
-
356
-
357
-
358
-
359
-
360
-
361
-
362
-
363
-
364
-
365
-
366
-
367
-
368
-
369
-
370
-
371
-
372
-
373
-
374
-
375
-
376
-
377
-
378
-
379
-
380
 |
 |