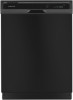
Amana ADB1400AGB Installation Instructions
Amana ADB1400AGB Manual
 |
View all Amana ADB1400AGB manuals
Add to My Manuals
Save this manual to your list of manuals |
Amana ADB1400AGB manual content summary:
- Amana ADB1400AGB | Installation Instructions - Page 1
INSTALLATION INSTRUCTIONS UNDERCOUNTER DISHWASHER PLASTIC GIANT TUB MODELS INSTRUCTIONS D'INSTALLATION LAVE-VAISSELLE SOUS COMPTOIR MODÈLES À TRÈS GRANDE CUVE EN PLASTIQUE Table of Contents 2 Table des matières 25 W10435040C - Amana ADB1400AGB | Installation Instructions - Page 2
door until latched. ■ Observe all governing codes and ordinances. ■ Install this dishwasher as specified in these instructions. ■ Installation should be performed by a qualified service technician. The dishwasher must be installed to meet all electrical and plumbing national and local codes and - Amana ADB1400AGB | Installation Instructions - Page 3
tools and parts before starting installation. Read and follow the instructions provided with any tools listed here. Parts needed: All Installations Tools needed: Other parts you may also need: *Must be the proper size to connect your household wiring to 16-gauge wiring in dishwasher. Other - Amana ADB1400AGB | Installation Instructions - Page 4
installing your dishwasher at the end of your cabinetry. A moisture barrier accessory (Part Number 4396277) is available from your dealer for installing dishwasher will be left unused for a period of time or in a location where it may be subject to freezing, have it winterized by authorized service - Amana ADB1400AGB | Installation Instructions - Page 5
5 - Amana ADB1400AGB | Installation Instructions - Page 6
fittings. ■ If required, the air gap should be installed in accordance with the air gap installation instructions. When you are connecting the air gap, a rubber 49°C) water at dishwasher O.D. copper tubing with compression fitting or flexible braided water supply line (Part Number 4396897RP). NOTE: - Amana ADB1400AGB | Installation Instructions - Page 7
or circuit breaker box before installing dishwasher. Failure to do so can result in death or electrical shock. If the water line and the cable extend to the locations shown, proceed to the "Install Drain Hose" section. If they do not reach far enough, follow the instructions in the "Prepare Cabinet - Amana ADB1400AGB | Installation Instructions - Page 8
to the floor in area shown. This will prohibit cable from moving when dishwasher is moved into cabinet opening. Prepare and Route Water Line Helpful Tip: until smooth. Metal cabinet: Cover hole with grommet (Part Number 302797 not provided). Measure overall length of copper tubing for the water supply - Amana ADB1400AGB | Installation Instructions - Page 9
should have a manual shutoff valve located under the sink. Route water line and tape it to the floor in area shown. This will keep it from moving when dishwasher is moved into cabinet opening. Install Drain Hose IMPORTANT: Always use a new drain hose. Check local codes to determine whether - Amana ADB1400AGB | Installation Instructions - Page 10
of the disposer or a waste tee must be made before the drain trap and at least 20" (50.8 cm) above the floor where the dishwasher will be installed. Helpful Tip: To reduce vibration of the hose, keep the hose away from the floor. Option A, Waste disposer - no air gap 1. Fit rubber end - Amana ADB1400AGB | Installation Instructions - Page 11
down on open door. Doing so can result in serious injury or cuts. WARNING Excessive Weight Hazard Use two or more people to move and install dishwasher. Failure to do so can result in back or other injury. Using the precut slots in the insulation, fasten the insulation over the molded hooks - Amana ADB1400AGB | Installation Instructions - Page 12
Option B, proceed to "Determine Cabinet Opening," to continue with the installation of your dishwasher. Make Power Supply Cord Connection Option A, Power Supply Cord: Using that it does not touch dishwasher motor to lower part of dishwasher tub. Pull cord through strain relief in terminal box. 12 - Amana ADB1400AGB | Installation Instructions - Page 13
UL Listed/CSA Approved twist-on wire connectors. Electrical Shock Hazard Electrically ground dishwasher. Connect ground wire to green ground connector in terminal box. Do not use an extension cord. Failure to follow these instructions can result in death, fire, or electrical shock. If needed, see - Amana ADB1400AGB | Installation Instructions - Page 14
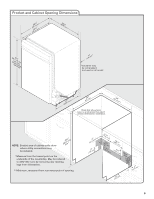
has leveling legs. The following provides instructions to adjust the leveling legs to set the dishwasher to the correct height for your cabinet opening. Measure height of cabinet opening from underside of countertop to floor where dishwasher will be installed (you will need to measure the - Amana ADB1400AGB | Installation Instructions - Page 15
IMPORTANT: The dishwasher must be secured to the cabinet. There are 2 brackets found in the parts bag. Attach the brackets using Option Number 1 if the countertop is wood, laminate or another similar surface. If your countertop is marble, granite or another hard surface, install using Option Number - Amana ADB1400AGB | Installation Instructions - Page 16
. WARNING Excessive Weight Hazard Use two or more people to move and install dishwasher. Failure to do so can result in back or other injury. NOTE: Do not install kick plate until instructed to do so. With another person holding the dishwasher to keep it from tipping, open and close the door a few - Amana ADB1400AGB | Installation Instructions - Page 17
to back in the opening. If needed, adjust leveling leg until dishwasher is plumb. Repeat for other side of dishwasher. Helpful Tip: Push up on front of dishwasher to raise dishwasher off the ground to adjust front legs. With some installations, it may be easier to adjust the front leg using the - Amana ADB1400AGB | Installation Instructions - Page 18
Connect to Water Supply Connect to Drain Be sure rubber washer is properly seated in fitting. Slide the ³⁄₄" fitting up to the valve and hand tighten to avoid crossthreading. Hand tighten until the coupling is tight. Using pliers, check the tightness of the coupling. An additional ¹⁄₄ to ¹⁄₂ turn - Amana ADB1400AGB | Installation Instructions - Page 19
in terminal box. Do not use an extension cord. Failure to follow these instructions can result in death, fire, or electrical shock. Route cable so that it does not touch dishwasher motor or lower part of dishwasher tub. Pull cable through UL Listed/CSA Approved strain relief in terminal box - Amana ADB1400AGB | Installation Instructions - Page 20
Connect wires black to black and white to white, using UL Listed/CSA Approved twist-on wire connectors (not included). Secure Dishwasher in Cabinet Opening If needed, see website for animated representation of this step. Visit www.whirlpool.com/electrical under FAQ tab. Tighten strain relief - Amana ADB1400AGB | Installation Instructions - Page 21
Complete Installation Check that top of door does not contact screws, brackets or countertop. If it does, adjust leveling legs. Place the plastic access panel against the dishwasher leg. Open door and check that space between dishwasher cabinet opening and tub is equal on both sides. If spacing - Amana ADB1400AGB | Installation Instructions - Page 22
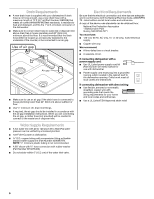
dishwasher motor or lower part of dishwasher tub. Reconnect Power Check Operation ■ Read the Dishwasher User Instructions that came with your dishwasher. ■ Check that all parts have been installed Guide for service contact information. Additional Tips Expect longer wash times. Your new dishwasher - Amana ADB1400AGB | Installation Instructions - Page 23
Notes 23 - Amana ADB1400AGB | Installation Instructions - Page 24
Notes 24 - Amana ADB1400AGB | Installation Instructions - Page 25
et pièces 26 Exigences d'emplacement 27 Exigences d'évacuation 29 Spécifications de l'alimentation en eau 29 Spécifications électriques 29 INSTRUCTIONS D'INSTALLATION 30 Préparation de l'ouverture d'encastrement du placard - Moyens de raccordement préexistants 30 Préparation de l'ouverture - Amana ADB1400AGB | Installation Instructions - Page 26
installation. Lire et observer les instructions fournies avec chacun des outils de la liste ci-dessous. Pièces nécessaires : Toutes les installations électriques par un électricien qualifié agréé. D'autre part, pour les premières installations Outillage nécessaire : Pièces fournies : Pièces - Amana ADB1400AGB | Installation Instructions - Page 27
lave-vaisselle, on doit pouvoir établir le dégagement approprié entre le moteur et le plancher. Le moteur ne doit pas toucher le plancher. Ne pas installer le lave-vaisselle sur de la moquette. Abriter du gel le lave-vaisselle et les canalisations d'eau qui l'alimentent. La garantie de l'appareil ne - Amana ADB1400AGB | Installation Instructions - Page 28
28 - Amana ADB1400AGB | Installation Instructions - Page 29
de diamètre intérieur minimal de ¹⁄₂" pour le conduit d'évacuation. ■ Si nécessaire, le dispositif de brise-siphon doit être installé conformément aux instructions d'installation de ce dernier. Lors du raccordement du dispositif de brise-siphon à la canalisation d'égout en T ou au raccord de broyeur - Amana ADB1400AGB | Installation Instructions - Page 30
. Si la canalisation d'eau et le câble dépassent des emplacements indiqués, passer à la section "Installation du tuyau d'évacuation". S'ils ne sont pas assez longs, suivre les instructions dans la section "Préparation de l'ouverture d'encastrement du placard - Nouveaux moyens de raccordement". Pr - Amana ADB1400AGB | Installation Instructions - Page 31
Placard en bois : Poncer le trou jusqu'à obtenir une surface lisse. Placard métallique : Couvrir le trou avec l'œillet fourni dans la trousse du cordon d'alimentation électrique. Option B, raccordement direct : Conseil utile : Le raccordement au lave-vaisselle sera plus facile si l'on achemine le câ - Amana ADB1400AGB | Installation Instructions - Page 32
les codes et règlements locaux. La canalisation d'alimentation en eau raccordée au lave-vaisselle doit comporter un robinet d'arrêt manuel situé sous l'évier. Installer la canalisation d'alimentation en eau et la fixer au plancher avec du ruban adhésif dans la zone indiquée. Cela l'empêchera de - Amana ADB1400AGB | Installation Instructions - Page 33
à déchets doit être réalisé en amont du siphon du circuit d'évacuation et à au moins 20" (50,8 cm) au-dessus du plancher de l'espace d'installation du lave-vaisselle. Conseil utile : Afin de minimiser les vibrations du tuyau, le tenir à distance du plancher. Option A - broyeur à déchets - sans brise - Amana ADB1400AGB | Installation Instructions - Page 34
des blessures graves ou des coupures. AVERTISSEMENT Risque du poids excessif Utiliser deux personnes ou plus pour déplacer et installer le lave-vaisselle. Le non-respect de cette instruction peut causer une blessure au dos ou d'autre blessure. En utilisant les fentes précoupées dans l'isolation - Amana ADB1400AGB | Installation Instructions - Page 35
lave-vaisselle pour placer le lave-vaisselle en appui sur la face arrière. Installer un serre-câble (homologation UL ou CSA). Veiller à ce que les têtes valuation de l'ouverture d'encastrement du placard" pour poursuivre l'installation du lave-vaisselle. Raccordement du cordon d'alimentation Option - Amana ADB1400AGB | Installation Instructions - Page 36
Ne pas utiliser un câble de rallonge. Le non-respect de ces instructions peut causer un décès, un incendie ou un choc électrique. Au besoin la serrer. REMARQUE : Ne pas pré-torsader les brins des conducteurs. Installer le connecteur de fils en le faisant pivoter. Tirer doucement sur les - Amana ADB1400AGB | Installation Instructions - Page 37
Le lave-vaisselle comporte des pieds de nivellement. Les instructions qui suivent indiquent comment ajuster les pieds de nivellement espacement arrière pour obtenir un dégagement supplémentaire. On pourra ainsi installer le lave-vaisselle dans une ouverture d'encastrement du placard d'une hauteur de - Amana ADB1400AGB | Installation Instructions - Page 38
plancher. Choix de l'option de fixation AVERTISSEMENT Risque du poids excessif Utiliser deux personnes ou plus pour déplacer et installer le lave-vaisselle. Le non-respect de cette instruction peut causer une blessure au dos ou d'autre blessure. Retirer les brides de l'emballage et les insérer dans - Amana ADB1400AGB | Installation Instructions - Page 39
excessif Utiliser deux personnes ou plus pour déplacer et installer le lave-vaisselle. Le non-respect de cette instruction peut causer une blessure au dos ou d'autre blessure. REMARQUE : Ne pas installer le garde-pieds avant que les instructions ne le spécifient. Vérifier que la canalisation d'eau - Amana ADB1400AGB | Installation Instructions - Page 40
autre côté du lave-vaisselle. Conseil utile : Pousser contre l'avant du lave-vaisselle pour le soulever et pouvoir ajuster les pieds avant. Pour certaines installations, il peut être plus facile de régler le pied avant à l'aide d'une clé à douille hexagonale ou une clé à molette de IMPORTANT : Si - Amana ADB1400AGB | Installation Instructions - Page 41
de cette étape. Visiter www.whirlpool.com/watersupply sous l'onglet FAQ. Raccordement au circuit d'évacuation S'assurer que la rondelle de caoutchouc est correctement installée dans le raccord. Enfiler le raccord de ³⁄₄" vers le haut jusqu'à la valve et serrer à la main afin d'éviter de fausser le - Amana ADB1400AGB | Installation Instructions - Page 42
la borne. Ne pas utiliser un câble de rallonge. Le non-respect de ces instructions peut causer un décès, un incendie ou un choc électrique. Former un crochet en REMARQUE : Ne pas pré-torsader les brins des conducteurs. Installer un connecteur de fils (homologation UL ou CSA). Tirer doucement sur les - Amana ADB1400AGB | Installation Instructions - Page 43
Connecter le conducteur noir avec le noir et le conducteur blanc avec le blanc à l'aide des connecteurs de fils (homologation UL ou CSA) (non fournis). Fixation du lave-vaisselle dans l'ouverture d'encastrement du placard Au besoin, visiter le site Web pour une représentation vidéo de cette étape. - Amana ADB1400AGB | Installation Instructions - Page 44
immobilisé pour l'empêcher de basculer lors de l'ouverture de la porte. Ouvrir la porte et vérifier que la distance entre l'ouverture du placard pour l'installation du lave-vaisselle et la cuve est la même des deux côtés. Si la distance n'est pas la même, desserrer les vis des brides d'arrimage et - Amana ADB1400AGB | Installation Instructions - Page 45
Achever l'installation AVERTISSEMENT Placer le panneau d'accès en plastique contre le pied du . Ne pas utiliser un adaptateur. Ne pas utiliser un câble de rallonge. Le non-respect de ces instructions peut causer un décès, un incendie ou un choc électrique. Vérifier que la rive inférieure du panneau - Amana ADB1400AGB | Installation Instructions - Page 46
■ Lire les instructions d'utilisation du lave-vaisselle fournies avec le lave-vaisselle. ■ Vérifier que toutes les pièces ont été installées et qu' Si aucune de ces vérifications ne résout le problème, voir le Guide d'utilisation et d'entretien pour les coordonnées des personnes à contacter pour - Amana ADB1400AGB | Installation Instructions - Page 47
47 - Amana ADB1400AGB | Installation Instructions - Page 48
W10435040C © 2013. All rights reserved. Used under license in Canada Tous droits réservés. Utilisé sous licence au Canada. 5/13 Printed in U.S.A. Imprimé aux É.-U.
-
 1
1 -
 2
2 -
 3
3 -
 4
4 -
 5
5 -
 6
6 -
 7
7 -
8
-
9
-
10
-
11
-
12
-
13
-
14
-
15
-
16
-
17
-
18
-
19
-
20
-
21
-
22
-
23
-
24
-
25
-
26
-
27
-
28
-
29
-
30
-
31
-
32
-
33
-
34
-
35
-
36
-
37
-
38
-
39
-
40
-
41
-
42
-
43
-
44
-
45
-
46
-
47
-
48
 |
 |

INSTALLATION INSTRUCTIONS
UNDERCOUNTER DISHWASHER
PLASTIC GIANT TUB MODELS
INSTRUCTIONS D'INSTALLATION
LAVE-VAISSELLE SOUS COMPTOIR
MODÈLES À TRÈS GRANDE CUVE EN PLASTIQUE
Table of Contents
..............................................................
2
Table des matières
..........................................................
25
W10435040C