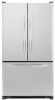
Amana AFD2535FES Use and Care
Amana AFD2535FES Manual
 |
UPC - 719881173986
View all Amana AFD2535FES manuals
Add to My Manuals
Save this manual to your list of manuals |
Amana AFD2535FES manual content summary:
- Amana AFD2535FES | Use and Care - Page 1
REFRIGERATOR USER INSTRUCTIONS THANK YOU for purchasing this high-quality product. If you should experience a problem not covered in TROUBLESHOOTING, please visit our website at www.amana.com for additional information. If you still need assistance, call us at 1-800-843-0304. In Canada, visit our - Amana AFD2535FES | Use and Care - Page 2
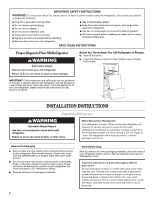
or more people to move and install refrigerator. ■ Disconnect power before installing ice maker (on ice maker kit ready models only). SAVE THESE INSTRUCTIONS Proper Disposal of Your Old Refrigerator WARNING Suffocation Hazard Remove doors from your old refrigerator. Failure to do so can result in - Amana AFD2535FES | Use and Care - Page 3
to do so can result in death, explosion, or fire. To ensure proper ventilation for your refrigerator, allow for a ¹⁄₂" (1.25 cm) space at the top and behind the refrigerator. If your refrigerator has an ice maker, allow extra space at the back for the water line connections. When installing your - Amana AFD2535FES | Use and Care - Page 4
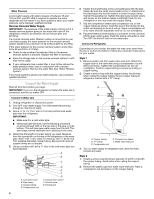
turn the refrigerator on before the water line is connected, turn the ice maker OFF. Connect to Water Line 1. Unplug refrigerator or disconnect Connect to Refrigerator Depending on your model, the water line may come down from the top or up from the bottom. Follow the connection instructions for - Amana AFD2535FES | Use and Care - Page 5
instructions can result in death, fire, or electrical shock. 1. Plug into a grounded 3 prong outlet. NOTE: Allow 24 hours to produce the first batch of ice. Discard the first three batches of ice produced. Allow 3 days to completely fill the ice container. Refrigerator the lower part of the handle - Amana AFD2535FES | Use and Care - Page 6
from the cabinet. 4. Remove the parts for the bottom hinge as shown in Bottom Hinge graphic. Freezer door models 1. Unplug refrigerator or disconnect power. 2. Keep the freezer door closed until you are ready to lift it free from the cabinet. NOTE: Provide additional support for the door while the - Amana AFD2535FES | Use and Care - Page 7
in Top Hinge graphic. Do not tighten the screws completely. 2. Replace the parts for the bottom hinges as shown in Bottom Hinge graphic. Tighten screws. Replace the refrigerator doors. NOTE: Provide additional support for the refrigerator doors while the hinges are being moved. Do not depend on the - Amana AFD2535FES | Use and Care - Page 8
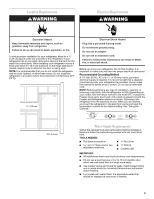
Style 1-Standard Door Door Removal & Replacement Top Hinge A B C A. Top Hinge Cover B Hex-Head Hinge Screws C. Top Hinge Center Hinge A B C A. Hinge Pin Cover B. Center Hinge C. Hinge Screws Bottom Hinge A B C D A. Hinge Pin Shim (on some models) B. Bottom Hinge C. ³⁄₈" Hex-Head Hinge Screws D. - Amana AFD2535FES | Use and Care - Page 9
Style 2-French Doors WARNING Electrical Shock Hazard Disconnect power before removing doors. Failure to do so can result in death or electrical shock. Top Hinges A B C D A. Hinge Cover Screw B. Top Hinge Cover C. 5/16" Hex Head Hinge Screws D. Top Hinge Bottom Hinges A B C Door Removal & - Amana AFD2535FES | Use and Care - Page 10
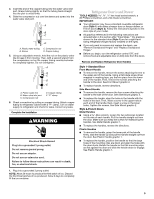
rollers (Styles 1 and 2), or a leveling screw (Style 3), located at the base of the refrigerator. If your refrigerator seems unsteady or you want the door to close more easily, follow the instructions for your model. Style 2-Freezer Drawer Models 1. Remove the base grille. Grasp the grille firmly - Amana AFD2535FES | Use and Care - Page 11
juice is as cold as you like and when ice cream is firm. ■ Wait 24 hours for your refrigerator to cool completely before adding food. If you add food before the refrigerator has cooled completely, your food may spoil. NOTE: Adjusting the refrigerator and freezer temperature controls to a colder than - Amana AFD2535FES | Use and Care - Page 12
. Ice Maker (on some models) Turning the Ice Maker On/Off To turn the ice maker ON, simply lower the wire shutoff arm. To manually turn the ice maker OFF on top of the ice maker or in the ice storage bin. Water Dispenser (on some models) IMPORTANT: ■ After connecting the refrigerator to a water - Amana AFD2535FES | Use and Care - Page 13
water flow to the water dispenser or ice maker decreases noticeably before 6 months have passed using the following cleaning instructions. To Clean Your Refrigerator: NOTE: Do not tools. 1. Unplug refrigerator or disconnect power. 2. Hand wash, rinse, and dry removable parts and interior surfaces - Amana AFD2535FES | Use and Care - Page 14
over light assembly. 5. Plug in refrigerator or reconnect power. TROUBLESHOOTING First try the solutions suggested here or visit our website and reference FAQs (Frequently Asked Questions) to possibly avoid the cost of a service call. In the U.S.A., www.amana.com In Canada, www.amanacanada.ca - Amana AFD2535FES | Use and Care - Page 15
recently removed? Allow 24 hours for ice maker to produce more ice. ■ Ice cube jammed in the ice maker ejector arm? Remove ice from the ejector arm with a plastic utensil. ■ Water filter installed on the refrigerator? Remove filter and operate ice maker. If ice volume improves, then the filter may - Amana AFD2535FES | Use and Care - Page 16
kPa)? The water pressure to the home determines the flow from the dispenser. See "Water Supply Requirements." ■ Water filter installed on the refrigerator? Remove filter and operate dispenser. If water flow increases, the filter may be clogged or incorrectly installed. Replace filter or reinstall it - Amana AFD2535FES | Use and Care - Page 17
.99 U.S.A./$49.95 Canada. Prices are subject to change without notice. Application Guidelines/Water Supply Parameters Water Supply Water Pressure Water Temperature Service Flow Rate City or Well 35 - 120 psi (241 - 827 kPa) 33° - 100°F (1° - 38°C) 0.78 gpm (2.9 L/min.) @ 60 psi ■ The product is - Amana AFD2535FES | Use and Care - Page 18
remote area where service by an authorized Amana servicer is not available. 10. The removal and reinstallation of your major appliance if it is installed in an inaccessible location or is not installed in accordance with Amana's published installation instructions. 11. Replacement parts or repair - Amana AFD2535FES | Use and Care - Page 19
cubierto en SOLUCIÓN DE PROBLEMAS, visite nuestro sitio de internet en www.amana.com para obtener información adicional. Si considera que aún necesita ayuda, ll importante. Hemos incluido muchos mensajes importantes de seguridad en este manual y en su electrodoméstico. Lea y obedezca siempre todos - Amana AFD2535FES | Use and Care - Page 20
ocasionar la muerte, explosión, o incendio. Para asegurar la ventilación apropiada de su refrigerador, permita un espacio de ¹⁄₂" (1,25 cm) en la parte superior y detrás del refrigerador. Si su refrigerador tiene fábrica de hielo, asegúrese que hay espacio adicional atrás para las conexiones de la - Amana AFD2535FES | Use and Care - Page 21
NOTA: No se recomienda instalar el refrigerador cerca de un horno, radiador u otra fuente de calor. No instale el refrigerador en un lugar donde la temperatura sea menor de 55°F (13°C). NOTA: Antes de realizar cualquier tipo de instalación, limpieza o de quitar un foco de luz, ponga el refrigerador - Amana AFD2535FES | Use and Care - Page 22
del refrigerador con una abrazadera en "P". A 4. Determine la longitud de la tubería de cobre que necesite. Mida desde la conexión de la parte trasera del refrigerador hasta la tubería de agua. Agregue 7 pies (2,1 m) para poder B mover el refrigerador para limpiarlo. Use tubería de cobre de - Amana AFD2535FES | Use and Care - Page 23
la ilustración Manija de metal 1. ■ Para volver a colocar las manijas, invierta las instrucciones. Manijas de plástico ■ Para quitar la manija, tome la parte inferior de la misma con firmeza, deslice la manija hacia arriba y jálela directamente hacia afuera de la puerta. Vea la ilustración Manija de - Amana AFD2535FES | Use and Care - Page 24
del lado de la manija y colóquelos del lado opuesto. Vea la ilustración 1-1. 2. Quite los tapones de los orificios de las bisagras de la parte superior de la carcasa y colóquelos en los orificios de la bisagra del lado opuesto, como se muestra en la Ilustración 1-2. Puerta del refrigerador 1. Saque - Amana AFD2535FES | Use and Care - Page 25
el frente del cajón. Para volver a colocar el frente del cajón 1. Deslice las guías fuera del compartimiento del congelador. Inserte los tornillos en la parte superior del frente del cajón, dentro de las ranuras que están en los soportes del cajón. Vea la ilustración Cómo volver a colocar el frente - Amana AFD2535FES | Use and Care - Page 26
Estilo 1 - Puerta estándar Cómo quitar y volver a poner la puerta en su lugar Bisagra superior A B C A. Cubierta de la bisagra superior B. Tornillos de cabeza hexagonal para bisagra de C. Bisagra superior Bisagra central A B C A. Cubierta del pasador de la bisagra B. Bisagra central C. Tornillos - Amana AFD2535FES | Use and Care - Page 27
Estilo 2-Dos puertas ADVERTENCIA Peligro de Choque Eléctrico Desconecte el suministro de energía antes de sacar las puertas. No seguir esta instrucción puede ocasionar la muerte o choque eléctrico. Cómo quitar y volver a poner la puerta en su lugar Bisagras superiores A B C D Manija metálica 1 - Amana AFD2535FES | Use and Care - Page 28
del rodillo hacia la derecha. ■ Para bajarlo, gire el tornillo regulador del rodillo hacia la izquierda. NOTA: Haga que alguien empuje la parte superior del refrigerador, lo cual disminuye el peso sobre los tornillos reguladores y los rodillos. Esto facilita el giro de los tornillos. A B 2. Levante - Amana AFD2535FES | Use and Care - Page 29
Vuelva a colocar la rejilla de la base. USO DE SU REFRIGERADOR Cómo abrir y cerrar las puertas (Modelos de dos puertas con congelador en la parte inferior) El compartimiento del refrigerador tiene dos puertas. Las puertas pueden abrirse y cerrarse ya sea en forma separada o juntas. Hay una junta con - Amana AFD2535FES | Use and Care - Page 30
Cómo ajustar los controles Si necesita regular la temperatura en el compartimiento del refrigerador o del congelador, utilice como guía los ajustes que se enumeran en la tabla a continuación. Para los controles del Estilo 1, presione los botones táctiles con las flechas hacia arriba o hacia abajo, - Amana AFD2535FES | Use and Care - Page 31
, detergentes concentrados, blanqueadores o productos de limpieza que contengan productos derivados del petróleo en las superficies exteriores (puertas y carcasa), las partes de plástico, en el interior y en los revestimientos o juntas de la puerta. No use toallas de papel, estropajos para fregar - Amana AFD2535FES | Use and Care - Page 32
a colocar la pantalla de luz. Modelos con congelador de cajón ■ Parte superior del compartimiento del refrigerador inserte las lengüetas en la pantalla, dentro de una visita de servicio técnico. En EE.UU., www.amana.com En Canadá, www.amanacanada.ca Funcionamiento del refrigerador El refrigerador - Amana AFD2535FES | Use and Care - Page 33
Parece que el refrigerador es ruidoso El ruido del refrigerador se ha ido reduciendo a lo largo de los años. Debido a esta reducción, es posible que escuche ruidos intermitentes en su nuevo refrigerador que no había notado en el modelo viejo. A continuación se enumeran algunos sonidos normales con - Amana AFD2535FES | Use and Care - Page 34
■ ¿Tiene un filtro de agua instalado en el refrigerador? Saque el filtro y ponga a funcionar la fábrica de hielo. Si el volumen de hielo aumenta, el filtro puede estar obstruido o haberse instalado incorrectamente. Reemplace el filtro o vuelva a instalarlo correctamente. ■ ¿Se ha conectado un - Amana AFD2535FES | Use and Care - Page 35
NTU 0,0002 mg/L 0,002 mg/L Concentración en Máximo el agua a tratar efluente 2,0 mg/L ± 10% 0,06 mg/L Por lo menos 10.000 69.000 #/mL** partículas/mL Concentración en Máximo el agua a tratar efluente 0,15 mg/L ± 10% < 0,001 mg/L 0,15 mg/L ± 10% < 0,001 mg/L 0,006 mg/L ± 10% 0,0005 mg - Amana AFD2535FES | Use and Care - Page 36
a los colores de marcadores recomendados para borrar en seco en el Manual de uso y cuidado. 13. Cualquier daño o decoloración causado por , o si quisiera hacer una cita para obtener servicio, puede ponerse en contacto con Amana, en el número que se indica a continuación. Tenga listo su número de - Amana AFD2535FES | Use and Care - Page 37
INSTRUCTIONS D'UTILISATION DU RÉFRIGÉRATEUR Nous vous REMERCIONS d'avoir acheté ce produit de haute qualité. Si vous rencontrez un problème non mentionné dans la section DÉPANNAGE, veuillez visiter notre site Web www.amana.com pour des informations supplémentaires. Si vous avez toujours besoin d' - Amana AFD2535FES | Use and Care - Page 38
frigérateur AVERTISSEMENT Risque du poids excessif Utiliser deux ou plus de personnes pour déplacer et installer le réfrigérateur. Le non-respect de cette instruction peut causer une blessure au dos ou d'autre blessure. Enlèvement des matériaux d'emballage ■ Enlever le ruban adhésif et la colle des - Amana AFD2535FES | Use and Care - Page 39
pas enlever la broche de liaison à la terre. Ne pas utiliser un adaptateur. Ne pas utiliser un câble de rallonge. Le non-respect de ces instructions peut causer un décès, un incendie ou un choc électrique. Avant de placer le réfrigérateur à son emplacement final, il est important de vous assurer - Amana AFD2535FES | Use and Care - Page 40
eau peut être configurée vers le haut ou vers le bas. Suivre les instructions de raccordement appropriées à votre modèle. 1. Débrancher le réfrigé é solidement en tirant sur le tube en cuivre. 2. Créer une boucle de service avec le tube de cuivre. Éviter les déformations en pliant le tube de cuivre - Amana AFD2535FES | Use and Care - Page 41
pas enlever la broche de liaison à la terre. Ne pas utiliser un adaptateur. Ne pas utiliser un câble de rallonge. Le non-respect de ces instructions peut causer un décès, un incendie ou un choc électrique. 1. Brancher le réfrigérateur sur une prise à 3 alvéoles reliée à la terre. REMARQUE : Prévoir - Amana AFD2535FES | Use and Care - Page 42
les portes. Le non-respect de cette instruction peut causer un décès ou un choc les soulever de la caisse. REMARQUE : Prévoir un support additionnel des portes pendant la réinstallation des charnières. 5. Serrer toutes les vis. Conserver la porte à part jusqu'à ce que les charnières et la porte ou - Amana AFD2535FES | Use and Care - Page 43
Réinstaller la porte du congélateur. REMARQUE : Prévoir un support additionnel de la porte pendant la réinstallation des charnières. La adaptateur. Ne pas utiliser un câble de rallonge. Le non-respect de ces instructions peut causer un décès, un incendie ou un choc électrique. 2. Brancher sur une - Amana AFD2535FES | Use and Care - Page 44
Style 1-Porte standard Dépose et réinstallation de la porte Charnière supérieure A B C A. Couvercle de la charnière supérieure B. Vis de charnière à tête hexagonale de C. Charnière supérieure Charnière centrale A B C A. Couvercle de l'axe de la charnière B. Charnière centrale C. Vis de charnière - Amana AFD2535FES | Use and Care - Page 45
battants AVERTISSEMENT Risque de choc électrique Déconnecter la source de courant électrique avant d'enlever les portes. Le non-respect de cette instruction peut causer un décès ou un choc électrique. Charnières supérieures A B C D Dépose et réinstallation de la porte Poignée en métal 1 A. Vis - Amana AFD2535FES | Use and Care - Page 46
vous désirez que les portes se ferment plus facilement, suivre les instructions pour votre modèle. Style 1-Modèles de compartiments de congélation grille fermement et tirer vers soi pour la détacher. 2. Enlever le couvercle du support. Insérer l'extrémité d'un crayon doté d'une gomme dans l'encoche - Amana AFD2535FES | Use and Care - Page 47
Style 3-Vis de réglage de l'aplomb 1. Retirer la grille de la base. Tenir la grille fermement et tirer vers soi pour la détacher. UTILISATION DU RÉFRIGÉRATEUR 2. À l'aide d'un tournevis à tête hexagonale de ¹⁄₄", tourner les vis de réglage de l'aplomb pour soulever et abaisser chaque côté du ré - Amana AFD2535FES | Use and Care - Page 48
nécessaire d'ajuster la température dans le compartiment de réfrigération ou de congélation, utiliser les réglages indiqués dans le tableau ci-dessous comme guide. Pour les commandes du Style 1, appuyer sur les touches à flèches vers le haut ou vers le bas, ou pour les commandes du Style 2, tourner - Amana AFD2535FES | Use and Care - Page 49
bleu. ENTRETIEN DU RÉFRIGÉRATEUR Nettoyage AVERTISSEMENT Risque d'explosion Utiliser un produit de nettoyage ininflammable. Le non-respect de cette instruction peut causer un décès, une explosion ou un incendie. Les compartiments de réfrigération et de congélation se dégivrent automatiquement - Amana AFD2535FES | Use and Care - Page 50
résistant à la corrosion, et non pas anticorrosion. Pour éviter la corrosion de l'acier inoxydable, garder les surfaces propres à l'aide des instructions de nettoyage suivantes. Nettoyage de votre réfrigérateur : REMARQUE : Ne pas utiliser des nettoyants abrasifs tels que les nettoyants à vitre en - Amana AFD2535FES | Use and Care - Page 51
questions) pour éviter le coût d'un appel de service. Aux É.-U., www.amana.com Au Canada, www.amanacanada.ca Fonctionnement du réfrigé un adaptateur. Ne pas utiliser un câble de rallonge. Le non-respect de ces instructions peut causer un décès, un incendie ou un choc électrique. ■ Le cordon d' - Amana AFD2535FES | Use and Care - Page 52
Température et humidité La température est trop élevée ■ S'agit-il d'une nouvelle installation? Accorder 24 heures après l'installation pour que le réfrigérateur se refroidisse complètement. ■ La/Les porte(s) est/sont-elle(s) fréquemment ouverte(s) ou laissée(s) ouverte(s)? Ceci permet à l'air chaud - Amana AFD2535FES | Use and Care - Page 53
Mauvais goût, odeur ou couleur grise des glaçons ■ Les raccords de plomberie sont-ils neufs? Des raccords de plomberie neufs peuvent causer une décoloration et un mauvais goût des glaçons. ■ Les glaçons ont-ils été gardés trop longtemps? Jeter les glaçons. Laver le compartiment à glaçons. Accorder - Amana AFD2535FES | Use and Care - Page 54
FEUILLES DE DONNÉES SUR LE PRODUIT Système de filtration d'eau intérieur Modèle UKF8001AXX-750 /Capacité : 750 gallons (2839 litres) Système testé et certifié par NSF International en vertu de la norme NSF/ANSI 42 (réduction du goût et de l'odeur du chlore, et particules (classe I*)); et en vertu - Amana AFD2535FES | Use and Care - Page 55
services d'entretien ou de réparation Amana autorisé n'est pas disponible. 10. La dépose et la réinstallation de votre gros appareil ménager si celui-ci est installé dans un endroit inaccessible ou n'est pas installé conformément aux instructions d'installation fournies par Amana le Guide d' - Amana AFD2535FES | Use and Care - Page 56
W10208786A EN/FR PN W10208785A © 2008 All rights reserved. Todos los derechos reservados. Tous droits réservés. ®Registered Trademark/™Trademark of Maytag Corporation or its related companies. Used under license by Maytag Limited in Canada. ®Marca registrada/™Marca de comercio de Maytag Corporation - Amana AFD2535FES | Use and Care - Page 57
NOTICE: Flush four (4) gallons of water through water filter cartridge before use. AVIS : Vider quatre (4) gallons d'eau par la cartouche du filtre à eau avant utilisation. AVISO: Deje pasar cuatro (4) galones de agua a través del cartucho del filtro de agua antes de usarlo. W10297791
-
 1
1 -
 2
2 -
 3
3 -
 4
4 -
 5
5 -
 6
6 -
 7
7 -
8
-
9
-
10
-
11
-
12
-
13
-
14
-
15
-
16
-
17
-
18
-
19
-
20
-
21
-
22
-
23
-
24
-
25
-
26
-
27
-
28
-
29
-
30
-
31
-
32
-
33
-
34
-
35
-
36
-
37
-
38
-
39
-
40
-
41
-
42
-
43
-
44
-
45
-
46
-
47
-
48
-
49
-
50
-
51
-
52
-
53
-
54
-
55
-
56
-
57
 |
 |

THANK YOU for purchasing this high-quality product. If you should experience a problem not covered in TROUBLESHOOTING,
please visit our website at
www.amana.com
for additional information. If you still need assistance, call us at 1-800-843-0304. In
Canada, visit our website at
www.amanacanada.ca
or call us at 1-800-807-6777.
You will need your model and serial number, located on the inside wall of the refrigerator compartment.
REFRIGERATOR SAFETY
Table of Contents
/
Índice / Table des matières
REFRIGERATOR SAFETY
...............................
1
INSTALLATION INSTRUCTIONS
...................
2
REFRIGERATOR USE
...................................
11
REFRIGERATOR CARE
.................................
13
TROUBLESHOOTING
....................................
14
WATER FILTER CERTIFICATIONS
..............
16
PRODUCT DATA SHEETS
............................
17
WARRANTY
....................................................
18
SEGURIDAD DEL REFRIGERADOR
............
19
INSTRUCCIONES DE INSTALACIÓN
..........
20
USO DE SU REFRIGERADOR
......................
29
CUIDADO DE SU REFRIGERADOR
.............
31
SOLUCIÓN DE PROBLEMAS
.......................
32
HOJA DE DATOS DEL PRODUCTO
............
35
GARANTÍA
......................................................
36
SÉCURITÉ DU RÉFRIGÉRATEUR
................
37
INSTRUCTIONS D’INSTALLATION
..............
38
UTILISATION DU RÉFRIGÉRATEUR
...........
47
ENTRETIEN DU RÉFRIGÉRATEUR
.............
49
DÉPANNAGE
..................................................
51
FEUILLES DE DONNÉES
SUR LE PRODUIT
..........................................
54
GARANTIE
......................................................
55
REFRIGERATOR USER INSTRUCTIONS
W10208786A
You can be killed or seriously injured if you don't immediately
You
can be killed or seriously injured if you don't follow
All safety messages will tell you what the potential hazard is, tell you how to reduce the chance of injury, and tell you what can
happen if the instructions are not followed.
Your safety and the safety of others are very important.
We have provided many important safety messages in this manual and on your appliance. Always read and obey all safety
messages.
This is the safety alert symbol.
This symbol alerts you to potential hazards that can kill or hurt you and others.
All safety messages will follow the safety alert symbol and either the word “DANGER” or “WARNING.”
These words mean:
follow instructions.
instructions.
DANGER
WARNING