American Standard Champion-4 Installation Instructions
American Standard Champion-4 - 3180.016.165 Townsend Right Height Manual
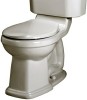 |
UPC - 033056659069
View all American Standard Champion-4 manuals
Add to My Manuals
Save this manual to your list of manuals |
American Standard Champion-4 manual content summary:
- American Standard Champion-4 | Installation Instructions - Page 1
Closet Bolts Regular Screwdriver Wax Ring/Gasket Tape Measure Adjustable Wrench Flexible Supply Tube Carpenters Level Sealant 1/2" Deep Well Nut Driver or Deep Well Socket Wrench 1 REMOVE OLD TOILET a. Close toilet supply valve and flush tank completely. Towel or sponge remaining water from - American Standard Champion-4 | Installation Instructions - Page 2
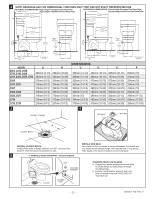
EXACT REPRESENTATIONS. ROUGHING-IN DIMENSIONS: Right Height™ Elongated Two Piece Toilet FINISHED WALL Right Height™ Round Front Two Piece Toilet ROUGHING-IN DIMENSIONS: Normal Height Elongated Two Piece Toilet FINISHED WALL Normal Height Round Front Two Piece Toilet 772mm (30-3/8") *(72281-3m - American Standard Champion-4 | Installation Instructions - Page 3
height to size before installing caps.) c. Smooth off the bead of sealant around base. Remove excess sealant. 7 TANK MTG. BOLTS PREINSTALLED MTG. RIBS WASHER/NUT DEEP SOCKET TOOL RUBBER GASKET INSTALL TANK Recommended tool: Deep socket tool included in tank kit. a. Install large rubber gasket - American Standard Champion-4 | Installation Instructions - Page 4
and moving FLOAT CUP up or down. American Standard shall not be responsible or liable for any damage caused by the use of in-tank cleaners. 13 TROUBLE SHOOTING FLUSH VALVE SEAL REPLACEMENT: 1. Turn off water supply and flush toilet to empty tank. 2. Disconnect chain from trip lever by removing - American Standard Champion-4 | Installation Instructions - Page 5
10. a. Review Step 9 of installation procedure. b. Review Step 4 through 7 of installation procedure. a. Clean debris from seal surface. Replace flush valve seal as needed. (see Step 13) b. Shut off water supply. Remove cap and clean as per Step 14. In the United States: American Standard Brands
-
 1
1 -
 2
2 -
 3
3 -
 4
4 -
 5
5
 |
 |

SAVE FOR FUTURE USE
730529-100 Rev. V
Product names listed herein are trademarks of AS America, Inc.
© AS America, Inc. 2011
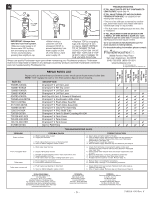
RECOMMENDED TOOLS AND MATERIALS
Putty Knife
Regular Screwdriver
Adjustable Wrench
Sealant
Hacksaw
Wax Ring/Gasket
Flexible Supply Tube
1/2" Deep Well Nut Driver or
Closet Bolts
Tape Measure
Carpenters Level
Deep Well Socket Wrench
CAUTION: PRODUCT IS FRAGILE. TO AVOID BREAKAGE AND POSSIBLE INJURY HANDLE WITH CARE!
NOTE:
Pictures may not exactly define contour of china and components.
1
Recommended fitting type for back-to-back installations.
D
epending upon your plumbing and venting conditions, the flow from
the Champion in a back-to-back installation may create a vacuum on
the system and draw water from the opposing bowl. The National
Standards Plumbing Code prohibits the use of a cross fitting for
drainage as throw over is possible. The code does approve a
directional "Y" style fitting with proper venting to direct the water
downward and away from the other toilet.
NOTE: BACK-TO-BACK INSTALLATION
Doral Classic
™
Champion
®
4 2-piece Toilets
Models - 2058, 2074, 2076, 2473
Doral Classic
™
Champion
®
4
2-piece Toilets
Models - 2367, 2368, 2369, 2443
Oakmont
™
Champion
®
4 2-piece Toilets
Models - 2625, 2627, 2738
Portsmouth
®
Champion
®
4 2-piece Toilets
Models - 2733, 2735
Champion
®
4
2-piece Toilets
Models - 2002, 2018, 2023, 2414, 2585,
2792, 2586, 2793, 3186, 3404
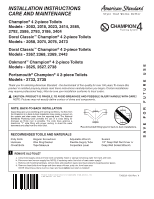
INSTALLATION INSTRUCTIONS
CARE AND MAINTENANCE
Thank you for selecting American Standard - the benchmark of fine quality for over 100 years. To ensure this
product is installed properly, please read these instructions carefully before you begin. (Certain installations
may require professional help.) Also be sure your installation conforms to local codes.
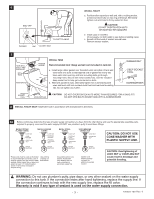
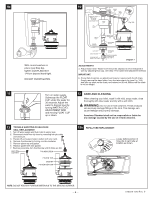
REMOVE OLD TOILET
a.
Close toilet supply valve and flush tank completely. Towel or sponge remaining water from tank and bowl.
b.
Disconnect and remove supply line. NOTE:
If replacing valve, first shut off main water supply!
c.
Remove old mounting hardware, remove toilet and plug floor waste opening to prevent escaping sewer gases.
d.
Remove closet bolts from flange and clean away old wax, putty, etc. from base area.
NOTE:
Mounting surface must be clean and level
before
new toilet is installed!
!