Archos 501714 User Guide
Archos 501714 Manual
 |
View all Archos 501714 manuals
Add to My Manuals
Save this manual to your list of manuals |
Archos 501714 manual content summary:
- Archos 501714 | User Guide - Page 1
to ARNOVA technical support (http://arnovatech.com/support). ? Support (see Register your Product). P/N: 109563 As we are often updating and improving our products, your device's software may have a slightly different appearance or modified functionality than presented in this Quick Start Guide - Archos 501714 | User Guide - Page 2
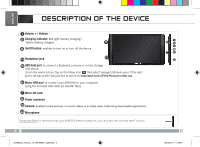
9 Camera: enables to take pictures, to record videos or to make video chats using downloaded applications. 10 Microphone Hardware Reset: In the event that your ARNOVA freezes operation, you can press the "pinhole reset" button. 2 UserGuide_Arnova_10_PN109563_book.indd 2 1 23 4 5 76 8 15/02/2011 - Archos 501714 | User Guide - Page 3
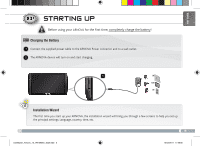
device will turn on and start charging. 1 UK EUR US Installation Wizard The first time you start up your ARNOVA, the installation wizard will bring you through a few screens to help you set up the principal settings: Language, country, time, etc. 3 UserGuide_Arnova_10_PN109563_book.indd 3 15 - Archos 501714 | User Guide - Page 4
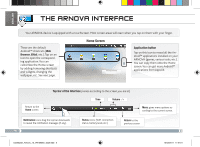
, changing the wallpaper, etc. See next page. Home Screen Application button Tap on this icon to reveal all the Android™ applications installed on your ARNOVA (games, various tools, etc.). You can copy them onto the Home screen. You can get more Android™ applications from AppsLib. Top bar of the - Archos 501714 | User Guide - Page 5
tab, on the right side of the screen, turns into a recycle bin) and release your finger. Adding more applications with APPSLIB : With the ARNOVA connected to the Wifi, tap on the AppsLib icon . This online library of free and purchasable applications has thousands of fun games and useful - Archos 501714 | User Guide - Page 6
to connect to, enter the required network information* and then tap on Connect. Your ARNOVA will now attempt to establish a connection to that WiFi hot spot with the network parameters required, contact the Internet service provider . 6 UserGuide_Arnova_10_PN109563_book.indd 6 15/02/2011 17:47:06 - Archos 501714 | User Guide - Page 7
English Playing multimedia files 1 From the Home screen, tap on the video, audio or photo application. 2 The ARNOVA will display a list of files or folders corresponding to the selected category. 3 Tap on an item to start playing it. Only in Video and Photo - Archos 501714 | User Guide - Page 8
use the Sync tab to synchronize your music, videos, and photos onto your ARNOVA. See Windows Media Player®'s Help to learn more about this. Once all your ® Explorer and any other program that may have read or written to 4 the ARNOVA. Click on the 'safely remove' icon in the system tray, next to the - Archos 501714 | User Guide - Page 9
(http://arnovatech.com/register). Cela vous permettra d'avoir accès au support technique ARNOVA (http://arnovatech.com/support). ? Besoin d'aide ? Sur notre site Web: Consultez la légèrement différentes de celles décrites dans ce guide. 9 UserGuide_Arnova_10_PN109563_book.indd 9 15/02/2011 17:47:14 - Archos 501714 | User Guide - Page 10
érer des fichiers). 7 Lecteur de cartes Micro-SD 8 Connecteur d'alimentation : pour connecter le câble d'alimentation fourni. 9 Webcam 10 Microphone intégré 1 23 4 5 76 8 Réinitialisation de votre appareil : Si votre ARNOVA venait à se bloquer totalement, vous pouvez appuyer sur le bouton reset - Archos 501714 | User Guide - Page 11
fois, chargez complètement sa batterie ! Charger la batterie 1 Branchez le câble d'alimentation fourni sur le connecteur d'alimentation de l'ARNOVA et sur une prise secteur. 2 Votre ARNOVA s'allume et commence à se charger. Le témoin de charge est rouge lorsque que la batterie est en charge. Il - Archos 501714 | User Guide - Page 12
Voir page suivante. Ecran d'accueil Bouton Applications Appuyez sur cette icône pour afficher toutes les applications Android™ installées sur votre ARNOVA (jeux, différents outils, etc.). Il est possible de les copier sur l'écran d'accueil. Vous pouvez obtenir d'autres applications Android™ depuis - Archos 501714 | User Guide - Page 13
en corbeille lorsque vous maintenez un élément appuyé) et relâchez votre doigt. Ajouter d'autres d'applications avec APPSLIB : Connectez votre ARNOVA à Internet, puis appuyez sur l'icône AppsLib . Ce portail de téléchargement vous propose des milliers d'applications gratuites et payantes, telles - Archos 501714 | User Guide - Page 14
seau WiFi. Pour suivre cette procédure, vous devez vous situer dans une zone WiFi vous permettant de vous connecter. Chaque fois que l'ARNOVA détectera un réseau que vous avez déjà configuré, il tentera de s'y connecter. 1 Pour configurer un nouveau réseau WiFi, allez sur l'écran d'accueil, appuyez - Archos 501714 | User Guide - Page 15
LECTURE de fichiers multimédia Français 1 Sur l'écran d'accueil, appuyez sur l'application vidéo, audio ou photo. 2 L'ARNOVA affiche la liste de fichiers/dossiers correspondant à la catégorie sélectionnée. 3 Appuyez sur un élément pour l'ouvrir. Uniquement dans les modes Vidéo et Photo : pour - Archos 501714 | User Guide - Page 16
utiliser Windows Media® Player. 3 Lancez Windows Media Player®, puis utilisez l'onglet Synchroniser pour synchroniser vos chansons, vidéos et photos avec votre ARNOVA. Consultez l'aide de Windows Media Player® pour en savoir plus à ce sujet. Une fois que tous les transferts de fichiers sont termin - Archos 501714 | User Guide - Page 17
Zeit zu nehmen, und es zu registrieren (http://arnovatech.com/register). Dadurch erhalten Sie Zugriff auf den technischen Support von ARNOVA (http://arnovatech.com/support). ? SIE BENÖTIGEN HILFE? Auf unserer Website: Für häufig gestellte Fragen (FAQ) siehe http://arnovatech.com/faq Kontaktieren Sie - Archos 501714 | User Guide - Page 18
den Host Port nach Gebrauch aus. 6 Micro USB Port: Um Ihren ARNOVA mit Ihrem Computer zu verbinden, verwenden Sie das mitgelieferte USB Kabel (um : zum Anschluss des mitgelieferten Stromkabels. 9 Webcam 10 Eingebautes Mikro Hardware-Reset: Falls Ihr ARNOVA einmal abstürzt, können Sie die Reset- - Archos 501714 | User Guide - Page 19
die Leistungsanzeige rot. Diese wechselt zu Gelb, sobald der Akku vollständig geladen ist. 1 UK EUR US Installationsassistent Wenn Sie Ihren ARNOVA das erste Mal in Betrieb nehmen, leitet Sie der Installationsassistent durch einige Bildschirme, um Ihnen dabei zu helfen, die grundlegenden - Archos 501714 | User Guide - Page 20
DEUTSCH ▼ Die ARCHOS SCHNITTSTELLE Ihr ARNOVA-Gerät ist mit einem Touchscreen ausgerüstet. Die meisten Bereiche des Bildschirms reagieren, sobald Sie mit Ihrem Finger auf diese tippen. Dies sind Desktop-Verkü - Archos 501714 | User Guide - Page 21
den Mülleimer (dieser erscheint auf der rechten Seite des Displays) anstatt des Applikations-Tab. Applikationen hinzufügen - APPSLIB: Wenn Sie Ihren ARNOVA mit dem Internet verbunden haben, tippen Sie auf das AppsLib Ikon . Diese Onlinebibliothek bietet Ihnen Tausende zum Teil kostenlose Apps wie - Archos 501714 | User Guide - Page 22
hlen Sie Wireless. Wenn das WiFi ausgeschaltet ist, tippen Sie auf die WLAN Zeile um es einzuschalten. 3 Dann wählen Sie WLAN-Einstellungen aus. Der ARNOVA wird die verfügbaren WiFi- Netze suchen und sie auf dem Display anzeigen. Tippen Sie auf das Netzwerk, mit dem Sie verbinden möchten, geben Sie - Archos 501714 | User Guide - Page 23
Abspielen von Multimediadateien DEUTSCH 1 Tippen Sie auf der Startseite auf Video-, Audio- oder Fotoanwendung. 2 Der ARNOVA zeigt nun eine Liste von Dateien oder Ordern an, je nach gewählter Kategorie. 3 Tippen Sie auf eine Datei, um diese abzuspielen. Nur in den - Archos 501714 | User Guide - Page 24
® Player verwenden. Verwenden Sie den Windows Media Player® (Tab Sync [Synchronisieren]), um Musik, Videos und Fotos Ihrer Wahl auf Ihrem ARNOVA zu synchronisieren. Weitere Informationen entnehmen Sie bitte der Windows Media Player®-Hilfe. 4 Sobald die Dateiübertragung beendet ist, schließen Sie - Archos 501714 | User Guide - Page 25
de su tiempo para registrarlo (http://arnovatech.com/ register). De esta forma, podrá acceder al servicio de asistencia técnica de ARNOVA (http://arnovatech.com/support). ? ¿NECESITA AYUDA? En nuestro sitio web: Consulte la sección de preguntas más frecuentes en http://arnovatech.com/faq Póngase en - Archos 501714 | User Guide - Page 26
Lector de tarjetas Micro-SD 8 Conector de alimentación: para conectar el cable de alimentación suministrado. 9 Webcam 10 Micrófono Restablecimiento del equipo: Si su ARNOVA iban a bloquear completamente, puede pulsar el botón de reinicio. 26 UserGuide_Arnova_10_PN109563_book.indd 26 15/02/2011 17 - Archos 501714 | User Guide - Page 27
de color amarillo cuando la batería está completamente cargada. 1 UK EUR US ESPAÑOL Asistente para la instalación La primera vez que encienda el ARNOVA, el asistente para la instalación le guiará a través de una serie de pantallas que le ayudarán a configurar los parámetros principales: idioma - Archos 501714 | User Guide - Page 28
etc. Consulte la página siguiente. Aplicaciones botón Dé un toque en este icono para mostrar todas las aplicaciones Android™ instaladas en el ARNOVA (juegos, distintas herramientas, etc.). Puede copiarlas a la pantalla de inicio. Usted puede obtener otras aplicaciones Android™ desde la AppsLib (en - Archos 501714 | User Guide - Page 29
del lado derecho de la pantalla se convierte en una papelera de reciclaje) y suelte el dedo. Agregar más aplicaciones - APPSLIB: Conecte el ARNOVA Internet, a continuación, pulse el icono de AppsLib. Esta biblioteca en línea de aplicaciones gratis y adquiribles, tiene miles de juegos y aplicaciones - Archos 501714 | User Guide - Page 30
Conexiones inalámbricas. Si el WiFi está desactivado, dé un toque en la línea Wi-Fi para activarlo. Después, 3 seleccione Configuración de Wi-Fi. El ARNOVA realizará una exploración para ver si hay redes WiFi disponibles y las mostrará en la parte inferior de la pantalla. 4 Pinche en la red a la - Archos 501714 | User Guide - Page 31
Reproducción de archivos multimedia ESPAÑOL 1 En la pantalla principal, pulse la aplicación de vídeo, audio o fotos. 2 El ARNOVA mostrará una lista de archivos o carpetas correspondientes a la categoría seleccionada. 3 Pinche en un elemento para empezar a reproducirlo. Sólo en los modos Foto y Ví - Archos 501714 | User Guide - Page 32
vez finalizadas todas las transferencias de archivos, cierre el Explorador de Windows® y cualquier otro programa que 4 pueda haber leído o escrito en el ARNOVA. Haga clic en el icono "Quitar hardware con seguridad" de la bandeja del sistema, junto al reloj. Ahora ya puede desenchufar el cable USB - Archos 501714 | User Guide - Page 33
solo pochi minuti (http://arnovatech.com/register). Una volta registrato, potrete accedere al servizio di assistenza tecnica di ARNOVA (http://arnovatech. com/support). ? SERVE AIUTO? Sul nostro sito Web: Consultare la sezione FAQ (Frequently Asked Questions) all'indirizzo http://arnovatech.com - Archos 501714 | User Guide - Page 34
Lettore di schede micro SD 8 Connettore di alimentazione: per collegare il cavo di alimentazione fornito. 9 Webcam 10 Microfono incorporato Ripristino hardware: se il vostro ARNOVA si blocca totalmente potete premere sul bottone reset. 34 UserGuide_Arnova_10_PN109563_book.indd 34 15/02/2011 17:48 - Archos 501714 | User Guide - Page 35
giallo quando la batteria è completamente ricaricata. 1 UK EUR US ITALIANO Installazione guidata Al primo avvio del dispositivo ARNOVA, l'installazione guidata consentirà di impostare facilmente le impostazioni principa�li: lingua, paese, ora ecc. 35 UserGuide_Arnova_10_PN109563_book.indd - Archos 501714 | User Guide - Page 36
successiva Schermata Home [Pagina iniziale] Applicazioni pulsante Sfiorare questa icona per mostrare le applicazioni Android™ installate sul vostro ARNOVA (giochi, tools vari ecc..). E' possibile copiarli direttamente sul vostro schermo. Potete ottenere altre applicazioni Android™ dall'Appslib che - Archos 501714 | User Guide - Page 37
destra dello schermo, si trasforma in un cestino) quindi rilasciare il dito. Aggiungere altre applicazioni - APPSLIB: connettete il vostro ARNOVA a Internet, poi premete cull'icona AppsLib . Questo portale vi propone di scaricare, gratuitamente e a pagamento, diverse migliaia di applicazioni, come - Archos 501714 | User Guide - Page 38
trovarsi in una zona WIFI che permetta la connessione. Ogni qualvolta ARNOVA si trova in un raggio di rete che avete già configurato ) di tipo WEP, WPA o WPA2. Contattare il Internet Service Provider per ottenere i parametri di connessione appropriati. 38 UserGuide_Arnova_10_PN109563_book.indd - Archos 501714 | User Guide - Page 39
Lettura dei files multimedia ITALIANO 1 Sulllo schermo tattile, premete sull'applicazione video, audio o foto. 2 Verrà visualizzato un elenco di fi le o cartelle corrispondenti alla categoria selezionata. 3 Toccare un elemento per riprodurlo. Solo nelle modalità Video e Photo [Foto]: per - Archos 501714 | User Guide - Page 40
®. Una volta terminati tutti i trasferimenti dei file, chiudere Windows® Explorer e tutti gli altri programmi che possano aver letto o 4 scritto sull'ARNOVA. Fare clic sull'icona "Rimozione sicura dell'hardware" nella barra di sistema, accanto all'orologio. Potete adesso disconnettere il cavo USB - Archos 501714 | User Guide - Page 41
het uit de verpakking hebt gehaald (http://arnovatech.com/register). Na registratie krijgt u toegang tot de technische ondersteuning van ARNOVA (http://arnovatech.com/support). ? HULP NODIG? Op onze website: Raadpleeg het onderdeel Frequently Asked Questions op http://arnovatech.com/faq Neem contact - Archos 501714 | User Guide - Page 42
bestanden over te brengen). 7 Micro-SD-kaartlezer 8 Stroomaansluiting: voor aansluiting van het meegeleverde netsnoer. 9 Webcam 10 Ingebouwde microfoon Het toestel resetten: indien de ARNOVA niet meer reageert, kunt u hem resetten. 42 UserGuide_Arnova_10_PN109563_book.indd 42 15/02/2011 17:49:07 - Archos 501714 | User Guide - Page 43
voor de eerste maal te gebruiken. De batterijen laden 1 Sluit het meegeleverde netsnoer aan op de stroomaansluiting van de ARNOVA en op een stopcontact. 2 Uw ARNOVA zal worden ingeschakeld en starten met laden. Het aan/uit-lampje brandt rood wanneeer de batterij aan het opladen is. Het wordt geel - Archos 501714 | User Guide - Page 44
(achtergrond) te veranderen, enz. Zie hiervoor de volgende pagina. Startscherm Applicaties knop Druk op dit pictogram om al de op uw ARNOVA geïnstalleerde Android™-applicaties te zien (games, verschillende instrumenten, enz.). U kunt deze op uw beginpagina plakken. U kunt meer Android™toepassingen - Archos 501714 | User Guide - Page 45
de rechterkant van het scherm, in een prullenbak) en laat u het item tot slot los. Het toevoegen van meer toepassingen - APPSLIB: Met de ARNOVA verbonden met het internet, druk op het pictogram AppsLib . Deze online bibliotheek van gratis en betaalde toepassingen heeft duizenden leuke spelletjes en - Archos 501714 | User Guide - Page 46
om het aan te zetten. Selecteer vervolgens 3 Wi-Fi Instellingen. Uw ARNOVA zal nu gaan zoeken naar beschikbare WiFi-netwerken en zal de gevonden netwerken aan van het WEP, WPA of WPA2. Vraag om de Internet service provider om de juiste vereiste verbindingsparameters te verkrijgen. NEDERLANDS 46 - Archos 501714 | User Guide - Page 47
Multimediabestanden NEDERLANDS 1 Tik in het Beginscherm de video-, audio- of fototoepassing aan. 2 De ARNOVA zal een lijst van bestanden of mappen weergeven die overeenstemmen met de geselecteerde categorie. 3 Tik een item aan om het af te spelen. Alleen in - Archos 501714 | User Guide - Page 48
meer informatie. 4 Sluit, zodra alle bestanden overgeplaatst zijn, Windows® Verkenner en eventuele andere toepassingen die bestanden op de ARNOVA hebben gelezen of bestanden op uw ARNOVA hebben geplaatst. Klik op het 'VEILIG VERWIJDEREN'-pictogram in het systeemvak, naast de klok. U kunt de USB
-
 1
1 -
 2
2 -
 3
3 -
 4
4 -
 5
5 -
 6
6 -
 7
7 -
8
-
9
-
10
-
11
-
12
-
13
-
14
-
15
-
16
-
17
-
18
-
19
-
20
-
21
-
22
-
23
-
24
-
25
-
26
-
27
-
28
-
29
-
30
-
31
-
32
-
33
-
34
-
35
-
36
-
37
-
38
-
39
-
40
-
41
-
42
-
43
-
44
-
45
-
46
-
47
-
48
 |
 |
www
?
1
ENGLISH
P/N: 109563
NEED HELP?
As we are often updating and improving our products, your device’s software may have
a slightly different appearance or modified functionality than presented in this Quick Start Guide.
On our Website
:
See the Frequently Asked Questions section on
http://arnovatech.com/faq
Contact our Technical Support Team
: Visit
http://arnovatech.com/support
for e-mail support.
Please register your product before contacting Technical Support (see
Register your Product
).
REGISTER YOUR PRODUCT!
Thank you for choosing this ARNOVA product. We hope that you will enjoy using it and that it will give you satisfaction for many
years to come. Once you unpack your ARNOVA product, we recommend that you take a few minutes to register it
(
http://arnovatech.com/register
). This will allow you to get access to ARNOVA technical support (
http://arnovatech.com/support
).
On the web at http://arnovatech.com/register
Ä
UserGuide_Arnova_10_PN109563_book.indd
1
15/02/2011
17:46:49