Archos 502018 Setup Guide
Archos 502018 Manual
 |
View all Archos 502018 manuals
Add to My Manuals
Save this manual to your list of manuals |
Archos 502018 manual content summary:
- Archos 502018 | Setup Guide - Page 1
battery is charging. - It will turn green when the battery is fully charged. UK EUR US Installation Wizard The first time you start up your ARNOVA, the installation wizard will bring you through a few screens to help you set up the principal settings: language, country, time, etc. 1 - Archos 502018 | Setup Guide - Page 2
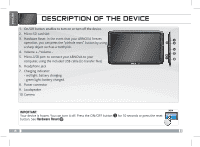
DEVICE 1. On/Off button: enables to turn on or turn off the device. 2. Micro-SD card slot 3. Hardware Reset: in the event that your ARNOVA freezes operation, you can press the "pinhole reset" button by using a sharp object such as a toothpick. 10 4. Volume + / Volume - 5. Micro-USB port: to - Archos 502018 | Setup Guide - Page 3
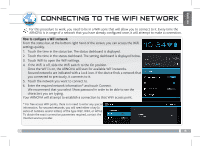
the WiFi is off, slide the WiFi switch to the On position. Once the WiFi is on, the ARNOVA will scan for available WiFi networks. Secured networks are indicated with a Lock icon. If the device finds a WPA2. To obtain the exact connection parameters required, contact the Internet service provider. 3 - Archos 502018 | Setup Guide - Page 4
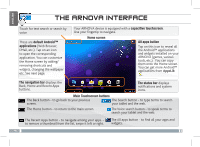
Use your fingertip to navigate. Home screen All apps button Tap on this icon to reveal all the Android™ applications and widgets installed on your ARNOVA (games, various tools, etc.). You can copy them onto the Home screen. You can get more Android™ applications from AppsLib . The navigation bar - Archos 502018 | Setup Guide - Page 5
Settings Tap on Settings and choose a menu among these categories: Wireless & networks, Device, Personal, System. Adding more applications with APPSLIB : with the ARNOVA connected to the Internet, tap on the AppsLib icon . This online library has thousands of applications to download and use. 5 - Archos 502018 | Setup Guide - Page 6
> Display. -- If you don't need it, turn off automatic syncing for all apps: Settings > Personal > Accounts & sync. Note that this means you need to sync manually to collect messages, email, and other recent information, and won't receive notifications when updates occur. 6 - Archos 502018 | Setup Guide - Page 7
using the USB cable. Your device is automatically detected. It appears as an icon on "My Computer". 2. You can transfer your media files to the ARNOVA by copy/pasting them into the respective folders. 3. Once all your file transfers are finished, close any program that may have read or written to - Archos 502018 | Setup Guide - Page 8
that you take a few minutes to register it (http://arnovatech.com/register). This will allow you to get access to ARNOVA technical support (http://arnovatech.com/support). ? NEED HELP? On our Website: see the Frequently Asked Questions section on http://arnovatech.com/faq Contact our Technical - Archos 502018 | Setup Guide - Page 9
re fois, chargez complètement sa batterie ! Charger la batterie 1. Branchez le câble d'alimentation fourni sur le connecteur d'alimentation de l'ARNOVA et sur une prise secteur. 2. Votre ARNOVA s'allume et commence à se charger. - Le témoin de charge est rouge lorsque la batterie est en charge. - Il - Archos 502018 | Setup Guide - Page 10
sur le bouton reset en utilisant un objet pointu tel qu'un trombone. 10 4. Volume + / Volume - 5. Port micro-USB : permet de connecter votre ARNOVA à un ordinateur, à l'aide du câble USB fourni (pour transférer des fichiers). 6. Prise casque 7. Témoin de charge : - rouge : batterie en charge - Archos 502018 | Setup Guide - Page 11
À UN RÉSEAU WIFI Pour suivre cette procédure, vous devez vous situer dans une zone WiFi vous permettant de vous connecter. Chaque fois que l'ARNOVA détectera un réseau que vous avez déjà configuré, il tentera de s'y connecter. Comment configurer un réseau WiFi A partir de la barre de statut, dans le - Archos 502018 | Setup Guide - Page 12
naviguer. Ecran d'accueil Icone Toutes les applications Appuyez sur cet icone pour afficher toutes les applications Android™ installées sur votre ARNOVA (jeux, différents outils, etc.). Il est possible de les copier sur l'écran d'accueil. Vous pouvez obtenir d'autres applications Android™ depuis - Archos 502018 | Setup Guide - Page 13
menu parmi ces catégories : Connexions et réseaux, Appareil, Personnel, Système, etc. Ajouter d'autres d'applications avec APPSLIB Connectez votre ARNOVA à un réseau WiFi, puis appuyez sur l'icone AppsLib . Ce portail de téléchargement vous propose des milliers d'applications gratuites et payantes - Archos 502018 | Setup Guide - Page 14
FRANÇAIS PERSONNALISATION DE L'APPAREIL Ajouter des widgets Les widgets sont comparables à des fenêtres ouvertes sur vos applications. Vous pouvez les sélectionner dans l'onglet "Toutes les applications", puis les déplacer vers vos écrans d'accueil. Pour afficher vos widgets, procédez comme suit : - Archos 502018 | Setup Guide - Page 15
votre appareil, ainsi que les informations relatives à l'espace disponible, en bas de celle-ci. 3. Vous pouvez transférer vos fichiers multimédias sur votre ARNOVA en les copiant/collant dans les dossiers correspondants. 4. Une fois le transfert de fichiers terminé, fermez tout programme Windows li - Archos 502018 | Setup Guide - Page 16
l'enregistrer (http://arnovatech.com/register). Cela vous permettra d'avoir accès au support technique ARNOVA (http://arnovatech.com/support). ? BESOIN D'AIDE ? Sur notre site Web: Consultez la Foire Aux interface ou des fonctionnalités légèrement différentes de celles décrites dans ce guide. 16 - Archos 502018 | Setup Guide - Page 17
Leistungsanzeige rot. - Diese wechselt zu Grün, sobald der Akku vollständig geladen ist. UK EUR US Installationsassistent Wenn Sie Ihren ARNOVA das erste Mal in Betrieb nehmen, leitet Sie der Installationsassistent durch einige Bildschirme, um Ihnen dabei zu helfen, die grundlegenden Einstellungen - Archos 502018 | Setup Guide - Page 18
drücken, indem Sie einen scharfen Gegenstand verwenden, wie z. B. einen Zahnstocher. 10 4. Lautstärke 5. Micro USB Port: zum Verbinden des ARNOVA mit dem Computer über das mitgelieferte USB Kabel (zur Datei- Übertragung). 6. Kopfhöreranschluss 7. Anzeige Lade-Status: - rote Anzeige: Akku wird - Archos 502018 | Setup Guide - Page 19
öffnen. 4. Bei ausgeschaltetem WiFi schieben Sie den WiFi-Schalter in die Position AN. Nachdem das WiFi eingeschaltet wurde, sucht das ARNOVA nach verfügbaren WiFi-Netzwerken. Gesicherte Netzwerke werden mit einem Schlosssymbol angezeigt. Findet das Gerät eine zuvor vorhandene Verbindung, wird diese - Archos 502018 | Setup Guide - Page 20
BENUTZEROBERFLÄCHE Suchbegriff eintippen oder Spracheingabe verwenden Ihr ARNOVA-Gerät ist mit einem Kapazitiven Touchscreen ausgerüstet. Die Bedienung erfolgt durchBerührung des Touchscreens. DEUTSCH Anzeige von DesktopVerknüpfungen von Android™ (WebBrowser, eMail, usw.). - Archos 502018 | Setup Guide - Page 21
auf Einstellungen und wählen Sie aus einer der Kategorien: Drahtlos & Netzwerke, Gerät, Nutzer, System. Applikationen hinzufügen - AppsLib: wenn Sie Ihren ARNOVA mit dem Internet verbunden haben, tippen Sie auf das AppsLib Symbol . Dieses Online-Portal bietet Ihnen tausende zum Teil kostenlose Apps - Archos 502018 | Setup Guide - Page 22
DEUTSCH ANPASSEN IHRES PRODUKTES Widgets hinzufügen Widgets sind wie Fenster für Ihre Apps. Sie können sie über den Tab "Alle Apps" auf Ihre Startbildschirme verschieben. So zeigen Sie Ihre Widgets an: 1. Berühren Sie das Symbol Alle Apps auf Ihrem Startbildschirm. 2. Berühren Sie oben auf dem - Archos 502018 | Setup Guide - Page 23
ein Fenster mit den Inhalten Ihres Geräts angezeigt. Unten im Fenster finden Sie Details zum Speicherplatz. 3. Sie können Ihre Mediendateien auf den ARNOVA mittels Kopieren/Einfügen übertragen und in den entsprechenden Ordnern ablegen. 4. Wenn alle Ihre Dateien übertragen wurden, schließen Sie alle - Archos 502018 | Setup Guide - Page 24
Zeit zu nehmen, und es zu registrieren (http://arnovatech.com/register). Dadurch erhalten Sie Zugriff auf den technischen Support von ARNOVA (http://arnovatech.com/support). ? SIE BENÖTIGEN HILFE? Auf unserer Website: Für häufig gestellte Fragen (FAQ) siehe http://arnovatech.com/faq Kontaktieren Sie - Archos 502018 | Setup Guide - Page 25
cargando. - Es de color verde cuando la batería está completamente cargada. UK EUR US Asistente para la instalación La primera vez que encienda el ARNOVA, el asistente para la instalación le guiará a través de una serie de pantallas que le ayudarán a configurar los parámetros principales: idioma, pa - Archos 502018 | Setup Guide - Page 26
el botón de reinicio utilizando 10 un objeto punzante como un clip. 4. Botones de volumen 5. Puerto micro-USB: para conectar el ARNOVA a un ordenador, mediante el cable USB incluido (para transferir archivos). 6. Toma de auriculares 7. Indicador de carga - rojo: batería cargando - verde: bater - Archos 502018 | Setup Guide - Page 27
ESPAÑOL CONEXIÓN A UNA RED WIFI www Para que este procedimiento funcione, debe encontrarse en una zona WiFi que le permita conectarse. Cuando el ARNOVA se encuentre dentro del alcance de una red que ya haya configurado una vez, intentará realizar una conexión. Cómo configurar una red WiFi Desde la - Archos 502018 | Setup Guide - Page 28
la página siguiente. Todas las aplicaciones Dé un toque en este icono para mostrar todas las aplicaciones Android™ instaladas en el ARNOVA (juegos, distintas herramientas, etc.). Puede copiarlas a la pantalla de inicio. Usted puede obtener otras aplicaciones Android™ desde AppsLib . La barra - Archos 502018 | Setup Guide - Page 29
toque en Ajustes y elija una categoría: Conexiones inalámbricas y redes, Dispositivo, Personal, Sistem. Agregar más aplicaciones - APPSLIB: Conecte el ARNOVA Internet, a continuación, pulse el icono de AppsLib. Esta biblioteca en línea de aplicaciones gratis y adquiribles para descargar y utilizar - Archos 502018 | Setup Guide - Page 30
ón automática de todas las aplicaciones (Ajustes > Personal > Cuentas y sincronización). Ten en cuenta que, de este modo, tendrás que sincronizar de forma manual los mensajes, el correo electrónico y otro tipo de información reciente y que no recibirás notificaciones sobre actualizaciones. 30 - Archos 502018 | Setup Guide - Page 31
junto con información sobre el espacio de almacenamiento en la parte inferior de la ventana. 3. Puede transferir sus archivos de medios al ARNOVA copiándolos o pegándolos en sus carpetas correspondientes. 4. Una vez finalizadas todas las transferencias de archivos, cierre cualquier otro programa que - Archos 502018 | Setup Guide - Page 32
de su tiempo para registrarlo (http://arnovatech.com/register). De esta forma, podrá acceder al servicio de asistencia técnica de ARNOVA (http://arnovatech.com/support). ? ¿NECESITA AYUDA? En nuestro sitio web: consulte la sección de preguntas más frecuentes en http://arnovatech.com/faq Póngase en - Archos 502018 | Setup Guide - Page 33
la batteria. Caricamento della batteria 1. Collegare il cavo di alimentazione fornito al connettore di alimentazione del dispositivo ARNOVA e a una presa a muro. 2. Il dispositivo ARNOVA si accende e viene avviata la ricarica. - L'indicatore della carica è rosso quando la batteria è in ricarica - Archos 502018 | Setup Guide - Page 34
totalmente potete premere sul bottone reset utilizzando un 10 oggetto appuntito come una graffetta 4. Tasti volume 5. Porta micro USB: per collegare ARNOVA al vostro PC, utilizzare il cavo USB (anche per trasferire files). 6. Spinotto cuffie 7. Indicatore della ricarica - Rosso: batteria in carica - Archos 502018 | Setup Guide - Page 35
, portare il selettore WiFi in posizione ON. Una volta che il WiFi è attivo, ARNOVA verificherà la presenza delle reti WiFi disponibili. Le reti protette sono indicate con un'icona di tipo WEP, WPA o WPA2. Contattare il Internet Service Provider per ottenere i parametri di connessione appropriati. 35 - Archos 502018 | Setup Guide - Page 36
sfondo ecc.. - vedi pagina successiva Tutte le applicazioni Sfiorare questa icona per mostrare le applicazioni Android™ installate sul vostro ARNOVA (giochi, tools vari ecc..). E' possibile copiarli direttamente sul vostro schermo. Potete ottenere altre applicazioni Android™ da Appslib . La barra - Archos 502018 | Setup Guide - Page 37
Impostazioni e scegliere una categoria: Wireless e reti, Dispositivo, Personale, Sistema. Aggiungere altre applicazioni - APPSLIB: connettete il vostro ARNOVA a Internet, poi premete cull'icona AppsLib . Questo portale vi propone di scaricare, gratuitamente e a pagamento, diverse migliaia di - Archos 502018 | Setup Guide - Page 38
PERSONALIZZA IL PRODOTTO Aggiungere widget I widget sono come finestre sulle applicazioni. Sono disponibili in una scheda Tutte le applicazioni per poterli spostare nelle schermate Home. Per visualizzare i widget, procedere nel seguente modo: 1. Toccare l'icona Tutte le applicazioni nella schermata - Archos 502018 | Setup Guide - Page 39
nelle rispettive cartelle. 3. Una volta terminati tutti i trasferimenti dei file, chiudere tutti i programmi che possano aver letto o scritto sull'ARNOVA. 4. È ora possibile staccare il cavo USB. Per Macintosh: Prima è necessario installare l'applicazione gratuita Android File Transfer (non in - Archos 502018 | Setup Guide - Page 40
solo pochi minuti (http://arnovatech.com/register). Una volta registrato, potrete accedere al servizio di assistenza tecnica di ARNOVA (http://arnovatech.com/support). ? SERVE AIUTO? Sul nostro sito Web: consultare la sezione FAQ (Frequently Asked Questions) all'indirizzo http://arnovatech. com - Archos 502018 | Setup Guide - Page 41
batterij aan het opladen is. - Het wordt groene zodra de batterij volledig is opgeladen. UK EUR US Installatiewizard De eerste keer dat u uw ARNOVA opstart, zal de installatiewizard u door een paar schermen leiden om u te helpen met de voornaamste instellingen: taal, land, tijd, enz. 41 NEDERLANDS - Archos 502018 | Setup Guide - Page 42
1. AAN/UIT-knop: ingedrukt houden om in/uit te schakelen. 2. Micro-SD-kaartlezer 3. Het toestel resetten: indien de ARNOVA niet meer reageert, kunt u hem resetten door met een scherp voorwerp, bijvoorbeeld een tandenstoker. 10 4. Volumeknoppen 5. Micro-USB-poort: met de bijgesloten USB - Archos 502018 | Setup Guide - Page 43
Password (Wachtwoord tonen) selecteert zodat u de tekens die u invoert, kunt zien. Uw ARNOVA zal nu een verbinding met dit WiFi-toegangspunt maken. * Voor WiFi-punten met vrije of WPA2. Vraag om de Internet service provider om de juiste vereiste verbindingsparameters te verkrijgen. 43 NEDERLANDS - Archos 502018 | Setup Guide - Page 44
toe te voegen/ te verwijderen, het wallpaper (achtergrond) te veranderen, enz. Applicaties knop Druk op dit pictogram om al de op uw ARNOVA geïnstalleerde Android™applicaties te zien (games, verschillende instrumenten, enz.). U kunt deze op uw beginpagina plakken. U kunt meer Android™-toepassingen - Archos 502018 | Setup Guide - Page 45
op Instellingen en kies een categorie: Draadloos en netwerken, Apparaat, Persoonlijk, Systeem. Het toevoegen van meer toepassingen - APPSLIB: met de ARNOVA verbonden met het internet, druk op het pictogram AppsLib . Deze online bibliotheek van gratis en betaalde toepassingen om te downloaden en te - Archos 502018 | Setup Guide - Page 46
PERSONALISEER UW PRODUCT Widgets toevoegen Met widgets heeft u overal toegang tot uw apps. U kunt ze vanaf het tabblad 'Alle apps' verplaatsen naar uw startschermen. Uw widgets weergeven: 1. Raak het pictogram 'Alle apps' aan op het startscherm. 2. Raak Widgets boven aan het scherm aan. 3. U kunt - Archos 502018 | Setup Guide - Page 47
inhoud van uw telefoon wordt weergegeven, samen met informatie over de opslagruimte onder aan het venster. 3. U kunt uw mediabestanden overzetten op de ARNOVA door deze in hun respectievelijke mappen te kopiëren/ plakken. 4. Eenmaal al uw bestanden zijn overgezet, sluit u alle programma's die vanuit - Archos 502018 | Setup Guide - Page 48
-product te registreren (http://arnovatech.com/register). Na registratie krijgt u toegang tot de technische ondersteuning van ARNOVA (http://arnovatech.com/support). ? HULP NODIG? Op onze website: raadpleeg het onderdeel Frequently Asked Questions op http://arnovatech.com/faq Neem contact op met - Archos 502018 | Setup Guide - Page 49
bateria está carregando. - Ele ficará verde quando a bateria está completamente carregada. UK EUR US Assistente de instalação Ao iniciar o dispositivo ARNOVA pela primeira vez, o assistente de instalação fornecerá instruções através de alguns ecrãs para ajudar o utilizador a configurar as definições - Archos 502018 | Setup Guide - Page 50
DO APARELHO 1. Botão On/Off: permite ligar ou desligar o dispositivo. 2. Slot para cartão micro SD 3. Repor hardware: no caso em que o seu ARNOVA congela operação, você pode pressionar o Repor hardware botão usando um objeto pontiagudo, como um palito de dentes 10 4. Botões de volume 5. Porta Micro - Archos 502018 | Setup Guide - Page 51
WiFi que permitirá que você se conecte a ela. Todas as vezes que ARNOVA estiver no alcance de uma rede que você já configurou uma vez, ela tentar deslize o interruptor wifi para a posição Lig. 5. Quando activar wifi, o ARNOVA localizará as redes wifi disponíveis. As redes seguras são indicadas com o - Archos 502018 | Setup Guide - Page 52
Consulte a próxima página. O ícone Todas as Aplicações Toque neste ícone para apresentar todas as aplicações An-droid™ instaladas no dispositivo ARNOVA (jogos, ferramentas várias, etc.). Pode copiá-las para o ecrã inicial. Pode obter mais aplicações Android™ na AppsLib . A barra de navegação exibe - Archos 502018 | Setup Guide - Page 53
, toque em Ajustes e escolha uma categoria: Redes sem fios e outras, Dispositivo, Pessoal, Sistema. Adicionando mais aplicações com APPSLIB: Com o ARNOVA conectado à Internet, toque no ícone AppsLib . Esta biblioteca online de aplicações gratuitas e pagáveis para fazer download e usar. 53 PORTUGU - Archos 502018 | Setup Guide - Page 54
PERSONALIZANDO O SEU PRODUTO Adicionar widgets Os widgets são como janelas para as suas aplicações. Estão disponíveis num separador Todas as Aplicações para que os possa mover para os Ecrãs Principais. Para ver os seus widgets: 1. Toque no ícone Todas as Aplicações no Ecrã Principal. 2. Toque em - Archos 502018 | Setup Guide - Page 55
do aparelho, bem como detalhes sobre o espaço de armazenamento, na parte inferior da janela. 3. Você pode transferir seus arquivos de mídia para o ARNOVA por copiar / colar-los para as pastas respectivas. 4. O todas as suas transferências de arquivos terminar, feche qualquer programa que possa ter - Archos 502018 | Setup Guide - Page 56
Recomendamos que você leve alguns minutos para registrá-lo (http://arnovatech.com/register). Isto lhe permitirá o acesso ao suporte técnico ARNOVA (http://arnovatech.com/support). ? PRECISA DE AJUDA? Em nosso site da web: veja a seção de Perguntas Prequentes no http://arnovatech.com/faq Contate - Archos 502018 | Setup Guide - Page 57
2012 Italy None If used outside of own premises, general authorization is required. Luxembourg None General authorization required for network and service supply (not for spectrum) Norway Implemented This subsection does not apply for the geographical aera within a radius of 20 km from - Archos 502018 | Setup Guide - Page 58
copy of the source code corresponding to the binaries for any GPL-Licensed file by contacting ARNOVA customer service at http://www.arnovatech.com and ARNOVA will send you a link to such source code or will provide instructions to get the source on a physical medium. This offer is valid to anyone in
-
 1
1 -
 2
2 -
 3
3 -
 4
4 -
 5
5 -
 6
6 -
 7
7 -
8
-
9
-
10
-
11
-
12
-
13
-
14
-
15
-
16
-
17
-
18
-
19
-
20
-
21
-
22
-
23
-
24
-
25
-
26
-
27
-
28
-
29
-
30
-
31
-
32
-
33
-
34
-
35
-
36
-
37
-
38
-
39
-
40
-
41
-
42
-
43
-
44
-
45
-
46
-
47
-
48
-
49
-
50
-
51
-
52
-
53
-
54
-
55
-
56
-
57
-
58
 |
 |
▲
!
1
EUR
US
UK
ENGLISH
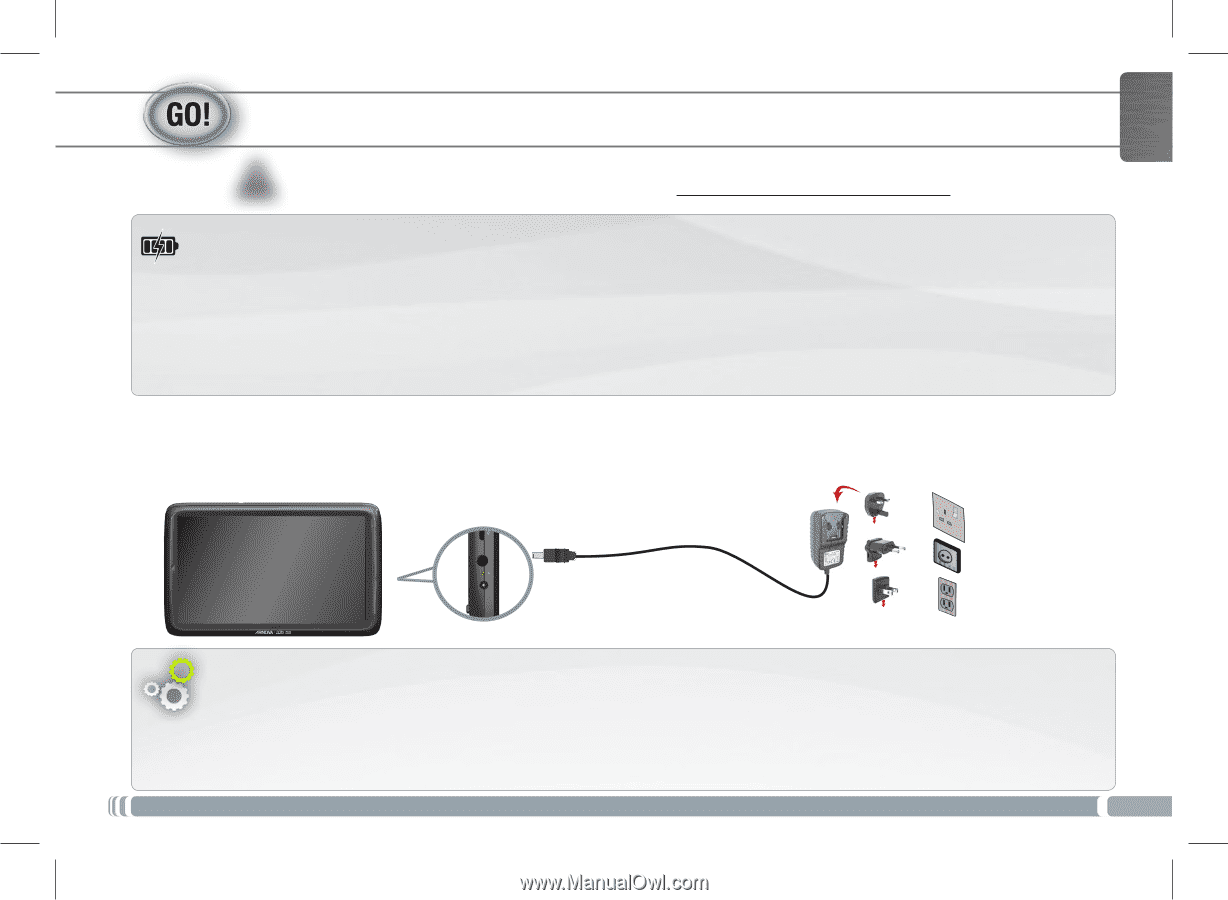
STARTING UP
Installation Wizard
The first time you start up your ARNOVA, the installation wizard will bring you through a few screens to
help you set up the principal settings: language, country, time, etc.
Before using your ARNOVA for the first time,
completely charge the battery
!
Charging the Battery
1.
Connect the supplied power cable to the ARNOVA Power connector and to a wall outlet.
2.
The ARNOVA device will turn on and start charging.
- The Power indicator light is red while the battery is charging.
- It will turn green when the battery is fully charged.