Asus AIO M241DA Users Manual
Asus AIO M241DA Manual
 |
View all Asus AIO M241DA manuals
Add to My Manuals
Save this manual to your list of manuals |
Asus AIO M241DA manual content summary:
- Asus AIO M241DA | Users Manual - Page 1
User Guide M241D/A6521 - Asus AIO M241DA | Users Manual - Page 2
COMPUTER INC. ("ASUS"). ASUS PROVIDES THIS MANUAL "AS IS"WITHOUT the listed contract price of each product. ASUS will only be ASUS, ITS SUPPLIERS OR YOUR RESELLER IS INFORMED OF THEIR POSSIBILITY. SERVICE AND SUPPORT Visit our multi-language web site at https://www.asus.com/support 2 ASUS - Asus AIO M241DA | Users Manual - Page 3
About this manual...6 Conventions used in this manual 7 Typography...7 Icons...8 Safety information...9 Setting up your system 9 Care during use...10 Sound Pressure Warning 12 Adapter...12 DC Fan Warning...12 Package contents...13 Chapter 1: Hardware Setup Getting to know your ASUS All-in - Asus AIO M241DA | Users Manual - Page 4
to wired networks 46 Configuring a dynamic IP/PPPoE network connection 46 Configuring a static IP network connection 47 Turning your ASUS All-in-One PC off 48 Putting your ASUS All-in-One PC to sleep 49 Chapter 4: Recovering your system Entering the BIOS Setup 51 Quickly enter the BIOS - Asus AIO M241DA | Users Manual - Page 5
61 EU REACH and Article 33 61 EU RoHS...61 Japan JIS-C-0950 Material Declarations 61 India RoHS...62 Vietnam RoHS...62 ASUS Recycling/Takeback Services 62 Ecodesign Directive...62 ENERGY STAR Qualified Product 63 EPEAT Registered Products 64 Simplified EU Declaration of Conformity 64 - Asus AIO M241DA | Users Manual - Page 6
About this manual This manual provides information about the hardware and software features of your ASUS All-in-One PC, organized through the following chapters: Chapter 1: Hardware Setup This chapter details the hardware components of your ASUS Allin-One PC. Chapter 2: Using your ASUS All-in-One PC - Asus AIO M241DA | Users Manual - Page 7
To highlight key information in this manual, some texts are presented as follows: IMPORTANT! This message contains vital information that must be followed to complete menu or an item that must be selected. Italic = This indicates sections that you can refer to in this manual. ASUS All-in-One PC 7 - Asus AIO M241DA | Users Manual - Page 8
you can use for completing a series of tasks or procedures on your ASUS All-in-One PC. = Use the touch screen panel (on selected models Use the wired/wireless keyboard. All illustrations and screenshots in this manual are for reference only. Actual product specifications and software screen images - Asus AIO M241DA | Users Manual - Page 9
Safety information Your All-in-One ASUS All-in-One PC is designed and tested to meet the latest standards of safety for information technology equipment. However, to ensure your safety, it is important that you read the following safety instructions. Setting up your system • Read and follow all - Asus AIO M241DA | Users Manual - Page 10
glass cleaner on the supplied cleaning cloth and gently wipe the surface of the screen. - Do not spray the cleaner directly on the screen. 10 ASUS All-in-One PC - Asus AIO M241DA | Users Manual - Page 11
• If you encounter the following technical problems with the product, unplug the power cord and contact a qualified service technician or your retailer. - The power operating instructions. - The system was dropped or the cabinet is damaged. - The system performance changes. ASUS All-in-One PC 11 - Asus AIO M241DA | Users Manual - Page 12
Input voltage: 100-240Vac Input frequency: 50-60Hz Rating output voltage: 19Vdc 2. It is recommended that the power socket is in close proximity to the ASUS All-in-One PC. DC Fan Warning Please note that the DC fan is a moving part and can cause harm when used improperly. Keep away - Asus AIO M241DA | Users Manual - Page 13
Package contents ASUS All-in-One PC AC adapter Power cord Warranty card Quick User Guide Keyboard (optional) Mouse (optional) Quick Start Guide KBM USB receiver dongle (optional) Optical drive (optional) NOTE: • If any of the items are damaged or missing, contact your retailer. • The - Asus AIO M241DA | Users Manual - Page 14
14 ASUS All-in-One PC - Asus AIO M241DA | Users Manual - Page 15
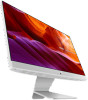
Chapter 1: Hardware Setup Getting to know your ASUS All-in-One PC Front view ASUS All-in-One PC 15 - Asus AIO M241DA | Users Manual - Page 16
features for photos, videos, and other multimedia files. On selected models, multi-touch is supported. You can operate your ASUS All-in-One PC using touch gestures. Power indicator This LED power indicator lights up when the ASUS All-in-One PC is turned on. Microphone This built-in microphone can be - Asus AIO M241DA | Users Manual - Page 17
speakers The built-in audio speaker allows you to hear audio straight from the ASUS All-in-One PC. Audio features are softwarecontrolled. Mode button Touch to switch the display signal source. When switched to HDMI-in, the ASUS All-in-One PC can be used as a standard desktop LCD monitor. Kensington - Asus AIO M241DA | Users Manual - Page 18
Serial Bus) port is compatible with USB 2.0 or USB 1.1 devices such as keyboards, pointing devices, flash disk drives, external HDDs, speakers, cameras and printers. 18 ASUS All-in-One PC - Asus AIO M241DA | Users Manual - Page 19
Rear view Power button Press this button to turn on your ASUS All-in-One PC. HDMI input port This port is for a HDMI (High-Definition Multimedia Interface) connector and is HDCP compliant for HD DVD, Blu-ray, and other protected content playback. ASUS All-in-One PC 19 - Asus AIO M241DA | Users Manual - Page 20
compatible to USB 2.0. HDMI output port This port allows you to connect your ASUS All-in-One PC to another HDMI-compatible device for file sharing or extending your display monitor. LAN port This 8-pin RJ-45 LAN port supports a standard Ethernet cable for connection to a local network. Power input - Asus AIO M241DA | Users Manual - Page 21
Chapter 2: Using your ASUS All-in-One PC Positioning your ASUS All-in-One PC -5O 20O 1. Place your ASUS All-in-One PC on a flat surface such as a table or desk. 2. Tilt the display to an angle between -5° to 20°. IMPORTANT! • Use both hands when setting up your ASUS All-in-One PC. • Avoid - Asus AIO M241DA | Users Manual - Page 22
batteries into the wireless keyboard and mouse. 2. Connect the wireless dongle for keyboard and mouse to a USB port to automatically pair both devices to your ASUS All-in-One PC. 3. You can begin using the wireless keyboard and mouse. 22 - Asus AIO M241DA | Users Manual - Page 23
rear panel. NOTE: The illustrations above are for reference only. Actual hardware and specifications of the optional wired or wireless keyboard and mouse may vary. ASUS All-in-One PC 23 - Asus AIO M241DA | Users Manual - Page 24
Powering on the system A. Connect the AC power cord to the AC/DC adapter. B. Connect the DC power connector into your ASUS All-in-One PC's power (DC) input. C. Plug the AC power adapter into a 100V~240V power source. D. Press the power button. 24 ASUS All-in-One PC - Asus AIO M241DA | Users Manual - Page 25
NOTE: For details on turning off your ASUS All-in-One PC, refer to the section Turning your ASUS All-in-One PC off in Working with Windows® 10. ASUS All-in-One PC 25 - Asus AIO M241DA | Users Manual - Page 26
touch screen (on selected models only) The touch screen panel of your ASUS All-in-One PC provides excellent viewing features for photos, videos, and other multimedia files on your ASUS All-in-One PC. It also supports the 10-point multi-touch feature that facilitates smoother and more accurate touch - Asus AIO M241DA | Users Manual - Page 27
allow you to launch programs and access the settings of your ASUS All-in-One PC. Refer to the following illustrations when using programs and access the settings of your ASUS All-in-One PC. The functions can be activated by using the hand gestures on your ASUS All-in-One PC's touch screen panel - Asus AIO M241DA | Users Manual - Page 28
-click menu. Zoom out Spread apart your two fingers on the touch screen panel. Bring together your two fingers on the touch screen panel. 28 ASUS All-in-One PC - Asus AIO M241DA | Users Manual - Page 29
Finger slide Drag Slide your finger to scroll up and • Drag to create a selection down and slide your finger to box around multiple pan the screen left or right. items. • Drag and drop an item to move it to a new location. ASUS All-in-One PC 29 - Asus AIO M241DA | Users Manual - Page 30
30 ASUS All-in-One PC - Asus AIO M241DA | Users Manual - Page 31
ASUS All-in-One PC for the first time, a series of screens appear to guide you in configuring your Windows® 10 operating system. To start your ASUS to use on your ASUS All-in-One PC. 3. Carefully read the License Terms. Select I accept. 4. Follow the onscreen instructions to configure the following - Asus AIO M241DA | Users Manual - Page 32
Start screen Launch Taskview Launch an app from the taskbar Launch Search Launch the Start menu Launch All apps Shut down, restart, or put your ASUS All-in-One PC to sleep Launch Settings Launch File Explorer You can use the Start menu to do these common activities: • Start programs or - Asus AIO M241DA | Users Manual - Page 33
on your keyboard. Opening programs from the Start menu One of the most common uses of the Start menu is opening programs installed on your ASUS All-in-One PC. Tap the program to launch it. Position your mouse pointer over the program then click to launch it. Use the arrow - Asus AIO M241DA | Users Manual - Page 34
Windows® apps These are apps pinned on the right pane of the Start menu and displayed in tiled-format for easy access. NOTE: Some Windows® apps require signing in to your Microsoft account before they are fully launched. 34 ASUS All-in-One PC - Asus AIO M241DA | Users Manual - Page 35
Working with Windows® apps Use your ASUS All-in-One PC's touch screen, mouse, or keyboard to launch, customize, and close apps. Launching Windows® apps from the drop it to a new location. Position your mouse pointer over the app, then drag and drop the app to a new location. ASUS All-in-One PC 35 - Asus AIO M241DA | Users Manual - Page 36
app and rightclick it, then click Unpin from Start. Use the arrow keys to navigate to the app. Press , then select Unpin from Start. 36 ASUS All-in-One PC - Asus AIO M241DA | Users Manual - Page 37
click Pin to Start. From All apps, press on the app that you want to add to the Start menu, then select Pin to Start. ASUS All-in-One PC 37 - Asus AIO M241DA | Users Manual - Page 38
form the left edge of the screen. Position your mouse pointer over the taskbar and click it. icon on the Press on your keyboard. 38 ASUS All-in-One PC - Asus AIO M241DA | Users Manual - Page 39
Snap feature The Snap feature displays apps side-by-side, allowing you to work or switch between apps. Snap hotspots You can drag and drop apps to these hotspots to snap them into place. ASUS All-in-One PC 39 - Asus AIO M241DA | Users Manual - Page 40
hold the key, then use the arrow keys to snap the app. 3. Launch another app and repeat the above steps to snap another app. 40 ASUS All-in-One PC - Asus AIO M241DA | Users Manual - Page 41
swipe from the right edge of the screen. Position your mouse pointer over the taskbar and click it. icon on the Press on your keyboard. ASUS All-in-One PC 41 - Asus AIO M241DA | Users Manual - Page 42
the desktop Launches the File Explorer Opens the Share panel Launches Settings Launches Connect panel Activates the Lock screen Minimizes all currently active windows 42 ASUS All-in-One PC - Asus AIO M241DA | Users Manual - Page 43
Launches Search Launches Project panel Opens the Run window Opens Ease of Access Center Opens the context menu of the Start button Launches the magnifier icon and zooms in your screen Zooms out your screen Opens Narrator Settings ASUS All-in-One PC 43 - Asus AIO M241DA | Users Manual - Page 44
to wireless networks Wi-Fi Access emails, surf the Internet, and share applications via social networking sites using your ASUS All-in-One PC's Wi-Fi connection. Connecting Wi-Fi Connect your ASUS All-in-One PC to a Wi-Fi network by using the following steps: 1. Select the icon from the taskbar - Asus AIO M241DA | Users Manual - Page 45
. Pairing with other Bluetooth-enabled devices You need to pair your ASUS All-in-One PC with other Bluetooth-enabled devices to enable data devices. or 3. Select a device from the list. Compare the passcode on your ASUS All-in-One PC with the passcode sent to your chosen device. If they are the - Asus AIO M241DA | Users Manual - Page 46
You can also connect to wired networks, such as local area networks and broadband Internet connection, using your ASUS All-in-One PC's LAN port. NOTE: Contact your Internet Service Provider (ISP) for details or your network administrator for assistance in setting up your Internet connection. To - Asus AIO M241DA | Users Manual - Page 47
under Configuring a dynamic IP/PPPoE network connection. 2 Select Use the following IP address. or 3. Type the IP address, Subnet mask and Default gateway from your service provider. 4. If needed, you can also type the preferred DNS server address and alternate DNS server address then select OK - Asus AIO M241DA | Users Manual - Page 48
-in-One PC off You can turn off your ASUS All-in-One PC by doing either of the following procedures: • Launch the Windows. Select Shut down from the dropdown list then select OK. • If your ASUS All-in-One PC is unresponsive, press and hold the power button for at least four (4) seconds until your - Asus AIO M241DA | Users Manual - Page 49
-in-One PC to Sleep mode: • Launch the Start menu, then select > Sleep to put your ASUS All-in-One PC to sleep. or • From the log-in screen, select > Sleep. Press to launch Shut down Windows. Select Sleep from the drop- - Asus AIO M241DA | Users Manual - Page 50
50 ASUS All-in-One PC - Asus AIO M241DA | Users Manual - Page 51
settings only with the help of a trained service personnel. Quickly enter the BIOS To access the BIOS: • When your ASUS All-in-One PC is off, press the seconds to access the BIOS directly. • Press the power button to turn on your ASUS All-in-One PC then press or during POST. NOTE: POST - Asus AIO M241DA | Users Manual - Page 52
• Backup all your data files before doing any recovery option on your ASUS All-in-One PC. • Note down important customized settings such as network settings, user names, and passwords to avoid data loss. • Ensure that your ASUS All-in-One PC is plugged in to a power source before resetting your - Asus AIO M241DA | Users Manual - Page 53
All-in-One PC such as: - Using a USB drive, network connection or Windows recovery DVD to startup your ASUS All-in-One PC. - Using Troubleshoot to enable any of these advanced recovery options: System Restore, System Image Recovery, Startup Repair, Command Prompt, UEFI Firmware Settings, and Startup - Asus AIO M241DA | Users Manual - Page 54
2. Under the Update and security option, select Recovery then select the recovery option you would like to perform. 54 ASUS All-in-One PC - Asus AIO M241DA | Users Manual - Page 55
radiate radio frequency energy and, if not installed and used in accordance with the instructions, may cause harmful interference to radio communications. However, there is no guarantee that interference . • Consult the dealer or an experienced radio/TV technician for help. ASUS All-in-One PC 55 - Asus AIO M241DA | Users Manual - Page 56
frequency range. RF exposure warning This equipment must be installed and operated in accordance with provided instructions and the antenna(s) used for this transmitter must be installed to provide a separation distance of void the user's authority to operate the equipment. 56 ASUS All-in-One PC - Asus AIO M241DA | Users Manual - Page 57
utilisation à l'intérieur afin de réduire les risques de brouillage préjudiciable aux systèmes de satellites mobiles utilisant les mêmes canaux. CAN ICES-3(B)/NMB-3(B) ASUS All-in-One PC 57 - Asus AIO M241DA | Users Manual - Page 58
is incorrectly replaced. Replace only with the same or equivalent type recommended by the manufacturer. Dispose of used batteries according to the manufacturer's instructions. No Exposure to Liquids DO NOT expose to or use near liquids, rain, or moisture. This product is not waterproof or oil-proof - Asus AIO M241DA | Users Manual - Page 59
IMPORTANT! To provide electrical insulation and maintain electrical safety, a coating is applied to insulate the device except on the areas where the I/O ports are located. ASUS All-in-One PC 59 - Asus AIO M241DA | Users Manual - Page 60
Prevention of Hearing Loss To prevent possible hearing damage, do not listen at high volume levels for long periods. 60 ASUS All-in-One PC - Asus AIO M241DA | Users Manual - Page 61
REACH (Registration, Evaluation, Authorization, and Restriction of Chemicals) regulatory framework, we publish the chemical substances in our products at ASUS REACH website at http://csr.asus.com/english/REACH.htm. EU RoHS This product complies with the EU RoHS Directive. For more details, see http - Asus AIO M241DA | Users Manual - Page 62
tại Việt Nam, vào ngày 23 tháng 9 năm2011 trở về sau, đều phải đáp ứng các yêu cầu của Thông tư 30/2011/TT-BCT của Việt Nam. ASUS Recycling/Takeback Services ASUS recycling and takeback programs come from our commitment to the highest standards for protecting our environment. We believe in providing - Asus AIO M241DA | Users Manual - Page 63
save money and protect the environment through energy efficient products and practices. All ASUS products with the ENERGY STAR logo comply with the ENERGY STAR standard, and the joint program. NOTE: Energy Star is NOT supported on FreeDOS and Linux-based operating systems. ASUS All-in-One PC 63 - Asus AIO M241DA | Users Manual - Page 64
the essential requirements and other relevant provisions of Directive 2014/53/EU. Full text of EU declaration of conformity is available at https://www.asus.com/support/. The WiFi operating in the band 5150-5350 MHz shall be restricted to indoor use for countries listed in the table below: AT BE - Asus AIO M241DA | Users Manual - Page 65
Computer International 48720 Kato Rd., Fremont, CA 94538 (510)739-3777/(510)608-4555 hereby declares that the product Product Name : ASUS All-in-One PC Model Number : M241D, A6521 compliance statement: This device complies with part 15 of the FCC Rules. Operation is subject to the - Asus AIO M241DA | Users Manual - Page 66
Manufacturer Address Telephone Number Authorized Representative in Europe Address ASUSTek COMPUTER INC. 1F., No. 15, Lide Rd., Beitou Dist., Taipei City 112, Taiwan +886-2-2894-3447 ASUS COMPUTER GmbH Harkortstrasse 21-23, 40880 Ratingen, Germany
-
 1
1 -
 2
2 -
 3
3 -
 4
4 -
 5
5 -
 6
6 -
 7
7 -
8
-
9
-
10
-
11
-
12
-
13
-
14
-
15
-
16
-
17
-
18
-
19
-
20
-
21
-
22
-
23
-
24
-
25
-
26
-
27
-
28
-
29
-
30
-
31
-
32
-
33
-
34
-
35
-
36
-
37
-
38
-
39
-
40
-
41
-
42
-
43
-
44
-
45
-
46
-
47
-
48
-
49
-
50
-
51
-
52
-
53
-
54
-
55
-
56
-
57
-
58
-
59
-
60
-
61
-
62
-
63
-
64
-
65
-
66
 |
 |

M241D/A6521
User Guide