Asus Designo MX239H MX239 Series User Guide
Asus Designo MX239H Manual
 |
View all Asus Designo MX239H manuals
Add to My Manuals
Save this manual to your list of manuals |
Asus Designo MX239H manual content summary:
- Asus Designo MX239H | MX239 Series User Guide - Page 1
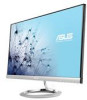
MX239H LCD Monitor User Guide October 2012 - Asus Designo MX239H | MX239 Series User Guide - Page 2
3.3 Troubleshooting (FAQ 3-7 3.4 Supported Timing List 3-8 Copyright © 2012 ASUSTeK COMPUTER INC. All Rights Reserved. No part of this manual, including written permission of ASUSTeK COMPUTER INC. ("ASUS"). Product warranty or service will not be extended if: (1) the product is repaired, modified - Asus Designo MX239H | MX239 Series User Guide - Page 3
. This equipment generates, uses and can radiate radio frequency energy and, if not installed and used in accordance with manufacturer's instructions, may cause harmful interference to radio communications. However, there is no guarantee that interference will not occur in a particular installation - Asus Designo MX239H | MX239 Series User Guide - Page 4
power supply is broken, do not try to fix it by yourself. Contact a qualified service technician or your retailer. • Before using the product, make sure all cables are correctly • If you encounter technical problems with the monitor, contact a qualified service technician or your retailer. iv - Asus Designo MX239H | MX239 Series User Guide - Page 5
hours. • When the screen becomes black or flashes, or cannot work anymore, contact your dealer or service center to fix it. Do not repair the screen by yourself! Conventions used in this guide WARNING: Information to prevent injury to yourself when trying to complete a task. CAUTION: Information to - Asus Designo MX239H | MX239 Series User Guide - Page 6
Where to find more information Refer to the following sources for additional information and for product and software updates. 1. ASUS websites The ASUS websites worldwide provide updated information on ASUS hardware and software products. Refer to http://www.asus.com 2. Optional documentation Your - Asus Designo MX239H | MX239 Series User Guide - Page 7
and delightful visual experience that the monitor brings you! 1.2 Package contents Check your package for the following items: LCD Monitor Monitor Base Quick Start Guide Warranty Card 1x Power Cord 1x Power Adapter 1x VGA Cable 1x HDMI-DVI Cable 1x Audio Cable • If any of the above items is - Asus Designo MX239H | MX239 Series User Guide - Page 8
1.3 Monitor introduction 1.3.1 Front of the LCD monitor 1 2 3 4 5 6 7 1. QuickFit Button: • This is a hotkey to activate the QuickFit function designed for alignment. • The QuickFit function contains 7 pages of common grid patterns, paper sizes, and photo sizes. See page 1-5 for details. - Asus Designo MX239H | MX239 Series User Guide - Page 9
5. Button: • Press this button to increase the value of the function selected or move to the previous functions. • This is also a hotkey for Brightness adjustment. 6. Input Select Button: • Use this hotkey to switch from VGA, HDMI1, or HDMI2 input signal. 7. Power Button/Power Indicator: • - Asus Designo MX239H | MX239 Series User Guide - Page 10
1.3.2 Rear of the LCD monitor 7 12 1. DC-in Port 2. HDMI Port 3. VGA Port 4. Audio-in Port 5. Earphone-out Port 6. Kensington Lock 7. Control Buttons 6 3 45 1-4 Chapter 1: Product Introduction - Asus Designo MX239H | MX239 Series User Guide - Page 11
1.3.3 QuickFit Function The QuickFit function contains three patterns: (1) Grid (2) Paper size (3) Photo size. 1. Grid pattern: Facilitates designers and users to organize content and layout on one page and achieve a consistent look and feel. Alignment Grid 2. Paper size: Provides users to view - Asus Designo MX239H | MX239 Series User Guide - Page 12
2.1 Assembling the base To assemble the base: 1. Carefully put the front of the monitor face down on a clean table. 2. Attach the base to the stand. Use your fingers to screw the base to the stand tightly. 3. The monitor is now ready for connection. 3 1 2 • We recommend that you cover the table - Asus Designo MX239H | MX239 Series User Guide - Page 13
2.3 Detaching the base To detach the base: 1. Disconnect power and signal cables. Carefully put the front of the monitor face down on a clean table. 2. Use your fingers to loosen the screw located at the bottom of the base, and remove the base from the stand. 3. Or you may directly use a screwdriver - Asus Designo MX239H | MX239 Series User Guide - Page 14
2.4 Adjusting the monitor • For optimal viewing, we recommend that you look at the full face of the monitor, then adjust the monitor to the angle that is most comfortable for you. • Hold the stand to prevent the monitor from falling while changing its angle. • You can adjust the monitor's angle from - Asus Designo MX239H | MX239 Series User Guide - Page 15
3.1 3.1.1 OSD (On-Screen Display) menu How to reconfigure MX239 Splendid Color Image Input Select System Setup Scenery Mode Standard Mode Theater Mode Game Mode Night View Mode sRGB Mode Move Menu Exit 1. Press the MENU button to activate the OSD menu. 2. Press and to navigate through - Asus Designo MX239H | MX239 Series User Guide - Page 16
User Mode. • Skin Tone: Contains three color modes including Reddish, Natural, and Yellowish. • Smart View: The versatile viewing positions with Smart View Technology. 3-2 Chapter 3: General Instruction - Asus Designo MX239H | MX239 Series User Guide - Page 17
• In the User Mode, colors of R (Red), G (Green), and B (Blue) are userconfigurable; the adjusting range is from 0 ~ 100. 3. Image You can adjust the image Sharpness, Trace Free, Aspect Control, ASCR, Position (VGA only), and Focus (VGA only) from this main function. MX239 Splendid Sharpness 40 - Asus Designo MX239H | MX239 Series User Guide - Page 18
the demo mode for the Splendid function. • Volume: Adjust the earphone or speaker output volume level. The adjusting range is from 0 to 100. 3-4 Chapter 3: General Instruction - Asus Designo MX239H | MX239 Series User Guide - Page 19
• ECO Mode: Activate the ecology mode for power saving. • OSD Setup: Adjusts the horizontal postition (H-Position), vertical position (V-Position), OSD Timeout, DDC/CI, and Transparency of the OSD screen. • Language: Select OSD language. The selections are: English, French, German, Spanish, Italian, - Asus Designo MX239H | MX239 Series User Guide - Page 20
W Yes Yes < 0.5 W < 0.5 W -5° ~ +20° 533 x 393.2 x 207.1 629 x 477 x 131 3.7 kg 6.17 kg AC 100 ~ 240 V (External) *Specifications are subject to change without notice. 3-6 Chapter 3: General Instruction - Asus Designo MX239H | MX239 Series User Guide - Page 21
3.3 Troubleshooting (FAQ) Problem Possible Solution Power LED is not ON • Press the button to check if the monitor is in the ON mode. • Check if the power cord - Asus Designo MX239H | MX239 Series User Guide - Page 22
List VESA / IBM Modes Support Timing (D-SUB, HDMI KHz 64.674 KHz 67.5 KHz 66.587 KHz HDMI 1.3 CEA-861 Formats Supported Timing (HDMI input) Resolution 640 x 480P 720 x 480P 720 x 576P 1280 tables may not be supported. For optimal resolution, we recommend that you choose a mode listed in the
-
 1
1 -
 2
2 -
 3
3 -
 4
4 -
 5
5 -
 6
6 -
 7
7 -
8
-
9
-
10
-
11
-
12
-
13
-
14
-
15
-
16
-
17
-
18
-
19
-
20
-
21
-
22
 |
 |

MX239H
LCD Monitor
User Guide
October
2012