Asus P1 User Manual
Asus P1 Manual
 |
View all Asus P1 manuals
Add to My Manuals
Save this manual to your list of manuals |
Asus P1 manual content summary:
- Asus P1 | User Manual - Page 1
October 2011 P1 Portable LED Projector User Guide - Asus P1 | User Manual - Page 2
installation. This equipment generates, uses and can radiate radio frequency energy and if not installed and used in accordance with the instructions, may cause harmful interference to radio communications. However, there is no guarantee that interference will not occur in a particular installation - Asus P1 | User Manual - Page 3
instructions should be adhered to. 3. Cleaning Unplug the projector from the wall socket before cleaning. Use a damp cloth for cleaning the projector power supply. 7. Servicing Do not attempt to service this projector yourself. Refer all servicing to qualified service personnel. 8. Replacement - Asus P1 | User Manual - Page 4
Cord must meet the requirement of countries where you use this projector. Please confirm your AC plug type with the graphics below Power Cord does not match your AC outlet, please contact your sales dealer. This projector is equipped with a grounding type AC line plug. Please ensure that your outlet - Asus P1 | User Manual - Page 5
Product warranty or service will not be extended if: (1) the product is repaired, modified or altered, unless such repair, modification of alteration is authorized in writing by ASUS; or (2) the serial number of the product is defaced or missing. ASUS PROVIDES THIS MANUAL "AS IS" WITHOUT WARRANTY - Asus P1 | User Manual - Page 6
Adjusting the projector focus ...15 Adjusting projection image size ...16 Menu operation ...17 Maintenance 22 Cleaning the lens ...22 Cleaning the projector housing ...22 Specifications 23 Dimensions ...24 Appendix 24 LED Indicator Messages 24 Compatibility modes ...25 Troubleshooting ...26 EN - Asus P1 | User Manual - Page 7
reliability and ease of use. The projector offers the following features: • Advanced LED light source provides a longer life span than traditional lamps. • Single chip 0.45" Texas Instruments DLP® technology • WXGA (1280 x 800 pixels) • The projector is small and light, making it useful for business - Asus P1 | User Manual - Page 8
Package contents When you unpack the projector, make sure you have all these components: Projector AC power cord Multi-input cable (30-pin CEA integrated cable) Quick Start Guide Power adapter User manual CD Quick start guide Projector carrying bag Warranty card Note • Contact you dealer - Asus P1 | User Manual - Page 9
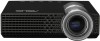
Projector overview Front view 34 1 1 Ventilation holes 2 Projection lens Rear/bottom view 2 1 3 Focus ring 4 Control panel 9 8 56 7 5 Power adapter inlet 6 Kensington lock 7 Multi-input socket VGA/composite video signal input jack 8 Tripod socket 9 Supporting stand EN-9 - Asus P1 | User Manual - Page 10
keys Use left/right keys to select items or make adjustments to your selection. 3 Menu Display the on-screen display menus or confirm the selection. 4 Input Manually select an input source. 5 Power Power LED indicator (Refer to "LED Indicator Messages".) Turn the projector on or off. EN-10 - Asus P1 | User Manual - Page 11
on the power cord into a wall outlet. 3 1 2 Important • In the connections shown above, some cables may not be included with the projector (see "Package contents" on page 8). They are commercially available from electronics stores. • The connection illustrations above are for reference only. The - Asus P1 | User Manual - Page 12
D-Sub output socket of the computer. 2. Connect the other end of the multi-input cable to the multi-input socket on the projector. Important • Many notebooks do not turn on their external video ports when connected to a projector. Usually a key combo like FN + F8 or CRT/LCD key turns the external - Asus P1 | User Manual - Page 13
can continue with this procedure. • If not, you will need to reassess which method you can use to connect to the device. To connect the projector to a composite video source device: 1. Take a video cable and connect one end to the composite video output socket of the video source device. 2. Connect - Asus P1 | User Manual - Page 14
, press Input to select your desired signal. 4. If the projector is activated for the first time, select your OSD language with / . 5. You may also select your OSD language after Reset All Settings in Setup menu has been activated. Warning • Never look into the lens when the LED light is on - Asus P1 | User Manual - Page 15
. Follow the illustration to open and close it. Note • To avoid damaging the projector, make sure that the supporting stand is fully retracted before placing the projector in its carrying case. Adjusting the projector focus Focus ring Focus the image by rotating the focus ring. A still image is - Asus P1 | User Manual - Page 16
. • Keep a space of 30 cm or more between the sides of the projector. • Do not use the projector in a smoky environment. Smoke residue may build-up on critical parts and damage the projector or its performance. • Consult with your dealer for special installation such as suspending from a ceiling - Asus P1 | User Manual - Page 17
Menu operation The projector has multilingual on-screen display menus that allow you to make image adjustments and change a variety of settings. Never, Auto, 30 Mins, 60 Mins, 90 Mins, 120 Mins, 150 Mins, 180 Mins EN-17 - Asus P1 | User Manual - Page 18
press to return to the main menu. 8. To exit OSD, select icon from the main menu and press . The OSD menu will close and the projector will automatically save the new settings. Main menu Setting Main menu Sub-menu Setting EN-18 - Asus P1 | User Manual - Page 19
light and dark areas. Keystone Manually correct distorted images resulting from an angled projection. Aspect Ratio Select how the picture fits on the screen: • Auto : Scales an image proportionally to fit the projector ratio. Splendid™ P1 provides different preset composite video input signal. - Asus P1 | User Manual - Page 20
(at idle state by second). Power Timeout Allows the projector to turn off if no input signal is detected after a set period of time. • Never: The projector will not turn off no matter whether the projector is active or inactive. • Auto: The projector will turn off in 5 minutes from the time when - Asus P1 | User Manual - Page 21
/60/90/120/150/180 minutes: No matter whether the projector is active or inactive, the projector will turn off according the the selections. Reset All Settings Restore settings to factory default. Information Display current information of the projector. Back Return to upper level of OSD menu. Exit - Asus P1 | User Manual - Page 22
first. Warning • Never open any of the covers on the projector. Dangerous electrical voltages inside the projector can cause severe injury. Do not attempt to service this product yourself. Refer all servicing to qualified service personnel. Cleaning the lens Gently wipe the lens with lens cleaning - Asus P1 | User Manual - Page 23
P1 Display Technology 0.45" DLP® Light Source R/G/B LED True Resolution (native) WXGA 30dBA Theater mode: 28dBA Signal Input Computer x 1 (combine in 30 pin connector) Video Input Video x 1 (combine in /Composite), User manual, Quick Start Guide, Warranty card, Support CD Note: - Asus P1 | User Manual - Page 24
Dimensions 125.5 mm (W) x 33.5 mm (H) x 130.0 mm (D) 125.5 130.0 33.5 Appendix LED Indicator Messages Status/Problem Standby Normal Temperature error Fan error LED indicators Power LED (White) Temp LED (Red) Solid Off Solid Off Solid Solid Solid Flashing EN-24 - Asus P1 | User Manual - Page 25
Compatibility modes Computer: Mode VGA SVGA XGA SXGA WXGA (Native) WXGA UXGA Video: Compatibility 480i 480p 576i 576p 720p 720p 1080i 1080i Resolution 640 x 480 640 x 480 640 x 480 640 x 480 800 x 600 800 x 600 800 x - Asus P1 | User Manual - Page 26
Troubleshooting Refer to the symptoms and measures listed below before sending the projector for repairs. If the problem persists, contact your local reseller or service center. Please refer to "LED Indicator Messages" as well. Start-up problems If no lights turn on: • Be sure that the power
-
 1
1 -
 2
2 -
 3
3 -
 4
4 -
 5
5 -
 6
6 -
 7
7 -
8
-
9
-
10
-
11
-
12
-
13
-
14
-
15
-
16
-
17
-
18
-
19
-
20
-
21
-
22
-
23
-
24
-
25
-
26
 |
 |

October 2011
P1 Portable LED Projector
User Guide