Asus P4P800 SE Motherboard DIY Troubleshooting Guide
Asus P4P800 SE Manual
 |
View all Asus P4P800 SE manuals
Add to My Manuals
Save this manual to your list of manuals |
Asus P4P800 SE manual content summary:
- Asus P4P800 SE | Motherboard DIY Troubleshooting Guide - Page 1
U1535 P4P800 SE Quick Start Guide Français Deutsch Italiano Español усский First Edition V1 Published January 2004 Copyright © 2004 ASUSTeK COMPUTER INC. All Rights Reserved. 15-063405100 - Asus P4P800 SE | Motherboard DIY Troubleshooting Guide - Page 2
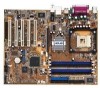
Top:Line In Center:Line Out Below:Mic In Intel 82865PE Memory Controller Hub Accelerated Graphics Port (AGP1) Marvell 88E8001 Gbit LAN CD1 MODEM1 AUX1 Audio Codec FP_AUDIO SPDIF_OUT PCI1 PCI2 PCI3 P4P800 SE PCI4 Intel ICH5R ® CHA_FAN1 PWR_FAN1 SATA1 SATA2 USBPW56 USBPW78 SMB20 CLRTC1 - Asus P4P800 SE | Motherboard DIY Troubleshooting Guide - Page 3
supportant les DIMM non-ECC PC3200/2700/2100 pour un total pouvant atteindre 4GB de mémoire système. REMARQUES 1. Lisez les remarques importantes relatives à la configuration de la mémoire décrites dans le guide (au lieu de 333MHz) en raison des limitations du chipset. Carte mère ASUS P4P800 SE 3 - Asus P4P800 SE | Motherboard DIY Troubleshooting Guide - Page 4
BIOS original ou le dernier fichier BIOS. Rebootez le système une fois que le BIOS sera rétabli. 5. Informations sur le CD technique Cette carte mère supporte les systèmes d'exploitation Windows 98SE/ME/2000/XP. le dossier BIN du CD technique et double-cliquez dessus. 4 Carte mère ASUS P4P800 SE - Asus P4P800 SE | Motherboard DIY Troubleshooting Guide - Page 5
Motherboard layout PS/2KBMS KBPWR T: Mouse B: Keyboard SPDIF_O 24.5cm (9.6in) Socket 478 CPU_FAN1 Super I/O KBPWR 12 23 +5V (Default) Memory Controller Hub Accelerated Graphics Port (AGP1) Marvell 88E8001 Gbit LAN CD1 MODEM1 AUX1 Audio Codec FP_AUDIO SPDIF_OUT PCI1 PCI2 PCI3 P4P800 SE - Asus P4P800 SE | Motherboard DIY Troubleshooting Guide - Page 6
arretieren. Sie hören einen Klickton, wenn der Hebel einrastet. 3. Arbeitsspeicher Deutsch Das Motherboard ist mit vier Double Data Rate (DDR)-DIMM-Steckplätzen ausgestattet. Diese Steckplätze unterst der Chipsatzeinschränkung nur mit 320MHz (nicht 333MHz) arbeiten. 6 ASUS P4P800 SE-Motherboard - Asus P4P800 SE | Motherboard DIY Troubleshooting Guide - Page 7
System aktiviert ist. Falls das Begrüßungsfenster nicht automatisch erscheint, klicken Sie bitte doppelt auf die Datei ASSETUP.EXE in dem BIN-Ordner auf der Support CD, um das Installationsmenü aufzurufen. ASUS P4P800 SE-Motherboard 7 - Asus P4P800 SE | Motherboard DIY Troubleshooting Guide - Page 8
Top:Line In Center:Line Out Below:Mic In Intel 82865PE Memory Controller Hub Accelerated Graphics Port (AGP1) Marvell 88E8001 Gbit LAN CD1 MODEM1 AUX1 Audio Codec FP_AUDIO SPDIF_OUT PCI1 PCI2 PCI3 P4P800 SE PCI4 Intel ICH5R ® CHA_FAN1 PWR_FAN1 SATA1 SATA2 USBPW56 USBPW78 SMB20 CLRTC1 - Asus P4P800 SE | Motherboard DIY Troubleshooting Guide - Page 9
quattro prese DIMM DDR (Double Data Rate) che supportano DIMM non-ECC PC3200/2700 / 2100 per memorie di sistema con dimensioni massime di 4 GB. NOTE 1. Prima di installare i DIMM leggere le solamente a 320 MHz (non a 333 MHz) a causa delle limitazioni del Chipset. Scheda madre ASUS P4P800 SE 9 - Asus P4P800 SE | Motherboard DIY Troubleshooting Guide - Page 10
con il sistema, oppure se questo diventa instabile dopo avere modificato le impostazioni, caricare le impostazioni predefinite di configurazione Setup Defaults. Fare riferimento al Capitolo 4 della Guida utente per informazioni dettagliate sul BIOS. Visitare la pagina Web ASUS (www.asus.com) per gli - Asus P4P800 SE | Motherboard DIY Troubleshooting Guide - Page 11
Top:Line In Center:Line Out Below:Mic In Intel 82865PE Memory Controller Hub Accelerated Graphics Port (AGP1) Marvell 88E8001 Gbit LAN CD1 MODEM1 AUX1 Audio Codec FP_AUDIO SPDIF_OUT PCI1 PCI2 PCI3 P4P800 SE PCI4 Intel ICH5R ® CHA_FAN1 PWR_FAN1 SATA1 SATA2 USBPW56 USBPW78 SMB20 CLRTC1 - Asus P4P800 SE | Motherboard DIY Troubleshooting Guide - Page 12
ranura. 4. Inserte con cuidado la CPU en la ranura hasta que entre en su sitio. 5. Cuando la CPU se encuentre en su sitio, empuje la palanca de la ranura para fijar la CPU. La palanca encajará en la a 320MHz (no a 333MHz) debido a la limitación del juego de chips. 12 Placa base ASUS P4P800 SE - Asus P4P800 SE | Motherboard DIY Troubleshooting Guide - Page 13
BIOS. 5. Información del CD de software Esta placa base admite los sistemas operativos (SO) Windows 98SE/ME/2000/XP. Instale siempre la versión más reciente del SO y las actualizaciones correspondientes para maximizar las funciones del hardware. El CD que se Placa base ASUS P4P800 SE 13 Español - Asus P4P800 SE | Motherboard DIY Troubleshooting Guide - Page 14
PLED+ PLED+5V Ground Ground Speaker USBPW56 USBPW78 12 23 CLRTC1 12 23 +5V (Default) +5VSB Normal Clear CMOS (Default) 2 IDE_LED+ IDE_LED- ExtSMI# Ground PWR Ground Reset Ground IDE_LED SMI ATX* ATX. 1 478 ZIF. 2 90°. У ! 14 ASUS P4P800 SE усский - Asus P4P800 SE | Motherboard DIY Troubleshooting Guide - Page 15
FSB 800 ц 533 ц 400 ц ип DDR DIMM PC3200/PC2700*/PC2100 PC2700/PC2100 PC2100 400/333*/266 ц 333/266 ц 266 ц 800 PC2700 DDR DIMM 320 усский ASUS P4P800 SE 15 - Asus P4P800 SE | Motherboard DIY Troubleshooting Guide - Page 16
BIOS AFUDOS: BIOS DOS afudos /i
-
 1
1 -
 2
2 -
 3
3 -
 4
4 -
 5
5 -
 6
6 -
 7
7 -
8
-
9
-
10
-
11
-
12
-
13
-
14
-
15
-
16
 |
 |

P4P800 SE
Quick Start Guide
First Edition V1 Published January 2004
Copyright © 2004 ASUSTeK COMPUTER INC. All Rights Reserved.
15-063405100
U1535
Français
Deutsch
Italiano
Español
±усский