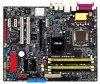
Asus P5GD2 Premium LGA775 CPU Installation Manual for Multi-Lingual
Asus P5GD2 Premium Manual
 |
View all Asus P5GD2 Premium manuals
Add to My Manuals
Save this manual to your list of manuals |
Asus P5GD2 Premium manual content summary:
- Asus P5GD2 Premium | LGA775 CPU Installation Manual for Multi-Lingual - Page 1
Boxed Intel® Processor Installation Instructions NOTE: Installation instructions are not part of the Three Year Limited vom Sockel weg drücken (A). Heben Sie den Hebel an (B). 1. Abra la palanca del socket empujándola hacia abajo y hacia fuera del mismo (A). Levante la palanca (B). 1. Libere a - Asus P5GD2 Premium | LGA775 CPU Installation Manual for Multi-Lingual - Page 2
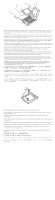
(D). 3. Remove protective cover (E) from load plate. Do not discard the protective cover. Always replace the socket cover if the processor is removed from the socket. 3. Retirez le cache de protection (E) de la plaque de chargement. Ne jetez pas ce cache. Remettez toujours le cache du connecteur - Asus P5GD2 Premium | LGA775 CPU Installation Manual for Multi-Lingual - Page 3
come illustrato in figura. [Accertarsi che le dita siano allineate agli intagli presenti sul socket (F).] Allineare le tacche (G) al socket (H). Posizionare il processore nel socket, mantenendo una posizione perpendicolare ed evitando di inclinarlo o farlo scivolare. 6. Close load plate. Pressing - Asus P5GD2 Premium | LGA775 CPU Installation Manual for Multi-Lingual - Page 4
matériau d'interface thermique recouvrant la partie inférieure du dissipateur du ventilateur.) 7. Nachdem Sie das Motherboard im Gehäuse eingebaut haben, setzen Sie den Lüfter auf das Motherboard und befestigen (beschädigen Sie dabei nicht die Unterseite des Lüfters.) 7. Con la PLACA MADRE INSTALADA - Asus P5GD2 Premium | LGA775 CPU Installation Manual for Multi-Lingual - Page 5
9. Schließen Sie den Lüfter (4-Draht-Leitung) am Motherboard an. Falls kein 4-Pin Anschluss vorhanden sein sollte, kann der Lüfter auch an einen del processore a un collettore della ventola della CPU a tre pin se quello a quattro pin non è disponibile. BOXED INTEL® PROCESSOR REMOVAL INSTRUCTIONS - Asus P5GD2 Premium | LGA775 CPU Installation Manual for Multi-Lingual - Page 6
. [Orientare i perni come illustrato in figura (L).] 4. To remove the processor do steps 1-5 in reverse. Be careful to protect the socket and processor from any foreign material contamination. REINSTALL SOCKET AND PROCESSOR PROTECTIVE COVERS. 4. Pour retirer le processeur, exécutez les étapes - Asus P5GD2 Premium | LGA775 CPU Installation Manual for Multi-Lingual - Page 7
Boxed Intel® Processor Installation Instructions NOTE: Installation instructions are not part of the Three Year load plate. Do not discard the protective cover. Always replace the socket cover if the processor is removed from the socket. 3. Retirez le cache de protection (E) de la plaque de - Asus P5GD2 Premium | LGA775 CPU Installation Manual for Multi-Lingual - Page 8
processor 4-wire fan cable connector to the motherboard 4-pin CPU fan header. (The processor 4-wire fan cable connector can be connected to a motherboard 3-pin CPU fan header if a 4-pin CPU perni siano correttamente inseriti. BOXED INTEL® PROCESSOR REMOVAL INSTRUCTIONS 1. To remove the fan heatsink,
-
 1
1 -
 2
2 -
 3
3 -
 4
4 -
 5
5 -
 6
6 -
 7
7 -
8
 |
 |
Boxed Intel
®
Processor Installation Instructions
NOTE:
Installation instructions are not part of the Three Year Limited Warranty.
REMARQUE:
les consignes d’installation ne font pas partie de la garantie limitée de trois ans.
HINWEIS:
Die Installationsanleitung ist nicht Teil der eingeschränkten Dreijahresgarantie.
NOTA:
Las instrucciones para la instalación no están incluidas en la Garantía limitada de tres años.
OBSERVAÇÃO:
As instruções de instalação não fazem parte da garantia limitada de três anos.
NOTA:
le istruzioni per l'installazione non sono comprese nella Garanzia limitata di tre anni.
This processor is intended to be professionally installed. Before installing the processor, please review the
additional integration notes available at http://www.intel.com/go/integration. Take proper electrostatic dis-
charge (ESD) precautions such as using appropriate ground straps, gloves, and ESD mats.
Ce processeur est dédié aux installations professionnelles. Avant d’installer le processeur, veuillez consulter
les conseils d’intégration supplémentaires à l’adresse suivante: http://www.intel.com/go/integration.
Respectez les consignes appropriées en matière de décharges électrostatiques (ESD), comme l’utilisation
de bandes de mise à la masse, de gants et de tapis de protection contre les décharges électrostatiques.
Dieser Prozessor sollte nur durch Fachpersonal installiert werden. Bevor Sie den Prozessor installieren,
lesen Sie bitte die zusätzlichen Installationshinweise unter http://www.intel.com/go/integration. Schützen
Sie das Gerät vor elektrostatischen Entladungen, indem Sie Erdungsbänder, Handschuhe und
Antistatikmatten verwenden.
Este procesador debe ser instalado por un profesional. Antes de instalar el procesador, revise las notas de
integración adicionales disponibles en http://www.intel.com/go/integration. Adopte las medidas de seguri-
dad apropiadas para las descargas electroestáticas (ESD), como el uso de correas conectadas a tierra,
guantes y esterillas de protección contra descargas.
Este processador deve ser instalado por um técnico especializado. Antes de instalar o processador, leia as
observações adicionais de integração disponíveis em http://www.intel.com/go/integration. Tome as devidas
precauções contra descargas eletrostáticas usando as tiras de aterramento, luvas e tapetes antidescarga elet-
rostática apropriados.
Questo processore deve essere installato da personale qualificato. Prima di installare il processore, con-
sultare la Guida all'integrazione disponibile all’indirizzo http://www.intel.com/personal/computing/emea/ita/
resources/build/components/intgd_systems.htm. Osservare le appropriate precauzioni relative alle scariche
elettrostatiche (ESD), utilizzando ad esempio fascette di terra, guanti e tappetini ESD.
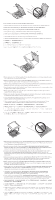
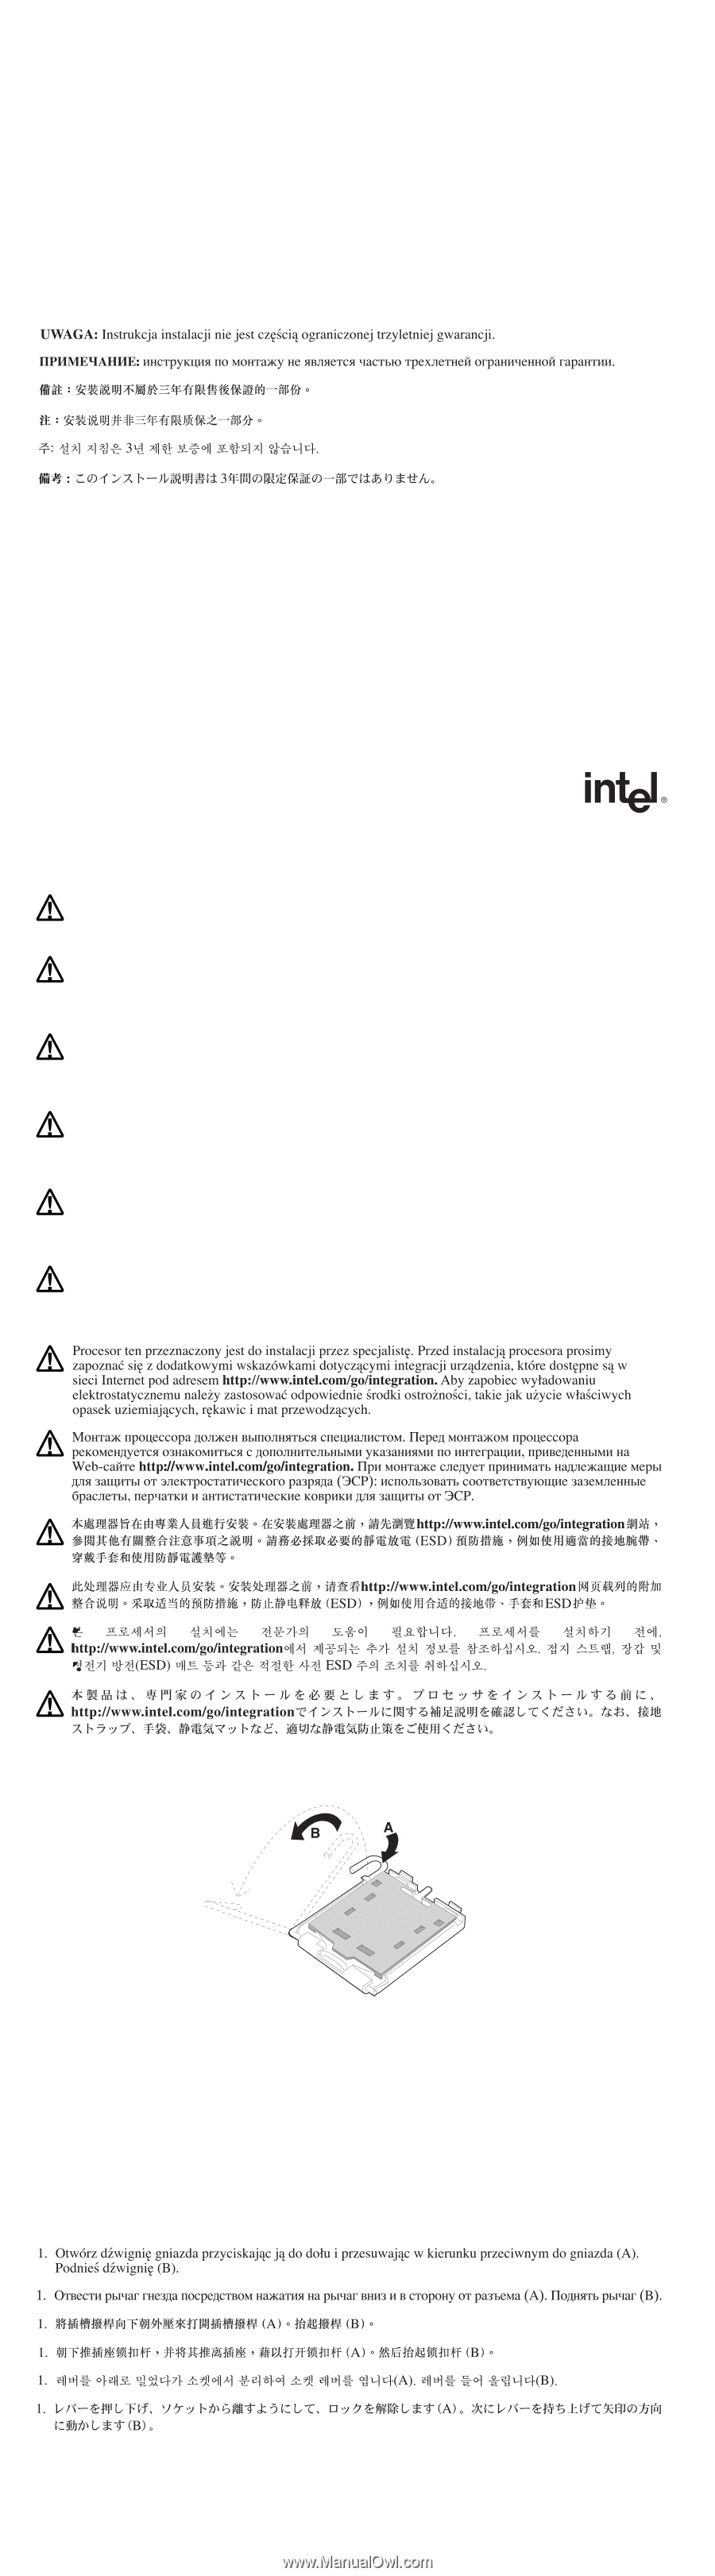
1.
Open socket lever by pushing lever down and away from socket (A). Lift lever (B).
1.
Ouvrez le levier du connecteur en appuyant dessus et en l’éjectant du connecteur (A). Soulevez le levier (B).
1.
Öffnen Sie die Sockel-Sperre, indem Sie den Hebel nach unten und vom Sockel weg drücken (A). Heben Sie
den Hebel an (B).
1.
Abra la palanca del socket empujándola hacia abajo y hacia fuera del mismo (A). Levante la palanca (B).
1.
Libere a alavanca do soquete empurrando-a para baixo e afastando-a do soquete (A). Levante a alavanca (B).
1.
Per aprire la leva di chiusura del socket, spingerla verso il basso e allontanarla dal socket (A), quindi tirarla
verso l’alto (B).