Audiovox HDTVo User Guide
Audiovox HDTVo Manual
 |
View all Audiovox HDTVo manuals
Add to My Manuals
Save this manual to your list of manuals |
Audiovox HDTVo manual content summary:
- Audiovox HDTVo | User Guide - Page 1
WARRANTY IS LIMITED IN DURATION TO THE ONE YEAR. For customer service and technical information:: 1.800.290.6650 TERK and the TERK logo are registered trademarks of AUDIOVOX Corp. For Customer Service Visit Our Website At www.audiovox.com Product Information, Photos, FAQ's, Owner's Manuals 44P008A - Audiovox HDTVo | User Guide - Page 2
HDTVo Owner's Manual Indoor/Outdoor Amplified HDTV Antenna - Audiovox HDTVo | User Guide - Page 3
HDTVo Safety Precautions Warning! Use extreme caution when installing or removing an outdoor antenna that is located close to overhead wires such as power lines, telephone lines or cable TV lines. If any part of the antenna makes contact with overhead power lines, touching the antenna or the - Audiovox HDTVo | User Guide - Page 4
Company to have it removed safely. Do not run the downlead cable over power wires. • Get help from a qualified professional when removing the old antenna if there is any doubt of clearing overhead wires. • Never install the antenna outdoors at night, when it is windy, or during rain or snow. • Make - Audiovox HDTVo | User Guide - Page 5
performance year after year. No assembly of the antenna is required. The HDTVo comes with all necessary mounting hardware for flexible placing indoors or outdoors. Your HDTVo Antenna Includes: (1) HDTVo Antenna (1) Power Injector with 110v AC to DC power adapter (1) Mini Mast (1) Mini Mast Bracket - Audiovox HDTVo | User Guide - Page 6
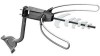
HDTVo Fig 1. 4 - Audiovox HDTVo | User Guide - Page 7
2.) with the front of the HDTVo precisely facing the direction of the TV station's broadcasting transmitters. (See Fig 2.) The higher the elevation of the antenna, the better the reception performance will be. Pointing the Antenna Towards the Broadcast Tower 1. Go to www.terk.com and click on the - Audiovox HDTVo | User Guide - Page 8
HDTVo Right On the side of the house facing the broadcast tower Fig 2. Wrong 6 Not on the side of the house facing the broadcast tower - Audiovox HDTVo | User Guide - Page 9
Mounting the HDTVo Antenna Mounting Options: For best performance, the HDTVo should be mounted outdoors in a high location (such as on the roof or high up on the side of your house). The HDTVo can also be mounted in an attic. Remember that the HDTVo is a highly directional antenna. As a result - Audiovox HDTVo | User Guide - Page 10
"). 9. Tighten the 3" partially threaded bolt and the 3/8" screw, securing the antenna in the antenna bracket. 10. Skip to the "Connecting the HDTVo to a TV" section to complete installation. To mount the HDTVo antenna on an outdoor wall without using the mini-mast (see fig. 3B): 1. Locate: - The - Audiovox HDTVo | User Guide - Page 11
a roof with 45-90 degree pitch (see fig. 3C): 1. Locate the HDTVo antenna and all included components. 2. Using the four lag screws, attach the mini-mast bracket to the roof. Be sure to position the bracket vertically on - Audiovox HDTVo | User Guide - Page 12
a roof with 0-45 degree pitch (see fig. 4): 1. Locate the HDTVo antenna and all included components. 2. Using the four lag screws, attach the mini-mast bracket to the roof. Be sure to position the bracket vertically on - Audiovox HDTVo | User Guide - Page 13
on a rafter located in an attic where the roof that has 45-90 degree pitch (see fig. 5): 1. Locate the HDTVo antenna and all included components. 2. Using the four lag screws, attach the mini-mast bracket to the rafter. Be sure to position the bracket vertically on - Audiovox HDTVo | User Guide - Page 14
on a rafter located in an attic where the roof has 0-45 degree pitch (see fig. 6): 1. Locate the HDTVo antenna and all included components. 2. Using the four lag screws, attach the mini-mast bracket to the rafter. Be sure to position the bracket vertically on - Audiovox HDTVo | User Guide - Page 15
bolts, the four washers and the four 1.75" nuts, attach the antenna bracket and the pole clamp to the mast. Position the HDTVo antenna as high as possible on the mast. 3. Slide the back of the antenna into the antenna bracket. 4. Insert the 3" partially threaded bolt and the 3/8" screw into the - Audiovox HDTVo | User Guide - Page 16
the HDTVo to a TV 1. Run the RG6 coaxial cable from the antenna towards your television set and connect the RG6 coaxial cable to the supplied Power Injector on the terminal labeled "TO ANTENNA". 2. Connect the "TO TV" lead on the power injector to the "ANT IN" on your TV. 3. Plug the Power Adapter - Audiovox HDTVo | User Guide - Page 17
HDTVo Avoiding Water Damage Water Damage Prevention: At the point where your coaxial cable lead enters the house, you should allow for some slack in the - Audiovox HDTVo | User Guide - Page 18
Terk model BDS-P1). The instructions listed below are for a basic satellite system. If you have a more complex satellite system and wish to install the HDTVo in this manner please call TERK Support at 1-800-290-6650. NOTE: The Power an RG6 coaxial cable from the INDOOR diplexer-port labeled "TV" to - Audiovox HDTVo | User Guide - Page 19
CABLE or CATV mode to ANTENNA or AIR mode. Q. I am not receiving channels clearly. A. Turn the Power Injector on and off. antenna signal reflects off of a tall obstruction and hits your antenna multiple times. Each reflection causes a ghost. To solve this problem, try repositioning the HDTVo - Audiovox HDTVo | User Guide - Page 20
HDTVo Need more help? Call 1-800-290-6650 for Technical Support Monday through Friday 9:00AM to 5:00PM EST, or contact us at www.audiovox.com. If your TV has a connection not mentioned in this manual, contact Terk for the appropriate adapter. 18
-
 1
1 -
 2
2 -
 3
3 -
 4
4 -
 5
5 -
 6
6 -
 7
7 -
8
-
9
-
10
-
11
-
12
-
13
-
14
-
15
-
16
-
17
-
18
-
19
-
20
 |
 |

Limited Warranty
TERK and the TERK logo are registered trademarks of AUDIOVOX Corp.
44P008A
For customer service and
technical information:: 1.800.290.6650
Audiovox Corporation (Audiovox) warrants this product against defects in
materials or workmanship for one (1) year from the date of purchase.
During this period, this product will be replaced without charge.
This
warranty does not cover any damage due to acts of nature, commercial
use, accident, misuse, abuse or negligence.
This warranty is only valid in
the USA.
Replacement as provided under this warranty is the exclusive
remedy of the consumer.
Audiovox shall not be liable for any incidental
or consequential damages for breach of any express or implied warranty
on this product, except to the extent that limitations of this sort are
prohibited by applicable law.
THERE ARE NO IMPLIED WARRANTIES OF
MERCHANTABILITY OR FITNESS FOR A PARTICULAR PURCHASE EXCEPT
TO THE EXTENT THAT IMPLIED WARRANTIES OR EITHER SORT ARE
REQUIRED BY APPLICABLE LAW, AND IN SUCH CASE, EACH WARRANTY
IS LIMITED IN DURATION TO THE ONE YEAR.
For Customer Service
Visit Our Website At
www.audiovox.com
P
ro
d
uct
Inf
orm
a
tio
n, Ph
otos
,
FA
Q’
s
,
O
wn
er
’
s
Man
u
al
s