Belkin F1DC108CUS-DL User Guide
Belkin F1DC108CUS-DL Manual
 |
View all Belkin F1DC108CUS-DL manuals
Add to My Manuals
Save this manual to your list of manuals |
Belkin F1DC108CUS-DL manual content summary:
- Belkin F1DC108CUS-DL | User Guide - Page 1
Belkin Tech Support US: 310-898-1100 ext. 2263 800-223-5546 ext. 2263 Europe: 00 800 223 55 460 Australia: 1800 235 546 New Zealand: 0800 235 546 Belkin Belkin Ltd. Express Business Park, Shipton Way Rushden, NN10 6GL, United Kingdom +44 (0) 1933 35 2000 +44 (0) 1933 31 2000 fax © 2005 Belkin - Belkin F1DC108CUS-DL | User Guide - Page 2
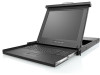
OmniView® ENTERPRISE 1U Rack-Mount Console with Built-In 8-Port KVM Switch Control your rack servers Control from a compact 1U rack-mount console User Manual F1DC108C - Belkin F1DC108CUS-DL | User Guide - Page 3
Selecting a Server Using Keyboard Hot Key Commands 21 AutoScan Mode 21 IntelliView Graphical On-Screen Display Menu Control 22 The AutoUpdate Firmware Update Utility 35 5. Troubleshooting 43 6. Glossary 44 7. Information 46 - Belkin F1DC108CUS-DL | User Guide - Page 4
Cable Keys 4 KVM Switch Screws 5 6 Registration User Quick Card Manual Installation Guide 7 Congratulations on your purchase of this Belkin • Video resolution support of up to 1280x1024 • PS/2 and USB mix-and-match support for output devices • Multi-console support • IntelliView™ - Belkin F1DC108CUS-DL | User Guide - Page 5
KVM Switch, from installation and operation to troubleshooting-in the unlikely event of a problem. For quick and easy installation, please refer to the Quick Installation Guide included in your packaging. Thank you for purchasing the Belkin OmniView ENTERPRISE 1U Rack-Mount Console with Built - Belkin F1DC108CUS-DL | User Guide - Page 6
Overview • Video Resolution 1 The LCD supports SXGA video resolutions of up to 1280x1024. cable size, Micro-Cabling simplifies cable management and allows for greater airflow in your racks, increasing the lifespan of your equipment. These cables are offered in both PS/2 and USB styles [Belkin - Belkin F1DC108CUS-DL | User Guide - Page 7
KVM Switch to a server requires custom Belkin OmniView ENTERPRISE Dual-Port Micro-Cabling. F1D9400-XX (PS/2) To connect multiple KVM Switches together, a custom Belkin OmniView ENTERPRISE Daisy-Chain Cable is required. OmniView ENTERPRISE Dual-Port Micro-Cabling F1D9400-XX (PS/2 Style) F1D9401-XX - Belkin F1DC108CUS-DL | User Guide - Page 8
section Overview Operating System Requirements Operating System Requirements 1 The Rack-Mount Console KVM Switch is compatible with servers running on the following platforms: 2 • Windows® 98, 2000, Me, NT®, XP, 2003 3 • Red Hat® Linux® 7.0, 7.1, 7.2 • Mandrake • Linspire 4 • Novell® - Belkin F1DC108CUS-DL | User Guide - Page 9
Daisy-Chain Port, In Power Switch Optional Console Daisy-Chain PS/2 or USB Ports Port, Out 4 High-Density, 50-Pin, SCSI 2-Style Computer Ports, each Supporting 2 Servers IEC Power Connector Back View 6 - Belkin F1DC108CUS-DL | User Guide - Page 10
section Overview LCD Display Buttons 1 LCD Display Buttons The Rack-Mount Console KVM Switch includes six buttons on the LCD 2 panel that allow you to adjust the settings on the display. The buttons are recessed in the panel to prevent accidental activation when the LCD is folded down and - Belkin F1DC108CUS-DL | User Guide - Page 11
50-pin, SCSI 2-style connector (requires Belkin OmniView ENTERPRISE Dual-Port Micro-Cabling) 1280x1024 (SXGA) 106-key, PS/2- compatible PS/2-compatible touch pad Metal enclosure 19 (W) x 1.75 (H) x 29 (L) in. (482.6 x 44.5 x 736.6mm) - Belkin F1DC108CUS-DL | User Guide - Page 12
to 25 feet for best video performance. Beyond that length, the probability of video degradation increases. 7 For USB servers We recommend that USB cable length from the Rack-Mount Console KVM Switch to your servers be limited to 12 feet for best video performance. Installing the Rack-Mount - Belkin F1DC108CUS-DL | User Guide - Page 13
Installation Installing the Rack-Mount Console KVM Switch into a Server Rack Installing the Rack-Mount Console KVM Switch into a Server Rack Step 1 Remove the contents from the box. Step 2 Place the Rack-Mount Console KVM Switch on a rack and install the rack-mount brackets. 10 - Belkin F1DC108CUS-DL | User Guide - Page 14
section Installation Installing the Rack-Mount Console KVM Switch into a Server Rack Step 3 1 Mount the Rack-Mount Console KVM Switch to your rack or cabinet. 2 3 4 5 6 7 Step 4 Connect the IEC power cable to an active power outlet and power up the Rack-Mount Console KVM Switch. 11 - Belkin F1DC108CUS-DL | User Guide - Page 15
Installation Installing the Rack-Mount Console KVM Switch into a Server Rack Step 5 Unlock your Rack-Mount Console KVM Switch with keys provided. 12 - Belkin F1DC108CUS-DL | User Guide - Page 16
the server, when possible.) 5 6 7 Step 2 Connect the VGA and PS/2 connectors to the server (make sure that you connect the keyboard and mouse cables to the correct ports on your server; purple indicates the keyboard connector and green indicates the mouse connector). Step 3 Repeat Steps 1 and - Belkin F1DC108CUS-DL | User Guide - Page 17
best results, screw the connectors into the Rack-Mount Console KVM Switch and the server, when possible.) Step 2 Connect the USB connector of your Micro-Cabling to the server. If your server is running Windows Me or newer, skip to Step 5; otherwise, continue with Step 3. Step 3 Boot up the server - Belkin F1DC108CUS-DL | User Guide - Page 18
do not automatically install USB HID devices, so you will have to manually press "Next" through the 2 Windows Add/Remove Hardware Wizard until the and monitor. 5 Step 5 6 Connect the male VGA HDDB15 connector on the Micro-Cabling to the VGA port on the server. Step 6 7 Repeat Steps 1 through - Belkin F1DC108CUS-DL | User Guide - Page 19
switches (without console support). If BANKs 00 Cable (F1D9402-XX) is required to daisy-chain each Rack-Mount Console KVM Switch, other KVM switch, and KVM expander, and is available through your Belkin reseller or online at www.belkin instructions on how to configure BANK 00 to join a daisy-chain. 16 - Belkin F1DC108CUS-DL | User Guide - Page 20
section Installation DIP Switch Configuration Chart DIP Switch Configuration Chart 1 DIP SWITCH # 1 2 3 4 BANK ADDRESS 2 Down Down Down Down BANK 00 (Default) 3 Up Down Down Down BANK 01 Primary/Secondary Down Up Down Down BANK 02 Secondary 4 Up Up Down Down BANK 03 Secondary - Belkin F1DC108CUS-DL | User Guide - Page 21
Console KVM Switch. 4. Connect the other end of the Daisy-Chain Cable to the "Daisy-Chain IN" port of the next KVM switch, OUT". Adding additional units: 5. Continuing in the same manner, using the Daisy-Chain Cable (F1D9402-XX), connect "Daisy-Chain OUT" to "Daisy-Chain IN" on all subsequent - Belkin F1DC108CUS-DL | User Guide - Page 22
with their corresponding BANK addresses, check that all KVM devices have the correct BANK address assigned to them and that all Daisy-Chain Cables are connected properly. 4 7. If the primary BANK is set to address 00, the KVM administrator must configure the Rack-Mount Console KVM Switch - Belkin F1DC108CUS-DL | User Guide - Page 23
that all servers are connected and responding correctly. If you encounter an error, check your cable connections for that server and reboot, if necessary. If the problem persists, please call Belkin Technical Support. Now that you have connected servers to your Rack-Mount Console KVM Switch, it is - Belkin F1DC108CUS-DL | User Guide - Page 24
Using your Rack-Mount Console KVM Switch section Using your Rack-Mount Console KVM Switch 1 Selecting a Server Using Keyboard Hot Key Commands To send commands to the Rack-Mount Console KVM Switch, the "Scroll Lock" 2 (SL) key must be pressed twice within about half a second (you will hear a - Belkin F1DC108CUS-DL | User Guide - Page 25
keys, refer to the "IntelliView OSD Features" section of this User Manual for more information). IntelliView OSD Features The "Main" page is the Selecting the "?" button displays the "Help" screen, which will provide instructions for using the current OSD page. Selecting the "X" button will close - Belkin F1DC108CUS-DL | User Guide - Page 26
Using your Rack-Mount Console KVM Switch section Input and Navigation Features 1 • Clicking on the Group, Computer Name, or ID column headers sorts the list box entries in ascending order, by the column header selected. • Double-clicking on a server (computer) line will select that server line - Belkin F1DC108CUS-DL | User Guide - Page 27
keyboard column displays the status of the current keyboard connection, and is updated in real time. If the connection to the server is via PS/2 cable, a small keyboard icon is displayed. If the keyboard connection to the server is via USB, the USB trident symbol is displayed. If no keyboard is - Belkin F1DC108CUS-DL | User Guide - Page 28
mouse column displays the status of the current mouse connection, and is updated in real time. If the connection to the server is via PS/2 cable, a small mouse icon is displayed. If the mouse connection to the server is via USB, the 2 USB trident symbol is displayed. If no mouse is - Belkin F1DC108CUS-DL | User Guide - Page 29
Using your Rack-Mount Console KVM Switch Setup Page The "Setup" page is only available to the Admin user and is used to set the group name, server (computer) name, and server scan times. The scan time is dependent on the port being scanned, and is global (i.e. it's independent of the console or - Belkin F1DC108CUS-DL | User Guide - Page 30
Using your Rack-Mount Console KVM Switch Scan Column 1 The "Scan" column displays the current setting for how long the console views each server during AutoScan. To change the viewing duration for a server, click in the desired cell. 2 Scan Time and "Change All" Button 3 The user can reset - Belkin F1DC108CUS-DL | User Guide - Page 31
Using your Rack-Mount Console KVM Switch User The User can switch between servers he or she has been given access to and can toggle the AutoScan function in the "Main" page. If the Guest account has been enabled by the Admin, the User logs off to Guest access. If the Admin has disabled the Guest - Belkin F1DC108CUS-DL | User Guide - Page 32
section Using your Rack-Mount Console KVM Switch Passwords Page 1 2 3 4 5 6 The "Passwords" page allows the administrator to change user passwords, enable or disable user accounts, and set the AutoLogout time. NOTE: Only the administrator can change user passwords and settings. 7 - Belkin F1DC108CUS-DL | User Guide - Page 33
logout occurs. The AutoLogout feature is not global; it has to be set independently for each console. NOTE: Unless AutoLogout is enabled, or the user manually logs out, the session will not end when the user closes the OSD (the next user will open the OSD at the privilege level of - Belkin F1DC108CUS-DL | User Guide - Page 34
section Using your Rack-Mount Console KVM Switch Display Banner 1 This check box enables a banner to be displayed for system events: pressing a front-panel button, powering-on the Rack-Mount Console KVM Switch, etc. The banner is either always displayed, or displayed for a configured time (1-99 - Belkin F1DC108CUS-DL | User Guide - Page 35
Using your Rack-Mount Console KVM Switch Advanced Dialog Page Activating this button will take the user to the "Advanced Dialog" screen. Disable Viewing When "Disable Viewing" is checked, only another administrator may view channels occupied by the administrator. This function will be active by - Belkin F1DC108CUS-DL | User Guide - Page 36
guest, if the account is enabled). If the user is not logged in, and guest is disabled, pressing "Cancel" will close the OSD. Help Screens Online help is available within the OSD. Simply press the F1 key, or click on the "?" button on the right side of the title bar. 33 - Belkin F1DC108CUS-DL | User Guide - Page 37
Using your Rack-Mount Console KVM Switch Banner The banner, a small window that is displayed to inform the user of the console's focus, appears as a line of text surrounded by a gray, 3-D frame. It displays the following information: • Group name • Host name • BANK and port in focus If multiple - Belkin F1DC108CUS-DL | User Guide - Page 38
your hardware and guide you 2 through Belkin website, or you can download the appropriate file manually by going to our website at www.belkin behind a proxy server. Please call Belkin Technical Support to have the file emailed to you , and all cables, excluding power and the USB cable, must be - Belkin F1DC108CUS-DL | User Guide - Page 39
on the Rack-Mount Console KVM Switch. 2. Connect one end of the USB cable to the flash port on your Rack-Mount Console KVM Switch (the USB "B" the AutoUpdate application will prompt the user to select an automatic or manual update. You should generally select automatic, unless you have a specific - Belkin F1DC108CUS-DL | User Guide - Page 40
-Mount Console KVM Switch user needs to acquire the correct update file manually. 1 2 3 4 5 6 7 section NOTE: Before updating you start the AutoUpdate application, it searches your server for devices that support the update process. It also automatically connects to the Web and searches - Belkin F1DC108CUS-DL | User Guide - Page 41
the update is in progress. NOTE: It is crucial that the server and the Rack-Mount Console KVM Switch remain powered-on, and the USB cable remains connected to the server and the Rack-Mount Console KVM Switch during the update. The user should also 38 - Belkin F1DC108CUS-DL | User Guide - Page 42
" button allows the user to manually force updates into the target device. AutoUpdate does minimal checking to determine whether the selected file is valid in this mode. Belkin does not recommend using Advanced Mode unless directed to do so by Belkin Technical Support. The Advanced button will 39 - Belkin F1DC108CUS-DL | User Guide - Page 43
Using your Rack-Mount Console KVM Switch become active at the same time that the Next button becomes active (when a device is selected and a valid file has been selected). 40 - Belkin F1DC108CUS-DL | User Guide - Page 44
Switch to stop working and become incapable of accepting corrective updates. Try updating the device again; if this fails, then contact Belkin Technical Support for assistance. Completing a Standalone Rack-Mount Console KVM Switch Firmware Update 1. Power-cycle or reset the Rack-Mount Console KVM - Belkin F1DC108CUS-DL | User Guide - Page 45
Using your Rack-Mount Console KVM Switch Completing a Firmware Update on Multiple KVM Devices (Daisy-Chained) 1. Power-off ALL of the KVM devices in the daisy-chain. 2. Power-on ONE KVM device. 3. The internal components of the KVM device will be reprogrammed with the new code (this may take a few - Belkin F1DC108CUS-DL | User Guide - Page 46
Troubleshooting section I've daisy-chained multiple KVM switches; now I want to add another console. What do that you would for a standalone KVM switch. Before you power-on the BANK, connect 3 the daisy-chain cable to it and one of the KVM devices on the end of the chain (be sure to use the "IN - Belkin F1DC108CUS-DL | User Guide - Page 47
are used throughout this User Manual. AutoScan: A mode of expanders that are connected one to another in a series. A Belkin KVM Switch daisy-chain uses common settings to allow seamless, complex microphones. KVM Device: In this User Manual, this term is used to refer to any Rack-Mount Console KVM - Belkin F1DC108CUS-DL | User Guide - Page 48
you can attach a device or 5 plug in a device cable. Primary KVM Switch: A KVM switch set to BANK address 00-03 only with a 6 console attached. 7 Rack-Mount Console KVM Switch: In this User Manual, this term is used to refer to the Belkin OmniView ENTERPRISE 1U Rack-Mount Console with Built - Belkin F1DC108CUS-DL | User Guide - Page 49
if the product has been damaged by accident, abuse, misuse, or misapplication; if the product has been modified without the written permission of Belkin; or if any Belkin serial number has been removed or defaced. THE WARRANTY AND REMEDIES SET FORTH ABOVE ARE EXCLUSIVE IN LIEU OF ALL OTHERS, WHETHER
-
 1
1 -
 2
2 -
 3
3 -
 4
4 -
 5
5 -
 6
6 -
 7
7 -
8
-
9
-
10
-
11
-
12
-
13
-
14
-
15
-
16
-
17
-
18
-
19
-
20
-
21
-
22
-
23
-
24
-
25
-
26
-
27
-
28
-
29
-
30
-
31
-
32
-
33
-
34
-
35
-
36
-
37
-
38
-
39
-
40
-
41
-
42
-
43
-
44
-
45
-
46
-
47
-
48
-
49
 |
 |

P74696
Belkin Tech Support
US: 310-898-1100 ext. 2263
800-223-5546 ext. 2263
Europe: 00 800 223 55 460
Australia: 1800 235 546
New Zealand: 0800 235 546
Belkin Corporation
501 West Walnut Street
Compton, CA 90220-5221, USA
310-898-1100
310-898-1111 fax
Belkin Ltd.
Express Business Park, Shipton Way
Rushden, NN10 6GL, United Kingdom
+44 (0) 1933 35 2000
+44 (0) 1933 31 2000 fax
Belkin Ltd.
7 Bowen Crescent, West Gosford
NSW 2250, Australia
+61 (0) 2 4372 8600
+61 (0) 2 4372 8603 fax
Belkin B.V.
Boeing Avenue 333
1119 PH Schiphol-Rijk, The Netherlands
+31 (0) 20 654 7300
+31 (0) 20 654 7349 fax
© 2005 Belkin Corporation. All rights reserved. All trade names are registered trademarks of
respective manufacturers listed. Mac OS and Mac are trademarks of Apple Computer, Inc.,
registered in the U.S. and other countries.
OmniView
®
ENTERPRISE
1U Rack-Mount Console with
Built-In 8-Port KVM Switch