Belkin F5D6020_ver1 XP Setup guide
Belkin F5D6020_ver1 Manual
 |
View all Belkin F5D6020_ver1 manuals
Add to My Manuals
Save this manual to your list of manuals |
Belkin F5D6020_ver1 manual content summary:
- Belkin F5D6020_ver1 | XP Setup guide - Page 1
F5D6020 PCMCIA Wireless Notebook Network Adapter XP Installation 1. Insert the PCMCIA card into you Notebook PC. Turn on the power media (floppy, CD-ROM). Click "Next". 3. The "Windows Logo Testing" screen will appear. This does not mean there is a problem. Click "Continue Anyway" to continue. - Belkin F5D6020_ver1 | XP Setup guide - Page 2
appear. Click "Finish" to complete the installation. Hardware and driver installation is now complete for Windows XP. The next step is to install the Belkin 11Mbps Wireless Configuration Utility. 1. Insert the CD-ROM that came with your Belkin Wireless Notebook Network Card into your CD-ROM. 2. From - Belkin F5D6020_ver1 | XP Setup guide - Page 3
the default folder specified however you have the option of selecting a custom location. Click "Next". 6. The Select Program Folder window will appear. Belkin recommends that you use the Default folder specified however you have the option of choosing the folder where the program icons are stored
-
 1
1 -
 2
2 -
 3
3
 |
 |
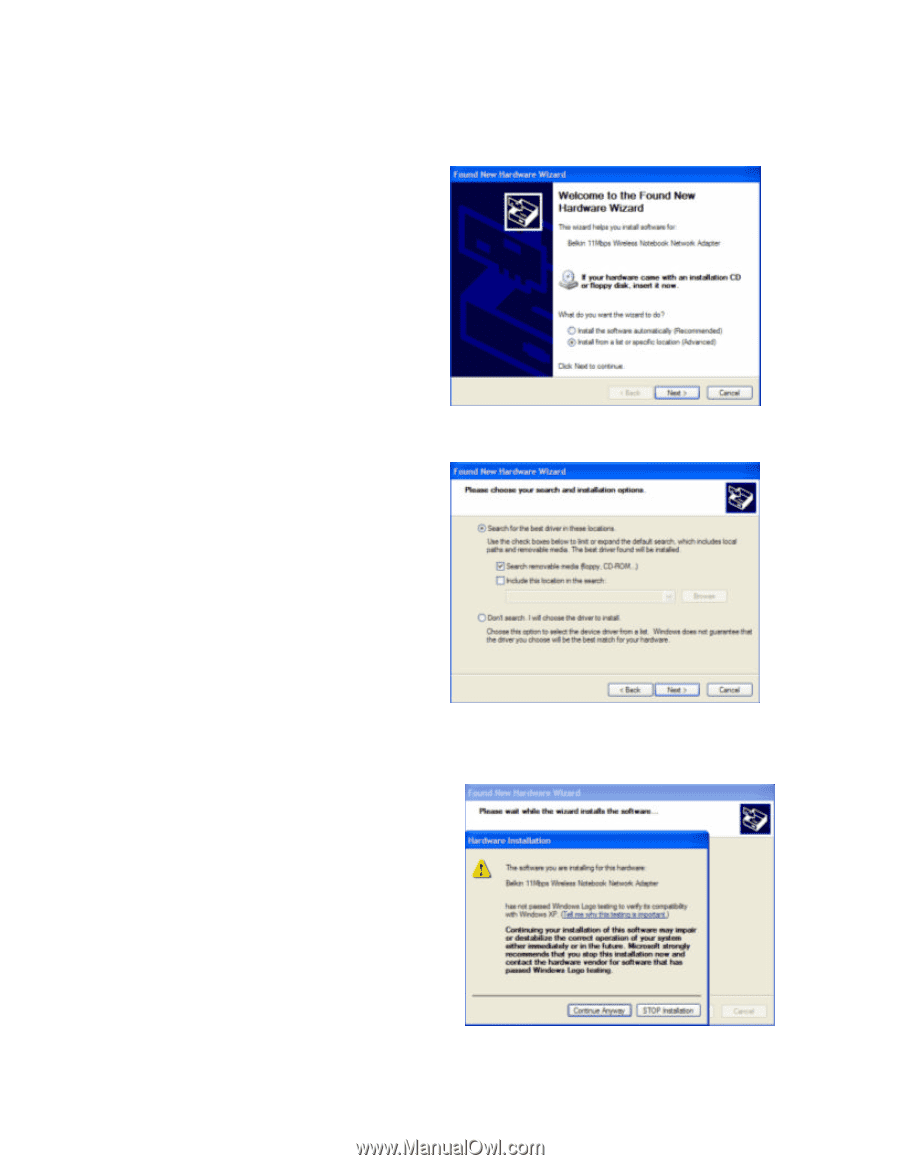
F5D6020 PCMCIA Wireless Notebook Network Adapter XP Installation
1.
Insert the PCMCIA card into you
Notebook PC. Turn on the power
to the PC. After Windows XP
starts up, the “Found New
Hardware Wizard” will begin.
Select “Install from a list or
specific location (Advanced)”.
Click “Next”
.
2.
The screen on the right will appear.
Make sure that the CD is inserted
into your CD-ROM drive and
check’ “Search removable media
(floppy, CD-ROM).
Click “Next”
.
3. The “Windows Logo Testing” screen
will appear.
This does not mean
there is a problem.
Click “Continue Anyway”
to
continue.