BenQ GL2450HM GL2450 Series User Manual
BenQ GL2450HM Manual
 |
View all BenQ GL2450HM manuals
Add to My Manuals
Save this manual to your list of manuals |
BenQ GL2450HM manual content summary:
- BenQ GL2450HM | GL2450 Series User Manual - Page 1
LCD Monitor User Manual GL950A / GL950AM G950A / G950AM GL951A / GL951AM / G951A G955A GL2250 / GL2250M / GL2250HM / GL2250TM G2250 / G2250HM G2255A / G2255 G2251M / G2251TM GL2450 / GL2450M / GL2450HM G2450 / G2450HM GL2750HM / G2750 / G2750HM - BenQ GL2450HM | GL2450 Series User Manual - Page 2
BenQ Corporation to notify any person of such revision or changes. Please follow these safety instructions for best performance, and long life for your monitor any kind into this product. Servicing Do not attempt to service this product yourself, as opening or removing covers may expose you to - BenQ GL2450HM | GL2450 Series User Manual - Page 3
and disposal of the products. BenQ ecoFACTS label lists key eco-friendly BenQ's CSR Website at http://csr.BenQ.com/ for more details on BenQ's environmental commitments and achievements. For GL950A / GL950AM / GL951A / GL951AM / GL2250 / GL2250M / GL2250HM / GL2250TM / GL2450 / GL2450M / GL2450HM - BenQ GL2450HM | GL2450 Series User Manual - Page 4
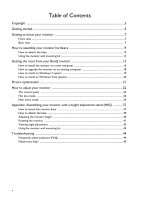
mode ...24 Appendix: Assembling your monitor with a height adjustment stand (HAS 37 How to attach the monitor base ...37 How to detach the base ...39 Adjusting the monitor height ...40 Rotating the monitor ...41 Viewing angle adjustment ...42 Using the monitor wall mounting kit 43 Troubleshooting - BenQ GL2450HM | GL2450 Series User Manual - Page 5
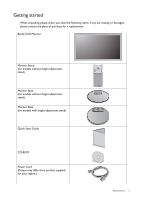
contact the place of purchase for a replacement. BenQ LCD Monitor Monitor Stand (for models without height adjustment stand) Monitor Base (for models without height adjustment stand) Monitor Base (for models with height adjustment stand) Quick Start Guide CD-ROM Power Cord (Picture may differ from - BenQ GL2450HM | GL2450 Series User Manual - Page 6
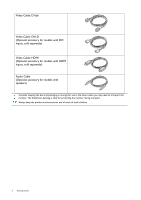
, sold separately) Video Cable: HDMI (Optional accessory for models with HDMI inputs, sold separately) Audio Cable (Optional accessory for models with speakers) Consider keeping the box and packaging in storage for use in the future when you may need to transport the monitor. The fitted foam packing - BenQ GL2450HM | GL2450 Series User Manual - Page 7
know your monitor Front view 1. Control buttons 1 2. Power button 2 Back view 3 3 3. Speakers (for models with speakers) 4. Input and output ports (vary by model, see Input and output ports on page 8) 5. Kensington lock slot 4 5 • Above diagram may vary depending on the model. • Picture may - BenQ GL2450HM | GL2450 Series User Manual - Page 8
Input and output ports Available input and output ports may vary depending on your purchased model. Models with HDMI inputs 1. AC power input jack 2. Audio Line In 1 23 4 5 6 Models with dual inputs and speakers 3. Headphone jack 4. HDMI socket 5. DVI-D socket 1 23 56 Models with analog- - BenQ GL2450HM | GL2450 Series User Manual - Page 9
(HAS), refer to Appendix: Assembling your monitor with a height adjustment stand (HAS) on page 37 for details on hardware installation. • If the computer is turned on you must turn it off before continuing. Do not plug-in or turn-on the power to the monitor until instructed to do so. • The following - BenQ GL2450HM | GL2450 Series User Manual - Page 10
If the screen size is 27 inches, follow the illustrations on the right to attach the monitor stand and the base. Gently attempt to pull them back apart to check that they have properly engaged. 2 1 4 5 3 You should position the monitor and angle the screen to minimize unwanted reflections from - BenQ GL2450HM | GL2450 Series User Manual - Page 11
the end with the ferrite filter) to the computer video socket. Tighten all finger screws to prevent the plugs from accidently falling out during use. To Connect the HDMI Cable Connect the plug of the HDMI cable to one of the two HDMI ports on the monitor. Connect the other end of the cable to the - BenQ GL2450HM | GL2450 Series User Manual - Page 12
supplied for your region. Turn on the monitor by pressing the power button on the right of the monitor. Turn on the computer too, and follow the instructions in Getting the most from your BenQ monitor on page 15 to install the monitor software. To extend the service life of the product, we recommend - BenQ GL2450HM | GL2450 Series User Manual - Page 13
the stand arm. 3. Remove the monitor stand. Insert a pointed object such as a screwdriver to the hole above the monitor stand arm, and then push the screwdriver against the release button inside the hole. Then pull the monitor stand backward away from the monitor. If the screen size is 27 inches - BenQ GL2450HM | GL2450 Series User Manual - Page 14
screen size is 27 inches, follow the illustration on the right to detach the monitor stand. In case you intend to use your monitor on the stand in the future, please keep the monitor base, monitor stand, and screws somewhere safe for future use. 2. Follow the instruction manuals of the wall mount - BenQ GL2450HM | GL2450 Series User Manual - Page 15
, click the Have Disk button, insert the BenQ LCD Monitor CD-ROM and select the appropriate monitor model. Further details and step-by-step instructions for either an automatic (new) or upgrade (existing) installation, see: • How to install the monitor on a new computer on page 16. • How to upgrade - BenQ GL2450HM | GL2450 Series User Manual - Page 16
How to install the monitor on a new computer This instruction details the procedure for selecting and installing the BenQ LCD Monitor driver software on a new computer which has never had a monitor driver installed before. This instruction is only suitable for a computer which has never been used - BenQ GL2450HM | GL2450 Series User Manual - Page 17
Driver files GL2750H G2750 G2750H GL2750HM G2750 G2750HM Suitable models Getting the most from your BenQ monitor 17 - BenQ GL2450HM | GL2450 Series User Manual - Page 18
an existing computer This instruction details the procedure for manually updating the existing monitor driver software on your Microsoft Windows computer. It is currently tested as compatible for Windows Vista and Windows 7 Operating System (OS). The BenQ LCD Monitor driver for your model may well - BenQ GL2450HM | GL2450 Series User Manual - Page 19
then the Properties button. 5. Click the Driver tab and the Update Driver button. 6. Insert the BenQ LCD Monitor CD-ROM into a CD drive on the computer. 7. In the Update Driver Software window, select the option Browse my computer for driver software. 8. Click Browse and navigate to the following - BenQ GL2450HM | GL2450 Series User Manual - Page 20
prompted User Account Control window. 5. Click the Driver tab and the Update Driver button. 6. Insert the BenQ LCD Monitor CD-ROM into a CD drive on the computer. 7. In the Update Driver Software window, select the option Browse my computer for driver software. 8. Click Browse and navigate to the - BenQ GL2450HM | GL2450 Series User Manual - Page 21
graphic card on your computer is set to the native resolution of the monitor when you use the AUTO key function. If you wish, you can always adjust the screen geometric settings manually using geometry menu items. To assist you in this endeavour, BenQ has provided a screen test image utility which - BenQ GL2450HM | GL2450 Series User Manual - Page 22
How to adjust your monitor The control panel For models without speakers 1 2 3 4 5 6 For models with speakers 1 2 3 4 5 6 1. Display. The hot keys will display a graduated scale for adjusting the value of that setting, and will only operate while the OSD menu is not currently displaying. Hot key - BenQ GL2450HM | GL2450 Series User Manual - Page 23
, Movie, Game, Photo, sRGB, and Eco. The setting will take effect immediately. See also Picture Mode on page 29. Input hot key (not available for analog-only models) Press the ENTER key to toggle between different PC video signal inputs that may be connected to your monitor. The setting will take - BenQ GL2450HM | GL2450 Series User Manual - Page 24
4. Audio (for models with Settings" for more details. For more information on each menu, please refer to the following pages: • Display menu on page 25 • Picture menu on page 27 • Picture Advanced menu on page 29 • Audio menu on page 32 • System menu on page 33 24 How to adjust your monitor - BenQ GL2450HM | GL2450 Series User Manual - Page 25
button. Item Function Operation Range Auto Adjustment Optimizes and adjusts the screen settings automatically for you. The AUTO key is a 'hot key' for connect a digital video output using a digital (DVI or HDMI) cable to your monitor, the AUTO key and the Auto Adjustment function will be - BenQ GL2450HM | GL2450 Series User Manual - Page 26
Item Phase Function Operation Adjusts the pixel clock phase timing to synchronize with the analog input video signal. Not applicable to a digital input signal. Press the or keys to adjust the value. Range 0 to 63 See also: Picture optimization on page 21. 26 How to adjust your monitor - BenQ GL2450HM | GL2450 Series User Manual - Page 27
Picture menu Available menu options may vary depending on the input sources, functions and settings. Menu options that are not available will become grayed out. 1. Press the MENU key to display Windows). the key to decrease the gamma value (tone becomes lighter). How to adjust your monitor 27 - BenQ GL2450HM | GL2450 Series User Manual - Page 28
to the factory defaults. Press the or keys to change the settings. • YES • NO Press MENU to leave the Color menu. AMA (for Improves the gray level models with response time of the LCD HDMI inputs) panel. Press the or keys to change the settings. • ON • OFF 28 How to adjust your monitor - BenQ GL2450HM | GL2450 Series User Manual - Page 29
Range Selects a picture mode that best suits the type of images shown on the screen. • Standard - for basic PC application. • Movie - for viewing videos. • Game - for playing video games. Press the or keys to • Standard change the settings. • Movie • Game • Photo • sRGB • Eco • Photo - for - BenQ GL2450HM | GL2450 Series User Manual - Page 30
the ENTER key to select this option. Press the or keys to change the settings. 0 to 5 This feature is provided to allow aspect ratios other than 16:9 or 16:10 (depending on the purchased model) to be displayed without geometric distortion. • Overscan - Slightly enlarges the input image. Use this - BenQ GL2450HM | GL2450 Series User Manual - Page 31
the or keys to change the settings. • RGB • YUV You might need to manually set the Color Format if colors shown on the monitor screen do not display properly. • DVI (for models with DVI inputs): Color Format is automatically set to RGB. • HDMI (for models with HDMI inputs): Color Format is not - BenQ GL2450HM | GL2450 Series User Manual - Page 32
the audio input Audio Select (for models with HDMI inputs) Allow users to select the audio source or let the monitor detect it automatically Operation Range Press the key to increase the volume and press the key to decrease the volume. 0 ~ 100 Press the or keys to • ON change the settings - BenQ GL2450HM | GL2450 Series User Manual - Page 33
to that appropriate to your video cable connection type. Analog-only models do not have the Input function. Press the or keys to change the settings. • DVI • D-sub (VGA) • HDMI (for models with HDMI inputs) OSD Settings - Press ENTER to enter the OSD Settings menu. How to adjust your monitor 33 - BenQ GL2450HM | GL2450 Series User Manual - Page 34
. Press the or keys • English to change the settings. • French • German • Italian • Spanish The Adjusts the horizontal Press the or keys 0 to 100 position of the OSD menu. to change the settings. Adjusts the vertical position of the OSD menu. 0 to 100 Adjusts the display time of the OSD - BenQ GL2450HM | GL2450 Series User Manual - Page 35
menu. DDC/CI* Allows the monitor settings to be set through the software on the PC. Press the ENTER key to select this option. Press the or keys to change the settings. • ON • OFF HDMI Auto Switch (for models with HDMI inputs) When this function is activated, HDMI port will be in the input - BenQ GL2450HM | GL2450 Series User Manual - Page 36
*DDC/CI, short for Display Data Channel/Command Interface, which was developed by Video Electronics Standards Association (VESA). DDC/CI capability allows monitor controls to be sent via the software for remote diagnostics. 36 How to adjust your monitor - BenQ GL2450HM | GL2450 Series User Manual - Page 37
Appendix: Assembling your monitor with a height adjustment stand (HAS) How to attach the monitor base • If the computer is turned on you must turn it off before continuing. Do not plug-in or turn-on the power to the monitor until instructed to do so. • The following illustrations are for your - BenQ GL2450HM | GL2450 Series User Manual - Page 38
want to adjust the monitor height. See Adjusting the monitor height on page 40 for more information. You should position the monitor and angle the screen to minimize unwanted reflections from other light sources. -5O~ +15O 38 Appendix: Assembling your monitor with a height adjustment stand (HAS) - BenQ GL2450HM | GL2450 Series User Manual - Page 39
on the upper part of the monitor stand and the other hand on the lower part of the stand as illustrated. 1. Prepare the monitor and area. Turn off the monitor and the power before unplugging the power cable. Turn off the computer before unplugging the monitor signal cable. Gently lift the display - BenQ GL2450HM | GL2450 Series User Manual - Page 40
upper or lower part of the height-adjustable stand or at the bottom of the monitor, as ascending or descending monitor might cause personal injuries. Keep children out of reach of the monitor while performing this operation. • If the monitor has been rotated to portrait mode and height adjustment - BenQ GL2450HM | GL2450 Series User Manual - Page 41
1. Pivot the display. Before rotating the monitor with a portrait viewing orientation, the display has to be rotated 90 degrees. Right-click the desktop and select Screen resolution from the popup menu. Select Portrait in Orientation, and apply the setting. Depending on the operating system on your - BenQ GL2450HM | GL2450 Series User Manual - Page 42
viewing angle. Viewing angle adjustment You may position the screen to the desired angle with -5° to +15° monitor tilt, 90° (left and right total) monitor swivel, and 110 mm monitor height. -5O~ +15O -45O ~ +45O 110 mm 42 Appendix: Assembling your monitor with a height adjustment stand (HAS) - BenQ GL2450HM | GL2450 Series User Manual - Page 43
of losing the screws. Then pull the monitor stand backward away from the monitor. In case you intend to use your monitor on the stand in the future, please keep the monitor base, monitor stand, and screws somewhere safe for future use. 3. Follow the instruction manuals of the wall mount bracket you - BenQ GL2450HM | GL2450 Series User Manual - Page 44
Troubleshooting Frequently asked questions (FAQ) The image is blurred: Read the instructions on the link "Adjusting the Screen Resolution" on the CD, and then select the correct resolution, refresh rate and make adjustments based on these instructions How do you use a VGA extension cable? Remove the - BenQ GL2450HM | GL2450 Series User Manual - Page 45
. The image is distorted, flashes or flickers: Read the instructions on the link "Adjusting the Screen Resolution" on the CD, and then select the correct resolution, refresh rate and make adjustments based on these instructions. You are running the monitor at its native resolution, but the image
-
 1
1 -
 2
2 -
 3
3 -
 4
4 -
 5
5 -
 6
6 -
 7
7 -
8
-
9
-
10
-
11
-
12
-
13
-
14
-
15
-
16
-
17
-
18
-
19
-
20
-
21
-
22
-
23
-
24
-
25
-
26
-
27
-
28
-
29
-
30
-
31
-
32
-
33
-
34
-
35
-
36
-
37
-
38
-
39
-
40
-
41
-
42
-
43
-
44
-
45
 |
 |

LCD Monitor
User Manual
GL950A / GL950AM
G950A / G950AM
GL951A / GL951AM / G951A
G955A
GL2250 / GL2250M / GL2250HM / GL2250TM
G2250 / G2250HM
G2255A / G2255
G2251M / G2251TM
GL2450 / GL2450M / GL2450HM
G2450 / G2450HM
GL2750HM / G2750 / G2750HM