Bernina 807 Manual
Bernina 807 Manual
 |
View all Bernina 807 manuals
Add to My Manuals
Save this manual to your list of manuals |
Bernina 807 manual content summary:
- Bernina 807 | Manual - Page 1
My BERNINA Guide 807 810 817 - Bernina 807 | Manual - Page 2
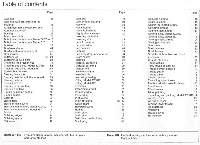
elastic seams Inserting the bobbin Inserting zips Lace in material Lace on tricot Lap hemmer Looping Lowering drop-feed control Lycra seams Marking Material gathering Material patching Monograms Needle position Needle table Normal gathering Oiling, Model 807/810 Oiling, Model 817 Overlock Patching - Bernina 807 | Manual - Page 3
thread tensioning incorporated in frame cover Winder self-releasing Motor power: 85 watts Sewing lamp (built-in) power: 15 watts Number of stitches approx. 1100 stitches/min. Weight of machine (807) approx. 8,1 kg Weight complete with carrying case (807) approx. 12,2 kg Important note - Bernina 807 | Manual - Page 4
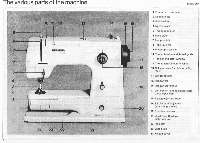
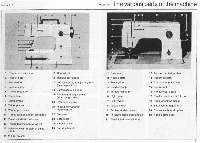
The various parts of the machine • rt 10 11 12 13 14 8 7 BERNINA 6 5 II 4 3 2 1 fl a4 24 23 22 21 2 Model 807 15 16 17 18 19 20 .0" 1 Free-arm cover-plate 2 Needle-plate 3 Presser-foot 4 Needle-clamp 5 Thread regulator 6 Face-plate 7 Lamp switch 8 Take-up lever 9 Winder pre-tension - Bernina 807 | Manual - Page 5
feed control 21 ,,Fast-Slow Sewing.> motor control 22 Free-arm 23 Base-plate 24 Hinged cover 25 Carrying handle 10 11 12 9 - 8 7 81580404A 8 4 .1, 1 14 15 1 17 18 1 Base-plate 2 Needle-plate 3 Sewing-foot 4 Needle-clamp 5 Thread regulator 6 Light cover 7 Light switch 8 Take-up lever 9 Bobbin - Bernina 807 | Manual - Page 6
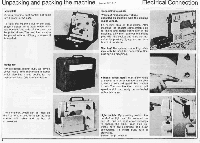
pressing lightly on the foot- board of the starter. ii -4 I> Warning! The special connecting cable may only be used for connecting Bernina sewing machines. Model 810 For protection against dust, we have a cover made from reenforced material, which also has a side pocket for the instruction book - Bernina 807 | Manual - Page 7
-free light can be switched on and off. Pull out light cover sideways to change the bulb. Press bulb upwards, turn anti-clockwise and draw downwards. To insert bulb, turn It clockwise. (Lamp: 15 Watt.) • l•r"Vip,&&.„ /MU 1 . : 7 tsorid Model 807, 810 Bobbin and Case Removing the bobbin case ii - Bernina 807 | Manual - Page 8
for sewing are numbers 80. 90 and 100 while those for darning are numbers 70 and 80. Open the hinged latch with thumb and forefinger of the left hand and remove the bobbin case. The insertion of the bobbin case Is carried out in the same manner. 6 The presser foot with the white plate is a Bernina - Bernina 807 | Manual - Page 9
pre-tensioning device (9) and from there - as shown In the picture - take to the mounted bobbin. Start motor with the foot starter. When the bobbin is full, the winding process stops automatically. Switch off motor, remove bobbin and push winder spindle back to left. Then re-tighten knurled screw on - Bernina 807 | Manual - Page 10
the needle thread slightly and the bobbin thread will come up through the 1needle hole. Pull both threads under the presser foot and lay them there sideways. Lowering the feed dog. The feed dog must be lowered for certain kinds of sewing, mainly when darning. Model 807 and 810 Darning. Turn knob (20 - Bernina 807 | Manual - Page 11
The sewing table Only model 807, 810 Removing work. It is essential to bring the take-up lever (8) into its highest position by use of the handwheel when sewing is finished. Raise presser foot by means of the lever at the back of the machine: this will release the top thread tension and the - Bernina 807 | Manual - Page 12
to the left. zag stitch. The knob may be moved while sewing but when the machine Is stationary only if the needle Is out of the material. Plain stitching The various plain stitches which can be sewn with the Bernina - Bernina 807 | Manual - Page 13
buttonholes -1 2 3 4 5 IV 0 .1 I,O - 11 VI - 3 01 tO BERNINA o t.s... Irma • I - 0- •7.1 6•71121INA a -- --0-- 0 --- b = Spacing from - center line a = Center 4 5 1 Buttonhole gauge 2 Ruler 3 Hem gauge The plastic gauge which fs enclosed with the accessories can be used as a ruler, as - Bernina 807 | Manual - Page 14
advise you to observe the following points: Place your Bernina far enough from the table edge (about 5 inches) for you to lean your left elbow on the table. Sit exactly in front of the needle bar. The mastering of your sewing depends only on how you guide the material. The basic rules are therefore - Bernina 807 | Manual - Page 15
19 IN In na la ut left centre right Straight stitch Reverse sewing Y. Stitch width: 0 For reserve sewing, move the stitch 12 3 1 123 4 0 I 22 4 Stitch length: 1-4 Needle position: centre Drop feed control: sewing length lever (19) upwards (where there are no numbers). The lever is - Bernina 807 | Manual - Page 16
to work and material. Finishing Edges Stitch width: 2'h-4 Stitch length: 1-2 Needle position: centre Automatic: zigzag WNWW (1) Drop feed control: sewing If you guide the work like this: From the front, close to the foot, fingers on the edge, you will easily get a neat finish. Zigzag - Bernina 807 | Manual - Page 17
Zigzag foot 000 Needle: 80-70 Embroidery thread: 30 0 I mom.. 2 3 -4 Automatic Pull lever 13 to right and set it next to desired pattern. When doing this do not leave the needle down in the material. Stitch width: 4 Stitch length: 1 Needle position: centre Drop feed control: sewing Paper - Bernina 807 | Manual - Page 18
foot 000 Needle: 80-70 Thread: 30 or 50 Hems for Jersey underwear Needle position: centre Automatic: zigzag WIMeM (1) Drop feed control: sewing guided easily. Important Hold the thread slightly taut while sew- / ing and the Jersey will not stretch so much. The Thread can also be guided - Bernina 807 | Manual - Page 19
centre Automatic: zigzag VWWvW (1) Drop feed control: sowing Baste the new piece on to the right side of the work, then sew it on, first Whenever possible make the patches in round shapes. with the zigzag just covering the edge. then a second time one presser foot width from the first seam. For - Bernina 807 | Manual - Page 20
on Jersey Seams on Jersey Needle position: centre Drop teed control: sewing Automatic: zigzag WNW/ (1) except for quick seam Quick seam pieces together leaving the double layer (gusset) protruding about Inch. Sew at one presser foot width from the Inner edge. 2nd run Stitch width 3: Stitch - Bernina 807 | Manual - Page 21
Crimplene, etc. Stitch width: 1-114/ Stitch length: /2--14/ Automatic: Stretch seam (5) Needle position: centre Drop feed control: On sewing Sew tacked seam (Lay the work under the presser foot in such a way that the somewhat wider zigzag stitch Is directed towards the cut edge.) Press seam - Bernina 807 | Manual - Page 22
foot 470 Needle: 80-70 Sewing thread: depeding on type of material 1 r The following point must be observed with overlock sewing: 19) Automatic unit: Needle position: Feed-dog: 4 (only) 1-1V: overlock (6) right at sew The overlock seam is used for sewing together and trimming. Warning: material - Bernina 807 | Manual - Page 23
Edgings 'Ig Zigzag foot 000 Needle: 80-70 Thread: 30 or 50 Shell Edging Stitch width: 4 Stitch length: 1 Needle position: centre Automatic: BlIndstitch I '% 7 I (2) Drop feed control: sewing Place folded edge to the left as for quick seam. Elastic Band Lace on Jersey Stitch width: 3 - Bernina 807 | Manual - Page 24
: about 1'h-2 Stitch length: about 'h- 1/2 Needle position: centre Automatic: zigzag VWWtAN (1) Drop feed control: sewing Prepare and press turnings. Sew zigzag over this pressed edge as for oversewing. (Guide work as for oversewing.) Finally trim away turnings. Hold scissors correctly. 23 - Bernina 807 | Manual - Page 25
: 30 Applying elastic thread Stitch width: Stitch length: Needle position: Automatic: Drop feed control : 2 2 centre zigzag 1NVVWW (1) sewing Thread the elastic through the hole in the embroidery foot and pull it while sewing. The more you pull the more it gathers. For a second row (one presser - Bernina 807 | Manual - Page 26
or 50 Basic Setting Stitch width: about 2'h Stitch length: about 214/ Needle position: right Drop feed control: sewing Automatic: Blindstitch n (2) Blind hem stitch V ) This Is how the work is placed under the foot. Adjust the zigzag so that the needle just catches the edge of the fold - Bernina 807 | Manual - Page 27
centre of the foot but only at the left hand swing of the needle. Needle position. left Place the basting line at the left side of the fool. (Holding Automatic: Blindstitch I V v I (2) the work taut from the front and rear ensures correct Drop feed control: sewing guiding.) The magic needle - Bernina 807 | Manual - Page 28
foot 033 Needle: 80-70 Thread: 30 or 50 For sewing a buttonhole, thread bottom cotton through hole in finger of bobbin case. Sew stitches for bar tack. It Is best to check the satin stitch spac- ing on a piece of spare material before Finishing off. Set zigzag on 0 and sew a starting to sew - Bernina 807 | Manual - Page 29
for the first bead. Finish first bead with needle in work end to right of the cord and lift foot. How to sew the buttonhole with reinforcing cord Set machine. Lower needle to the raised foot and make sure that it is In the centre. If not do one stitch by turning the hand - Bernina 807 | Manual - Page 30
Zigzag foot 000 Needle: 80-70 Thread: 50 Patching with running t- stitch Needle position. centre Drop feed control: sewing 1st run Stitch width: Stitch length: Automatic: Ph-2 1-11/i zigzag VWWWV (1) Do not cut off damaged part but baste the new patch on right side of work, and sew it on with - Bernina 807 | Manual - Page 31
foot 285 Needle: 80-70 Thread: 50 Darning material Stitch width: 0 Stitch length: 0 Automatic: straight stitch Drop feed control: lowered The quick mastering of this work depends on regular guiding movement. Take care not to get circles. Frequent thread breaking - work guided irregularly. - Bernina 807 | Manual - Page 32
Model 807 and 810 only Darning fine socks Small darning foot 285 Needle: 80-70 Thread: 50 Darning fine socks (also sleeves) Stitch width: 0 Stitch length: 0 Automatic: straight stitch (0) Needle position: centre Drop feed control: lowered It is obvious here that we do the 1st stitch run - Bernina 807 | Manual - Page 33
how to use it. This modern machine has an enormous potential. The second half of your Bernina book describes supplementary jobs that can be carried out on the Bernina. Some of them require extra accessories which are provided against additional sost. Your Bernina dealer will be glad to help. 32 - Bernina 807 | Manual - Page 34
Drop feed control: lowered Thread machine with matching thread. Lay the wool in the slot of the presser foot. The wool will then be guided Cut the wool at the presser foot. Hold work again as before. Now sew across the new wool threads with zigzag. The Model 807, 810 only zigzag rows should - Bernina 807 | Manual - Page 35
foot can be used for button sewing. However• those who sew buttons on often will find the button presser foot sew over it. for light weight materials. To finish (Add a few more stitches than usual.) anitli,11 01 e`i;, ; ; Lower drop feed control and set ma- raise needle. Set zigzag to 0 and sew - Bernina 807 | Manual - Page 36
position: according to side set left or right Drop feed control sewing 142 t' • 3 .1 Inserting zips Ttirlise; tityq 14 i • ti ti Nro 1.1 i1ili ti itre .0)1. ht t The zip is basted in by short stitches so that the teeth are entirely covered by the material. Open the zip before you sow - Bernina 807 | Manual - Page 37
between the tension discs. Automatic: zigzag VVVVVWV (1) Needle position: centre Drop feed control: sewing Draw thread to the rear under the pres- Pull both sides of the material gently ser foot. Before starting to sew always apart and cut through the threads. lay the thread sideways under the - Bernina 807 | Manual - Page 38
ormormroymmn Mark the corners th R1111111O11 and the Gaits like this tiP lli ti ii tra , Tailor tacking k. IP* t tIt V41%, x or vemottils'40 is se •;,,,..fr 4 t r it e? lic . PP, 41. ITf s 37 - Bernina 807 | Manual - Page 39
Stitch width: 0 Stitch length: 112/ -2 Automatic: straight stitch Needle position: centre Drop feed control: sewing To begin sewing: Fold edge of fabric twice (not too wide). Lay work under the (0) presser foot and sew a few stitches. I The corners: These are sewn in two stages as follows - Bernina 807 | Manual - Page 40
under the needle. Stick the needle In and lower foot. Shell hemmer 168 Needle: 80-70 Mercerised sewing thread No. 50 Stitch width. 4 Stitch length: 2,12-3 Automatic: zigzag WNVWV (1) Needle position: centre Drop feed control: sewing Use the same method as for normal hemming. To facilitate - Bernina 807 | Manual - Page 41
Drop feed control: sewing First operation: Pin both pieces of fabric together so that the piece underneath projects by 3 mm ('/e). Fold overlapping piece over the top piece and slide it under the presser foot. Sew a few stitches. Leave needle In the fabric. lift presser foot and guide fabric - Bernina 807 | Manual - Page 42
position: centre Drop feed control: sewing The flat piece of material Is inclined to slip out of the slot. In order to avoid this the work should be guided as shown in the material to be gathered always lies under the foot and the flat piece In the slot. The Gatherer • a . r• - 071•10 • 41 - Bernina 807 | Manual - Page 43
feed control: sewing Guiding with the frame: The left hand Guiding without frame: -You can only Working sequence must hold the frame steady, because guide the work it it is held lightly." often the frame is guided during sew- Nevertheless, It is essential to hold the Preparation: Trace design - Bernina 807 | Manual - Page 44
care- stitch, raising the presser foot and be oversewn. fully continue sewing. turning the work slightly. Curves: Using the same method as for blunt corners. Muill-coloured applique work 2. Trim away surplus applique mate- 3. When covering the contours leave The lower part: rial, cutting as - Bernina 807 | Manual - Page 45
the line drawn to assist you. c) Raise foot, turn work and turn zigzag to 0. Lower foot again. Make sure that the design appears once again in the slot that runs lengthwise. d) During sewing turn the zigzag again slowly onto 4; sew slowly! Note: The machine feeds in a straight line and not in curves - Bernina 807 | Manual - Page 46
foot and sew further three stit- Stitch width: 112/ ches. Raise drop feed control and con- Stitch length: 12/ Now completely cover the first satin tinue sewing with zigzag. At the same time guide through pearl cord (No.8 three- to five-ply) taking care that it nei- ; I ther slides over nor under the - Bernina 807 | Manual - Page 47
Double needle Embroidery foot 030 Thread: Embroidery thread: No. 30 or 50 ( Double needle When - sion disc. ent colours. Adjustment Automatic: As desired Needle position: centre Drop feed control: Sewing Double needle Stitch width: 212/ Stitch length: 14/ -1 (according to pattern) - Bernina 807 | Manual - Page 48
: about 112/ Automatic: straight stitch Needle position: centre Drop feed control: sewing The gimp Is threaded like this: model 807, 810 (0) To sew pintucks, 2 top threads are needed (for double needle). When threading the machine take care that the two threads are ont twisted together, but - Bernina 807 | Manual - Page 49
y.4 I CO 7 • I. Embroidery foot 030 Ivry Needle: Single hemstitch needle Thread: Embroidery thread No. 30 or 50 Single hemstitch needle Adjustment Stitch width: Stitch length: Needle position: Automatic: Drop feed control: 2 1 centre zigzag VVWVWV (1) Sewing ti Cr)i) c :42 r. Ruche - Bernina 807 | Manual - Page 50
. 50 Double hemstitch needle Automatic: 0 Needle position: centre Drop feed control: Sewing Ordinary Hemstitching Stitch width: 0 Stitch length: 13/• Automatic: straight stitch (0) Sew first hemstitch row of embroidery, raise needle and foot, turn work. Put wide needle in the first hole of - Bernina 807 | Manual - Page 51
the work is to be carried out without a foot. Important: Lower the foot lever Just the same as usual, otherwise the Guiding the work top thread tension will remain open and unattractive work will result. If the botton thread is drawn through the linger of the bobbin case the work Bold frame as - Bernina 807 | Manual - Page 52
low quality oil can block the a) the bottom thread tension is too tight: movement. The machine must be dis- b) bobbin is crushed and jammed in mantled and cleaned. Call Bernina the bobbin case; dealer; c) needle hole in throat plate is dam- d) machine has been standing in a aged by the needle - Bernina 807 | Manual - Page 53
under the needle plate and around the hook. The cover plate of the free arm should be removed from time to time so that the sewing fluff can be cleaned away. 'N I. Cleaning and oiling the hook. Remove After cleaning pour a few drops of oil bobbin case. With the forefinger of the into the shuttle - Bernina 807 | Manual - Page 54
of danger (danger of injury to fingers). The sewing machine should be disconnected from the power supply by pulling out the plug from the socket when changing the light bulb, the needle, presser foot, bobbin or needle plate, when stopping work without supervision and during servicing (cleaning). - Bernina 807 | Manual - Page 55
of danger (danger of injury to fingers). The sewing machine should be disconnected from the power supply by pulling out the plug from the socket when changing the light bulb. the needle. presser fool, bobbin or needle plate. when stopping work without supervision and during servicing (cleaning). - Bernina 807 | Manual - Page 56
Remarks Bernina Dealer's notes regarding Instructions, home calls and possible guarantee work Date Notes Subject to changes in design from those shown in text and illustrations. 55 - Bernina 807 | Manual - Page 57
Address of my Bernina agency: Genuine Bernina Parts BOOK. M.B.G. 807 ENGLISH Reorder tf 39010203 11 1 0 1 1 111 Loc WAL 16 070300
-
 1
1 -
 2
2 -
 3
3 -
 4
4 -
 5
5 -
 6
6 -
 7
7 -
8
-
9
-
10
-
11
-
12
-
13
-
14
-
15
-
16
-
17
-
18
-
19
-
20
-
21
-
22
-
23
-
24
-
25
-
26
-
27
-
28
-
29
-
30
-
31
-
32
-
33
-
34
-
35
-
36
-
37
-
38
-
39
-
40
-
41
-
42
-
43
-
44
-
45
-
46
-
47
-
48
-
49
-
50
-
51
-
52
-
53
-
54
-
55
-
56
-
57
 |
 |
My
BERNINA
Guide
807
810
817