Biostar TA780G M2 Setup Manual
Biostar TA780G M2 Manual
 |
View all Biostar TA780G M2 manuals
Add to My Manuals
Save this manual to your list of manuals |
Biostar TA780G M2 manual content summary:
- Biostar TA780G M2 | Setup Manual - Page 1
TA780G M2+ Setup Manual FCC Information and Copyright This equipment has been tested and found instructions, may cause harmful interference to radio communications. There is no guarantee that interference will not occur in a particular installation. The vendor makes no representations or warranties - Biostar TA780G M2 | Setup Manual - Page 2
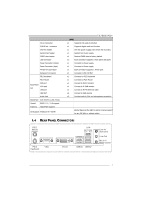
How RAID Works 19 Chapter 5: T-Series BIOS & Software 22 5.1 T-Series BIOS 22 5.2 T-Series Software 30 Chapter 6: Useful Help 33 6.1 Driver Installation Note 33 6.2 AMI BIOS Beep Code 34 6.3 Extra Information 34 6.4 Troubleshooting 35 Appendencies: SPEC In Other Language 36 - Biostar TA780G M2 | Setup Manual - Page 3
Serial ATA Power Cable X 1 Rear I/O Panel for ATX Case X 1 User's Manual X 1 Fully Setup Driver CD X 1 FDD Cable X 1 (optional) USB 2.0 Cable X1 (optional) S/PDIF out Cable X 1 (optional) DVI to HDMI Adapter X 1 (optional) Note: The package contents may differ by area or your motherboard version. 1 - Biostar TA780G M2 | Setup Manual - Page 4
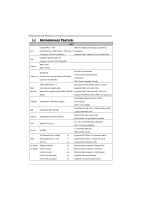
Motherboard Manual 1.3 MOTHERBOARD FEATURES SPEC Socket AM2+ / AM2 AMD 64 Architecture enables 32 and 64 bit CPU AMD Athlon 64 / Athlon 64 FX / Athlon 64 x2 computing / Sempron / Phenom processors Supports Hyper Transport 3.0 and Cool=n=Quiet Support HyperTransport 3.0 FSB Supports up to - Biostar TA780G M2 | Setup Manual - Page 5
(L) Special RAID 0 / 1 / 1+0 support Features HyperFlash support OS Support Windows XP / VISTA TA780G M2+ SPEC x1 Supports CD audio-in function x1 Supports digital audio out function x1 CPU Fan power supply (with Smart Fan function) x1 System Fan Power supply x1 Restore CMOS data to - Biostar TA780G M2 | Setup Manual - Page 6
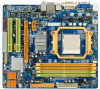
Motherboard Manual 1.5 MOTHERBOARD LAYOUT JKBMS1 JATXPWR2 JCFAN 1 JATXPWR1 Socket AM2+ DVI VGA DIMMA1 DIMMB1 DIMMA2 DIMMB2 JUSB1 JPRNT1 FDD1 JSFAN1 JUSB4 AMD SB700 SATA5 SATA6 SATA3 JUSB3 JUSB2 SATA1 JCMOS1 JUSBV2 SATA2 JPANEL1 BIOS Note: ■ represents the 1st pin. 4 SATA4 - Biostar TA780G M2 | Setup Manual - Page 7
TA780G M2+ CHAPTER 2: HARDWARE INSTALLATION 2.1 INSTALLING CENTRAL PROCESSING UNIT (CPU) Step 1: Remove the socket protection cap. Step 2: Pull the white triangle on socket, and the gold triangle on CPU should point towards this white triangle. The CPU will fit only in the correct orientation. 5 - Biostar TA780G M2 | Setup Manual - Page 8
Motherboard Manual Step 4: Hold the CPU down firmly, and then close the lever toward direct B to complete the installation. Step 5: Put the CPU Fan on the CPU and buckle it. Connect the CPU FAN power cable to the JCFAN1. This completes the installation. Note: Please update the BIOS to the latest - Biostar TA780G M2 | Setup Manual - Page 9
TA780G M2+ 2.2 FAN HEADERS These fan headers support cooling-fans built in the computer. The fan cable and connector may be different according to the fan manufacturer. Connect the fan cable to the connector while matching the black wire to pin#1. JCFAN1: CPU Fan Header 4 1 Pin Assignment 1 - Biostar TA780G M2 | Setup Manual - Page 10
DIMMA1 DIMMB1 DIMMA2 DIMMB2 Motherboard Manual 2.3 INSTALLING SYSTEM MEMORY A. Memory Modules 1. Unlock a DIMM slot by pressing the retaining clips outward. Align a DIMM on the slot such that the notch on the DIMM matches the break - Biostar TA780G M2 | Setup Manual - Page 11
256MB/512MB/1GB/2GB DIMMB2 256MB/512MB/1GB/2GB TA780G M2+ Total Memory Size Max is 8GB. C. Dual Channel Memory installation To trigger the Dual Channel function of the motherboard, the memory module must meet the following requirements: Install memory module of the same density in pairs, shown - Biostar TA780G M2 | Setup Manual - Page 12
Motherboard Manual 2.4 CONNECTORS AND SLOTS FDD1: Floppy Disk Connector The motherboard provides a standard floppy disk connector that supports 360K, 720K, 1.2M, 1.44M and 2.88M floppy disk types. This connector supports the provided floppy drive ribbon cable. 2 34 1 33 IDE1: Hard Disk - Biostar TA780G M2 | Setup Manual - Page 13
TA780G M2+ PEX16_1: PCI-Express up to 500MB/s per direction; 1GB/s in total. - PCI-Express Gen2 supports a raw bit-rate of 5.0Gb/s on the data pins. - 2X bandwidth . PEX1_1 PEX16_1 PCI1~PCI2: Peripheral Component Interconnect Slots This motherboard is equipped with 2 standard PCI slots. PCI stands for - Biostar TA780G M2 | Setup Manual - Page 14
Motherboard Manual CHAPTER 3: HEADERS & JUMPERS SETUP 3.1 HOW TO SETUP JUMPERS The illustration shows how to set up jumpers. When the jumper cap is placed on pins, the jumper is "close", if not, that means - Biostar TA780G M2 | Setup Manual - Page 15
TA780G M2+ JATXPWR1: ATX Power Source Connector This connector allows user to Voltage+5V 10 +12V 11 +12V 12 +3.3V JATXPWR2: ATX Power Source Connector By connecting this connector, it will provide +12V to CPU power circuit. 4 3 12 Pin Assignment 1 +12V 2 +12V 3 Ground 4 Ground 13 - Biostar TA780G M2 | Setup Manual - Page 16
Motherboard Manual JUSB2/JUSB3/JUSB4: Headers for USB 2.0 Ports at Ground 9 NC 10 Key SATA1~SATA6: Serial ATA Connectors The motherboard has a PCI to SATA Controller with 6 channels SATA interface, it satisfies the SATA 2.0 spec and with transfer rate of 3.0Gb/s. SATA5 SATA6 SATA3 SATA4 SATA1 - Biostar TA780G M2 | Setup Manual - Page 17
TA780G M2+ JSPDIF_OUT1: Digital Audio-out Connector This connector allows user to connect the PCI bracket SPDIF output header. Pin Assignment 1 +5V 2 SPDIF_OUT 3 Ground 13 JAUDIOF1: Front - Biostar TA780G M2 | Setup Manual - Page 18
on pin2-3, it allows user to restore the BIOS safe setting and the CMOS data, please carefully follow the procedures to avoid damaging the motherboard. 13 Pin 1-2 Close: Normal Operation (default). 13 13 Pin 2-3 Close: Clear CMOS data. ※ Clear CMOS Procedures: 1. Remove AC power line. 2. Set the - Biostar TA780G M2 | Setup Manual - Page 19
: Printer Port Connector This header allows you to connector printer on the PC. 2 1 TA780G M2+ 25 Pin Assignment 1 -Strobe 2 -ALF 3 Data 0 4 -Error 5 Data 24 Ground 25 SCLT 26 Key JCOM1: Serial port Connector The motherboard has a Serial Port Connector for connecting RS-232 Port. Pin - Biostar TA780G M2 | Setup Manual - Page 20
Motherboard Manual JUSBV1/JUSBV2: Power Source Headers for USB Ports Pin 1-2 Close: JUSBV1: +5V for USB ports at JUSB1/JUSBLAN1. JUSBV2: +5V for USB ports at front - Biostar TA780G M2 | Setup Manual - Page 21
TA780G M2+ CHAPTER 4: RAID FUNCTIONS 4.1 OPERATION SYSTEM z Supports Windows XP Home/Professional Edition, and Windows Vista. 4.2 RAID ARRAYS RAID supports the following types of RAID arrays: RAID 0: RAID 0 defines a disk striping scheme that improves disk read and write times for many applications. - Biostar TA780G M2 | Setup Manual - Page 22
Motherboard Manual RAID 1: Every read and write is actually carried out in parallel across can be applied for high-availability solutions, or as a form of automatic backup that eliminates tedious manual backups to more expensive and less reliable media. Features and Benefits - Drives: Minimum 2, and - Biostar TA780G M2 | Setup Manual - Page 23
TA780G M2+ RAID 1+0: RAID 1 drives can be stripped using RAID 0 techniques. Resulting in a RAID 1+0 solution for improved resiliency, performance and rebuild performance. Features and Benefits - Drives: Minimum 4, - Biostar TA780G M2 | Setup Manual - Page 24
Motherboard Manual CHAPTER 5: T-SERIES BIOS & SOFTWARE 5.1 T-SERIES BIOS T-Series BIOS Features Overclocking Navigator Engine (O.N.E.) Memory Integration Test (M.I.T., under Overclock Navigator Engine) BIO-Flasher: Update BIOS file from USB Flash Drive or FDD Self Recovery System (S.R.S) Smart Fan - Biostar TA780G M2 | Setup Manual - Page 25
TA780G M2+ Manual Overclock System (M.O.S.) MOS is designed for experienced overclock users. It allows users to customize personal overclock settings. Main Advanced PCIPnP BIOS SETUP UTILITY Boot Chipset T-Series Exit T-Series Settings WARNING: Setting wrong values in below sections may - Biostar TA780G M2 | Setup Manual - Page 26
PCIPnP BIOS SETUP UTILITY Boot Chipset T-Series Exit T-Series Settings WARNING: Setting wrong values in below sections may cause system to malfunction. OverClock Navigator [Normal] =========== Automate OverClock System =========== Auto OverClock System [V6-TOepcthionEsngine] Manual - Biostar TA780G M2 | Setup Manual - Page 27
V6 Tech Engine This engine will make a good over-clock performance. Main Advanced PCIPnP BIOS SETUP UTILITY Boot Chipset T-Series TA780G M2+ Exit T-Series Settings WARNING: Setting wrong values in below sections may cause system to malfunction. OverClock Navigator [Automate OverClock] - Biostar TA780G M2 | Setup Manual - Page 28
Motherboard Manual Notices: 1. Not all types of AMD CPU perform above overclock setting ideally; the difference will be based on the selected CPU model. B. Memory Integration Test (M.I.T.) This function is under "Overclocking Navigator Engine" item. MIT allows users to test memory - Biostar TA780G M2 | Setup Manual - Page 29
TA780G M2+ C. BIO-Flasher BIO-Flasher is a BIOS flashing utility providing you an easy and simple way to update your BIOS via USB pen drive or floppy disk. The BIO-Flasher is built in the BIOS chip. To enter the utility, press during the Power-On Self Tests (POST) procedure while booting up. - Biostar TA780G M2 | Setup Manual - Page 30
Motherboard Manual D. Self Recovery System (S.R.S.) This function can't be seen under BIOS setup; and is always on whenever the system starts up. However, it can prevent system hang-up due to inappropriate overclock actions. When the system hangs up, S.R.S. will automatically log in the default BIOS - Biostar TA780G M2 | Setup Manual - Page 31
TA780G M2+ Smart Fan Calibration Choose this item and then the BIOS will automatically test and detect the CPU/System fan functions and show CPU/System fan speed. Control Mode This item provides several operation modes of the fan. Fan Ctrl OFF(℃) If the CPU/System temperature is lower than the set - Biostar TA780G M2 | Setup Manual - Page 32
Motherboard Manual 5.2 T-SERIES SOFTWARE Installing T-Series Software 1. Insert the Setup CD to the optical drive. The drivers installation program Follow the on-screen instructions to complete the installation. Launching T-Series Software After the installation process, you will see the software - Biostar TA780G M2 | Setup Manual - Page 33
TA780G M2+ eHot-Line (Optional) eHot-Line is a convenient utility that helps you to contact with our Tech-Support system. This utility will collect the system information which is useful for analyzing the problem you may have encountered, and then send these information to our tech-support - Biostar TA780G M2 | Setup Manual - Page 34
Motherboard Manual Enter the file name and then click "Save". Your system information will be saved to a .txt file. Open the saved .txt file, you will see your system information including motherboard/BIOS/CPU/video/ device/OS information. This information is also concluded in the sent mail. We will - Biostar TA780G M2 | Setup Manual - Page 35
USEFUL HELP TA780G M2+ 6.1 DRIVER INSTALLATION NOTE After you installed your operating system, please insert the Fully Setup Driver CD into your optical drive and install the driver for better system performance. You will see the following window after you insert the CD The setup guide will auto - Biostar TA780G M2 | Setup Manual - Page 36
Motherboard Manual 6.2 AMI BIOS BEEP CODE Beep Sound Meaning One short beep VGA detected Quick boot set to disabled No keyboard detected One long beep followed by two short No memory detected beeps then a pause One long beep followed by three short No VGA detected beeps One long beep - Biostar TA780G M2 | Setup Manual - Page 37
TA780G M2+ 6.4 TROUBLESHOOTING Probable Solution 1. No power to the system at all 1. Make sure power cable is Power light don't illuminate, fan securely plugged in. inside power supply does not turn 2. Replace cable. on. 3. Contact technical support. 2. Indicator light on keyboard does - Biostar TA780G M2 | Setup Manual - Page 38
Motherboard Manual APPENDENCIES: SPEC IN OTHER LANGUAGE GERMAN Spezifikationen Sockel AM2+ / AM2 Die AMD 64-Architektur unterstützt eine 32-Bit- und CPU AMD Athlon 64 / Athlon 64 FX / Althlon 64 64-Bit-Datenverarbeitung X2 / Sempron / Phenom Prozessoren Unterstützt Hyper Transport 3.0 und - Biostar TA780G M2 | Setup Manual - Page 39
CD Audio-In-Funktion S/PDIF- Ausgangsanschluss x1 Unterstützt die digitale Audioausgabefunktion Onboard-Ans CPU-Lüfter-Sockel chluss System-Lüfter-Sockel CPU-Lüfterstromversorgungsanschluss (mit Smart x1 Fan-Funktion) x1 System-Lüfter-Stromversorgungsanschluss "CMOS XP / VISTA tzung Biostar - Biostar TA780G M2 | Setup Manual - Page 40
Motherboard Manual FRANCE SPEC Socket AM2+ / AM2 L'architecture AMD 64 permet le calcul 32 DDR2 533 / 667 / 800 Capacité mémoire maximale de 8 Go Prend en charge la DDR2 1066 (for AM2+ CPU only) Chaque DIMM prend en charge des DDR2 Les DIMM à registres et DIMM avec code correcteurs de 256/512 Mo - Biostar TA780G M2 | Setup Manual - Page 41
TA780G M2+ SPEC Connecteur du panneau avant x1 Prend en charge les équipements du panneau avant Connecteur Audio du panneau avant x1 Prend en charge la fonction audio du panneau avant Connecteur d'entrée CD x1 Prend en charge la fonction d'entrée audio de CD Connecteur de sortie S/PDIF x1 - Biostar TA780G M2 | Setup Manual - Page 42
Motherboard Manual ITALIAN SPECIFICA Socket AM2+ / AM2 L'architettura AMD 64 abilita la co mputazione 32 CPU Processori AMD Athlon 64 / Athlon 64 FX e 800 principale Ciascun DIMM supporta DDR2 Supporto di DDR2 1066 (for AM2+ CPU only) 256/512MB e 1GB/2GB DIMM registrati e DIMM ECC non sono - Biostar TA780G M2 | Setup Manual - Page 43
TA780G M2+ SPECIFICA Connettore audio frontale x1 Supporta la funzione audio pannello frontale Connettore CD-in x1 Supporta la funzione input audio CD Connettore output SPDIF x1 Supporta la funzione d'output audio digitale Collettore ventolina CPU Alimentazione ventolina CPU (con funzione - Biostar TA780G M2 | Setup Manual - Page 44
Motherboard Manual SPANISH Especificación La arquitectura AMD 64 permite el procesado de 32 y Conector AM2+ / AM2 64 bits CPU Soporte los Modos PIO 0~4, SATA Controlador ATA Serie Integrado Tasas de transferencia de hasta 3 Gb/s. Compatible con la versión SATA 2.0. Red Local Realtek - Biostar TA780G M2 | Setup Manual - Page 45
TA780G M2+ Especificación Conector de panel frontal X1 Soporta instalaciones en el panel frontal Conector de sonido frontal X1 Soporta funciones de sonido en el panel frontal Conector de entrada de CD X1 Soporta función de entrada de sonido de CD Windows XP / VISTA operativo Biostar se - Biostar TA780G M2 | Setup Manual - Page 46
Motherboard Manual PORTUGUESE ESPECIFICAÇÕES A arquitectura AMD 64 permite uma computação de Socket AM2+ / AM2 32 e 64 bits CPU Processadores AMD transmissão de dados até 3 Gb/s. Compatibilidade com a especificação SATA versão 2.0. LAN Realtek RTL 8111C Auto negociação de 10 / 100 / - Biostar TA780G M2 | Setup Manual - Page 47
TA780G M2+ ESPECIFICAÇÕES Conector de áudio frontal x1 Suporta a função de áudio no painel frontal Conector para entrada de CDs x1 Suporta a entrada de áudio a partir de CDs Conector de saída S/PDIF x1 Suporta a saída de áudio digital Conector da ventoinha da CPU Alimentação da ventoinha da - Biostar TA780G M2 | Setup Manual - Page 48
Motherboard Manual POLISH SPEC Socket AM2+ / AM2 Architektura AMD 64 umożliwia przetwarzanie 32 i 64 / 667 / 800 główna Każde gniazdo DIMM obsługuje moduły Obsługa DDR2 1066 (for AM2+ CPU only) 256/512MB oraz 1GB/2GB DDR2 Brak obsługi Registered DIMM oraz ECC DIMM Super I/O ITE 8718F - Biostar TA780G M2 | Setup Manual - Page 49
TA780G M2+ SPEC Złącze panela przedniego x1 Obsługa elementów panela przedniego Przednie złącze audio x1 Obsługa funkcji audio na panelu przednim Złącze wejścia CD x1 Obsługa funkcji wejścia audio CD HyperFlash Obsluga systemu Windows XP / VISTA operacyjne go Biostar zastrzega sobie prawo - Biostar TA780G M2 | Setup Manual - Page 50
Motherboard Manual RUSSIAN СПЕЦ CPU AM2+ / AM2 ный AMD Athlon 64 / Athlon 64 FX / Althlon 64 256/512МБ & 1ГБ/2ГБ DDR2 DDR2 DDR2 533 / 667 / 800 DDR2 1066 (for AM2+ CPU only DIMM and ECC DIMM Super I/O ITE 8718F Super I/O. ITE "Smart Guardian AMD 780G 512 DX10 - Biostar TA780G M2 | Setup Manual - Page 51
TA780G M2+ СПЕЦ SATA x6 1 SATA x1 x1 CD x1 S/PDIF x1 x1 x1 CMOS x1 USB x3 24 вывод) x1 4 вывод) x1 x1 x1 CD 2 USB 1 PS/2 x1 Мышь PS/2 x1 Задняя Порт VGA x1 панель Порт LAN x1 USB-порт x4 - Biostar TA780G M2 | Setup Manual - Page 52
Motherboard Manual ARABIC 32و 64ﺑﺖAMD 64 Cool'n'Quietو Hyper Transport 3.0 AM2+ / 667 / 533 DDR2 8 1066 DDR2 256/512 DDR2 DIMM )(DDR2 1066 is for AM2+ CPU only 1و 2 ECC DIMM 512 DX10 AMD 780G HDCP / UVD Ultra - Biostar TA780G M2 | Setup Manual - Page 53
Smart Fan USB Biostar TA780G M2+ 1 1 1 CD-IN 1 S/PDIF 1 1 1 CMOS 3 USB 1 24 1 4 1 1 1 PS/2 1 PS/2 1 VGA 1 4 SBU - Biostar TA780G M2 | Setup Manual - Page 54
Motherboard Manual JAPANESE 仕様 AMD 64 32ビットと64 Socket AM2+ / AM2 能です CPU AMD Athlon 64 / Athlon 64 FX / Althlon 64 3.0 800 リ 各DIMMは 256/512MB & 1GB/2GB DDR2 DDR2 1066 for AM2+ CPU only) 登録済みDIMMとECC DIMM Super I/O ITE 8718F Super I/O H/Wモニター ITE AMD 780G - Biostar TA780G M2 | Setup Manual - Page 55
CMOS USBコネクタ 24ピン) 4ピン) PS/2 PS/2マウス I/O VGAポート LANポート USBポート DVIポート 215 mm (幅) X 244 mm (高さ) 特殊機能 RAID 0 / 1 / 1+0 HyperFlash OS Windows XP / VISTA TA780G M2+ 仕様 x1 x1 x1 CD x1 x1 CPU x1 x1 2 USB x3 ます x1 x1 x1 1 x1 x1 x1 x1 x1 x4 x3 x1 Biostar
-
 1
1 -
 2
2 -
 3
3 -
 4
4 -
 5
5 -
 6
6 -
 7
7 -
8
-
9
-
10
-
11
-
12
-
13
-
14
-
15
-
16
-
17
-
18
-
19
-
20
-
21
-
22
-
23
-
24
-
25
-
26
-
27
-
28
-
29
-
30
-
31
-
32
-
33
-
34
-
35
-
36
-
37
-
38
-
39
-
40
-
41
-
42
-
43
-
44
-
45
-
46
-
47
-
48
-
49
-
50
-
51
-
52
-
53
-
54
-
55
 |
 |

TA780G M2+ Setup Manual
FCC Information and Copyright
This equipment has been tested and found to comply with the limits of a Class
B digital device, pursuant to Part 15 of the FCC Rules. These limits are designed
to provide reasonable protection against harmful interference in a residential
installation. This equipment generates, uses, and can radiate radio frequency
energy and, if not installed and used in accordance with the instructions, may
cause harmful interference to radio communications. There is no guarantee
that interference will not occur in a particular installation.
The vendor makes no representations or warranties with respect to the
contents here and specially disclaims any implied warranties of merchantability
or fitness for any purpose. Further the vendor reserves the right to revise this
publication and to make changes to the contents here without obligation to
notify any party beforehand.
Duplication of this publication, in part or in whole, is not allowed without first
obtaining the vendor’s approval in writing.
The content of this user’s manual is subject to be changed without notice and
we will not be responsible for any mistakes found in this user’s manual. All the
brand and product names are trademarks of their respective companies.