Bissell PowerForce® Compact Vacuum User Guide
Bissell PowerForce® Compact Vacuum Manual
 |
View all Bissell PowerForce® Compact Vacuum manuals
Add to My Manuals
Save this manual to your list of manuals |
Bissell PowerForce® Compact Vacuum manual content summary:
- Bissell PowerForce® Compact Vacuum | User Guide - Page 1
Earn BISSELL Rewards! Register your product today! See details on back page USER'S GUIDE 23T7 SERIES 2 Thank You 3 Safety Instructions 4 Product View 5 Assembly 6-7 Operations 8-12 Maintenance and Care 13 Troubleshooting 14 Replacement Parts 15 Warranty 16 Product Registration 16 Consumer Services - Bissell PowerForce® Compact Vacuum | User Guide - Page 2
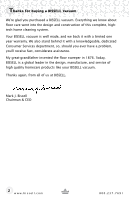
this complete, hightech home cleaning system. Your BISSELL vacuum is well made, and we back it with a limited one year warranty. We also stand behind it with a knowledgeable, dedicated Consumer Services department, so, should you ever have a problem, you'll receive fast, considerate assistance. My - Bissell PowerForce® Compact Vacuum | User Guide - Page 3
instructions before using your upright VACUUM. servicing. ■ Do not use outdoors or on wet surfaces. ■ Do not allow children to operate vacuum cleaner or use as a toy. ■ Close attention is necessary when used by or near children. ■ Do not use for any purpose other than described in this User's Guide - Bissell PowerForce® Compact Vacuum | User Guide - Page 4
Product view Handle Crevice Tool Dusting Brush Carrying Handle Upper Tank Primary Separator Dirt Cup Release Lever Filter Cup (Inner and Outer Circular Filters) Cord Hook Accessory Holder (select models) Easy Empty™ Dirt Cup Power Switch Pedal Handle Recline Pedal Stretch Hose Quick Release™ Cord - Bissell PowerForce® Compact Vacuum | User Guide - Page 5
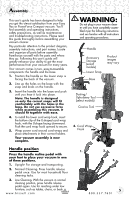
PowerForce Compact vacuum. You'll find assembly and operating instructions, safety precautions, as well as maintenance and troubleshooting instructions. Please read this guide thoroughly before assembling your vacuum cleaner force while assembling this vacuum. It should fit together with ease. - Bissell PowerForce® Compact Vacuum | User Guide - Page 6
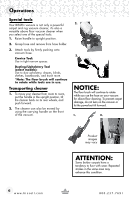
Operations Special tools Your BISSELL vacuum is not only a powerful carpet and rug vacuum cleaner, it's also a versatile above floor vacuum cleaner when you select one of the special tools. 1. Raise handle to upright position. 2. Grasp hose and remove from hose holder. 3. Attach tools by firmly - Bissell PowerForce® Compact Vacuum | User Guide - Page 7
top of the vacuum. Power Switch pedal The red power switch pedal is located on the back of the cleaner, under the cord vacuum hose. Do not pick up hard or sharp objects such as glass, nails, screws, coins, paper clips, etc. with vacuum. caution: Before using your vacuum, make sure that all filters - Bissell PowerForce® Compact Vacuum | User Guide - Page 8
be necessary if you are vacuuming new carpet, fine dust, or have allergy concerns. Follow the instructions on the following pages to perform these simple maintenance steps. Cleaning the dirt tank You have three parts to your dirt tank: 2. upper tank, dirt cup, and filter cup. Emptying the dirt - Bissell PowerForce® Compact Vacuum | User Guide - Page 9
for replacement parts). 7. The black outer foam filter can be washed by hand in warm water. Mild detergent may be used if desired. Rinse well, then air dry completely before putting back over the white inner filter. 4. 7. UNLOCK Lock Position Tip: Vacuuming new carpet or vacuuming fine powders - Bissell PowerForce® Compact Vacuum | User Guide - Page 10
secure. WARNING: Do not operate cleaner with damp or wet filters or without all filters in place. WARNING: To reduce the risk of injury from moving parts and/or electrical shock, turn power switch OFF and disconnect polarized plug from electrical outlet before performing troubleshooting checks. 10 - Bissell PowerForce® Compact Vacuum | User Guide - Page 11
replace rotating floor brush You should check your cleaner's rotating floor brush and drive belt regularly for wear or damage. You should has accumulated under the brush cover. 1. Turn off vacuum and unplug from electrical outlet. 2. Place vacuum upside down with brush roll facing upwards. 3. Remove - Bissell PowerForce® Compact Vacuum | User Guide - Page 12
motor shaft. If properly installed, drive belt will align itself on floor brush. 7. the dirt cup on the back of the vacuum. 2. 2. Rotate hose downward toward unlock debris cannot be reached through the hose, then follow the instructions for cleaning the air passageway in the "Clean and replace - Bissell PowerForce® Compact Vacuum | User Guide - Page 13
performing maintenance or troubleshooting. Vacuum cleaner won't run Possible causes Remedies 1. Vacuum cleaner is not plugged belt for any damage Other maintenance or service not included in the manual should be performed by an authorized service representative. Thank you for selecting a BISSELL - Bissell PowerForce® Compact Vacuum | User Guide - Page 14
Replacement parts - BISSELL Easy Vac® and PowerForce® Compact vacuum Item 1 2 3 4 5 6 7 8 9 Part No. Part Name 203-7592 Dirt Cup 203-7034 Drive Belt 203-7627 Floor Brush 203-7593 Inner & Outer Circular Filter Set 203-7943 Crevice Tool 203-7882 Dusting/Upholstery Tool (select models) - Bissell PowerForce® Compact Vacuum | User Guide - Page 15
® and PowerForce® Compact vacuum This warranty gives you specific legal rights, and you may also have other rights which may vary from state to state. If you need additional instruction regarding this warranty or have questions regarding what it may cover, please contact BISSELL Consumer Services by - Bissell PowerForce® Compact Vacuum | User Guide - Page 16
bissell.com/registration now! BISSELL consumer services For information about repairs or replacement parts, or questions about your warranty, call: BISSELL Consumer Services Services Or visit the BISSELL website - www.bissell.com When contacting BISSELL, have model number of cleaner available
-
 1
1 -
 2
2 -
 3
3 -
 4
4 -
 5
5 -
 6
6 -
 7
7 -
8
-
9
-
10
-
11
-
12
-
13
-
14
-
15
-
16
 |
 |
2
Thank You
USER'S GUIDE
23T7 SERIES
Safety Instructions
Product View
Assembly
Operations
Maintenance and Care
Troubleshooting
Consumer Services
Replacement Parts
3
4
5
6-7
8-12
13
16
14
Warranty
Product Registration
15
16
Earn BISSELL Rewards!
R
egister your
product today!
See details on
back page
Product images may vary