Bosch 1033VSR Operating Instructions
Bosch 1033VSR - 1/2" 0-850 RPM Heavy Duty Drill Manual
 |
UPC - 000346312881
View all Bosch 1033VSR manuals
Add to My Manuals
Save this manual to your list of manuals |
Bosch 1033VSR manual content summary:
- Bosch 1033VSR | Operating Instructions - Page 1
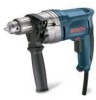
avant usage IMPORTANTE: Leer antes de usar Operating/Safety Instructions Consignes de fonctionnement/sécurité Instrucciones de funcionamiento y seguridad 1011VSR 1012VSR 1013VSR 1014VSR 1030VSR 1031VSR 1032VSR 1033VSR 1034VSR 1035VSR Consumer Information Renseignement des consommateurs Informaci - Bosch 1033VSR | Operating Instructions - Page 2
personal injury. SAVE THESE INSTRUCTIONS Work Area Keep your work Recommended sizes of Extension Cords" in the Accessory section of this manual. Electrical Safety Grounded adjusting keys or wrenches before turning the tool "ON". A wrench or a key that is left attached to a rotating part of - Bosch 1033VSR | Operating Instructions - Page 3
, safety guard return springs may be improperly mounted. When servicing a tool, use only identical replacement parts. Follow instructions in the Maintenance section of this manual. Use of unauthorized parts or failure to follow Maintenance Instructions may create a risk of electric shock or injury - Bosch 1033VSR | Operating Instructions - Page 4
"Lock-ON" button. When installing a drill bit, insert the shank of the bit well within the jaws of the chuck. If the bit is not inserted deep enough use. Check to see that keys and adjusting wrenches are removed from the drill before switching the tool "ON". Keys or wrenches can fly away at - Bosch 1033VSR | Operating Instructions - Page 5
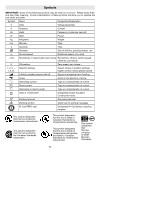
Current Hz Hertz Frequency (cycles per second) W Watt Power kg Kilograms Weight min Minutes Time s Seconds Time Diameter Size of drill bits, grinding wheels, etc. n0 .../min No load speed Rotational speed, at no load Revolutions or reciprocation per minute Revolutions, strokes - Bosch 1033VSR | Operating Instructions - Page 6
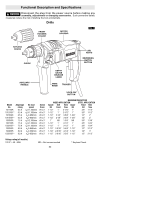
COLLAR MOTOR HOUSING FIG. 1 KEYLESS CHUCK CHUCK AIR VENTS REVERSING SWITCH BUTTON AUXILIARY HANDLE DEPTH GAUGE RELEASE LEVER WING KNOB TRIGGER "LOCK-ON" BUTTON Model Amperage No load No. rating speed 1011VSR 1012VSR * 1013VSR 1014VSR * 1030VSR 1031VSR 1032VSR * 1033VSR 1034VSR 1035VSR - Bosch 1033VSR | Operating Instructions - Page 7
jaws by hand. This positions the bit properly, giving maximum contact between the chuck jaws and the bit shank. KEYED MODELS To tighten chuck, insert key into each of the three key holes in succession and tighten clockwise firmly. The chuck can be released by using one hole only (Fig. 2). KEYLESS - Bosch 1033VSR | Operating Instructions - Page 8
CHUCK KEY & STORAGE AREA Keyed models are equipped with a chuck key that can be conveniently located on the cord protector where it is always handy and unlikely to get lost or misplaced (Fig. 5). FIG. 5 DEPTH GAUGE (Optional Accessory) Your drilling depth can be pre-set and/or repeated by using the - Bosch 1033VSR | Operating Instructions - Page 9
of wood for work that is likely to splinter, such as thin materials. You will drill a cleaner hole if you ease up on the pressure just before the bit breaks the nut or bolt runs down. Set the nut or bolt snugly by slowing the drill to a stop. If this procedure is not followed, the tool will have a - Bosch 1033VSR | Operating Instructions - Page 10
the bearings should be replaced at Bosch Factory Service Center or Authorized Bosch Service Station. Bearings which become noisy ( cleaning agents and solvents damage plastic parts. Some of these are: gasoline WARNING If an extension cord is necessary, a cord with adequate size conductors that - Bosch 1033VSR | Operating Instructions - Page 11
ci-après entraîne un risque de choc életrique, d'incendie et/ou de blessures graves. CONSERVEZ CES INSTRUCTIONS Aire de travail Veillez à ce que l'aire de travail soit propre et bien éclairée. Le désordre et le manque de lumière favorisent les accidents. N' - Bosch 1033VSR | Operating Instructions - Page 12
manuel. L'emploi de pièces non autorisées ou le non-respect des instructions d'entretien peut créer un risque de choc électrique ou de blessures. Certains Ne le tenez jamais dans votre main ou par-dessus vos jambes. Un support instable peut faire gripper le foret, provoquant ainsi une perte de contrô - Bosch 1033VSR | Operating Instructions - Page 13
Si le foret grippe dans l'ouvrage, relâchez la gâchette immédiatement, inversez le sens de rotation et appuyez lentement sur la gâchette pour faire ressortir le foret. Soyez prêt à un fort couple de réaction. Le corps de la perceuse aura tendance à tordre en sens opposé à mesure que le foret tourne. - Bosch 1033VSR | Operating Instructions - Page 14
Symboles IMPORTANT : Certains des symboles suivants peuvent être utilisés sur votre outil. Veuillez les étudier et apprendre leur signification. Une interprétation appropriée de ces symboles vous permettra d'utiliser l'outil de façon plus efficace et plus sûre. Symbole V A Hz W kg min s n0 .../min - Bosch 1033VSR | Operating Instructions - Page 15
BLOCAGE EN MARCHE Numéro Intensité de modèle nominale 1011VSR 6.5 A 1012VSR * 6.5 A 1013VSR 6.5 A 1014VSR * 6.5 A 1030VSR 7.5 A 1031VSR 7.5 A 1032VSR * 7.5 A 1033VSR 8.0 A 1034VSR 8.0 A 1035VSR * 8.0 A Vitesse Tailles à vide de vis n0 0-1 100/min #8 x 75mm n0 0-1 100/min #8 x 75mm n0 0-850/min - Bosch 1033VSR | Operating Instructions - Page 16
immobilisé. Un changement durant la rotation du mandrin pourrait endommager l'outil. POIGNÉE AUXILIAIRE La poignée auxiliaire permettra de mieux contrôler, supporter et guider l'outil. La poignée est réglable sur 360° autour de son collier de montage. Pour monter, desserrez le bouton à ailettes - Bosch 1033VSR | Operating Instructions - Page 17
permet d'augmenter lentement le régime. En utilisant une vitesse lente au départ, vous pouvez empêcher le foret d'« errer ». Vous pouvez augmenter la la fig. 6 vous permettra de fixer des matériaux ensemble à l'aide de votre drille en mode de perçage sans dénuder, fendre ni séparer le matériau. - Bosch 1033VSR | Operating Instructions - Page 18
nécessitent une « touche ». Choisissez la vitesse la plus efficace. En utilisant les bonnets de polissage, assurez-vous toujours que l'excédent de corde qui fixe le bonnet est bien rentré à l'intérieur du bonnet durant le fonctionnement. BROSSES MÉTALLIQUES Le travail avec les brosses nécessite des - Bosch 1033VSR | Operating Instructions - Page 19
ou tous les deux changements de balais, il est conseillé de faire remplacer les paliers par un centre de service d'usine Bosch ou une station service agréée Bosch. Si les paliers commencent à faire du bruit (à cause de surcharges importantes ou du toupillage de matériaux très abrasifs - Bosch 1033VSR | Operating Instructions - Page 20
. Las herramientas con conexión a tierra están equipadas con un cordón de tres conductores y enchufes del tipo de tres terminales. Antes recomendados de los cordones de extensión" en la sección Accesorios de este manual. Seguridad personal Manténgase alerta, fíjese en lo que está haciendo - Bosch 1033VSR | Operating Instructions - Page 21
las instrucciones que aparecen en la sección Mantenimiento de este manual. El uso de piezas no autorizadas o el incumplimiento de las con cables ocultos o con su propio cordón. El contacto con un cable que tenga corriente hará que ésta pase a las partes metálicas descubiertas de la herramienta y - Bosch 1033VSR | Operating Instructions - Page 22
bien ventilada y trabaje con equipo de seguridad aprobado, como por ejemplo máscaras antipolvo que estén diseñadas especialmente para impedir mediante filtración el paso de partículas microscópicas. -22- - Bosch 1033VSR | Operating Instructions - Page 23
Símbolos IMPORTANTE: Es posible que algunos de los símbolos siguientes se usen en su herramienta. Por favor, estúdielos y aprenda su significado. La interpretación adecuada de estos símbolos le permitirá utilizar la herramienta mejor y con más seguridad. Símbolo V A Hz W kg min s n0 .../min 0 1, - Bosch 1033VSR | Operating Instructions - Page 24
Amperaje Velocidad Tamaños modelo nominal sin carga de tornillo 1011VSR 1012VSR * 1013VSR 1014VSR * 1030VSR 1031VSR 1032VSR * 1033VSR 1034VSR 1035VSR * 6.5 A 6.5 A 6.5 A 6.5 A 7.5 A 7.5 A 7.5 A 8.0 A 8.0 A 8.0 A n0 0-1 100/min #8 x 75mm n0 0-1 100/min #8 x 75mm n0 0-850/min #8 x 75mm n0 0-850/min - Bosch 1033VSR | Operating Instructions - Page 25
Instrucciones de funcionamiento VELOCIDAD VARIABLE CONTROLADA POR GATILLO La herramienta está equipada con un interruptor gatillo de velocidad variable. La velocidad de la herramienta se puede controlar desde las "Revoluciones por minuto" mínimas hasta las "Revoluciones por minuto" máximas - Bosch 1033VSR | Operating Instructions - Page 26
AREA PARA Los modelos de apriete con llave están equipados con una llave de mandril que puede ubicarse convenientemente en el protector del cordón, donde siempre se encuentra a mano y es improbable que se pierda o se olvide en algún lugar (Fig. 5). FIG. 5 CALIBRE DE PROFUNDIDAD (accesorio opcional - Bosch 1033VSR | Operating Instructions - Page 27
un agujero mejor hecho si disminuye la presión justo antes de que la broca atraviese la madera completamente. Luego, termine el agujero desde la parte posterior. TALADRADO DE METAL Hay dos reglas para taladrar materiales duros. Primero, cuanto más duro sea el material, mayor es la presión que usted - Bosch 1033VSR | Operating Instructions - Page 28
examinen las escobillas. Sólo se deben usar escobillas de repuesto Bosch genuinas diseñadas específicamente para su herramienta. RODAMIENTOS Después de la herramienta Tamaño del cordón en A.W.G. Tamaños del cable en mm 2 Longitud del cordón en pies Longitud del cordón en metros 25 50 100 150 - Bosch 1033VSR | Operating Instructions - Page 29
Notes: -29- - Bosch 1033VSR | Operating Instructions - Page 30
Remarques : -30- - Bosch 1033VSR | Operating Instructions - Page 31
Notas: -31- - Bosch 1033VSR | Operating Instructions - Page 32
implied by law, shall be the repair or replacement of parts, without charge, which are defective in Service Station. For Authorized BOSCH Power Tool Service Stations, please refer to your phone directory. THIS LIMITED WARRANTY DOES NOT APPLY TO ACCESSORY ITEMS SUCH AS CIRCULAR SAW BLADES, DRILL
-
 1
1 -
 2
2 -
 3
3 -
 4
4 -
 5
5 -
 6
6 -
 7
7 -
8
-
9
-
10
-
11
-
12
-
13
-
14
-
15
-
16
-
17
-
18
-
19
-
20
-
21
-
22
-
23
-
24
-
25
-
26
-
27
-
28
-
29
-
30
-
31
-
32
 |
 |
Operating/Safety Instructions
Consignes de fonctionnement/sécurité
Instrucciones de funcionamiento
y seguridad
1011VSR
1012VSR
1013VSR
1014VSR
1030VSR
1031VSR
1032VSR
1033VSR
1034VSR
1035VSR
IMPORTANT:
IMPORTANT :
IMPORTANTE:
Read Before Using
Lire avant usage
Leer antes de usar
Consumer Information
Renseignement des consommateurs
Información para el consumidor
Toll Free Number:
Appel gratuit :
Número de teléfono gratuito:
1-877-BOSCH99 (1-877-267-2499)
For English
Parlez-vous français?
¿Habla español?
See page 2
Voir page 11
Ver página 20