Bosch HBL5460UC Installation Instructions
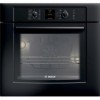
Bosch HBL5460UC - 500 Series, 30" Single Wall Oven Manual
 |
UPC - 825225843153
View all Bosch HBL5460UC manuals
Add to My Manuals
Save this manual to your list of manuals |
Bosch HBL5460UC manual content summary:
- Bosch HBL5460UC | Installation Instructions - Page 1
Installation Manual Guide d'installation Manual de instalación Built-In Ovens Models: HBL33, HBN33, HBL34, HBN34, HBL35, HBN35, HBL54, HBN54, HBL56, HBN56, HBL57, HBL8550, HBL8650, HBL8750 - Bosch HBL5460UC | Installation Instructions - Page 2
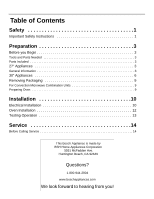
30" Appliances 6 Removing Packaging 9 For Convection Microwave Combination Units 9 Preparing Oven 9 Installation 10 Electrical Installation 10 Oven Installation 12 Testing Operation 13 Service 14 Before Calling Service 14 This Bosch Appliance is made by BSH Home Appliances Corporation 5551 - Bosch HBL5460UC | Installation Instructions - Page 3
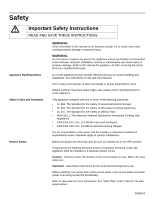
manual for guidance. All other servicing should be done by a qualified technician. Do not lift appliance by door handle. Remove the door for easier handling and installation. See instructions in Use and Care Manual Ranges It is the responsibility of the owner and the installer to determine if - Bosch HBL5460UC | Installation Instructions - Page 4
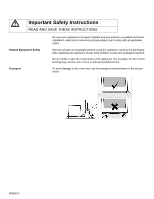
READ AND SAVE THESE INSTRUCTIONS Related Equipment Safety Transport Be sure your appliance is properly installed and grounded by a qualified legs, panels, wire covers or anti-tip brackets/screws. To avoid damage to the oven vent, use the transport method shown in the picture below. English 2 - Bosch HBL5460UC | Installation Instructions - Page 5
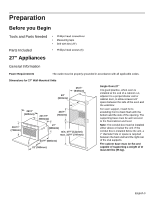
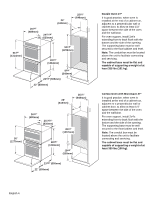
must be properly grounded in accordance with all applicable codes. Dimensions for 27" Wall-Mounted Units 24" (610mm) 251/2" (648mm) 263/4" the oven and the wall/door. For oven support, install 2x4's extending front to back flush with the bottom and the side of the opening. The supporting base - Bosch HBL5460UC | Installation Instructions - Page 6
the wall/door. For oven support, install 2x4's extending front to back flush with the bottom and the side of the opening. The supporting base must be well secured to the floor/cabinet and level. Note: The conduit box must be located above the unit to facilitate connecting and servicing. The cabinet - Bosch HBL5460UC | Installation Instructions - Page 7
the wall/door. For oven support, install 2x4's extending front to back flush with the bottom and the side of the opening. The supporting base must be well secured to the floor/cabinet and level. Note: The conduit box must be located above the unit to facilitate connecting and servicing. The cabinet - Bosch HBL5460UC | Installation Instructions - Page 8
the wall/door. For oven support, install 2x4's extending front to back flush with the bottom and the side of the opening. The supporting base must be well secured to the floor/cabinet and level. Note: The conduit box must be located above the unit to facilitate connecting and servicing. The cabinet - Bosch HBL5460UC | Installation Instructions - Page 9
the wall/door. For oven support, install 2x4's extending front to back flush with the bottom and the side of the opening. The supporting base must be well secured to the floor/cabinet and level. Note: The conduit box must be located above the unit to facilitate connecting and servicing. The cabinet - Bosch HBL5460UC | Installation Instructions - Page 10
the wall/door. For oven support, install 2x4's extending front to back flush with the bottom and the side of the opening. The supporting base must be well secured to the floor/cabinet and level. Note: The conduit box must be located above the unit to facilitate connecting and servicing. The cabinet - Bosch HBL5460UC | Installation Instructions - Page 11
Bracket Removal." Left and Right Packaging Bracket Removal Note: Different models use different packaging materials. Actual brackets may look differently. Bracket Only) Preparing Oven Place oven in front of cabinets where it is to be installed. Rest it on a jack or other sturdy support so that it - Bosch HBL5460UC | Installation Instructions - Page 12
Installation Electrical Installation All model ovens on the front cover are dual rated, designed to be connected to either 208/240V AC, 60 Hz, 4 wire, single-phase power supply. Model Circuit Required 208V, 60 Hz 240V, 60 Hz HBN33, HBL33 25 AMP 30 AMP HBN34, HBL34, HBN54, HBL54 HBL85 30 - Bosch HBL5460UC | Installation Instructions - Page 13
oven to red wire injunction box. • Connect black wire from oven to black wire in junction box. • Connect both green ground wire and white wire from oven oven, swivels. Rotate conduit cable upward (or downward) and direct through hole prepared in cabinet to attach to JBox. To maintain serviceability, - Bosch HBL5460UC | Installation Instructions - Page 14
Installation Note: Before installing the oven, be sure to verify the cabinet dimensions and electrical connections. Removing the Oven Door For ease of installation, some oven doors may be removed to reduce the weight of the oven by 30 lbs (14 kg) per door, before installing into the cabinet. See - Bosch HBL5460UC | Installation Instructions - Page 15
V installation, the reading between the red and black wires (line to line) should be 190 to 208 volts. 3. Test the oven mode. Select the BAKE mode. See the Use and Care Manual for detailed operation instructions. 4. Verify that the oven light comes on and the oven begins to preheat. 5. Test the door - Bosch HBL5460UC | Installation Instructions - Page 16
Manual for troubleshooting information. Refer to the Warranty in the Use and Care Manual. To reach a service representative, see the contact information at the front of the manual. Please be prepared with the information printed on your product data plate when calling. The data plate shows the model - Bosch HBL5460UC | Installation Instructions - Page 17
lectrique 10 Raccordement électrique 11 Installation du four 12 Test de contrôle 13 Dépannage 14 Avant d'appeler le service de dépannage 14 Cet appareil électroménager de Bosch est fait par BSH Home Appliances Corporation 5551 McFadden Ave. Huntington Beach, CA 92649 Questions ? 1-800-944-2904 - Bosch HBL5460UC | Installation Instructions - Page 18
Ne pas soulever l'appareil par la poignée de la porte. Enlever la porte pour faciliter la manipulation et l'installation de l'appareil. Voir les instructions du Manuel d'utilisation et d'entretien. Cet appareil est lourd et il faut au moins deux personnes ou l'équipement approprié pour le déplacer - Bosch HBL5460UC | Installation Instructions - Page 19
é importantes LIRE ET CONSERVER CES CONSIGNES Important - Conserver ces instructions pour l'usage de l'inspecteur local en électricité. Avant l'installation, couper le courant au panneau de service. Verrouiller le panneau de service pour éviter que le courant ne soit accidentellement rétabli. Pour - Bosch HBL5460UC | Installation Instructions - Page 20
prise doit être correctement reliée à la terre selon tous les codes applicables. Dimensions pour les appareils muraux de 27 po 24" (610mm) 251/2" (648mm) 263 le mur arrière et la partie arrière droite des montants de support de 2 pouces sur 4. Le socle du coffret doit être plate et apte à - Bosch HBL5460UC | Installation Instructions - Page 21
263/4" (680mm) 2413/16" (630mm) 24" (610mm) 251/2" (648mm) 513/4" (1314mm) 511/8" (1299mm) 493/4" (1264mm) 93/4" (248mm) 237/8" (606mm) 22" (559mm) 24" (610mm) 251/2" (648mm) 50" (1270mm) 263/4" (680mm) 2413/16" (630mm) 491/2" (1257mm) 483/8" (1229mm) 191/2" (500mm) 237/8" (606mm) 22" ( - Bosch HBL5460UC | Installation Instructions - Page 22
24" (610mm) 251/2" (648mm) 263/4" (680mm) 2413/16" (630mm) 603/4" (1543mm) 613/8" (1559mm) 595/8" (1514mm) 93/4" (248mm) 237/8" (606mm) 22" (559mm) Four combiné avec micro-ondes et tiroir-réchaud de 27 po Lorsque le four est installé à l'extrémité d'une série de placards, adjacent à un mur - Bosch HBL5460UC | Installation Instructions - Page 23
Appareils électroménagers de 30 po Dimensions pour les appareils muraux de 30 po 24" (610mm) 281/2" (724mm) 293/4" ( de diamètre est requis entre le mur arrière et la partie arrière droite des montants de support de 2 pouces sur 4. Le socle du coffret doit être plate et apte à soutenir un poids d' - Bosch HBL5460UC | Installation Instructions - Page 24
24" (610mm) 281/2" (724mm) 50" (1270mm) 293/4" (755mm) 2713/16" (706mm) 491/2" (1257mm) 483/8" (1229mm) 191/2" (500mm) 237/8" (606mm) 22" (559mm) 24" (610mm) 281/2" (724mm) 293/4" (755mm) 2713/16" (706mm) 603/4" (1543mm) 613/8" (1559mm) 595/8" (1514mm) 93/4" (248mm) 237/8" (606mm) 22" - Bosch HBL5460UC | Installation Instructions - Page 25
24" (610mm) 281/2" (724mm) 293/4" (755mm) 2713/16" (706mm) 40" (1016mm) 407/16" (1027mm) 381/8" (968mm) 93/4" (248mm) 237/8" (606mm) 22" (559mm) Four combiné avec tiroir-réchaud de 30 po Lorsque le four est installé à l'extrémité d'une série de placards, adjacent à un mur perpendiculaire ou à - Bosch HBL5460UC | Installation Instructions - Page 26
de fond de l'emballage jusqu'à ce qu'il soit prêt à être soulevé vers l'endroit qui lui est destiné. Pour les fours combinés de Enlevez les 2 supports d'expédition du four à micro-ondes/convection avant micro-ondes et convection l'installation, tel qu'indiqué sur la « Comment enlever les - Bosch HBL5460UC | Installation Instructions - Page 27
doit être alimenté en courant alternatif monophasé à 4 fils. Installer une boîte de connexions appropriée (non fournie). Un raccord de conduit aux dimensions appropriées répertorié par UL doit être utilisé pour fixer correctement le conduit à la boîte de raccordement. Important : les codes locaux - Bosch HBL5460UC | Installation Instructions - Page 28
Raccordement électrique La connexion de circuit terminal à 4 fils est recommandée, mais là où les codes le permettent, la connexion à 3 fils est acceptable. Connexion à quatre fils Boîte de jonction Fils rouges Câble de l'alimentation Fils blancs Neutre non mis à la terre Fils verts ou dénudés - Bosch HBL5460UC | Installation Instructions - Page 29
dimension du coffret et les raccordements électriques. Retrait de la porte du four Pour faciliter l'installation, certaines portes de four peuvent être démontées pour réduire le poids du four de 30 lb (14 kg) pour chaque porte, avant l'installation à l'intérieur du coffret. Voir les instructions - Bosch HBL5460UC | Installation Instructions - Page 30
rifier le mode four. Choisir le mode BAKE (four). Voir les instructions de fonctionnement dans le guide d'utilisation et d'entretien. 4. Vérifier si l'éclairage du four s' résultats escomptés, communiquer avec le service Thermador pour de l'aide. Autrement, l'installation est complétée. Franç - Bosch HBL5460UC | Installation Instructions - Page 31
Dépannage Avant d'appeler le service de dépannage Pour des informations sur le dépannage, se reporter au Manuel d'utilisation et d'entretien. Consulter la garantie figurant dans le Manuel d'utilisation et d'entretien. - Bosch HBL5460UC | Installation Instructions - Page 32
10 Instalación eléctrica 10 Instalar el horno 12 Probar el equipo 13 Servicio 14 Antes de llamar al servicio 14 Este electrodomestico de Bosch es hecho por BSH Home Appliances Corporation 5551 McFadden Ave. Huntington Beach, CA 92649 ¿Preguntas? 1-800-944-2904 www.boschappliances.com ¡Esparamos - Bosch HBL5460UC | Installation Instructions - Page 33
ESTAS INSTRUCCIONES ADVERTENCIA: Si no sigue la información de este manual exactamente, se puede ocasionar un incendio o una descarga elé puerta para facilitar la manipulación y la instalación. Consulte las instrucciones en el Manual de uso y cuidado. La unidad es pesada y se requieren al menos - Bosch HBL5460UC | Installation Instructions - Page 34
m Instrucciones de seguridad importantes LEA Y CONSERVE ESTAS INSTRUCCIONES Seguridad de los equipos relacionados Transporte Instalador: muestre al propietario la ubicación del disyuntor o el fusible. Márquela para recordarla más fácilmente. Importante: conserve estas instrucciones para uso del - Bosch HBL5460UC | Installation Instructions - Page 35
Instalación Antes de empezar Herramientas y piezas necesarias • Destornillador con cabeza Phillips • Cinta métrica • Taladro con broca (1/8") Piezas incluidas • Tornillos con cabeza Phillips (6) Electrodomésticos de 27" Información general Requisitos de electricidad La toma de corriente - Bosch HBL5460UC | Installation Instructions - Page 36
263/4" (680mm) 2413/16" (630mm) 24" (610mm) 251/2" (648mm) 513/4" (1314mm) 511/8" (1299mm) 493/4" (1264mm) 93/4" (248mm) 237/8" (606mm) 22" (559mm) 24" (610mm) 251/2" (648mm) 50" (1270mm) 263/4" (680mm) 2413/16" (630mm) 491/2" (1257mm) 483/8" (1229mm) 191/2" (500mm) 237/8" (606mm) 22" ( - Bosch HBL5460UC | Installation Instructions - Page 37
24" (610mm) 251/2" (648mm) 263/4" (680mm) 2413/16" (630mm) 603/4" (1543mm) 613/8" (1559mm) 595/8" (1514mm) 93/4" (248mm) Horno combinado con microondas y cajón calentador de 27" Cuando el horno está instalado al final de un gabinete, junto a una pared perpendicular o a una puerta del gabinete - Bosch HBL5460UC | Installation Instructions - Page 38
Electrodomésticos de 30" Dimensiones para unidades montadas a la pared de 30" 24" (610mm) 281/2" (724mm) 293/4" (755mm) 2713/16" (706mm) 281/4" (718mm) 291/16" (738mm) 27" (686mm) min. 43/4" (121mm) max. 313/8" (797mm) 237/8" (606mm) 22" (559mm) 293/4" (755mm) 2713/16" (706mm) 24" (610mm - Bosch HBL5460UC | Installation Instructions - Page 39
24" (610mm) 281/2" (724mm) 50" (1270mm) 293/4" (755mm) 2713/16" (706mm) 491/2" (1257mm) 483/8" (1229mm) 191/2" (500mm) 237/8" (606mm) 22" (559mm) 24" (610mm) 281/2" (724mm) 293/4" (755mm) 2713/16" (706mm) 603/4" (1543mm) 613/8" (1559mm) 595/8" (1514mm) 93/4" (248mm) 237/8" (606mm) 22" - Bosch HBL5460UC | Installation Instructions - Page 40
24" (610mm) 281/2" (724mm) 293/4" (755mm) 2713/16" (706mm) 40" (1016mm) 407/16" (1027mm) 381/8" (968mm) 93/4" (248mm) Horno combinado con cajón calentador de 30" Cuando el horno está instalado al final de un gabinete, junto a una pared perpendicular o a una puerta del gabinete, se aconseja - Bosch HBL5460UC | Installation Instructions - Page 41
Quitar el embalaje • Corte las correas del exterior de la caja. • Quite la caja de cartón. • Quite todos los cartones superiores y laterales así como las grapas de poliestreno. • Coloque el horno delante del sitio en que se instalará. • Destornille los tirantes de izquierda et derecha del embalaje, - Bosch HBL5460UC | Installation Instructions - Page 42
Instalación Instalación eléctrica Todos los modelos de hornos que se detallan en la portada tienen capacidad nominal doble y están diseñados para conectarse a una fuente de alimentación eléctrica monofásica, de 4 hilos, 208/240 V CA, 60 Hz. Modelo Circuito requerido 208 V, 60 Hz 240 V, 60 Hz - Bosch HBL5460UC | Installation Instructions - Page 43
Conexión eléctrica La conexión del circuito con cuatro hilos es preferible pero donde los códigos locales lo permiten, se acepta también una conexión con tres hilos. Conexión a cuatro cables Caja de conexiones Cables rojos Cable de la fuente de alimentación Cables blancos Neutral No Aterrizado - Bosch HBL5460UC | Installation Instructions - Page 44
Instalar el horno Nota: Antes de instalar el horno, asegúrese de verificar las dimensiones del gabinete y las conexiones eléctricas. Retirar la puerta del horno Para facilitar la instalación, las puertas de algunos hornos se pueden retirar para reducir el peso del horno 30 lb (14 kg) por puerta, - Bosch HBL5460UC | Installation Instructions - Page 45
. Ver la sección « Para quitar la puerta del horno » en el manual de instalación. 1. Instale el equipo hacia el lugar en que se instalará. Verifique el modo del horno. Seleccione el modo BAKE (Hornear). Consulte el manual de uso y cuidado para instrucciones detalladas de la operación. 4. Verifique - Bosch HBL5460UC | Installation Instructions - Page 46
de uso y cuidado. Para consultar a un representante de servicio técnico, remítase a la información de contacto que aparece en el frente del manual. Cuando llame, tenga a la mano la información impresa en la placa de datos de su producto. Placa de datos La placa de datos muestra el - Bosch HBL5460UC | Installation Instructions - Page 47
- Bosch HBL5460UC | Installation Instructions - Page 48
5551 McFadden Avenue, Huntington Beach, CA 92649 • 800-944-2904 • www.boschappliances.com 9000182532 • 5V0BHK • Rev. D • 02/08 © BSH Home Appliances Corporation, 2007 • All rights reserved Litho in USA
-
 1
1 -
 2
2 -
 3
3 -
 4
4 -
 5
5 -
 6
6 -
 7
7 -
8
-
9
-
10
-
11
-
12
-
13
-
14
-
15
-
16
-
17
-
18
-
19
-
20
-
21
-
22
-
23
-
24
-
25
-
26
-
27
-
28
-
29
-
30
-
31
-
32
-
33
-
34
-
35
-
36
-
37
-
38
-
39
-
40
-
41
-
42
-
43
-
44
-
45
-
46
-
47
-
48
 |
 |

Built-In Ovens
Installation Manual
Guide d’installation
Manual de instalación
Models:
HBL33, HBN33, HBL34, HBN34, HBL35, HBN35, HBL54, HBN54,
HBL56, HBN56, HBL57, HBL8550, HBL8650, HBL8750