Brother International PS-300B Instruction Manual - English
Brother International PS-300B Manual
 |
View all Brother International PS-300B manuals
Add to My Manuals
Save this manual to your list of manuals |
Brother International PS-300B manual content summary:
- Brother International PS-300B | Instruction Manual - English - Page 1
can search for a more detailed explanation by using the Help INDEX or Keyword tool. Chapter 2: Tutorial You can learn the procedure for using PS-300B by making and exporting sewing data for the four typical sewing machine's media. This chapter may be useful especially for beginners. If you are more - Brother International PS-300B | Instruction Manual - English - Page 2
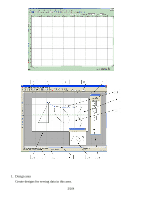
1. Design area Create designs for sewing data in this area. 2/164 - Brother International PS-300B | Instruction Manual - English - Page 3
to view the desired part of the design area. 5. Menu bar All functions of PS-300B can be selected from the drop-down menus in the menu bar. Refer to can be controlled with the mouse. Displayed when create outlines, stitch and feed data in the design area. The pointer is also used to select a command - Brother International PS-300B | Instruction Manual - English - Page 4
clicking Reference Windowon the View drop-down menu. This window shows all the design. 14.Sequence window Can be displayed by clicking Sequence Window on the Viewdrop-down menu. This window shows all the design elements separately in the sewing order. Icons in the toolbar The following indicates the - Brother International PS-300B | Instruction Manual - English - Page 5
5. Import From Machine 6. Export To Machine 7. Read From ROM 8. Write To ROM 9. File Info 10. Print 11. Gridlines 12.Pseudo 3D 13. Property 14.Reference Window 15.Sequence Window 16.Slow Draw 17.Snap Setting 5/164 - Brother International PS-300B | Instruction Manual - English - Page 6
18. Option 19.Machine Model Setting 20. Measure 21.Import From File 22.Zoom In 23.Zoom Out 24.Actual size 25.Fit To Window 26.Fit Sewing Area To Window 27. Help 28. Cut 29. Copy 30. Paste 31. Delete 32. Search 33. Undo 34. Redo 35. Split 36. Connect 37. Smooth 38 - Brother International PS-300B | Instruction Manual - English - Page 7
On PS-300B, stitch data used on the sewing machine will be automatically generated from outline data. You can also create stitch data directly without creating outline data. However, in general, you will create outline data first. You can create both outline and manual stitch data in the same window - Brother International PS-300B | Instruction Manual - English - Page 8
line Blue Black (The path of a line longer than the maximum stitch length is shown in red.) 4 Manual feed 5 Basting Dotted line with Trim code Dotted line without Trim code Black Black 6 Sewing start point Square Blue 7 Start point of an outline Blue square with "S" Blue 8 End point of an - Brother International PS-300B | Instruction Manual - English - Page 9
When the Select Punch Point tool is selected: When the Select Point tool is selected: No. Data type 9 Punch point of outline data 10 Stitch point Circle Shape Circle Default color Red Green 9/164 - Brother International PS-300B | Instruction Manual - English - Page 10
of PS-300B can be used with the mouse and/or shortcut keys including the computer's default shortcut keys. Mouse/shortcut keys Action/Outcome Left-button of mouse Right button of mouse Selects an object. Specifies a point in the design area for creating a design for sewing data. Determines - Brother International PS-300B | Instruction Manual - English - Page 11
Machine Model Setting dialog box. Chapter 2. Tutorial The Brother PS-300B software provides numerous functions to enable you to easily create sewing patterns for a wide variety of Brother electronic sewing machines. In addition to creating your own sewing data, you can change preset patterns to fit - Brother International PS-300B | Instruction Manual - English - Page 12
toolbar. On the keyboard, while holding down the Ctrl key, press the M key. The Machine Model Setting dialog box appears. 2. Select KE430D from the Machine Model Name drop-down list. The Preview window shows how the selected model's sewing area and the design area will appear. 3. In the Reference - Brother International PS-300B | Instruction Manual - English - Page 13
its length, width, number of stitches, and so on. (This section selects an eyelet pattern.) NOTE: The available preset patterns differ with each sewing machine model. 1. Click Pattern on the Shape drop-down menu, or the Pattern icon The Pattern Select dialog box appears. in the toolbar. 2. Select - Brother International PS-300B | Instruction Manual - English - Page 14
the design area. NOTE: Refer to the instruction manual for the machine model you specified for details about the parameter settings. 2-1-4. Importing sewing data from a sewing machine You can import sewing data saved in the storage media of a sewing machine. The following describes a procedure for - Brother International PS-300B | Instruction Manual - English - Page 15
To import sewing data from a CF card: NOTE: In order to connect to a CF card writer, the CF Drive must be correctly set in Option Setting on the Tools - Brother International PS-300B | Instruction Manual - English - Page 16
. * Click the Cancel button to cancel the current operation. 2-1-5. Editing the added pattern This section uses some of the PS-300B's editing functions to edit the added eyelet pattern. Creating two cycle data: Copy the pattern and paste it at the same position as the original to create two cycle - Brother International PS-300B | Instruction Manual - English - Page 17
This shows the outline number of the patterns and the sewing order of the point from the start of the outline for every point. * The outline number can be checked with the Sequence window. (The Sequence window can be displayed by clicking "Sequence Window" on the View drop-down menu.) 2. Select the - Brother International PS-300B | Instruction Manual - English - Page 18
Add any of the various sewing machine codes to the point you selected in the previous steps. (Refer to Point ( ) tool to select the point, then while holding down the keyboard's Shift key, move the pointer onto the point. A list appears to show the codes applied to the point. Checking or - Brother International PS-300B | Instruction Manual - English - Page 19
on the Viewdrop-down menu, or the Sequence window icon in the toolbar. The Sequence window appears. 2. Click to select the pattern in the Sequence window, and then press any of the numeric keys on the keyboard. The Sewing Data List dialog box appears, and the coordinates of all points and codes - Brother International PS-300B | Instruction Manual - English - Page 20
keyboard. NOTE: You cannot add a code to a point. 5. Click the OK button. The edited result is applied to the sewing data. Changing the sewing start point of the sewing data: You can change the sewing start point (the blue squa re connected with the start point of the first design element ) of the - Brother International PS-300B | Instruction Manual - English - Page 21
. To align the sewing start point to the start point of the first outline: While holding down the keyboard's Ctrl key, drag the sewing start point. To align the sewing start point to the center of all the sewing data: While holding down the keyboard's Shift key, drag the sewing start point. 21 - Brother International PS-300B | Instruction Manual - English - Page 22
2-1-6. Exporting the data to a sewing machine You can export the data you created to the storage media of a sewing machine. (KE430D uses the folder to which you want to export the data. The Data list shows all program number that KE430D can support. * Click the program number to display information - Brother International PS-300B | Instruction Manual - English - Page 23
Message dialog box (Do you really want to overwrite the data?) Click the Yes button if you will overwrite the existing data, or the Cancel button to cancel the exporting process and retain the existing data. 23/164 - Brother International PS-300B | Instruction Manual - English - Page 24
the following. Click New on the File drop-down menu, or the New icon in the toolbar. On the keyboard, while holding down the Ctrl key, press the N key. 2-2-2. Creating original sewing data PS-300B provides you with various tools for creating, editing and modifying design elements for the - Brother International PS-300B | Instruction Manual - English - Page 25
area, click to specify the desired location for the start point of the straight outline (1 in figure below). 3. While holding down the keyboard's Shift key, click to specify the desired location for the end point of the straight outline (2 in figure below). 4. Right-click once to finish the outline - Brother International PS-300B | Instruction Manual - English - Page 26
3. Click Property on the View drop-down menu (or the context menu that appears when right-clicking), or the Property icon in the toolbar. The Property dialog box appears. 4. Click the Border tab, and input "3.0" in the Width input box that appears. Then click the Close button to close the property - Brother International PS-300B | Instruction Manual - English - Page 27
2. Select the first stitch point of the outline. The point changes to a black circle . 3. Click Add on the Modify-Point drop-down sub-menu (or the context menu that appears when right-clicking). A new point is added in the center position between the selected and next points. 27/164 - Brother International PS-300B | Instruction Manual - English - Page 28
4. Select the stitch point just before the end point of the outline. The point changes to a black circle . 5. Repeat step 3. A new point is added in the center position between the selected and end points. Moving the added stitch points: Drag and move the points by following the steps shown in the - Brother International PS-300B | Instruction Manual - English - Page 29
2. Drag and move the point to position "2" as shown in the figure. 3. Drag and move the point "3" to position "4". 4. Drag and move the point "5" to position "6". 5. Drag and move the point "7" to position "8". 6. Drag and move the point "9" to position "10". 29/164 - Brother International PS-300B | Instruction Manual - English - Page 30
downward quickly: While holding down the keyboard's Ctrl key, rotate the mouse wheel. To move the design area from side to side the toolbar. The outline data is cleared and the stitch data remains. The outline's property is removed. Editing the sewing data (making fine adjustments of the - Brother International PS-300B | Instruction Manual - English - Page 31
The Sewing Data List dialog box appears, and the coordinates of all points are shown in the list. (When the radio button for "Relative Coordinate From a new value to replace it.) . 3. Click the OK button when you have finished moving the points. The edited result is applied to the sewing data. 31/164 - Brother International PS-300B | Instruction Manual - English - Page 32
Making a symmetrical copy of the data: You can duplicate the data symmetrically on the basis of a reference line (mirror axis). 1. Use the Select ( ) tool to select the data. 2. Click Mirror Copy on the Modify drop-down menu, or the Mirror Copy icon in the toolbar. 3. Draw a mirror axis in the - Brother International PS-300B | Instruction Manual - English - Page 33
A symmetrical copy of the data is created on the basis of the mirror axis. 33/164 - Brother International PS-300B | Instruction Manual - English - Page 34
current link of the two design elements (the original data and its copy) is not proper for sewing. By reversing the start and end points of the second element, it can be improved. 1. Use the Select tool to select the second design element. 2. - Brother International PS-300B | Instruction Manual - English - Page 35
appears when right-clicking), or the Connect icon in the toolbar. NOTE: The Connect command is available only when a point at the end of the sewing data is selected. 3. Click the start point of the second element. The two points are connected into one. 35/164 - Brother International PS-300B | Instruction Manual - English - Page 36
sewing machine model that you created sewing data for, and then put its sewing area frame into the design area. NOTE: We recommend that you specify the machine model before creating a design, since the sewing down the Ctrl key, press the M key. The Machine Model Setting dialog box appears. 36/164 - Brother International PS-300B | Instruction Manual - English - Page 37
the OK button to apply the specified settings. 5. While holding down the keyboard's Shift key, click on the design area. The sewing area frame is placed at the center of the data created in the above procedure. NOTE: The sewing area frame can be placed at any position. Refer to 3-7-5. Specifying - Brother International PS-300B | Instruction Manual - English - Page 38
. If your computer's A drive is assigned as the floppy disk drive, you can save the data to a floppy disk. To save the data in a folder on the computer: Click the Browse button to specify the folder. The Data list shows all program number available for BAS311F. * Click the program number to display - Brother International PS-300B | Instruction Manual - English - Page 39
the following. Click New on the File drop-down menu, or the New icon in the toolbar. On the keyboard, while holding down the Ctrl key, press the N key. 2-3-2. Creating original sewing data PS-300B provides you with various tools for creating, editing and modifying design elements for the - Brother International PS-300B | Instruction Manual - English - Page 40
This setting makes the pointer snap to the intersections of gridlines. 3. Click Straight Line on the Shape drop-down menu, or the Straight Line icon toolbar. in the When the pointer is moved into the design area, its shape changes to . 4. Set the stitch pitch to 2 mm by inputting "2.0" in the - Brother International PS-300B | Instruction Manual - English - Page 41
9. Set the stitch pitch of the third path to 4 mm by inputting "4.0" in the Pitch input box. 10.Click the start point again to finish the triangle. The start point marker ("S") and end point marker ("E") appear for every path of the triangle. 11.Click Select Point on the Shape drop-down menu, or - Brother International PS-300B | Instruction Manual - English - Page 42
drawing a triangle, though the pitch cannot be changed for every path. To keep the straight line vertically or horizontally, hold down the keyboard's Shift key while moving the pointer in the design area. Adding an inverted triangle: 1. Use the Select tool to select the triangle. 2. Click Copy To - Brother International PS-300B | Instruction Manual - English - Page 43
draw a circle. Moving the punch point of the circle: You can align the punch point of the circle with a punch point of a triangle to improve sewing efficiency. 1. Use the Select Punch Point tool to select the punch point of the circle. 43/164 - Brother International PS-300B | Instruction Manual - English - Page 44
order for all the design elements You can change the sewing order for all the design elements to increase the sewing efficiency. 1. Click Sequence Window on the Viewdrop-down menu, or the Sequence window icon in the toolbar. The Sequence window appears. All the design elements are shown in separate - Brother International PS-300B | Instruction Manual - English - Page 45
the Close [X] button on the upper right corner of the Sequence window to close the Sequence window. Viewing a simulation of the st itching Use the Slow Draw command to view a simulation of the stitching in order to check for any possible problems. 1. Click Slow Draw on the Tools drop-down menu, or - Brother International PS-300B | Instruction Manual - English - Page 46
drawing is finished. 2-3-3. Specifying a sewing machine model Specify the sewing machine model that you create sewing data for, and then put its sewing area frame into the design area. NOTE , while holding down the Ctrl key, press the M key. The Machine Model Setting dialog box appears. 46/164 - Brother International PS-300B | Instruction Manual - English - Page 47
the OK button to apply the specified settings. 5. While holding down the keyboard's Shift key, click on the design area. The sewing area frame is placed at the center of the data created in the above procedure. NOTE: The sewing area frame can be placed at any position. Refer to 3-7-5. Specifying - Brother International PS-300B | Instruction Manual - English - Page 48
to Machine icon in the toolbar. The Export to Machine dialog box appears. 2. Click the program number to which you want to export the data, and then click the Export button. If the program number already has data, the following message appears. Message dialog box (Do you really want to overwrite the - Brother International PS-300B | Instruction Manual - English - Page 49
create manual stitch data by tracing an imported image and exporting it to a ROM. 2-4-1. Opening a new design area When starting up PS-300B, key, press the N key. 2-4-2. Specifying a sewing machine model Specify the sewing machine model that you are creating sewing data for, and then put its sewing - Brother International PS-300B | Instruction Manual - English - Page 50
holding down the keyboard's Shift key, click on the design area. The sewing area frame is placed at the origin (0) of the sewing machine model for details. 2-4-3. Importing an image An existing image file can be imported to the design area in order to create manual stitch data. NOTE: PS-300B - Brother International PS-300B | Instruction Manual - English - Page 51
size of the image so that it fits into the sewing area. 1. Click Select on the Shape drop-down menu procedure. With the Trace tool, you can easily create manual stitch data by tracing the imported image. Before tracing the image, key, press the T key. The Options Setting dialog box appears. 51/164 - Brother International PS-300B | Instruction Manual - English - Page 52
desired tracing-start point. 4. Move the pointer to trace the image. Manual stitches are created with the specified pitch and margin. 5. Right-click once ("S") and end point marker ("E") for the created data appear. 6. Check the newly created data by hiding the image using the following steps. (a) - Brother International PS-300B | Instruction Manual - English - Page 53
, etc.) with the specified pitch. You can also make stitch points at the desired positions using the following procedure. While holding down the keyboard's Shift key, click the left mouse button at the position where you want to make a stitch point. Drawing a smooth curve You may not be able to draw - Brother International PS-300B | Instruction Manual - English - Page 54
by using the following procedure. Press the keyboard's Backspace or space key. Repeat the above to delete more points. Adjusting the stitch points Point tool. 2-4-6. Making a symmetrical copy of the data You can duplicate the manual stitch data symmetrically on the basis of a reference line (mirror - Brother International PS-300B | Instruction Manual - English - Page 55
A symmetrical copy of the data is created on the basis of the mirror axis. 55/164 - Brother International PS-300B | Instruction Manual - English - Page 56
2-4-7. Converting two design elements into one The following procedure explains how to connect the current data (two design elements) and convert them into one. Reversing the sewing direction of design elements: The current link of the two design elements (the original and its copy) is not proper - Brother International PS-300B | Instruction Manual - English - Page 57
when right-clicking), or the Connect icon in the toolbar. 3. Click the same point again. The two points are connected into one. 2-4-8. Reading data from a sewing machine Read the desired data from a sewing machine ROM by using a ROM reader/writer and save it as a ROM file in the computer. 57/164 - Brother International PS-300B | Instruction Manual - English - Page 58
box. 3. In the Read From ROM dialog box, make settings for the ROM file to which you want to store the data you created. (Refer to "3-1-8. Reading data from a sewing machine ROM" of "Chapter 3. Reference" for details.) 4. In the Save To ROM File dialog box, make the following settings. Specify the - Brother International PS-300B | Instruction Manual - English - Page 59
a ROM file Export the data you created to the ROM file stored in the above procedure. 1. Click the folder. 3. Click the Export button to save the data to the selected ROM file. The data is added to the end of the ROM file. NOTE: To export the data to a new ROM file you create: Click the Export - Brother International PS-300B | Instruction Manual - English - Page 60
can write the ROM file you saved in the above procedure to a sewing machine ROM by using a ROM reader/writer. 1. Click Write to program numbers in the file are shown in the ROM Data list. 4. If you have the PRW-1(SW-1), click the Write ROM button. All data in the specified ROM file is written to the - Brother International PS-300B | Instruction Manual - English - Page 61
5. If you don't have the PRW-1(SW-1), click the Write to MOT File button, the selected file will be converted to MOT file which you can write it to machine ROM by any ROM reader/writer. 61/164 - Brother International PS-300B | Instruction Manual - English - Page 62
on the drop-down menu, the icon on the toolbar, and/or the shortcut keys. 3-1-1. Creating a new design area (File -New, , Ctrl+N) To create a new design for sewing data, first create a new design area in the PS-300B main window by doing one of the following: On the File drop-down menu, click New - Brother International PS-300B | Instruction Manual - English - Page 63
images of the available files contained in the folder are previewed in the right window of the dialog box. NOTE: The images of files in the format designated of the dialog box. 3-1-3. Closing the current data (File-Close) To close the current data Click the Close on the File drop-down menu. If - Brother International PS-300B | Instruction Manual - English - Page 64
. Sewing data saved in the dxf format can only be read by CAD software. To save the data in the current format (File-Save, ): Do one of the following: On the File drop-down menu, click Save. Click the Save icon in the toolbar. On the keyboard, while holding down the Ctrl key, press the S key - Brother International PS-300B | Instruction Manual - English - Page 65
where you want to place the imported file in the design area of the main window. The imported file is placed at the specified point. Follow the instructions below to place the imported file correctly: 1. If a sewing area of a specified machine model is set in the design area: While holding down the - Brother International PS-300B | Instruction Manual - English - Page 66
specified point. 4. While holding down the keyboard's Ctrl and Shift key, click the left mouse button. The center of the imported file aligns 3-1-6. Importing data from a sewing machine (File-Import From Machine, ) You can import data that is saved in the storage media of a sewing machine. NOTE - Brother International PS-300B | Instruction Manual - English - Page 67
specify the machine model and make settings for selecting the data you want to import. Item Description Machine Model Select in the dialog box will be unavailable. Machine ID Available when a model that supports the ISM format (KE430D or BE438D) is selected. If the drop-down list is available - Brother International PS-300B | Instruction Manual - English - Page 68
of the selected model is FD-300, it shows all the program numbers that the selected model can support. If the media is a different type, it shows the program number which has data in the specified folder. Clicking a program number shows the following information for the program. (If the clicked - Brother International PS-300B | Instruction Manual - English - Page 69
position in the design area. If you import the data as a new file, follow the instructions below to place the imported file correctly: 1. If a sewing area of a specified machine model is set in the design area: While holding down the keyboard's Shift key, click the left mouse button. The center of - Brother International PS-300B | Instruction Manual - English - Page 70
down the keyboard's Ctrl and Shift key, click the left mouse button. The center of the imported file aligns with the center of the design element(s) in the design area. 3-1-7. Exporting data to a sewing machine (File-Export To Machine, ) You can export data created in PS-300B to the storage media of - Brother International PS-300B | Instruction Manual - English - Page 71
the dialog box will be unavailable. End Code Specify the end code of the data you will export by selecting it from the dropdown list. Data Data list: Shows all the program numbers that the selected model can support in the list. Clicking a program number shows the following information for the - Brother International PS-300B | Instruction Manual - English - Page 72
Comments If the selected machine model supports the ISM format, you can store comments to each data. First select the program No., and then click this button. In the dialog box that appears, edit comments. When exporting the data, the comments will be exported with the data. NOTE: The other items in - Brother International PS-300B | Instruction Manual - English - Page 73
All data in the sewing machine ROM is read and displayed in the Read from ROM dialog box. 3. In the Read From ROM dialog box, make settings for the ROM file to which you want to store the data. Item Description Read From ROM Model Name : Shows the machine model name for which the - Brother International PS-300B | Instruction Manual - English - Page 74
in Option Setting on the Tools drop-down menu. It will take a little while to write data to a PROM. Do not click anywhere while writing data to a PROM otherwise, it may fail to write data. To write data to a sewing machine ROM: 1. Do one of the following: On the File drop-down menu, click Write - Brother International PS-300B | Instruction Manual - English - Page 75
be write to a machine ROM by any PROM reader/writer (not only the SW-1). Click this to write the selected ROM file to a sewing machine ROM. After the data is written to the ROM, the corresponding check sum appears in this box. 3. Click on the ROM file name in the ROM File - Brother International PS-300B | Instruction Manual - English - Page 76
a ROM, insert the ROM into the ROM reader/writer, and then click the ROM button. A message appears, instructing you to insert the ROM into the ROM writer. Then, click the OK button. If the data is to be copied to a ROM file, click the FILE button. The Select ROM File dialog box - Brother International PS-300B | Instruction Manual - English - Page 77
a ROM, insert the ROM into the ROM reader/writer, and then click the ROM button. A message appears, instructing you to insert the ROM into the ROM reader/writer. Click the OK button. If the data is to be stored in a ROM file, click the FILE button. The Select ROM File dialog box - Brother International PS-300B | Instruction Manual - English - Page 78
The Print Setup dialog box appears. 2. In the Print Setup dialog box, make settings for printing the current data. Item/group box Description Printer group box Name: Select the Printer from the drop-down menu. Status : Displays current status of the printer. Type : Displays a - Brother International PS-300B | Instruction Manual - English - Page 79
stitch, last modified date and the data size. Sewing Area: Check the Sewing Area check box to print the sewing area of the selected machine model. on the File drop-down menu. To preview the data, click this button. The preview window for the data appears. For more details, refer to Print Preview. - Brother International PS-300B | Instruction Manual - English - Page 80
. Click this to close the preview window. 3-1-12. Printing the current data (File-Print, , Ctrl+P) To print the current data: 1. Do one of the following: the Ctrl key, press the P key. The Print dialog box appears. 2. In the Print dialog box, make settings for printing the current data. Item - Brother International PS-300B | Instruction Manual - English - Page 81
the Cancel button is clicked, the Print dialog box appears. 3-1-13. Viewing the file information (File-Design Info ) To view the properties for the current data: Do one of the following: On the File drop-down menu, click Design Info. Click the Design Info icon in the toolbar. Right-click to - Brother International PS-300B | Instruction Manual - English - Page 82
machine model. Sewing Area: Shows the frame size of the sewing area of the selected machine model. Original Position: Shows the sewing start point supported file formats are emb, dst, dsb, dsz, dxf and if2. 3-1-15. Quitting the PS-300B application (File-Exit) To quit the PS-300B application: 82/164 - Brother International PS-300B | Instruction Manual - English - Page 83
appears asking if you want to save the changes. Do one of the following: To save the changes, click the Yes button. To close the data without saving the changes, click the No button. To quit trying to close the design, click the Cancel button. 83/164 - Brother International PS-300B | Instruction Manual - English - Page 84
attributes to it, such as stitch type (running stitch or zigzag stitch), and stitch pitch. In addition, PS-300B allows you to create manual stitch data directly without creating outline data. Almost all the functions described here can be selected from the Shape drop-down menu. The parenthesis - Brother International PS-300B | Instruction Manual - English - Page 85
target. To delete the last point you have inputted, press the keyboard's Backspace or Space key. Repeat pressing the Backspace or Space key to delete more points. To delete all points, press the keyboard's Esc key. 3. After specifying the end point of the outline, right-click once to finish the - Brother International PS-300B | Instruction Manual - English - Page 86
For details on drawing the desired shape of outline, refer to "3-2-2 Selecting commands for drawing the desired outlines". 2. Press any of the numeric keys on the keyboard. The Input Outline (Stitch, Feed) dialog box appears. 3. Make necessary settings and input values in the Input Outline (Stitch - Brother International PS-300B | Instruction Manual - English - Page 87
. The First Reference Point group box Select the reference point of the data from the drop-down list for inputting relative coordinates. The absolute values input box below will be the relative distance from the center of the sewing area. NOTE: If nothing has been selected in the drop-down list, - Brother International PS-300B | Instruction Manual - English - Page 88
path. NOTE: Refer to "Example of inputting values" below. The keyboard's Tab key and arrow keys can be used to determine the inputted value and move to the next cell. OK Click this button to create an outline with the settings - Brother International PS-300B | Instruction Manual - English - Page 89
"-80" in the Angle cell and "60.5" in the Y cell. To draw an outline using the Input Point dialog box: You can draw an outline manually or by specifying the coordinates of points configuring the outline on the design area. 1. Do one of the following: On the Shape drop-down menu - Brother International PS-300B | Instruction Manual - English - Page 90
Selecting commands for drawing the desired outlines." 2. In the design area, click to specify the start point of the outline. 3. Press any of the numeric keys on the keyboard. The Input Point dialog box appears. 4. Input values in the Input Point dialog box to specify the next point. When you have - Brother International PS-300B | Instruction Manual - English - Page 91
are 0 to -360°. When you have made the settings that conflict, PS-300B automatically applies the values in the following priority. 1. X and Y-coordinates point, press the keyboard's Backspace or Space key. To delete all points, press the keyboard's Esc key. 6. After specifying the last point in the - Brother International PS-300B | Instruction Manual - English - Page 92
the straight line vertically or horizontally, hold down the keyboard's Shift key while moving the pointer in the design area. The angle of a be adjusted in increments of 15 degrees, by holding down the keyboard's Ctrl key while moving the pointer in the design area. 4. Right-click once to finish - Brother International PS-300B | Instruction Manual - English - Page 93
4. Right-click once to finish the curved line. To draw an arc (Shape-Arc, ): 1. Do one of the following: On the Shape drop-down menu, click Arc. Click the Arc icon in the toolbar. When the pointer is moved into the design area, its shape changes to . 2. In the design area, specify the desired - Brother International PS-300B | Instruction Manual - English - Page 94
NOTE: To cancel drawing the rectangle, press the keyboard's Backspace or Space key or the right mouse button. 3. Specify the second point until the next path of the outline vertically or horizontally, hold down the keyboard's Shift key while moving the pointer in the design area. The angle of a path - Brother International PS-300B | Instruction Manual - English - Page 95
4. Right-click once to close the polygon. To draw a circle by specifying three points (Shape-Circle, ): 1. Do one of the following: On the Shape drop-down menu, click Circle. Click the Circle icon in the toolbar. When the pointer is moved into the design area, its shape changes to . 2. In the design - Brother International PS-300B | Instruction Manual - English - Page 96
axis of the ellipse (2 in the figure below). NOTE: To keep the next path of the outline vertically or horizontally, hold down the keyboard's Shift key while moving the pointer in the design area. The angle of a path can be adjusted in increments of 15 degrees, by holding down the keyboard - Brother International PS-300B | Instruction Manual - English - Page 97
you specify. This section describes how to create sewing data manually. NOTE:The sewing data created in the way are all open outline types. Creating manual stitch data (Shape-Stitch, ) In PS-300B, stitch data is basically generated from outline data. In this way, stitch points are automatically - Brother International PS-300B | Instruction Manual - English - Page 98
moved into the design area, its shape changes to . To create manual feed data, click Feed on the Shape drop-down menu, or click the Feed the start point of the data, and then continue clicking at the points where you want to create the data. Press any of the numeric keys on the keyboard. The Input - Brother International PS-300B | Instruction Manual - English - Page 99
the desired shape of data. In the design area, click to specify the start point of the data. Then press any of the numeric keys on the keyboard. The the current data. 3-2-4. Drawing manual stitch data by tracing an image (Shape-Trace, ) The Trace command allows you to draw manual stitch data with the - Brother International PS-300B | Instruction Manual - English - Page 100
pasted on the design area. NOTE: Refer to the instruction manual for the machine model you specified for the parameter instructions below to place the imported pattern correctly: 1. When a sewing area of a specified machine model is set in the design area: While holding down the keyboard's Shift key - Brother International PS-300B | Instruction Manual - English - Page 101
setting the sewing area of a specified machine, refer to "3-7-5. Specifying a sewing machine model and set its sewing area". 3. Click a numeric key on the 1. Using the Select Point tool , select the point in the stitch or feed data where you want to add a code. The selected point turns black. 2. Do - Brother International PS-300B | Instruction Manual - English - Page 102
if you prefer. 6. Click the Close button to close the window. NOTE: If a machine model is already specified, Show selected Select Point tool, then while holding down the keyboard's Shift key, move the pointer onto the point. A list appears to the maximum sewing speed. Select the desired speed from 8 - Brother International PS-300B | Instruction Manual - English - Page 103
. Select "Pause OFF" or "Pause ON". Controls the electric output of a sewing machine. Select Option 1 to option 3 for the Optional Output 1 to 3. Controls Priority sequence Elements 1 Outline 2 Sewing start point of the data 3 The sewing area frame of the specified machine model 103/164 - Brother International PS-300B | Instruction Manual - English - Page 104
selecting two or more outlines, the one whose sewing order is earlier is given high priority. The design around the elements to show that they are selected. Hold down the keyboard's Shift or Ctrl key while clicking design elements one by one. Dragging the pointer over the design elements from upper - Brother International PS-300B | Instruction Manual - English - Page 105
Dragging the pointer over the design elements in the direction other than above (shown below) selects all design elements that are either fully enclosed or partially enclosed by the selection frame. NOTE: If other design elements were accidentally selected, click outside the selection frame, and - Brother International PS-300B | Instruction Manual - English - Page 106
the first outline's start point: While holding down the keyboard's Ctrl key, drag the sewing start point. To align the sewing start point to the center of all the sewing data: While holding down the keyboard's Shift key, drag the sewing start point. To select a stitch point (Shape-Select Point, ) In - Brother International PS-300B | Instruction Manual - English - Page 107
area of the data: Drag the pointer the selectable points and their attributes (the outline number, the sewing order of the point from the start of the outline.). manually: Place the pointer on the selected point(s) and drag it (them) to the desired position. You can use the keyboard's arrow keys - Brother International PS-300B | Instruction Manual - English - Page 108
the keyboard's Ctrl key while clicking each additional point. To select more than one punch point in a specific area of the data: Drag the pointer points manually: Place the pointer on the selected punch point(s) and drag it (them) to the desired position. You can use the keyboard's arrow keys to - Brother International PS-300B | Instruction Manual - English - Page 109
all points on the selected outline or sewing data, and move the desired punch points by changing the coordinates of them. 1. Select an outline with the Select tool. 2. Click any of the numeric keys on the keyboard. The Select Data Type dialog box appears. 3. Select the data type you want to display - Brother International PS-300B | Instruction Manual - English - Page 110
Click this button to preview the settings. Sewing Data List dialog box Item Description Absolute Coordinate data in the point, the code data will be shown in the list. If you want to delete the code data, click to highlight it and press the Delete key on the keyboard. You cannot add code data - Brother International PS-300B | Instruction Manual - English - Page 111
3-3. Viewing This section describes the various ways of displaying design element(s), the design area and other windows of PS-300B. Almost all the functions described here can be selected from the View drop-down menu. The parenthesis following each title includes the name of the - Brother International PS-300B | Instruction Manual - English - Page 112
selected, all the design element(s) in the design area are enlarged to fill the window. To display the sewing area in the size fit in the window (View-Zoom-Fit Sewing Area To Window, ): You can adjust the size of the sewing area of the machine model you specified so that it will fit within the - Brother International PS-300B | Instruction Manual - English - Page 113
the Viewdrop-down menu, click Pseudo 3D. Click the Pseudo 3D icon in the toolbar. Displaying the Reference window (View-Reference window, ): The Reference window displays all the design elements. With this window, you can create elements while checking the overall image of the sewing data. 113/164 - Brother International PS-300B | Instruction Manual - English - Page 114
display the design elements to fill the window: Clear the Fit Sewing Area check box on the Reference window. NOTE: If the Fit Sewing Area check box is checked: When the sewing area is larger than the design elements, the sewing area will fit to fill the window, and when the design elements' size is - Brother International PS-300B | Instruction Manual - English - Page 115
, do one of the following: On the Viewdrop-down menu, click Sequence Window. Click the Sequence window icon in the toolbar. The Sequence window appears. The design elements are shown in separate frames, and arranged in the actual sewing order. To check the positions of the design elements: Check the - Brother International PS-300B | Instruction Manual - English - Page 116
the element you want to delete in the Sequence window. (Its number is highlighted.) Then press the keyboard's Delete key. To delete more elements, repeat this operation. To manually change the sewing order for the desired elements: Drag the element whose sewing order you want to change and drop it - Brother International PS-300B | Instruction Manual - English - Page 117
Item Image Outlines Stitches Feeds Codes Connections Sewing Area Explanation Set to show or hide the hide all codes. Set to show or hide all connection data (feeds or stitches). Set to show or hide the frame of the sewing area when the sewing area of a specified machine model is displayed in the - Brother International PS-300B | Instruction Manual - English - Page 118
. 3. Click the OK button to apply the specified setting. NOTE: If you have checked two or more check boxes, Gridline is given top priority. 3-3-5. Setting sewing attributes (View-Property, ): You need to set sewing attributes to design element(s). Use the Property dialog box to set or change - Brother International PS-300B | Instruction Manual - English - Page 119
the Running group box. If you select Border, you can make setting changes in the Border group box. Color: Select the color for the outline data from the drop-down list. Connection: When a design element is created or edited, or its attributes are changed, the connection between the element and the - Brother International PS-300B | Instruction Manual - English - Page 120
the Pitch input box in the toolbar. Division: When stitch data is generated from outline data, the outline can be divided into stitches in two methods: Equal Pitch from the drop-down list. Division Explanation Equal Creates stitch data so that needle drops on all the punch points. Stitches are - Brother International PS-300B | Instruction Manual - English - Page 121
Balanced Width: If you want to set a zigzag width in the center of the outline, check the box for this item. If you do not want to, clear this check box and set the values for the Right Width and Left Width. Width: When you set zigzag width in the center of the outline, set the width of the zigzag. - Brother International PS-300B | Instruction Manual - English - Page 122
A B Zigzag shape: You can specify a zigzag shape for the stitch data from the drop-down list. Zigzag shape Explanation N Shape Makes zigzag stitching like letter N. V Shape Makes zigzag stitching like letter V. 122/164 - Brother International PS-300B | Instruction Manual - English - Page 123
following: On the Edit drop-down menu, click Redo. Click the Redo icon in the toolbar. On the keyboard, while holding down the Ctrl key, press the R key. To reverse more than one Undo operation, repeat one of the above operations until all of the desired actions are performed again. NOTE: If - Brother International PS-300B | Instruction Manual - English - Page 124
Copy icon in the toolbar. Right-click to display the context menu, and then click Copy. On the keyboard, while holding down the Ctrl key, press the C key. To paste the design elements that have been cut or copied (Edit-Paste, , Ctrl+V): A copy of the last design element(s) stored in memory can - Brother International PS-300B | Instruction Manual - English - Page 125
is not available. Follow the instructions below to paste the design element(s) on a correct position: 1. If the sewing area of a specified machine model to the specified point. 4. While holding down the keyboard's Ctrl and Shift key, click the left mouse button. The center of the design element (s) - Brother International PS-300B | Instruction Manual - English - Page 126
available. Follow the instructions below to place the design element(s) correctly: 1. If the sewing area of a . 4. While holding down the keyboard's Ctrl and Shift key, click the left mouse button. The center of the data, manual stitch data, manual feed data, images, stitch points and outline's punch - Brother International PS-300B | Instruction Manual - English - Page 127
: You can duplicate design element(s) manually. 1. Select one or more design elements. A selection frame of "dashes" appears around the element(s). 2. While holding down the keyboard's Ctrl key, drag the elements to the desired position. The selected element(s) is duplicated and positioned where - Brother International PS-300B | Instruction Manual - English - Page 128
3-4-4. Searching for the desired sewing data You can search for the desired sewing data (manual stitches, manual feeds and codes) in the design area by specifying the criteria (the type or length of stitch and others). Search is performed on the selected outline data. If no outline is selected, - Brother International PS-300B | Instruction Manual - English - Page 129
of the search results are displayed in red. 5. To display one of the search results, press the keyboard's or key. To display the next search result, press the keyboard's key. To display the previous result, press the keyboard's key. To select the currently displayed data, press the keyboard's Enter - Brother International PS-300B | Instruction Manual - English - Page 130
is converted. You can confirm that the conversion was successful by seeing how the data is displayed. 3-5-2. Editing single points PS-300B is provided with various ways of modifying single stitch and punch points on a design element, for example, to add or split points at the desired - Brother International PS-300B | Instruction Manual - English - Page 131
The selected point changes to a black circle. NOTE: The Add command is available only if a point that is not at the end of a design element is selected. 2. Do one of the following: On the Modify drop-down menu, click Point. On the Point sub- menu, click Add. Right-click to display the context menu, - Brother International PS-300B | Instruction Manual - English - Page 132
are joined at a point (ModifyPoint-Connect, ): The Connect command allows you to join two end (start) points of design elements (outline, manual stitch and manual feed data) allowing you to connect two design elements or close an open outline. 1. Using the Select Point tool or Select Punch Point - Brother International PS-300B | Instruction Manual - English - Page 133
You cannot connect a point on a closed outline to a separate design element. When two punch points are connected, the property of the last-selected outline is applied to the new one. To smooth out a punch (corner) point (Modify-Point-Smooth, ): The Smooth command allows you to round off a punch ( - Brother International PS-300B | Instruction Manual - English - Page 134
To straighten a smooth punch point (Modify-Point-Cusp, ): The Cusp command allows you to straighten a smooth punch point between two rounded paths of an outline. 1. Using the Select Punch Point tool , select the smooth punch point that you want to straighten. The selected punch point changes to a - Brother International PS-300B | Instruction Manual - English - Page 135
to a percentage of the original size. The design elements can also be enlarged or reduced manually. To resize design elements (Modify-Resize, ): Design elements (outline, manual stitch and manual feed data) can be resized by inputting values. 1. Select one or more design elements. A selection frame - Brother International PS-300B | Instruction Manual - English - Page 136
stitches (Stitch Number) or the pitch (Pitch) of the original data. Item Explanation Stitch Number Select this to keep the number of stitches generation will be done again.) NOTE: If you resize a shape of manual stitch or manual feed, the stitch number will not change even when you select Pitch. - Brother International PS-300B | Instruction Manual - English - Page 137
them while maintaining stitch number, hold down the keyboard's Shift key while dragging a handle. 3-5-4. Flipping design elements The Flip command allows you to flip the selected design elements (outline, manual stitch, manual feed data) vertically or horizontally, or by using a reference line so - Brother International PS-300B | Instruction Manual - English - Page 138
inputting values in the Input Point dialog box. (a) Press any of the numeric keys on the keyboard to display the Input Point dialog box. (b) Input values in line, and then click the OK button. (c) Press any of the numeric keys on the keyboard to display the Input Point dialog box again. (d) Input - Brother International PS-300B | Instruction Manual - English - Page 139
360°, and angles in the counterclockwise direction are 0 to -360°. When you have made the settings that conflict, the PS-300B automatically applies the values in the following priority. 1. X and Y-coordinates 2. X-coordinate + Angle 3. Y-coordinate + Angle 4. Length + Angle 3-5-5. Rotating design - Brother International PS-300B | Instruction Manual - English - Page 140
the new settings without closing the Rotate dialog box, click the Apply button. To rotate design elements manually (Modify-Rotate By Drag, ): You can rotate the selected design elements manually by dragging the rotation handle. The center of rotation is fixed to the center of the selected design - Brother International PS-300B | Instruction Manual - English - Page 141
the rotation handle. To rotate the design elements in increments of 15 degrees, hold down the keyboard's Ctrl key while dragging the rotation handle. To rotate design elements manually by specifying the center of rotation (Modify-Rotate By Point, ): You can rotate the selected design elements - Brother International PS-300B | Instruction Manual - English - Page 142
rotation angle is shown in the dialog box. NOTE: To rotate the design elements in increments of 15 degrees, hold down the keyboard's Shift key while dragging the rotation handle. 3-5-6. Making an offset copy of the selected outlines To make an offset copy of the selected outlines (Modify-Offset - Brother International PS-300B | Instruction Manual - English - Page 143
are not deleted. 3-5-7. Making a copy of design elements at the specified position You can make a copy of the desired design elements (outline, manual stitch, manual feed data) at the specified position. To make a copy of design elements (Modify-Copy To, ): 1. Select one or more design elements - Brother International PS-300B | Instruction Manual - English - Page 144
two points. Follow the next steps (a) to (d) to draw a mirror axis by inputting values in the Input Point dialog box. (a) Press any of the numeric keys on the keyboard to display the Input Point dialog box. 144/164 - Brother International PS-300B | Instruction Manual - English - Page 145
boxes to specify the absolute coordinates of the start point for the mirror axis, and then click the OK button. (c) Press any of the numeric keys on the keyboard to display the Input Point dialog box again. (d) Input values to specify the end point for the mirror axis, and then click - Brother International PS-300B | Instruction Manual - English - Page 146
. To specify the point by inputting values: Press any of the numeric keys on the keyboard to display the Input Point dialog box. In the dialog position. 3-5-9. Reversing the sewing direction of design elements The Swap Start/End Point command reverses the sewing direction of the selected design - Brother International PS-300B | Instruction Manual - English - Page 147
elements (Modify-Swap Start/End Point, ): To reverse the sewing direction of the selected design elements: 1. Select one or more element(s) are switched. NOTE: If no design element is selected in step 1, the sewing direction of all the design elements in the design area is reversed. This command will - Brother International PS-300B | Instruction Manual - English - Page 148
the design area's X-Y coordinates. NOTE: Align To The Origin Of The Coordinate can also be selected by clicking the icon in the toolbar. Align To Sewing Area Center can also be selected by clicking the icon in the toolbar. Moreover, these two commands can be selected on the context menu that - Brother International PS-300B | Instruction Manual - English - Page 149
and/or the icon on the toolbar. 3-6-1. Generating stitch data manually By default, stitch data is automatically generated as you draw outlines. You can clear the stitch data and regenerate it. To generate stitch data for the selected outline data (Stitch-Generate Select, ): 1. Using the Select tool - Brother International PS-300B | Instruction Manual - English - Page 150
select one or more outlines. A selection frame of "dashes" appears around the element(s). NOTE: This command is available only for outlines that have stitch data 2. Do one of the following: On the Stitch drop-down menu, click Clear Outline . Click the Clear Outline icon in the toolbar. The property - Brother International PS-300B | Instruction Manual - English - Page 151
-down menu and/or the icon on the toolbar. 3-7-1. Viewing a simulation of sewing data Use the Slow Draw command to view a simulation of the sewing data in order to check for any possible problems. To view a simulation of sewing data (Tools-Slow Draw, ): 1. Do one of the following: On the Tools drop - Brother International PS-300B | Instruction Manual - English - Page 152
Forward Back input box Count Marker Click this to begin drawing all of the sewing data. Click this to pause the drawing of sewing data. Click this to locate the start of sewing data. Click this to locate the end of sewing data. Click to skip in the forward direction the number of stitch points - Brother International PS-300B | Instruction Manual - English - Page 153
NOTE: To continue measuring from the end point of the previous measurement, click again to quit the previous measurement, and then click the same point once more as the start point for the next measurement. If Snap Setting on the Vie w menu is active, the Measure tool snaps to the specified target ( - Brother International PS-300B | Instruction Manual - English - Page 154
3. Click the OK button to perform resizing all the design elements. All the design elements in the design area are enlarged or reduced in accordance with the ratio of the current and desired lengths. 3-7-3. Setting the space and color of gridlines You can change the space and color of the gridlines - Brother International PS-300B | Instruction Manual - English - Page 155
close this dialog box. Click the Default button to revert all the settings to the software defaults. 3-7-4. Specifying various default settings of PS-300B You can specify various default settings of PS-300B, for example the maximum and minimum stitch lengths. To change default settings (Tools-Option - Brother International PS-300B | Instruction Manual - English - Page 156
click Option Setting. On the keyboard, while holding down the Ctrl key, press the T key. The Option Setting dialog box appears. 2. Change the default revert the settings to the software defaults. Max. Length Specify the maximum length of the interval between stitch data. This is available when - Brother International PS-300B | Instruction Manual - English - Page 157
the box to change the pitch for manual stitches created with the Trace tool. (Setting range: 0.05 to 12.7 mm, software default: 0.2 mm) Margin: Type the which is not the PRW-1. NOTE: To find the COM port, click the Windows' Start button, and then click Control Panel. In Control Panel, double -click - Brother International PS-300B | Instruction Manual - English - Page 158
menus and dialog boxes. The change will be applied when starting PS-300B the next time. The current design is automatically saved. Type in the time interval at which the data is automatically saved. (Setting range: 0 to 30 minutes, software default: 10 minutes. If you set it to 0, the current design - Brother International PS-300B | Instruction Manual - English - Page 159
on the items and their functions. Item Machine Model Name Description Select a sewing machine model from the drop-down list. The list shows the model names for sewing machines that are applicable to PS-300B. The size of sewing area and the maximum number of stitches for the model are also shown - Brother International PS-300B | Instruction Manual - English - Page 160
coordinates. When there is design element(s) in the design area: The frame reference point will be shifted to the sewing start point of the element(s). Press any of the numeric keys on the keyboard. The Input Point dialog box appears. Input values of the X-Y coordinates where the frame reference - Brother International PS-300B | Instruction Manual - English - Page 161
available. If the Relative Coordinate check box is checked, the inputted value will be the distance from the current frame center. 161/164 - Brother International PS-300B | Instruction Manual - English - Page 162
format for the image file that you want to import. The formats supported by PS-300B are BMP and JPG. 3. In the Look in drop-down list sewing area of a specified machine is displayed in the design area. When the sewing area of a specified machine is displayed, the image will be placed at the sewing - Brother International PS-300B | Instruction Manual - English - Page 163
-down menu, click Help. Click the Help icon in the toolbar. The online Help starts. To display the information on the version of PS-300B (Help-About PS300B): On the Help drop-down menu, click About PS -300B. A dialog box containing information about the version of this application appears. 163/164 - Brother International PS-300B | Instruction Manual - English - Page 164
164/164
-
 1
1 -
 2
2 -
 3
3 -
 4
4 -
 5
5 -
 6
6 -
 7
7 -
8
-
9
-
10
-
11
-
12
-
13
-
14
-
15
-
16
-
17
-
18
-
19
-
20
-
21
-
22
-
23
-
24
-
25
-
26
-
27
-
28
-
29
-
30
-
31
-
32
-
33
-
34
-
35
-
36
-
37
-
38
-
39
-
40
-
41
-
42
-
43
-
44
-
45
-
46
-
47
-
48
-
49
-
50
-
51
-
52
-
53
-
54
-
55
-
56
-
57
-
58
-
59
-
60
-
61
-
62
-
63
-
64
-
65
-
66
-
67
-
68
-
69
-
70
-
71
-
72
-
73
-
74
-
75
-
76
-
77
-
78
-
79
-
80
-
81
-
82
-
83
-
84
-
85
-
86
-
87
-
88
-
89
-
90
-
91
-
92
-
93
-
94
-
95
-
96
-
97
-
98
-
99
-
100
-
101
-
102
-
103
-
104
-
105
-
106
-
107
-
108
-
109
-
110
-
111
-
112
-
113
-
114
-
115
-
116
-
117
-
118
-
119
-
120
-
121
-
122
-
123
-
124
-
125
-
126
-
127
-
128
-
129
-
130
-
131
-
132
-
133
-
134
-
135
-
136
-
137
-
138
-
139
-
140
-
141
-
142
-
143
-
144
-
145
-
146
-
147
-
148
-
149
-
150
-
151
-
152
-
153
-
154
-
155
-
156
-
157
-
158
-
159
-
160
-
161
-
162
-
163
-
164
 |
 |

1/164
How to use this online Help
This online Help consists of the following three chapters.
Refer to the chapter appropriate for
finding the information you need.
Chapter 1: Windows and icons
This chapter gives you brief descriptions about the windows, icons and other items that appear
in the main window of PS-300B.
Details about each icon are described in Chapter 3.
For example, you can find the name of the item you want to learn about in this chapter, then
you can search for a more detailed explanation by using the Help INDEX or Keyword tool.
Chapter 2: Tutorial
You can learn the procedure for using PS-300B by making and exporting sewing data for the
four typical sewing machine’s media.
This chapter may be useful especially for beginners.
If
you are more experienced, you may need only Chapter 3.
Chapter 3: Reference
Refer to this chapter for details about all the functions of PS-300B.
The function descriptions
are basically classified according to the groups shown in the menu.
Chapter 1: Windows and icons
This chapter gives you brief descriptions about the windows, icons and other items that appear
in the main window of PS-300B.
Main window items
When starting up PS-300B, the main window and a new design area appear.
In the design area,
you will create designs or modify existing ones.
All of the tools and functions for creating
designs can be selected in this window.
The following gives you brief descriptions of the
windows and items shown in the main window.