Brother International TD-2125NWB Quick Reference Guide TD-2020A/2125NWB/2135NW
Brother International TD-2125NWB Manual
 |
View all Brother International TD-2125NWB manuals
Add to My Manuals
Save this manual to your list of manuals |
Brother International TD-2125NWB manual content summary:
- Brother International TD-2125NWB | Quick Reference Guide TD-2020A/2125NWB/2135NW - Page 1
Guide at support.brother.com/manuals. To install the printer driver and software or to check for firmware updates, go to support.brother.com, click Downloads, and select your model. For other questions or issues, go to support.brother.com, click FAQs & Troubleshooting Customer Service for assistance
-
 1
1
 |
 |
Quick Reference Guide
Thank you for purchasing the Brother TD-2020A/2125N/2135N/2125N
WB/2135NWB.
The TD-2020A/2125N/2135N/2125NWB/2135NWB (hereafter referred
to as “the printer”) is a powered desktop thermal printer.
Be sure to read the User’s Guide (Brother support website), Product
Safety Guide (Printed), Quick Reference Guide (this manual), Software
User’s Guide (Brother support website) and Network User’s Guide
(Brother support website TD-2125N/2135N/2125NWB/2135NWB only)
before using the printer. We suggest that you keep these documents in a
handy place for future reference. To download the latest manuals, please
visit the Brother support website at support.brother.com, where you can
also download the latest drivers and utilities for your printer, get product
support and answers to frequently asked questions (FAQs).
Options can be used with the TD-2125N/2135N/2125NWB/2135NWB.
For details, refer to the User’s Guide.
General Description
±
Front
9
10
11
12
13
14
15
11
16
1
2
3
4
5
6
7
8
±
Back
TD-2020A
18
19
20
17
TD-2125N/2135N
18
19
20
21
22
17
TD-2125NWB/2135NWB
18
23
19
20
24
21
22
17
1 POWER indicator
2
(Power) button
3 Media exit
4
Media Roll compartment top cover
5 STATUS indicator
6
(Feed) button
7
(Print) button
8 Cover release lever
9 Tear bar
10 Print head
11 Transmissive/gap sensor
NOTE:
Before using the printer, remove the
cover over the tear bar.
Do not dispose of the removed cover.
In order to avoid injuries when the printer is not
being used, attach the cover to the tear bar.
12 Media guide
13 Media tip guide
14 Media guide adjustment lever
15 Platen roller
16
Reflective/black mark sensor
17 External media feed slot
18 Serial port
19 Power connector
20 Mini-USB port
21 USB host port (TD-2125N/2135N/
2125NWB/2135NWB only)
22 Ethernet network port (TD-2125N/2135N/
2125NWB/2135NWB only)
23 Wi-Fi
®
indicator
24 Bluetooth
®
indicator
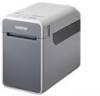
Connecting the Printer to an AC Power
Outlet
Connect the AC adapter to the printer, and then plug the AC power
cord into an AC power outlet to power the printer.
a
Connect the AC adapter to the printer.
b
Connect the AC power cord to the AC adapter.
c
Connect the AC power cord to a nearby AC power outlet
(100 - 240 V, 50 - 60 Hz).
1
2
1 AC adapter
2 AC power cord
Installing the Printer Driver and
Software
For detailed machine information and product specifications, see your
model’s
User’s Guide
at support.brother.com/manuals.
To install the printer driver and software or to check for firmware updates,
go to support.brother.com, click
Downloads
, and select your model.
For other questions or issues, go to support.brother.com,
click
FAQs & Troubleshooting
, and select your model.
NOTE
• The information provided in this document is subject to change
without notice.
• Unauthorized duplication or reproduction of any or all content of this
document is prohibited.
• Models may vary depending on your country.
Indicators
=
Indicator is lit
G
= Green
O
= Orange
R
= Red
B
= Blue
=
Indicator is blinking
=
Indicator blinks 1 or 3 times, then turns off
=
Indicator is lit or blinking in any color or pattern
(off)
=
Indicator is off
Example:
G
= Indicator is blinking in green
POWER
STATUS
Description
G
Printer turned on
Initializing
O
Media Roll compartment top cover open
G
Receiving data
Transferring/importing data
O
Now cooling
O
(3 times)
O
(3 times)
Resetting the incrementing field
O
(1 time)
O
(1 time)
Initializing complete
G
R
(Once every
1.8 seconds)
Error 1
See “Troubleshooting” above.
G
R
(Twice every
1.8 seconds)
Error 2
See “Troubleshooting” above.
R
R
System error
R
(off)
In boot mode
O
(3 times)
G
(3 times)
Resetting
POWER
STATUS
Description
O
In mass storage mode
O
G
(1 time)
Processing file in mass storage mode
G
±
USB host port connected to a supported
device
G
G
±
Bluetooth and Wi-Fi on, either or both
connected
*1
Both Bluetooth and Wi-Fi indicators are lit
G
±
Configuring WPS
*2
±
Pairing with Bluetooth
POWER
STATUS
Wi-Fi
Bluetooth
Description
G
G
Ready to change
the mode
*3
No change
Power on
G
(Once every
3 seconds)
G
(Once every
3 seconds)
Wi-Fi ON,
not connected
G
G
Wi-Fi ON, connected
*1
G
(Once every
3 seconds)
B
(Once every
3 seconds)
Bluetooth ON,
not connected
G
B
Bluetooth ON,
connected
*1
G
G
G
B
Wi-Fi and Bluetooth
ON, either one or
both connected
*1
*1
Press and hold the
(Feed) button for five seconds to enable or
disable Wi-Fi, Bluetooth, or both. See the User’s Guide for more
information.
*2
Press and hold the
(Feed) button for 10 seconds to enable a WPS
connection.
*3
The Power and Status LEDs blink in green alternately.
Troubleshooting
The POWER indicator is not lit.
±
Is the AC power cord inserted correctly?
Check that the AC power cord is inserted correctly. If it is, try plugging it into another AC
power outlet.
±
Be sure to use a genuine Brother AC adapter.
±
If the POWER indicator still does not light up, contact Brother Customer Service.
The indicators show that the printer is in boot mode.
±
The AC adapter was unplugged while the firmware was being updated, and the printer
started up in boot mode the next time it was started.
This issue must be resolved. Contact your reseller or Brother Customer Service for
assistance.
The indicators show that the printer is cooling.
±
The print head or motor is too hot.
Print head:
If the print head becomes too hot, it may produce imaging on the paper in areas not
intended to be printed. This condition is normal when printing a large number of documents
with a high print density. The printer will stop, then resume printing after the print head
has cooled down. To avoid or delay the onset of this condition, print using a lighter density
setting, reduce the amount of black areas being printed (for example, remove background
shading and colors in graphs and presentation documents). Also, make sure that the printer
has adequate ventilation and is not located in an enclosed space.
Motor:
If the printer is used continuously, the motor will become too hot. In this case, the printer
will stop and resume printing after the motor has cooled down.
NOTE:
This condition may occur more often when the printer is used at a high altitude
(above 3,048 m (10,000 feet)) due to the lower air density available to cool the printer.
The indicators show that a system error has occurred.
If this condition occurs, turn off the printer, and then contact your reseller or Brother
Customer Service.
The printer does not print.
±
Is a cable loose?
Check that the cables are connected securely.
±
Is the STATUS indicator blinking?
An error occurred. Check the error details in “Indicators” below, and then see “If the STATUS
indicator was blinking in red”.
Media is not fed correctly.
±
Is the print head or platen roller dirty?
Although the print head generally remains clean under normal use, dust or dirt from the
platen roller may become stuck to the print head.
If this occurs, clean the print head or platen roller.
±
Are the sensors in the correct position?
Check that the sensors are correctly positioned.
±
Has the paper size information been registered with the printer?
If the paper size information has not been registered with the printer, the media will not be
fed correctly.
A data transmission error appears on your computer.
±
Is the correct port selected?
Check that the correct port is selected.
±
Is the printer in cooling mode (the POWER indicator is blinking in orange)?
Wait until the indicator stops blinking, and then try printing again.
±
Is someone printing via the network?
If you try to print while other users are printing large amounts of data, the printer will be
unable to accept your print job until the ongoing printing is finished. In such a situation,
execute the print job again after the other jobs are completed.
Media is jammed. / Media is not ejected correctly after printing.
±
Is there dust or dirt on the platen roller preventing it from turning freely?
±
Check that the media exit path is not blocked.
±
Is there adhesive on the media exit, or has a media misfeed occurred?
±
Remove the Media Roll, and then reinstall it.
±
Check that the Media Roll compartment top cover is firmly closed.
±
If the label peeler (optional) is being used, check that printer driver settings for the Peeler
function have been specified correctly.
The print quality is poor. / Printed labels contain white streaks.
±
Adjust the printing density. The print density can be specified in the printer driver’s dialog
box or the “
Printer Setting Tool
”.
±
Is there dust or dirt on the print head or platen roller preventing it from turning freely?
Clean the print head or platen roller.
Printed barcodes cannot be read.
±
Print labels so that barcodes are aligned with the print head as shown below.
1
2
3
1
Print head
2
Barcode
3
Printing orientation
±
We recommend printing the barcodes with [
Give priority to quality
] selected from the
[
Quality
] options.
±
Try using another scanner.
I want to reset the printer/delete the data transferred from the computer.
To reset the printer, perform the following procedure.
1 Press and hold the
(Power) button to turn the printer off.
2 Press and hold the
(Feed) button and the
(Power) button until the POWER,
indicator lights in orange and the STATUS indicator blinks in green.
3 While holding down the
(Power) button, press the
(Feed) button 6 times.
4 Release the
(Power) button.
All the transferred data from the computer will be deleted, and the printer will be reset to its
factory settings.
I want to cancel the current print job.
Make sure that this printer is turned on, and then press the
(Power) button.
Maintaining the Printer
Maintenance of the printer may be carried out as required. However, some
environments require that maintenance must be done more frequently (for
example, in dusty conditions). If dirt or dust is not removed, the printed
labels may contain white streaks, or media may become jammed.
±
Print Head Maintenance
Use a dry cotton swab to wipe the print head (1).
1
2
±
Platen Roller Maintenance
Use a piece of cellophane tape to remove dirt from the platen roller (2).
±
Media Exit Maintenance
If adhesive accumulates at the media exit (3) and media becomes
jammed, disconnect the printer from the AC power outlet, and then
clean the media exit with a cloth slightly moistened with isopropyl
alcohol.
3
Printing the Printer Setup Information
You can use the
(Print) button to print a report that lists the following
printer settings:
±
Program version
±
Printer usage history
±
Missing dot test pattern
±
List of transferred data
±
Communication settings
NOTE
• You can use [
Device settings
] of the “
Printer Setting Tool
” to set,
in advance, which items will be printed.
• The node name will also appear in the communication settings.
The default node name is “BRWxxxxxxxxxxxx”. (“xxxxxxxxxxxx” is
based on your printer’s MAC address/Ethernet address.)
a
Make sure that a roll of 2.25" (57mm) receipt paper has been loaded,
and the Media Roll compartment top cover is closed.
b
Turn on the printer.
c
Hold down (for at least 1 second) the
(Print) button until the
POWER indicator starts blinking in green and the printer setup
information is printed.
NOTE
• To print the printer setup information, we recommend using 2.25"
(57mm) receipt paper.
The length required for printing differs depending on the information
to be printed.
• The printer setup information can also be printed from
[
Device settings
] of the “
Printer Setting Tool
”.
For details, see the User’s Guide (Brother support website).
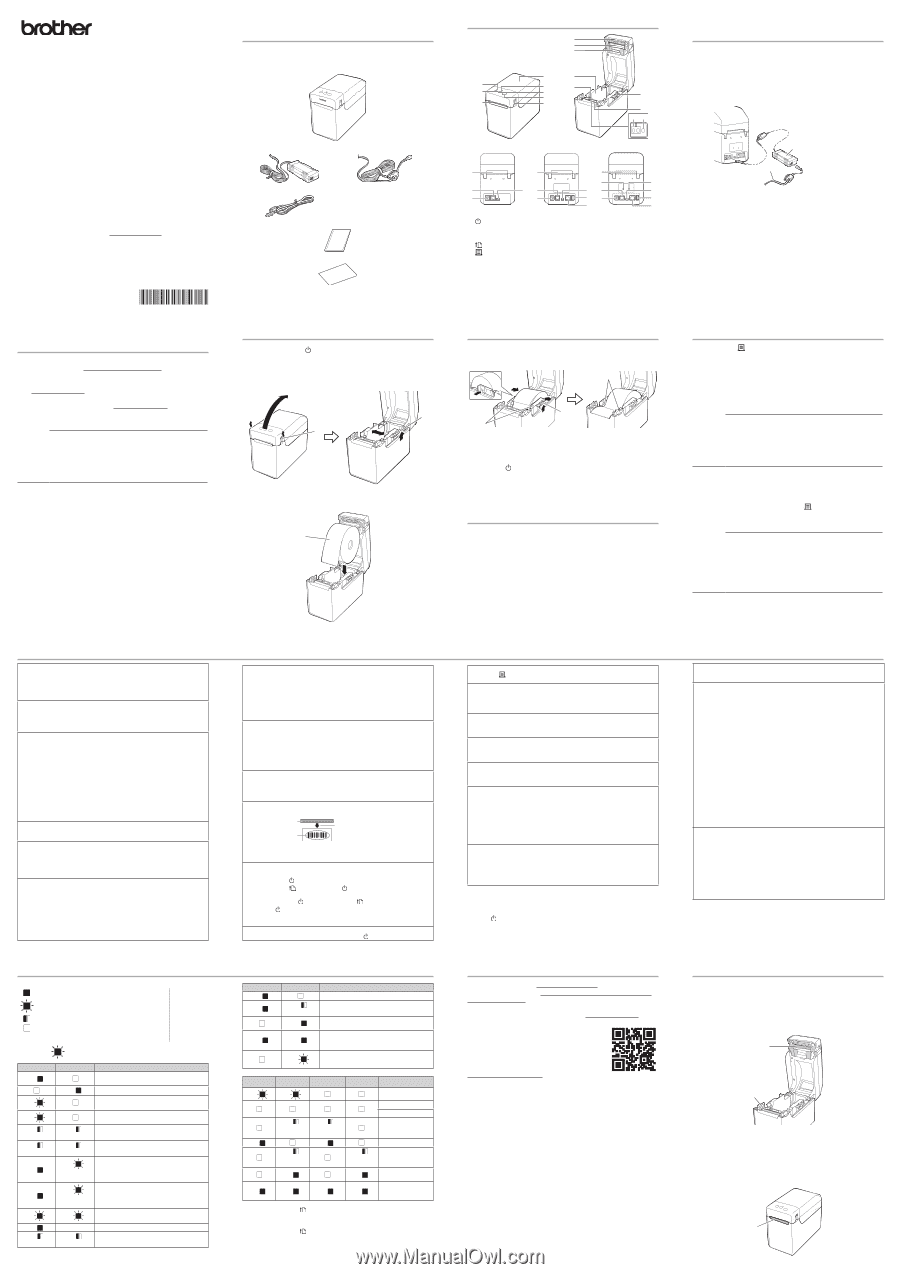
Inserting the Media Roll
a
Press and hold the
(Power) button to turn the printer off.
Press the cover release lever (1) on either side and lift up to open
the Media Roll compartment top cover.
Open the media guides by lifting up the media guide adjustment
lever (2) and pulling the media guide outwards.
1
2
b
Insert the Media Roll so that the labels feed with the side to be
printed on facing up (1), as shown.
1
c
While lifting up the media guide adjustment lever (1), push in both
media guides (2) to fit the width of the paper.
Feed the end of the Media Roll under the media tip guides (3).
1
2
3
d
Position the end of the paper centered over the platen roller and
slightly out of the media exit.
e
Close the Media Roll compartment top cover by pressing it in the center.
Press down until it snaps into place.
Press the
(Power) button to turn the printer on.
After loading the paper, check that the transmissive/gap sensor and
triangle on the printer are aligned, or if there is a black mark on the
paper, check that the black mark is aligned with the centerline of the
reflective/black mark sensor.
Printing
a
Install the printer driver and the software.
b
Check that the printer has the correct power source. (Make sure
that the AC adapter is connected to an AC power outlet or that a
fully charged rechargeable Li-ion battery is installed.)
c
Turn on the printer. The POWER indicator lights in green.
d
Connect the printer to a computer.
e
Insert the Media Roll.
f
Print receipts or labels.
g
Hold one edge of the ejected media and pull it up and diagonally
toward the other edge.
For details, see the User’s Guide (Brother support website).
Inserting the Media Roll (continued)
I want to reset the incrementing field.
Hold down the
(Print) button for at least 5 seconds, until the POWER and STATUS indicators
blink 3 times in orange.
The media is not feeding correctly or an error occurred.
±
If a feed error occurred, use the Custom Label Tool to apply the correct paper settings to
the printer.
±
Are the sensors in the correct position?
Check that the sensors are correctly positioned.
Even though data is being sent to the printer, the POWER indicator is not blinking in green.
Make sure that the USB cable is connected firmly and correctly. Try using another USB cable.
If a connection is being made using the WLAN (TD-2125NWB/2135NWB only) or Bluetooth
(TD-2125NWB/2135NWB only), check that the LED indicator is lit.
The labels are not being peeled off correctly (when using the optional label peeler).
±
Make sure that the paper is correctly fed through the label peeler.
±
Has the peeler option setting been specified in the printer driver and with the “Printer
Setting Tool”?
The media is not ejected correctly (when using the optional label peeler).
Has the sensor of the label peeler been exposed to direct sunlight?
If the sensor of the label peeler has been exposed to direct sunlight, loaded media may not
be detected correctly. Use the printer in a location not exposed to direct sunlight.
The printer does not operate according to the operations performed with the touch
panel display (when using the optional touch panel display).
±
Does the touch panel name (A or B) printed in the upper-right corner of the touch panel
match the specified touch panel name, which appears in the lower-right corner of the main
screen on the LCD?
If they do not match, select [
Set Panel
] from the touch panel display, and then select the
correct setting.
±
Has the type of data assigned to one-touch keys been correctly specified?
If the correct setting has not be selected, select [
Keys Function
] from the touch panel
display, and then correctly select [
Template
] or [
Database
].
Although no key in the touch panel display was pressed, data was unintentionally entered
(when using the optional touch panel display)./The data that was entered is different than the
data for the touch panel key that was pressed (when using the optional touch panel display).
±
Since foreign material, such as dust, caught between the touch panel, protective sheet and
touch panel holder may cause a malfunction. Make sure that no foreign material is attached.
±
Has the touch panel been folded? When a folded touch panel is used, the fold may press
on the touch panel holder. Therefore, do not use a touch panel that has been folded.
If the STATUS indicator is blinking in red
If the STATUS indicator is blinking in red, perform the following procedures to clear
the error.
Press the
(Power) button once.
If the error is still not cleared, turn the printer off, then on again.
If the error appears, even after performing the procedures described above,
contact Brother Customer Service.
TD-2020A
TD-2125N
TD-2135N
TD-2125NWB
TD-2135NWB
The STATUS indicator is blinking.
±
An error occurred.
Check the error details in “Indicators”, and then see below.
The indicators show that error 1 has occurred.
±
Is the correct Media Roll installed?
Check that the correct media, for example, type (die-cut label or continuous length tape)
and die-cut label size, is installed.
±
Is the Media Roll installed correctly?
If not, remove the Media Roll, and then reinstall it.
±
Are the media guides not touching the side of the Media Roll?
Move the media guides against the side of the Media Roll.
±
Is there enough of the roll remaining?
If not, install a new Media Roll.
±
Is the Media Roll compartment top cover open?
Check that the Media Roll compartment top cover is closed.
±
After the specified length of time (120 seconds) has passed, either the access point could
not be found or two or more access points were found (TD-2125NWB/2135NWB only).
±
If the error still occurs, check for the following:
Tape exceeding 39.37" (1 m) or incompatible files cannot be printed.
When sending a template as a BLF file, an error is indicated if the model name in the file
is different.
When printing a template, an error is indicated if the specified template does not exist.
An error is indicated if the search of a template with a linked database fails.
An error is indicated if data is transferred, causing the capacity of the user storage area to
be exceeded.
In these cases, turn off the printer, and then turn it on again.
If the error still occurs, contact Brother Customer Service.
The indicators show that error 2 has occurred.
±
Has a device been connected that is not supported by the USB host port?
An overcurrent was detected by the USB host port, or the connection of an unsupported
device was detected. Turn off the printer, and then check the connected device.
If a USB hub is connected, the printer will automatically turn off after a certain length of
time has passed.
±
Is the printer in mass storage mode?
An error is indicated if the file system becomes corrupted or a file is copied while a mass
storage file is being processed. Turn off the printer.
±
Has the wireless LAN or Bluetooth connection been interrupted? (2125NWB/2135NWB only).
The wireless LAN or Bluetooth connection established while the printer is on was
interrupted. Turn off the printer, and then turn the printer on again.
Internet Addresses
Brother Global Web Site: http://www.brother.com
Brother Developer Center: https://support.brother.com/g/s/es/dev/en/
index.html?navi=offall
For Frequently Asked Questions (FAQs), Product Support and Technical
Questions, and Driver Updates and Utilities: support.brother.com
DON’T FORGET TO REGISTER!
Registering your product will provide purchase
confirmation, proof of ownership and, if you choose,
allow us to notify you of product enhancements and
special offers!
You can register online at:
www.reqistermybrother.com (USA)
Unpacking the TD-2020A/2125N/
2135N/2125NWB/2135NWB
Check that the package contains the following before using the printer.
If any item is missing or damaged, contact your Brother reseller.
• Printer
• AC Adapter
• AC Power Cord
• USB Cable
• Product Safety Guide
• Quick Reference Guide
US ENG
D02H8A001