Brother International TD-4420TN Mac Driver Installation Guide
Brother International TD-4420TN Manual
 |
View all Brother International TD-4420TN manuals
Add to My Manuals
Save this manual to your list of manuals |
Brother International TD-4420TN manual content summary:
- Brother International TD-4420TN | Mac Driver Installation Guide - Page 1
Mac Driver Installation Guide for Brother Label Printers © 2019 Brother Industries, Ltd. All rights reserved. Version 01 - Brother International TD-4420TN | Mac Driver Installation Guide - Page 2
Contents Trademarks ...1 1. Install the Printer Driver 2 2. Change the Driver Settings 8 3. Specify a Label Size in the Printer Driver 10 - Brother International TD-4420TN | Mac Driver Installation Guide - Page 3
Trademarks Apple, Macintosh, Safari, iPad, iPhone, iPod touch, iPod, Mac and macOS are trademarks of Apple Inc. 1 - Brother International TD-4420TN | Mac Driver Installation Guide - Page 4
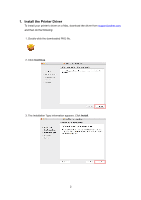
1. Install the Printer Driver To install your printer's driver on a Mac, download the driver from support.brother.com, and then do the following: 1. Double-click the downloaded PKG file. 2. Click Continue. 3. The Installation Type information appears. Click Install. 2 - Brother International TD-4420TN | Mac Driver Installation Guide - Page 5
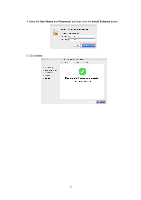
4. Enter the User Name and Password, and then click the Install Software button. 5. Click Close. 3 - Brother International TD-4420TN | Mac Driver Installation Guide - Page 6
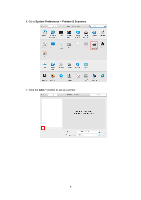
6. Go to System Preferences > Printers & Scanners. 7. Click the Add (+) button to set up a printer. 4 - Brother International TD-4420TN | Mac Driver Installation Guide - Page 7
8. Select Add Printer or Scanner... from the pop-up menu. 9. Connect your printer to the Mac using a USB cable and do the following: - Select the printer model name. - Select "Other..." from the Use pop-up menu. 5 - Brother International TD-4420TN | Mac Driver Installation Guide - Page 8
10. In Finder, go to Devices > Macintosh HD > Library > Printers > Brother > PPDs, and then select your printer model's PPD file. 11. Make sure your printer name is listed in the Use field, and then click Add to install the driver. 6 - Brother International TD-4420TN | Mac Driver Installation Guide - Page 9
12. When finished, your printer will appear in the Printers & Scanner dialog box. 7 - Brother International TD-4420TN | Mac Driver Installation Guide - Page 10
2. Change the Driver Settings To change print settings, use the Print dialog box. This example shows TextEdit. 1. Open the file you want in TextEdit, and then click File > Print. 2. Change TextEdit to Printer Features in the pop-up menu. 8 - Brother International TD-4420TN | Mac Driver Installation Guide - Page 11
3. Select Media Setting from the Feature Sets pop-up menu, and then specify the settings you want. 4. Select Post Print from the Feature Sets pop-up menu, and then specify the settings you want. 9 - Brother International TD-4420TN | Mac Driver Installation Guide - Page 12
3. Specify a Label Size in the Printer Driver To specify the label size, use the Page Setup dialog box. This example shows TextEdit. 1. Open the file you want in TextEdit, and then click File > Page Setup. 2. Select Manage Custom Size... from the Paper Size pop-up menu, and then click OK. 3. Click - Brother International TD-4420TN | Mac Driver Installation Guide - Page 13
4. Press the key, and then enter a name for the new label size. 5. Press the key, and specify the size settings in the Paper Size and Non-Printable Area sections, and then click OK. 6. You can now select your newly defined size preset from the Paper Size pop-up menu. Click OK. 11 - Brother International TD-4420TN | Mac Driver Installation Guide - Page 14
-
 1
1 -
 2
2 -
 3
3 -
 4
4 -
 5
5 -
 6
6 -
 7
7 -
8
-
9
-
10
-
11
-
12
-
13
-
14
 |
 |

Mac Driver Installation Guide for Brother Label Printers
© 2019 Brother Industries, Ltd. All rights reserved.
Version 01