Brother International XL-3010 Users Manual - English
Brother International XL-3010 Manual
 |
View all Brother International XL-3010 manuals
Add to My Manuals
Save this manual to your list of manuals |
Brother International XL-3010 manual content summary:
- Brother International XL-3010 | Users Manual - English - Page 1
OPERATION MANUAL MANUAL DE INSTRUCCIONES ® - Brother International XL-3010 | Users Manual - English - Page 2
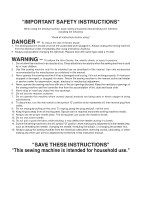
the needle, threading the bobbin, or changing the presser foot. 15. Always unplug the sewing machine from the electrical outlet when removing covers, lubricating, or when making any other user service adjustments mentioned in this instruction manual. "SAVE THESE INSTRUCTIONS" "This sewing machine is - Brother International XL-3010 | Users Manual - English - Page 3
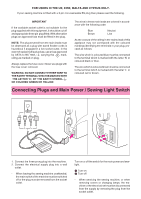
or coloured red or brown. Connecting Plugs and Main Power / Sewing Light Switch 1 2 1. Connect the three-prong plug into the machine. 2. Connect the electrical supply plug into a wall outlet. - When leaving the sewing machine unattended, the main switch of the machine must be switched off or the - Brother International XL-3010 | Users Manual - English - Page 4
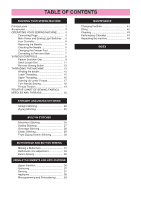
TABLE OF CONTENTS KNOWING YOUR SEWING MACHINE Principal parts 1 Accessories 3 OPERATING YOUR SEWING MACHINE .......... 4 Connecting Plugs 4 Main Power and Sewing Light Switches ... 5 Foot Controller 5 Replacing the Needle 6 Checking the Needle 6 Changing the Presser Foot 7 Converting to Free - Brother International XL-3010 | Users Manual - English - Page 5
DE COSER Elementos principales 1 Accesorios 3 Funcionamiento de la máquina de coser 4 Conexión de los enchufes 4 Interruptor principal y de luz 5 Pedal 5 Cambio de la aguja 6 Verificación de la aguja 6 Cambio del prensatelas 7 Conversión en modalidad de brazo libre ... 7 Distintos mandos - Brother International XL-3010 | Users Manual - English - Page 6
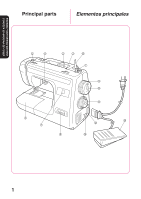
KNOWING YOUR SEWING MACHINE CONOZCA SU MAQUINA DE COSER Principal parts Elementos principales 5 4 2 3 E 1 9 0 A 6 7 C B 8 D 21 - Brother International XL-3010 | Users Manual - English - Page 7
the sewing thread. 3 STITCH LENGTH DIAL Controls the length of the stitches. 4 PRESSER FOOT LEVER Raises and lowers the presser foot. 5 UPPER TENSION CONTROL DIAL Controls the tension of the upper thread. 6 EXTENSION TABLE & ACCESSORIES COMPARTMENT Converts from the free-arm into a flat bed machine - Brother International XL-3010 | Users Manual - English - Page 8
Parts Code for Zigzag Presser Foot: 138135-051 Foot Controller: J00360051 (110/120V Area) J00016051 (220/240V Area) J00492051 (U.K.) J00921051 (Australia, New Zealand) J01367051 (Canada) J00478051 (110/220V Dual Area) The above accessories are stored in the accessory bag inside the extension table - Brother International XL-3010 | Users Manual - English - Page 9
OPERATING YOUR SEWING MACHINE Connecting Plugs 1. Connect the three-prong plug into the machine. It is located between the foot controller and the power supply plug on the cord. 2. Connect the power supply plug into a wall outlet. CAUTION 1. When changing the light bulb or when the sewing machine is - Brother International XL-3010 | Users Manual - English - Page 10
be taken that nothing is placed on the foot controller when the machine is not in use. 1 Foot controller: Model N Note (For U.S.A. only): This foot controller can be used for sewing machine models XL3010 and XL3022. Pedal Al presionar ligeramente el pedal, la máquina funcionará a baja velocidad. Al - Brother International XL-3010 | Users Manual - English - Page 11
KNOWING YOUR SEWING MACHINE CONOZCA SU MAQUINA DE COSER Replacing the Needle 1. Remove the power supply plug from the outlet. 2. Raise the needle bar to its highest position. 3. Lower the presser foot. 4. Remove the needle by loosening the needle clamp with a coin. 5. Insert a different needle as - Brother International XL-3010 | Users Manual - English - Page 12
de golpe. Converting to Free-arm Style Free-arm sewing is convenient for sewing tubular and hard-to-reach areas on a garment. To change your machine to the free-arm style, simply lift out the extension table. 1 Lift up on the extension table. 2 Slide the extension table to the left. Conversi - Brother International XL-3010 | Users Manual - English - Page 13
KNOWING YOUR SEWING MACHINE CONOZCA SU MAQUINA DE COSER VARIOUS CONTROLS Pattern Selection Dial To select a stitch, simply turn the Pattern Selection Dial, located on the right side of the machine. The stitch selection dial may be turned in either direction. All stitches are preset in width, - Brother International XL-3010 | Users Manual - English - Page 14
SEWING MACHINE CONOZCA SU MAQUINA DE COSER RECOMMENDED LENGTHS FOR STITCHES PATTERN a-b-c-d 1 2 3 4 5 6 7 8 9 10 11 12 STITCH NAME 4-STEP AUTOMATIC BUTTONHOLE STRAIGHT STITCH (Left needle position) STRAIGHT STITCH (Center needle 0 RECOMMENDED PAGE IN LENGTH INSTRUCTIONS [mm(inch)] F-1.5 31 - Brother International XL-3010 | Users Manual - English - Page 15
KNOWING YOUR SEWING MACHINE CONOZCA SU MAQUINA DE COSER Largo recomendado para cada puntada PUNTADA NOMBRE ANCHO LARGO (1/64-5/64) F-1,5 (1/64-1/16) F-1,5 (1/64-1/16) Fija 2,5 (3/32) F-2,5 (1/64-3/32) Fija 2,5 (3/32) Fija 2,5 (3/32) PÁGINA DEL MANUAL 31 22 22 25 25 25 26 26 27 28 29 30 22 101 - Brother International XL-3010 | Users Manual - English - Page 16
KNOWING YOUR SEWING MACHINE CONOZCA SU MAQUINA DE COSER Stitch Length Dial Depending on your selected stitch, you may need to adjust the stitch length for best results. The numbers marked on the Stitch length dial represent the length of the stitch in millimeters (mm). THE HIGHER THE NUMBER, THE - Brother International XL-3010 | Users Manual - English - Page 17
YOUR SEWING MACHINE CONOZCA SU MAQUINA DE COSER Reverse Sewing Button To sew in reverse, push the Reverse Sewing Button in as far as possible and hold in that position while pressing lightly on the foot pedal. To sew forward, release the Reverse Sewing Button. The machine will then sew forward - Brother International XL-3010 | Users Manual - English - Page 18
YOUR SEWING MACHINE CONOZCA SU MAQUINA DE COSER THREADING THE MACHINE Winding the bobbin 1. Change the Clutch Release Switch from the needle mark to the bobbin mark. 2. Place a spool of thread onto the horizontal spool pin and firmly hold it with a spool holder so that the spool of thread will - Brother International XL-3010 | Users Manual - English - Page 19
thread onto the bobbin by depressing the foot controller. NOTE: The machine stops automatically when the bobbin is full. 7. Cut the thread, push the shaft to the left and remove the full bobbin from the shaft. 8. Return the Clutch Release Switch back to the needle suavemente el pedal para que el - Brother International XL-3010 | Users Manual - English - Page 20
SEWING MACHINE CONOZCA SU MAQUINA DE COSER Lower Threading 1. Raise the needle to its highest position by turning the balance wheel toward you (counterclockwise) and raise the presser foot lever. 2. Open the shuttle cover behind the extension table on the front of the machine and remove the bobbin - Brother International XL-3010 | Users Manual - English - Page 21
KNOWING YOUR SEWING MACHINE CONOZCA SU MAQUINA DE COSER Upper Threading 1. Raise the presser foot using the Presser Foot Lever as shown in fig. A below. 2. Raise the needle to its highest position by turning the balance wheel toward you (counterclockwise). 3. Place a spool of thread on the - Brother International XL-3010 | Users Manual - English - Page 22
SEWING MACHINE CONOZCA SU MAQUINA DE COSER Drawing Up Lower Thread 1. Raise the presser foot and the needle to their highest positions. 2. With your left hand, hold the end of the upper thread. With your right hand, turn the balance wheel toward you (counterclockwise) until the needle parte - Brother International XL-3010 | Users Manual - English - Page 23
CONOZCA SU MAQUINA DE COSER Twin Needle Sewing Your sewing machine is designed for twin needle sewing, which allows you to sew with two top threads. You can use the same color or two different colors of thread for making decorative stitches. Any of the patterns, except the buttonhole pattern - Brother International XL-3010 | Users Manual - English - Page 24
KNOWING YOUR SEWING MACHINE CONOZCA SU MAQUINA DE COSER Thread Tension Thread tension will affect the quality of your stitches. It may need to be adjusted when you change fabric or thread type. NOTE: It is recommended that a test sample be made on a fabric scrap before sewing on your project. - Brother International XL-3010 | Users Manual - English - Page 25
2 Derecho 1 2 1 2 RELATIVE CHART OF SEWING FABRICS, NEEDLES AND THREADS SEWING FABRICS NEEDLE SIZES THREAD SIZES Cotton: 80 VERY THIN Fine tricot, Fine , Fine corduroy, Suitings, Linen, Muslin 11 14 (Supplied with your machine) Cotton: 60~80 Silk: "A" Synthetic Mercerized 50 Cotton: 50~60 - Brother International XL-3010 | Users Manual - English - Page 26
KNOWING YOUR SEWING MACHINE CONOZCA SU MAQUINA DE COSER Tabla de relación entre tejidos, hilos y agujas Tejidos Tamaño de aguja Tamaño de hilo Muy fino Ligero Medio Pesado Algodón: - Brother International XL-3010 | Users Manual - English - Page 27
threads toward the back of the presser foot. 4. Place the fabric under the presser foot and position the needle 1 cm (3/8") from the edge of the fabric. 5. Lower the presser foot. 6. To backtack, push the Reverse Sewing Button as far as possible and lightly touch the foot controller. Reverse sewing - Brother International XL-3010 | Users Manual - English - Page 28
Reverse stitching is used to lock the threads at the end of the seam or wherever reinforcement is needed. 1. Stitch to the end of the seam and stop. 2. Push the Reverse Sewing Button and lightly touch the foot controller to stitch backwards for 1 cm (3/8") from the end of the fabric. Para terminar - Brother International XL-3010 | Users Manual - English - Page 29
AND ZIGZAG STITCHING PUNTADAS RECTAS Y ZIGZAG Removing the Material from the Machine 1. Stop the machine. 2. Raise the needle to its highest position and make sure that the thread take-up lever is also in its highest position. 3. Lift the presser foot and pull the fabric out gently to the left side - Brother International XL-3010 | Users Manual - English - Page 30
Selection Dial. Then select the stitch length. It is recommended to sew using the Straight Stitch at the beginning and end of the Zigzag Stitches . Puntada de realce Cuando se define el largo de la puntada en la parte "F", se coserán puntadas tupidas (puntada zigzag muy cerradas) que pueden servir - Brother International XL-3010 | Users Manual - English - Page 31
los tejidos elásticos. BUILT-IN STITCHES PUNTADAS INCORPORADAS 1. Both the threads should be the same color as the fabric. 2. Fold back the (1/4") overlap at the edge. 3. Set the Pattern Selection Dial to either 6 or 7. 4. Sew on the fold as in fig. C. 5. When the fabric is unfolded you will have a - Brother International XL-3010 | Users Manual - English - Page 32
Scallop Stitching Pattern 8 (Scallop Stitch) Stitch Length F-1.5 This machine automatically produces a Scallop Stitch which may be used as a decorative edging. 1. Set the Pattern Selection Dial to 8. 2. Sew the Scallop Stitch along the edge of the material. 3. If desired, trim around the scallop - Brother International XL-3010 | Users Manual - English - Page 33
sewing stretch material. 1. Set the Pattern Selection Dial to 9. 2. Position the fabric under the presser foot so that the seamline is approximately 3 mm (1/8") to the left of the center of the presser foot. This stitch works best a lo largo de la parte derecha de la orilla cortada - Brother International XL-3010 | Users Manual - English - Page 34
sewing knitted fabrics. When nylon thread is used, the stitch will not be visible. 1. Place the edge of the two pieces of fabric together and center them under the presser foot. 2. Sew F y 2,5. 2. Coloque una tela de refuerzo debajo de la parte a remendar. 3. Siguiendo la línea de la rasgadura, cosa - Brother International XL-3010 | Users Manual - English - Page 35
Triple Zigzag Stretch Stitching Pattern 11 (Triple Zigzag Stretch Stitch) Stitch Length Fixed 2.5 This stitch can be used to sew heavyweight stretch fabrics wherever a Zigzag Stitch could be used. The Triple Zigzag Stretch Stitch can also be used as a decorative top stitch. Set the Pattern - Brother International XL-3010 | Users Manual - English - Page 36
first. Place the fabric under the presser foot so that the center of the front bar tack mark is directly under the center of the presser foot and aligned with the two red como ilustra do. 1 Parte delantera de la marca con jaboncillo. 1 BUTTONHOLE AND BUTTON SEWING OJALES Y COSTURA DE BOTONES 312 - Brother International XL-3010 | Users Manual - English - Page 37
a Step b (Left side) b Pattern ac c a b Step c (Back end of buttonhole) Step d (Right side) c ac c a d d How to Sew 1. Set the Pattern Selection Dial to a. 2. Lower the presser foot and sew 5 to 6 stitches. 3. Stop the machine when the needle is at the left side of the stitches and raise the - Brother International XL-3010 | Users Manual - English - Page 38
counterclockwise and sew Straight Stitches (2) to the end of the front bar tack of the buttonhole. 2. Remove the material from the machine. It is puntadas rectas (No 2) hasta el final de la línea del remate de la parte delantera. 2. Retire el tejido de la máquina. Se recomienda colocar alfileres en - Brother International XL-3010 | Users Manual - English - Page 39
Buttonhole fine adjusting screw 8 Right row 9 In case 6 8 3. Cuando se logró una alimentación correcta para la parte izquierda, cosa la parte derecha del ojal y mire de nuevo la alimentaci derecho 9 En caso que 9 9 BUTTONHOLE AND BUTTON SEWING OJALES Y COSTURA DE BOTONES 7 - + - + 345 - Brother International XL-3010 | Users Manual - English - Page 40
a button between the foot and the fabric and make sure that the needle enters the holes without hitting the button. If it hits see step 1. 5. At a slow speed, sew approximately 10 stitches. 6. Remove the material from the machine. Cut the upper and lower threads and tie both threads at the back of - Brother International XL-3010 | Users Manual - English - Page 41
needle should be positioned on the zipper side of the foot for best results. See fig. B. 6. To sew the opposite side of the zipper, release the foot by pressing the button located at the back of the presser foot, install the zipper foot el botón situado en su parte posterior, instale la pata en el - Brother International XL-3010 | Users Manual - English - Page 42
the portion to be darned under the presser foot together with a fabric underlay for reinforcement. 4. Lower the presser foot. 5. Begin sewing alternating between gently drawing the work away from you and pulling it toward you. With the darning plate on the machine the feed dogs will not move the - Brother International XL-3010 | Users Manual - English - Page 43
into a shape to be used as a decoration on a garment or project. 1. Baste the cut design to the fabric in the location where desired. 2. Carefully sew around the edge of the cutout design with a Zigzag Stitch (patterns 3, 4 or 5) in the fine stitch length. 3. Cut away the surplus fabric outside of - Brother International XL-3010 | Users Manual - English - Page 44
of the fabric. 4. Stretch the fabric between embroidery hoops as firmly as possible with the underside of the fabric on the bottom of the inside hoop. 5. Place the work under the needle and lower the presser bar with the foot removed. 6. Pull the lower thread up through the work at the starting - Brother International XL-3010 | Users Manual - English - Page 45
AND APPLICATIONS USO DE ACCESORIOS Y APLICACIONES MONOGRAMMING 1. Sew moving the hoop slowly along the lettering at a filled in. Keep the stitching close together. NOTE: A long stitch is made by moving the embroidery hoop rapidly and a short stitch is made by moving it slowly. 3. Secure with a - Brother International XL-3010 | Users Manual - English - Page 46
Bulb 1. Remove the power supply plug from the outlet. 2. Loosen the face plate screw as shown in fig. A. 3. Remove the face plate from the machine MANTENIMIENTO 4. Replace the sewing light bulb. See fig. C. 5. Reattach the face plate and fasten the screw as shown in fig. D. 1 Bulb 2 Loosen - Brother International XL-3010 | Users Manual - English - Page 47
1. Remove the power supply plug from the outlet. 2. Put 2 to 3 drops of oil at each of the points indicated in fig. A. 3. After oiling, run the machine at a fast speed without thread installed for a short time. 4. Be sure to wipe any excess oil off the machine. NOTE: The machine should be oiled - Brother International XL-3010 | Users Manual - English - Page 48
MAINTENANCE MANTENIMIENTO Cleaning Removing the Shuttle Hook 1. Raise the needle to its highest position. 2. Open the shuttle cover on the front of the free arm. 3. Take out the bobbin case by opening its latch and pulling it out from the shuttle race. 4. Slide the latch levers out from the - Brother International XL-3010 | Users Manual - English - Page 49
. MAINTENANCE MANTENIMIENTO Performance Checklist Whenever sewing difficulties are encountered, review the section in this instruction manual that details the operation you are performing to make sure you are correctly using the machine. If the problem continues, the following check list may - Brother International XL-3010 | Users Manual - English - Page 50
. M Page 19 No M Spool of thread is not correctly installed. M Page 17 No M Bobbin is not threaded properly in the shuttle hook. M Page 15 No M Lower thread tension is too tight. M Page 19 No M Lower threading is not correct. M Page 6 No M Inferior needle is used. M Page 6 No M The - Brother International XL-3010 | Users Manual - English - Page 51
LISTADO DE POSIBLES INCIDENCIAS ROTURA DEL HILO SUPERIOR ROTURA DEL HILO INFERIOR SALTO DE PUNTADAS BAGAS EN LAS PUNTADAS ARRUGAS EN EL TEJIDO MAINTENANCE MANTENIMIENTO El hilo superior no está bien enhebrado El hilo inferior está enredado M Página 16 No M El hilo superior está enredado M - Brother International XL-3010 | Users Manual - English - Page 52
the fabric. No Power supply plug is removed from outlet. M Page 4 No M Main power switch is turned off. M Page 5 No M Foot controller is not used correctly. M Page 5 No M Clutch Release Switch is set at bobbin mark. M Page 13 No No M M M M CONTACT YOUR LOCAL SERVICE CENTER 478 - Brother International XL-3010 | Users Manual - English - Page 53
Falta de aceite M Página 42 No Está desenchufada M Página 4 No M El interruptor principal está apagado M Página 5 No M No se usa bien el pedal M Página 5 No M El conmutador está puesto para bobinar canilla M Página 13 No No M M M M PONGASE EN CONTACTO CON EL SERVICIO TECNICO LOCAL 489 - Brother International XL-3010 | Users Manual - English - Page 54
carton and packing materials for future use. It may become necessary to reship the sewing machine. Improper packing or improper packing material could result in damage during shipping. Instructions for repacking the machine are illustrated below. Embalaje de la máquina Guarde la caja de cartón y el - Brother International XL-3010 | Users Manual - English - Page 55
Plugs 4 D Darning 37 Drawing Up Lower Thread 17 E Elastic Stitch 29 Elastic Overlock Stitch 28 Embroidering 39 F Feed Dog Cleaning 44 Foot Controller 5 Free-arm Style 7 G Gathering 37 L Lower Threading 15 M Main Power Switch 5 Monogramming 39 N Needle Replacement 6 Inspection - Brother International XL-3010 | Users Manual - English - Page 56
5 Light Bulb Replacement 41 Shuttle Hook Removal 43 Shuttle Race Cleaning 43 Stitch Length Dial 11 Straight Stitch 22 Stretch Blind Stitch 26 T Thread Tension 19 Triple Stretch Stitch 22 Triple Zigzag Stretch Stitch 30 Troubleshooting 45, 47 Twin Needle Sewing 18 U Upper Tension Control - Brother International XL-3010 | Users Manual - English - Page 57
NOTE 53 - Brother International XL-3010 | Users Manual - English - Page 58
NOTA - Brother International XL-3010 | Users Manual - English - Page 59
English Spanish 194256-111 Printed in Taiwan
-
 1
1 -
 2
2 -
 3
3 -
 4
4 -
 5
5 -
 6
6 -
 7
7 -
8
-
9
-
10
-
11
-
12
-
13
-
14
-
15
-
16
-
17
-
18
-
19
-
20
-
21
-
22
-
23
-
24
-
25
-
26
-
27
-
28
-
29
-
30
-
31
-
32
-
33
-
34
-
35
-
36
-
37
-
38
-
39
-
40
-
41
-
42
-
43
-
44
-
45
-
46
-
47
-
48
-
49
-
50
-
51
-
52
-
53
-
54
-
55
-
56
-
57
-
58
-
59
 |
 |

®
OPERATION MANUAL
MANUAL DE INSTRUCCIONES