Canon 1267B001 User Manual
Canon 1267B001 Manual
 |
View all Canon 1267B001 manuals
Add to My Manuals
Save this manual to your list of manuals |
Canon 1267B001 manual content summary:
- Canon 1267B001 | User Manual - Page 1
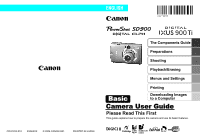
The Components Guide Preparations Shooting Playback/Erasing Menus and Settings Printing Basic Downloading Images to a Computer Camera User Guide Please Read This First This guide explains how to prepare the camera and use its basic features. CDI-E293-010 XX06XXX © 2006 CANON INC. PRINTED - Canon 1267B001 | User Manual - Page 2
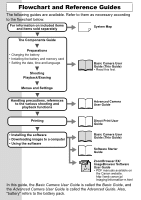
User Guide (This Guide) Software Starter Guide ZoomBrowser EX/ ImageBrowser Software User Guide • PDF manuals available on the Canon website. http://web.canon.jp/ Imaging/information-e.html In this guide, the Basic Camera User Guide is called the Basic Guide, and the Advanced Camera User Guide is - Canon 1267B001 | User Manual - Page 3
the Wrist Strap* Wrist Strap Mount Microphone (Advanced Guide pp. 42, 86) AF-assist Beam (Advanced Guide p. 24) Red-Eye Reduction Lamp (Advanced Guide p. 33) Self-Timer Lamp (p. 16) Viewfinder Window (Advanced Guide p. 18) Flash (p. 14) Lens * When carrying the camera by the strap, be careful not to - Canon 1267B001 | User Manual - Page 4
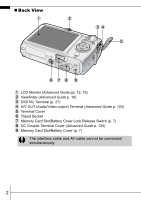
pp. 12, 15) Viewfinder (Advanced Guide p. 18) DIGITAL Terminal (p. 27) A/V OUT (Audio/Video output) Terminal (Advanced Guide p. 103) Terminal Cover Tripod Socket Memory Card Slot/Battery Cover Lock Release Switch (p. 7) DC Coupler Terminal Cover (Advanced Guide p. 125) Memory Card Slot/Battery Cover - Canon 1267B001 | User Manual - Page 5
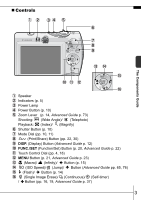
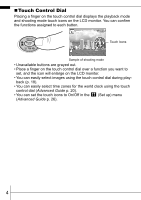
pp. 10, 11) (Print/Share) Button (pp. 22, 30) DISP. (Display) Button (Advanced Guide p. 12) FUNC./SET (Function/Set) Button (p. 20, Advanced Guide p. 22) Touch Control Dial (pp. 4, 18) MENU Button (p. 21, Advanced Guide p. 23) (Macro)/ (Infinity)/ Button (p. 15) (ISO Speed)/ (Jump)/ Button (Advanced - Canon 1267B001 | User Manual - Page 6
using the touch control dial during play- back (p. 18). • You can easily select time zones for the world clock using the touch control dial (Advanced Guide p. 20). • You can set the touch icons to On/Off in the (Set up) menu (Advanced - Canon 1267B001 | User Manual - Page 7
is flashing green. These actions may corrupt image data. • Shake or jolt the camera • Shut off the power, or open the memory card slot/battery cover „ : Ready to shoot (flash on) Blinking Orange: Ready to shoot (camera shake warning) „ Left Indicator Yellow: Macro mode/infinity mode/AF lock - Canon 1267B001 | User Manual - Page 8
-2LX For CB-2LXE To protect the battery and prolong its life, do not charge it for longer than 24 hours continuously. Î See the Advanced Guide: Battery Handling (p. 121). 6 - Canon 1267B001 | User Manual - Page 9
memory card slot/battery cover. Back Ensure that the memory card is correctly oriented before inserting it in the camera. Inserting it backward may cause the camera to fail to recognize the memory card or to malfunction. Î See the Advanced Guide: Handling the Memory Card (p. 123). Î See the Advanced - Canon 1267B001 | User Manual - Page 10
„ To Remove the Memory Card Use a finger to push the memory card in until you hear a click, then release it. You can use SD memory cards, SDHC memory cards and MultiMediaCards with this camera. These cards are collectively called memory cards in this guide. 8 - Canon 1267B001 | User Manual - Page 11
separately) to charge the lithium battery. It will charge even if the camera is turned off. • The date/time settings may be lost after approximately battery. Reset the date/time settings if this occurs. Î See the Advanced Guide: Setting the World Clock (p. 20). „ Setting the Display Language 1. Turn - Canon 1267B001 | User Manual - Page 12
. button while pressing the power button. Î See the Advanced Guide: Using the LCD Monitor (p. 12). Î See the Advanced Guide: Power Saving Function (p. 19). Î See the Advanced Guide: Set up Menu (p. 26). Î See the Advanced Guide: My Camera Menu (p. 28). 2. Turn the mode dial to (Auto). 3. Aim - Canon 1267B001 | User Manual - Page 13
- played in the LCD monitor. To stop displaying the image, press the shutter button halfway. Î See the Advanced Guide: Review (p. 24). Î See the Advanced Shooting (p. 67). Guide: Checking for Focus Right After Î See Erasing (p. 19). Selecting a Shooting Mode 1. Turn the mode dial to the - Canon 1267B001 | User Manual - Page 14
The subject can be shown larger than in standard macro mode because the camera trims the image edges and zooms in with the digital zoom. Î See the Advanced Guide (p. 34). Color Accent MANUAL Use this option to have only the color specified in the LCD monitor remain and to transform all others to - Canon 1267B001 | User Manual - Page 15
in black and white except for the selected color; and [ Color Swap] for recording a selected color as a different color. Î See the Advanced Guide (p. 40). • In mode, the resolution is fixed at . • The shutter speed is slow in mode. Always use a tripod to avoid camera shake. • In or mode, the ISO - Canon 1267B001 | User Manual - Page 16
between modes ( ). Auto On Off Î See the Advanced Guide: Red-Eye Reduction Function (p. 33). Î See the Advanced Guide: Setting the Slow Synchro (p. 33). You are recommended to shoot with the camera attached to a tripod or other device if the camera shake warning icon appears. The option cannot be - Canon 1267B001 | User Manual - Page 17
. • The exposure may not be optimal when the flash is used in macro mode. The option cannot be set in (Auto) mode. Î See the Advanced Guide: Functions Available in Each Shooting Mode (p. 144). Î See Selecting a Shooting Mode (p. 11). 15 - Canon 1267B001 | User Manual - Page 18
. When [Shots] is set to more than 1, the self-timer sound only beeps before the first shot. *1 This may differ depending on your My Camera settings (Advanced Guide p. 104). *2 Default setting. *3 Default setting is 3 shots. The self-timer cannot be used in some shooting modes. Î See the Advanced - Canon 1267B001 | User Manual - Page 19
is used, the interval between shots lengthens because the flash must charge. • The interval between shots lengthens when the built-in mem- ory of the camera fills. • Shooting will automatically cease if the memory card becomes full. 17 - Canon 1267B001 | User Manual - Page 20
a counterclockwise direction displays the previous image, and clockwise displays the next image. Playback screen when the touch control dial is activated. Î See the Advanced available Guide for the various playback methods Î See Touch Control Dial (p. 4). 18 - Canon 1267B001 | User Manual - Page 21
( ). To exit instead of erasing, select [Cancel]. Please note that erased images cannot be recovered. Exercise adequate caution before erasing an image. Î See the Advanced Guide: Erasing Images (p. 95). 19 Playback/Erasing - Canon 1267B001 | User Manual - Page 22
time and sounds are set using the FUNC. menu or the Rec., Play, Print, Set up or My Camera menu. FUNC. Menu This menu sets many of the common shooting functions. This example shows the FUNC. menu the settings easily. Press the FUNC./SET button. Î See the Advanced Guide: Menu List (p. 24). 20 - Canon 1267B001 | User Manual - Page 23
the Rec. menu in (Auto) mode. • In playback mode, the Play, Print, Set up and My Camera menus display. Press the MENU button. Use the or button to switch between menus. • You can also use the the setting. Press the MENU button. Î See the Advanced Guide: Menu List (p. 24). Menus and Settings 21 - Canon 1267B001 | User Manual - Page 24
easily print by connecting the camera to a direct print compatible printer*1 with a cable and simply pressing the button on the camera. 1. Connect the camera to a Direct Print compatible printer and turn on the printer's power. Canon Brand Printers Camera Interface Cable SELPHY CP Series - Canon 1267B001 | User Manual - Page 25
the button ( ). • You can also select an image with the touch control dial. • The button will blink blue and printing will start. Î See the Advanced Guide: Setting the DPOF Print Settings (p. 97). Î See the Direct Print User Guide. Î See the user guide for your printer. Printing 23 - Canon 1267B001 | User Manual - Page 26
It Computer Procedure - - - z z Computer System Requirements •Basic Guide (p. 25) •Software Starter Guide Connecting the Camera to a Computer •Basic Guide (p. 27) Downloading Images to •Basic Guide (pp. 28-29) a Computer •Software Starter Guide •Windows® XP and Mac OS X Users leaflet - Canon 1267B001 | User Manual - Page 27
Windows Me Windows 2000 Service Pack 4 Windows XP (including Service Pack 1 and Service Pack 2) The above Canon Utilities - ImageBrowser - PhotoStitch 200 MB or more 40 MB or more 1,024 x 768 pixels/32,000 Colors or better * EOS Utility (software for EOS DIGITAL series cameras) is only supported - Canon 1267B001 | User Manual - Page 28
. Double-click the [Canon Digital Camera Installer] icon in the CD-ROM window. When the installer panel appears, click [Install]. 2. Click [Easy Installation]. Select [Easy Installation] as the setup type and click [Next]. Proceed with the installation while reviewing installation settings. 3. When - Canon 1267B001 | User Manual - Page 29
be able to communicate. Interface Cable Always grasp the sides of the connector when disconnecting the interface cable from the camera's DIGITAL terminal. If the Digital Signature Not Found window appears, click [Yes]. The USB driver will automatically finish installing onto the computer when you - Canon 1267B001 | User Manual - Page 30
click the [Start] menu and select [All Programs] or [Programs], followed by [Canon Utilities], [CameraWindow], [PowerShot IXY - IXUS - DV 6] and [CameraWindow]. 2. Download the images. • Download the images using the camera or the computer. • By default, the downloaded images are saved into the [My - Canon 1267B001 | User Manual - Page 31
Images to a Computer Downloading Images to a Computer The following window will appear when you establish a connection between the camera and computer. If it fails to appear, click the [Canon CameraWindow] icon on the Dock (the bar which appears at the bottom of the desktop). 1. Download the images - Canon 1267B001 | User Manual - Page 32
the computer only the images with DPOF Transfer Order settings (Advanced Guide, p. 101). Select & Transfer Transfers and saves single images computer desktop. 1. Confirm that the Direct Transfer menu is displayed on the camera's LCD monitor. • The button will light blue. • Press the MENU - Canon 1267B001 | User Manual - Page 33
is in progress. • Images can also be selected during index playback (Advanced Guide p. 74). • Press the MENU button to return to the Direct Transfer menu images. The option selected with the button is retained even when the camera's power is turned off. The previous setting will be in effect - Canon 1267B001 | User Manual - Page 34
MEMO 32 - Canon 1267B001 | User Manual - Page 35
in order to prevent injury, burns or electrical shock to yourself and others. Be sure to also read the safety precautions listed in the Advanced Camera User Guide. Warnings • Do not trigger the flash in close proximity to human or animal eyes. • Store this equipment out of the reach of children and
-
 1
1 -
 2
2 -
 3
3 -
 4
4 -
 5
5 -
 6
6 -
 7
7 -
8
-
9
-
10
-
11
-
12
-
13
-
14
-
15
-
16
-
17
-
18
-
19
-
20
-
21
-
22
-
23
-
24
-
25
-
26
-
27
-
28
-
29
-
30
-
31
-
32
-
33
-
34
-
35
 |
 |
The Components Guide
Preparations
Shooting
Playback/Erasing
Menus and Settings
CDI-E293-010
XX06XXX
Camera User Guide
Please Read This First
This guide explains how to prepare the camera and use its basic features.
© 2006 CANON INC.
PRINTED IN JAPAN
ENGLISH
Basic
Downloading Images
to a Computer
Printing