Canon 475D i475D Direct Printing Guide
Canon 475D - i Color Inkjet Printer Manual
 |
UPC - 013803031928
View all Canon 475D manuals
Add to My Manuals
Save this manual to your list of manuals |
Canon 475D manual content summary:
- Canon 475D | i475D Direct Printing Guide - Page 1
BUBBLE JET PRINTER Direct Printing Guide Table of Contents Operation Panel Names and Functions 1 Printing Flow 4 Using a Memory Card 6 Printing a Photograph 9 Printing an Image List - Print Index 9 Selecting and Printing an Image - Print One 11 Loading Paper 13 Using the Photo Viewer - Canon 475D | i475D Direct Printing Guide - Page 2
is currently printing. Flashing orange: an error has occurred and the printer is not ready to print. Flashing orange and green alternately: an error has occurred that may require a service call. (3) Resume Button Press this button after resolving a printer problem to resume printing. If this button - Canon 475D | i475D Direct Printing Guide - Page 3
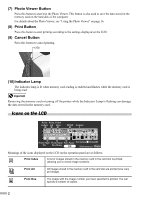
card on the hard disk of the computer. For details about the Photo Viewer, see "Using the Photo Viewer" on page 16. (8) Print Button Press this button to card is being read. Removing the memory card or turning off the printer while the Indicator Lamp is flashing can damage the data stored in the - Canon 475D | i475D Direct Printing Guide - Page 4
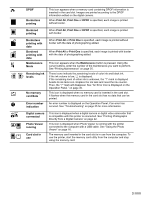
Remaining ink levels No memory card/data Error number error has occured. See "Troubleshooting" on page 35 for more information. Digital camera connected Photo Viewer running Card slot in use This icon is displayed when a digital camera or digital video camcorder that is compatible with this printer - Canon 475D | i475D Direct Printing Guide - Page 5
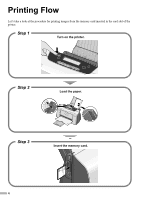
Printing Flow Let's take a look at the procedure for printing images from the memory card inserted in the card slot of the printer. Step 1 Turn on the printer. Step 2 Load the paper. Step 3 Insert the memory card. 4 - Canon 475D | i475D Direct Printing Guide - Page 6
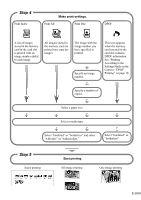
Step 4 Print Index Make print settings. Print All Print One DPOF A list of images stored in the memory card in the card slot is printed with an image number added to each image. All images stored in the memory card are printed (one copy per image). The image with the image number you have - Canon 475D | i475D Direct Printing Guide - Page 7
by the digital camera may fail in loading or damage. For types of memory cards supported by the digital camera, refer to your digital camera user's manual. • To format a memory card, use the digital camera. Memory card formats are not compatible with computer-specific formats. • Images edited - Canon 475D | i475D Direct Printing Guide - Page 8
/write mode is selected in the Memory Card Utility (Windows) or BJ Utility (Macintosh), neither printing nor maintenance can to print images may result in improper printing. The Indicator lamp lights. 1 Turn on the printer. 2 Install the memory card in the card slot. • If you use CompactFlash (CF) - Canon 475D | i475D Direct Printing Guide - Page 9
Removing a Memory Card If you use the printer and memory card slot as a removable disk drive, follow the instructions for removal of the memory card from the computer. For the procedure, refer to the electronic User's Guide on the CD-ROM. 1 Ensure that the Indicator lamp is not flashing, then - Canon 475D | i475D Direct Printing Guide - Page 10
an Image List - Print Index Make an index print of all images stored on the memory card together with their image numbers. 1 Turn on the printer. 2 Load the paper. See "Loading Paper" on page 13. 3 Insert the memory card in the card slot. See "Using a Memory Card" on page 6. 4 Select Print - Canon 475D | i475D Direct Printing Guide - Page 11
6 Select a media type. (1) Using (cursor buttons), locate above the type of the printing media. (2) Press the OK button. 7 Start printing. (1) Confirm the settings. To modify a setting that has already been made, keep pressing the OK button to display the setting. (2) Press the Print button. - Canon 475D | i475D Direct Printing Guide - Page 12
Selecting and Printing an Image - Print One After confirming the images (stored in the memory card) by printing an index, specify the image number of the image you want to print and then print it. 1 Load the paper. See "Loading Paper" on page 13. 2 Confirm the image number. Make an index print - Canon 475D | i475D Direct Printing Guide - Page 13
6 Select a paper size. (1) Using size. (cursor buttons), select a paper 7 Select a media type. (2) Press the OK button. (1) Using (cursor buttons), locate above the type of the printing media. (2) Press the OK button. 8 Determine whether the image is to be printed with or without a border. - Canon 475D | i475D Direct Printing Guide - Page 14
paper will not only produce unsatisfactory results, but can also cause the printer to jam or malfunction. • Folded, curled or wrinkled paper • Damp (more than 105 gsm or 28 lb) *non-Canon branded paper • Picture postcards • Postcards affixed with photos or stickers • Any type of paper with holes - Canon 475D | i475D Direct Printing Guide - Page 15
3 Preparing to load paper. (1) Attach the paper support. (2) Open the cover and pull out the paper the paper guide and slide it against the left side of the stack of paper. Do not touch the printed surface until the ink dries. For specific drying times, refer to the instructions packaged with - Canon 475D | i475D Direct Printing Guide - Page 16
„ Media Types for Card Direct Printing You can use the following Canon media: Paper size Media type Media Type Plain Paper Photo Paper Pro Photo Paper Plus Glossy Paper Rest Load Limit Up to 100 sheets A4: 10 sheet* 101.6 x 152.4 mm: up to 20 sheets A4: 10 sheet* 4" x 6"/ 101.6 x - Canon 475D | i475D Direct Printing Guide - Page 17
must have been installed in the computer. If the printer driver has not been installed, install it following the procedure described in the Quick Start Guide. 1 Ensure that the printer and the computer are turned on. 2 Start the Photo Viewer. (1) Insert the memory card in the card slot. See "Using - Canon 475D | i475D Direct Printing Guide - Page 18
selector button The Photo Viewer is terminated forcibly in the following cases: • When a "PictBridge" compliant or Canon "Bubble Jet and the name of the destination folder are displayed in the Photo Viewer window. • If you keep pressing the Photo Viewer button for 3 seconds or longer while in the - Canon 475D | i475D Direct Printing Guide - Page 19
(addition of comment, title, trimming, rotation, etc.) are not supported. zImages are automatically scaled according to the paper size. The upper, may be missing depending on the size of the paper you use. 1 Turn on the printer. 2 Load the paper. See "Loading Paper" on page 13. 3 Select the DPOF - Canon 475D | i475D Direct Printing Guide - Page 20
4 Select a paper size. (1) Using size. (cursor buttons), select a paper 5 Select a media type. (2) Press the OK button. (1) Using (cursor buttons), locate above the type of the printing media. (2) Press the OK button. 6 Select bordered or borderless printing. (1) Using (cursor buttons), - Canon 475D | i475D Direct Printing Guide - Page 21
the computer, the printer must be connected to the computer and a Memory Card Utility (Windows) or BJ Utility (Macintosh) must have been installed in the computer. If the utility is not installed, install it following the installation procedure explained in the Quick Start Guide. • When Read/write - Canon 475D | i475D Direct Printing Guide - Page 22
menu. Next, select Canon Utilities, Memory Card Utility, and then USB Memory Card Settings. The USB Memory Card Settings window appears. 3 Specify Click Complete. The selected read/write attribute is saved. 1 Ensure that the printer and the computer are turned on. 2 Start the BJ Utility. (1) Ensure - Canon 475D | i475D Direct Printing Guide - Page 23
camera or Canon digital camera with the Bubble Jet Direct function to the printer allows Photo Paper Pro 4"x 6"/101.6 x 152.4 mm Photo Paper Plus Glossy 4" x 6"/101.6 x 152.4 mm Photo Paper Plus Glossy 5" x 7"/127 x 177.8 mm Photo Paper Pro or Photo Paper Plus Glossy Letter Photo Paper Pro or Photo - Canon 475D | i475D Direct Printing Guide - Page 24
Printing from a Digital Camera 1 Ensure that the printer is turned on. 2 Load the paper. Load the Photo Paper Pro paper as shown below. (1) Load the media with the more glossy surface facing up. (2) Align the media on the right. (3) Press the paper guide and slide it against the left side of the - Canon 475D | i475D Direct Printing Guide - Page 25
manual's instructions for changing the camera to the Replay mode. will display on the LCD display of the digital camera when the printer troubleshooting, refer to your digital camera manual. For print error adjusted by using the Photo Optimizer PRO function. does not support the following functions - Canon 475D | i475D Direct Printing Guide - Page 26
Step3 "Print Head Deep Cleaning" on page 28 If the problem still remains Step4 "Replacing Ink Tanks" on page 31 • If ink tank replacement does not resolve the problem, contact a Canon service representative. • You will be alerted if low ink warning is enabled. • When the Maintenance button on the - Canon 475D | i475D Direct Printing Guide - Page 27
Check Pattern The nozzle check pattern should appear as follows when ink is discharged properly. Examine the nozzle check pattern output by the printer. (1) Lines missing in this pattern indicate that the print head of black ink requires cleaning. See "Print Head Cleaning" on page 27. When with - Canon 475D | i475D Direct Printing Guide - Page 28
nozzles might be clogged. Cleaning the print head consumes ink, so perform print head cleaning only when necessary. 1 Ensure that the printer is on. 2 Start print head cleaning. (1) " on page 26. If the problem persists, perform print head deep cleaning. See "Print Head Deep Cleaning" on page 28 - Canon 475D | i475D Direct Printing Guide - Page 29
. Print head deep cleaning consumes ink, so perform this procedure only when necessary. 1 Ensure that the printer is on. 2 Start Print ink tank. See "Replacing an Ink Tank" on page 31. If ink tank replacement does not resolve the problem, the print head may be worn out. Contact a Canon service - Canon 475D | i475D Direct Printing Guide - Page 30
the Print Head Aligning the print head position allows you to print without shifts in the color registration. 1 With the printer on, load a sheet of A4 paper in the printer. 2 Print the Pattern. (1) Press the Maintenance button. 3 Align the Print Head. (2) Press three times to display 04 on the - Canon 475D | i475D Direct Printing Guide - Page 31
Column "K" 4 Exit the maintenance mode. (4) Repeat the above procedure to determine the pattern numbers (+7 to -3) of the checked patterns in columns B through E and the pattern numbers (+5 to -5) of the checked patterns in columns F through K. When pattern numbers have been determined up to column - Canon 475D | i475D Direct Printing Guide - Page 32
is used, or installed in the incorrect position. ‰ Black: BCI-24 Black ‰ Color: BCI-24 Color Replacing Ink Tanks When ink tanks run out of ink, replace them using the following steps. 1 Ensure that the printer is on, and then open the front cover. The print head holder moves to the left. 2 Remove - Canon 475D | i475D Direct Printing Guide - Page 33
head cleaning and deep cleaning, which are necessary to maintain the printer's capabilities. 5 Reset the ink counter. After replacing an ink tank, be sure to reset the ink counter with the front cover open. The remaining ink volume display on the operation panel is only displayed properly if the - Canon 475D | i475D Direct Printing Guide - Page 34
the mark set above them, press the OK button. 6 Close the front cover. Resetting the Ink Counter in the Maintenance Mode If you have closed the front cover after replacing an ink tank, reset the ink counter in the maintenance mode as described below. (1) Press the Maintenance button. (2) Press four - Canon 475D | i475D Direct Printing Guide - Page 35
level will not work properly. If you did not reset the counter when you installed the current ink tanks, the low ink may not function correctly, until the next time you replace the ink tanks. Also, be sure to you treat both counters separately. Refer to the section "The ? mark is displayed beside - Canon 475D | i475D Direct Printing Guide - Page 36
Troubleshooting Let's take a look at countermeasures against the troubles that may occur during use of the printer. Here, we will discuss errors indicated on the operation panel, problems that might occur during direct printing from the digital camera, and problems that are also likely to occur - Canon 475D | i475D Direct Printing Guide - Page 37
or digital video camcorder. 802/804/806/807/808/809 An error requiring a service may have occurred. Try This Turn off the printer by pressing the Power button, then turn on the printer again. If the same error persists, the print head may be faulty. Contact a Canon service representative. Press the - Canon 475D | i475D Direct Printing Guide - Page 38
the print head. • If ink supply is uneven: See "Print Head Cleaning" on page 27. • If straight lines are misaligned: See "Aligning the Print Head" on page 29. Check that your paper is loaded with the correct print side facing up. Incorrect paper type Follow the instructions packaged with your - Canon 475D | i475D Direct Printing Guide - Page 39
to the Quick Start Guide. The print head is defective. (The Power lamp on the printer flashes seven times.) Contact a Canon service representative. The waste ink tank is nearly full. Press the Resume button on the printer to recover from the error. Contact a Canon service representative as soon as - Canon 475D | i475D Direct Printing Guide - Page 40
of the following messages appears while using the Photo Viewer, printing may be disabled or the Photo Viewer may be terminated forcibly. Error Massage Executing maintenance. Insert a memory card. The printer's card slot has been write-enabled. ...... There is a problem with the memory card or it is - Canon 475D | i475D Direct Printing Guide - Page 41
QA7-2845-V01 XX2003XX ©CANON INC.2003 PRINTED IN VIETNAM
-
 1
1 -
 2
2 -
 3
3 -
 4
4 -
 5
5 -
 6
6 -
 7
7 -
8
-
9
-
10
-
11
-
12
-
13
-
14
-
15
-
16
-
17
-
18
-
19
-
20
-
21
-
22
-
23
-
24
-
25
-
26
-
27
-
28
-
29
-
30
-
31
-
32
-
33
-
34
-
35
-
36
-
37
-
38
-
39
-
40
-
41
 |
 |

BUBBLE JET PRINTER
Direct Printing Guide
Table of Contents
Operation Panel Names and Functions
1
Printing Flow
4
Using a Memory Card
6
Printing a Photograph
9
Printing an Image List – Print Index
9
Selecting and Printing an Image – Print One
11
Loading Paper
13
Using the Photo Viewer
16
Other Useful Functions
18
Printing According to the Settings Made on the Camera
– DPOF Printing
18
Changing the Date Style
20
Setting up the Card Slot as the Memory Card Drive of the
Computer
20
Printing Photographs Directly from a Digital Camera
22
Printing Maintenance
25
Replacing an Ink Tank
31
Troubleshooting
35
QA7-2845-V01
BE