Canon 9150A002 User Manual
Canon 9150A002 Manual
 |
View all Canon 9150A002 manuals
Add to My Manuals
Save this manual to your list of manuals |
Canon 9150A002 manual content summary:
- Canon 9150A002 | User Manual - Page 1
Document Scanner INSTRUCTIONS ENGLISH PlePalseeasreeardetahdistmhiasnmuaal nbueafolrbeeofpoereratoinpgerthaitsinugnitth. Aisftuernyito. uAffitneirshyou finish rearediandginthgisthmisanmuaaln, ustaolr,esitoinreaitsainfeapslaacfee fpolrafcueturfoerrefufeturernecree.ference. - Canon 9150A002 | User Manual - Page 2
office equipment such as computers, monitors, printers, fax machines, copiers and scanners. and used in accordance with the instruction manual, may cause harmful interference to radio ée par l'Industrie Canada. NOTICE q Copyright 2004 by CANON ELECTRONICS INC. All rights reserved. No part of this - Canon 9150A002 | User Manual - Page 3
you to use the SOFTWARE. No updates, fixes or support will be made available for the SOFTWARE. 4. LIMITED WARRANTY AND DISCLAIMER OF INDEMNITY: Canon, Canon's affiliate, their distributor or dealer will not guarantee uninterrupted service, or absence or correction of errors. Therefore, the SOFTWARE - Canon 9150A002 | User Manual - Page 4
- Canon 9150A002 | User Manual - Page 5
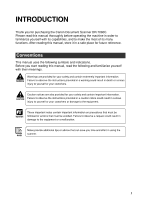
symbols and indications. Before you start reading this manual, read the following and familiarize yourself with their meanings. WARNING Warnings are provided for your safety and contain extremely important information. Failure to observe the instructions provided in a warning could result in death - Canon 9150A002 | User Manual - Page 6
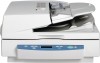
CONTENTS INTRODUCTION 1 Conventions 1 Safety Precautions 5 Safe Operation 5 Installation Location 7 Power Supply 8 Operating and Closing the Feeder 8 Carrying ...9 Chapter 1 Getting Ready 1.1 Features of the DR-7080C 12 1.2 Before Getting Started 14 Unpacking 14 Removing the Transportation - Canon 9150A002 | User Manual - Page 7
3 Using the Software 3.1 About the Software 36 3.2 Installing the Software 37 3.3 How to Use the Software 39 How to Display the ISIS/TWAIN Driver Help File 39 How to Start CapturePerfect 40 How to Start the Job Registration Tool 41 3.4 Uninstalling the Software 43 Chapter 4 Using the Scanner - Canon 9150A002 | User Manual - Page 8
6.4 Display Messages 83 Error Messages 83 Scanner Status Messages 85 6.5 Troubleshooting 86 Chapter 7 User Maintenance 7.1 Changing the Stamp Cartridge 90 7.2 Daily 94 Cleaning the Power Plug 98 Appendix Specifications 100 Specification for the Scanner 100 Options ...101 Consumables 101 Exterior Dimensions - Canon 9150A002 | User Manual - Page 9
you suspect the scanner has been accidentally damaged, turn OFF the power immediately and disconnect the power cord from the power outlet. Call for service immediately. ■ Before you move the scanner, always turn OFF the power and disconnect the power cord from the power outlet. ■ The scanner weighs - Canon 9150A002 | User Manual - Page 10
liquid or drop a metal object into the scanner, turn OFF the power immediately and disconnect the power cord from the power outlet. Call for service immediately. ■ Never install the scanner in humid or dusty locations. Doing so might cause a fire or electrical shock. ■ Never place heavy objects on - Canon 9150A002 | User Manual - Page 11
Installation Location More than 5.9" (150 mm) More than 27.6" (700 mm) More than 3.9" (100 mm) More than 5.9" (150 mm) More than 33.5" (850 mm) For operation, maintenance and ventilation, make sure that there is enough space around the scanner, as shown in the illustration above. Avoid placing - Canon 9150A002 | User Manual - Page 12
an extension cord, pay attention to the total amperage of the cord. • If you are unsure of anything relating to the power supply, contact your service representative or the power company. • Never place an object on top of the power cord or step on the power cord. • Never bundle the power - Canon 9150A002 | User Manual - Page 13
Carrying Take care when moving the scanner. Two people should hold the scanner firmly on opposite sides when lifting it. WARNING ■ The scanner weighs 74.0 lb (33.6 kg). Two people must carry the scanner. You may drop the scanner, or pinch your fingers if you attempt to carry it by yourself. ■ When - Canon 9150A002 | User Manual - Page 14
- Canon 9150A002 | User Manual - Page 15
Chapter 1 Getting Ready This chapter describes the features of the scanner, what's in the box, and the names and functions of parts on the scanner. 1.1 Features of the DR-7080C 12 1.2 Before Getting Started 14 Unpacking 14 Removing the Transportation Screw ....... 15 1.3 Part Names 16 Feeder 16 - Canon 9150A002 | User Manual - Page 16
● Flatbed scanning Flatbed scanning is also supported for thin paper, paper that does not , which eliminates the need for troublesome manual settings. Document pages of different sizes can key. Scanned images can be sent directly to a specific folder, printer, or e-mail address. (See "Job Function," - Canon 9150A002 | User Manual - Page 17
or are written in pencil, or if the text is a color other than black. ● Dropout color This feature lets you skip ("drop out") a specific color when scanning. ● Stamping (option) This feature automatically marks the trailing edge of a scanned document page with a stamp to indicate that is has been - Canon 9150A002 | User Manual - Page 18
your sales representative. DR-7080C reaPdleinagsethriseamdatnhuisaml, satnourealitbienfoaresaofpeepralatcinegfothrisfuutunriet. Areffteerreynocue.finish Document INSTRUCTIONS Scanner Instructions (this manual) QUICK REFERENCEDOCUMENT SCANNER Quick Reference Power Cord* Warranty Card*1 USB - Canon 9150A002 | User Manual - Page 19
1.2 Before Getting Started Removing the Transportation Screw 1 A transportation screw is installed at the factory to lock the scanner's optical unit in place and protect it against damage caused by vibration and other forces during shipment. You must remove the transportation screw before trying - Canon 9150A002 | User Manual - Page 20
feeder cover. e Document Set Indicator This indicator lights when there is a document in the document feeder tray. (See p. 49.) r Slide Guide Adjust this guide to the marking on the document size label that indicates the applicable document size. (See p. 48.) t Document Feeder Tray Load documents to - Canon 9150A002 | User Manual - Page 21
Flatbed 1.3 Part Names 1 i Pressure Board This board presses the document page against the glass during scanning. (See p. 89.) o Flatbed (Platen Glass) When placing the document onto the platen glass, align it with the arrow in the upper left corner of the glass. (See p. 51.) !0 Opening Sensor - Canon 9150A002 | User Manual - Page 22
Chapter 1 Getting Ready Rear !2 Air Vents !3 USB Connector Connect a Hi-Speed USB 2.0 compatible USB cable here. (See p. 28.) !4 DIP Switches Configure these switches to specify the SCSI ID or terminator ON or OFF. (See p. 26.) !5 SCSI Connectors Connect a SCSI cable (50-pin half pitch, pin type) - Canon 9150A002 | User Manual - Page 23
scanning of the document and forwards the scanned image to the registered job. y New File Key This key is active for applications that support batch separation. This key lights when pressed or in accordance with the application's batch separation settings. Scanning the next document while this key - Canon 9150A002 | User Manual - Page 24
attachments (Scan to Mail). • Images can be output to a specified printer (Scan to Printer). For details about using the Job function, see "Using the Job Mode for ," on page 59. Scan to PC Scan to Printer Save image to specified folder. Output to printer (Mail Server) Scan to Mail Send image as - Canon 9150A002 | User Manual - Page 25
1.5 Optional Products Optional Products 1 The following options can be purchased and used on the DR-7080C, if they are necessary. Contact your sales representative. Stamp Unit The stamp unit affixes a "scanned" stamp on document pages that are scanned using the feeder. The application can be used - Canon 9150A002 | User Manual - Page 26
- Canon 9150A002 | User Manual - Page 27
Chapter 2 Connecting to a Computer This chapter describes how to connect the scanner to a computer, and includes information about what you need to do to get Windows to recognize the scanner. 2.1 Checking Your Operating Environment 24 2.2 Connecting to a Computer 25 SCSI Connections 25 USB - Canon 9150A002 | User Manual - Page 28
with a computer running a supported operating system other than Windows NT. ● Use the latest USB 2.0 driver when using USB connections. Contact your sales representative. ● If the CPU, memory, SCSI card, or USB interface card does not meet the recommended specifications, the scanning speed may slow - Canon 9150A002 | User Manual - Page 29
Manufacturer: Adaptec Product names: AHA-2930U, AHA-2940AU, ASC-19160, ASC-29160, APA-1480 Be sure to follow the installation procedure in your computer's operation manual when Important installing the SCSI card on your computer. 25 - Canon 9150A002 | User Manual - Page 30
Chapter 2 Connecting to a Computer ◆ Connecting the SCSI Cable CAUTION ■ The SCSI cable should only be as long as the rating for the SCSI card being used. If the SCSI cable is longer than the rated length, the scanner may not operate correctly. ■ Before you connect the SCSI cable, make sure that - Canon 9150A002 | User Manual - Page 31
Important ● The SCSI ID default is set to 2. ● Assign SCSI ID numbers ranging from 0 to 7 for each SCSI device. Do not select 7 as this is normally assigned to the SCSI controller. If a SCSI hard disk is mounted, do not use 0 and 1. Normally 0 and 1 are assigned for hard disks. Set the terminator - Canon 9150A002 | User Manual - Page 32
compatible with Hi-Speed USB 2.0 and operationally tested by Canon. ● Turn the SCSI terminator on, even if you are manual when installing the USB 2.0 interface card on your computer. ● Use the most recent USB 2.0 driver provided by Adaptec or Microsoft. ● Windows NT operating system does not support - Canon 9150A002 | User Manual - Page 33
◆ Connecting a USB Interface Cable Do not connect both a SCSI cable and USB interface cable at the same time. CAUTION 2 USB Connector SCSI Connectors (Cannot be used at the same time a USB connector is in use.) Connecting the Power Cord Connect the power cord. Be sure to use only the power cord - Canon 9150A002 | User Manual - Page 34
vibration, or smell odd odors around the scanner, turn OFF the power immediately and disconnect the power cord from the power outlet. Contact your service representative immediately. Failure to do so might cause a fire. 2 Turn ON the computer. Note You will need to install the scanner device - Canon 9150A002 | User Manual - Page 35
a screen prompting you to install the scanner driver. Follow the instructions on the screen to proceed with the installation. setup disc into the computer's CD-ROM drive. 3. Select [Search for the best driver for your device. (Recommended).], and then select [Specify a location]. Enter "D:\INF" - Canon 9150A002 | User Manual - Page 36
[Install from a list or specific location (Advanced)], and then click the [Next] button. 3. Select [Search for the best driver in these locations], and then the driver "has not passed Windows logo testing," this is not a problem. ● The DR-7080C will be registered as "CANON DR-7080C SCSI" or "CANON - Canon 9150A002 | User Manual - Page 37
Turning OFF the Power Important If you are using a SCSI connection, turn OFF the computer first, before turning OFF the scanner. 1 Turn OFF the computer. 2 2 Turn OFF the scanner. OFF ON CAUTION ■ Wait at least 10 seconds before turning ON the scanner again. ■ For your safety, disconnect the - Canon 9150A002 | User Manual - Page 38
- Canon 9150A002 | User Manual - Page 39
This chapter describes how to install and use the ISIS/TWAIN driver, CapturePerfect, and Job Registration Tool that come packaged with the scanner 3.3 How to Use the Software 39 How to Display the ISIS/TWAIN Driver Help File ... 39 How to Start CapturePerfect 40 How to Start the Job Registration Tool - Canon 9150A002 | User Manual - Page 40
software. ● ISIS/TWAIN driver This driver allows the scanner to use ISIS (Image and Scanner Interface Specification) compatible applications or TWAIN the Job function. Note, however, that the Job function is not supported on a computer that is running Windows NT. If you want to use the - Canon 9150A002 | User Manual - Page 41
Job function, run the scanner with a computer running a supported operating system other than Windows NT. ● If another ISIS compatible driver is already installed on the computer, be sure to 3 the setup disc into the CD-ROM drive. This manual assumes that "D" is assigned to your CD-ROM drive. 37 - Canon 9150A002 | User Manual - Page 42
folder where you will install the applicable software. ISIS/TWAIN Driver: D:\Driver\setup.exe CapturePerfect: D:\CapturePerfect\setup.exe Job Registration Tool: D:\JobTool\setup.exe 5 This starts the installer. Follow the instructions that appear on your computer screen to complete the installation - Canon 9150A002 | User Manual - Page 43
on using the ISIS/TWAIN driver. How to Display the ISIS/TWAIN Driver Help File The explanation on how to use the ISIS/TWAIN driver is in the ISIS/TWAIN driver help file. To view the help file, click the [Start] button, and then click [Programs] - 3 [Canon DR-7080C] - [Canon DR-7080C Help]. 39 - Canon 9150A002 | User Manual - Page 44
Chapter 3 Using the Software How to Start CapturePerfect This section describes the procedure to start and exit CapturePerfect. See [Help] in CapturePerfect for information on how to use CapturePerfect. 1 Click the [Start] button, and then click [Programs] - [CapturePerfect 2.0]. Click [All Programs - Canon 9150A002 | User Manual - Page 45
Windows NT. If you want to use the Job function, run the scanner with a computer running a supported operating system other than Windows NT. 1 Click the [Start] button, and then click [Programs] - [Canon DR- 7080C] - [Job Registration Tool]. In the case of Windows XP, click [All Programs] - [DR - Canon 9150A002 | User Manual - Page 46
file for information about how to use the Job Registration Tool. To view the help file, click the [Help] button. ● The last page of this manual is "Job Title Record." Use it to record the titles of jobs that you register with the Job Registration Tool. 42 - Canon 9150A002 | User Manual - Page 47
Windows XP. ● The dialogs and button names in Windows XP are different from those used in the explanations in this manual. Refer to the Windows XP "Help and Support Center" to uninstall the software. 1 Click the [Start] button, and then click [Settings] - [Control Panel]. 3 2 Double click on the - Canon 9150A002 | User Manual - Page 48
. 4 This displays a [Confirm File Deletion] dialog box for the application you are removing. If you selected "Canon DR-7080C Driver," the above dialog box appears. 5 Click the [Yes] button, and the uninstaller starts. Follow the instructions on the screen to finish uninstalling the software. 44 - Canon 9150A002 | User Manual - Page 49
Chapter 4 Using the Scanner This chapter describes precautions regarding documents that can be handled on this scanner and scanning operations. 4.1 Documents 46 Types of Documents 46 Feeder Capacity 47 4.2 Placing Documents onto the Scanner 48 Loading a Document into the Feeder ...... 48 - Canon 9150A002 | User Manual - Page 50
Chapter 4 Using the Scanner Documents This section describes the various types of documents that can be scanned with the feeder. Handle documents with care. Improper handling of paper can cause paper cuts or other CAUTION personal injury. Types of Documents The following are the dimensions of - Canon 9150A002 | User Manual - Page 51
4.1 Documents • If you scan documents with a rough surface, friction between the documents may cause a paper jam. In this case, select [Flatbed], and then scan the documents one page at a time. • When you scan a batch of NCR documents, make sure that they are not stuck together. If a jam occurs, - Canon 9150A002 | User Manual - Page 52
personal injury. Loading a Document into the Feeder Perform the following steps to load the pages of a document into the feeder for scanning. 1 Adjust each slide guide so its pointer is aligned with the corresponding paper size on the document size label. Slide - Canon 9150A002 | User Manual - Page 53
4.2 Placing Documents onto the Scanner 2 Align the edges of the document stack on a flat surface, and then load the stack into the feeder with the scanning side facing upwards. Insert the stack into the feeder as far as it will go, until the document set indicator lights. Document Set Indicator ● - Canon 9150A002 | User Manual - Page 54
Chapter 4 Using the Scanner 4 After scanning is complete, lift the document feeder tray, and then remove the document from the document eject tray. Important ● Leaving a document in the document eject tray and scanning another document can cause jamming. ● Raise the document feeder tray only as - Canon 9150A002 | User Manual - Page 55
4.2 Placing Documents onto the Scanner Positioning a Document on the Flatbed (Platen Glass) Use the following procedure to scan on the flatbed (platen glass) when scanning a book, thick document, very thin document, an OHP (Overhead Transparency) transparency, or any other document that cannot be - Canon 9150A002 | User Manual - Page 56
Chapter 4 Using the Scanner 2 Place the document onto the flatbed (platen glass) with the scanning side facing downwards. With the scanning side of the document facing downwards, align its corner with the arrow mark in the upper left corner of the flatbed (platen glass). 3 Slowly and carefully lower - Canon 9150A002 | User Manual - Page 57
4.2 Placing Documents onto the Scanner 4 Raise the feeder and remove the document from the flatbed (platen glass). Important ● Raise the feeder carefully and slowly, taking care to avoid letting the feeder fall over backwards. ● Leave the feeder raised when scanning thick documents like books, or - Canon 9150A002 | User Manual - Page 58
document jams, or damage the scanner. Scan Procedure The ISIS/TWAIN driver "Feeding Option" setting allows you to select from among the three an application on your computer. After placing the document onto the scanner, instruct the scanner from your computer to start scanning. ● Panel Feeding (See - Canon 9150A002 | User Manual - Page 59
Document Feeding and Scanning ◆ Standard Feeding To use the standard feeding mode, instruct the scanner to start from the application. 1 Select [Standard Feeding] in [Feeding Option] on the ISIS/TWAIN driver's settings screen. 2 Place the document onto the scanner. 4 See "Placing Documents onto - Canon 9150A002 | User Manual - Page 60
then use the scanner's [Start] and [Stop] keys to control the scanning operation. 1 Select [Panel-Feeding] in [Feeding Option] on the ISIS/TWAIN driver's settings screen. 2 From the application you are using, execute the required command to start scanning. This causes the [Start] key lamp to light - Canon 9150A002 | User Manual - Page 61
starts scanning automatically whenever it detects a document loaded into the feeder. 1 Select [Automatic Feeding] in [Feeding Option] on the ISIS/TWAIN driver's settings screen. 2 From your application, execute the command to start scanning. This causes the [Start] key lamp to light green. 57 - Canon 9150A002 | User Manual - Page 62
Chapter 4 Using the Scanner 3 Load the document into the document feeder tray. The scanner detects the documents, and scanning starts. See "Placing Documents onto the Scanner," on page 48 for information about placing Important documents onto the scanner. 4 When scanning of the document is complete - Canon 9150A002 | User Manual - Page 63
on a computer that is running Windows NT. If you want to use the Job function, run the scanner with a computer running a supported operating system other than Windows NT. 1 Set the Event function. (See "Setting the Event Function," on p. 60.) 4 2 Use Job Registration Tool to register a job - Canon 9150A002 | User Manual - Page 64
of the document is complete, press the [Stop] key to exit the Job Mode. If you cannot get the Job Mode to operate correctly, see "Troubleshooting," on page 86. Note ◆ Setting the Event Function The Job function does not function when [DR7080C Job Tool] has not been specified in the scanner - Canon 9150A002 | User Manual - Page 65
2 Double click [Scanners and Cameras]. 4.4 Other Scanning Techniques This displays the [Scanners and Cameras] dialog box. The dialog box that appears differs according to what version of Windows is running on the computer. Note 4 3 Select [Canon DR-7080C SCSI], and then click [Properties]. 4 - Canon 9150A002 | User Manual - Page 66
Chapter 4 Using the Scanner 5 Specify [Job Start Button] in the [Scanner events] field. 6 Uncheck all the items in the [Send to this application] field except for [DR7080C Job Tool]. 7 Click the [Apply] button. You cannot use the Job function if the [Disable device events] check box is checked. - Canon 9150A002 | User Manual - Page 67
4.4 Other Scanning Techniques Using the Count Only Mode In the Count Only Mode, document pages are sent through the feeder in order to count them. The document is not scanned. You can perform Count Only Mode operations on the scanner, without using your computer. 1 Use the user modes to enter the - Canon 9150A002 | User Manual - Page 68
sheets, which allows files to be separated. Note ● Refer to "ISIS/TWAIN Driver HELP" when using patch code sheets. ● Patch code sheets are enabled only when the application being used for scanning supports file separation. ◆ Patch Code Sheets Patch code sheets are PDF (portable document format - Canon 9150A002 | User Manual - Page 69
4.4 Other Scanning Techniques ◆ Types of Patch Code Patterns There are two patch code patterns as shown below. The result varies depending on the pattern. ● PATCH T (FILE A) When this sheet is recognized, the document following the sheet is saved to a separate file. ● PATCH II (FILE B) 4 When this - Canon 9150A002 | User Manual - Page 70
Chapter 4 Using the Scanner ◆ How to Use Patch Code Sheets 1 Print the patch code sheet on the following paper size: ● Print [PATCH II (A4)] and [PATCH T (A4)] on A4-size paper. ● Print [PATCH II (LTR)] and [PATCH T (LTR)] on letter size paper. Note ● Patch code patterns are detected within the - Canon 9150A002 | User Manual - Page 71
4.4 Other Scanning Techniques 2 Place the patch code sheet on top of the documents that are to be saved to a separate file, and then scan the documents. Place the patch code sheet on top of the documents that are to be saved to a separate 4 file. 3 Set the scanning conditions, and then start - Canon 9150A002 | User Manual - Page 72
- Canon 9150A002 | User Manual - Page 73
Chapter 5 User Modes This chapter describes the user modes, which you can use to configure the scanner settings. 5.1 About the User Modes 70 User Mode Functions 70 How to Set the User Modes 72 - Canon 9150A002 | User Manual - Page 74
Chapter 5 User Modes About the User Modes You can configure the scanner settings with the user modes described below. User Mode Functions User mode functions are as follows: ● Count Only Mode ON: Count Only Mode (See "Using the Count Only Mode," on p. 63.) OFF: Normal Mode (default) ● Long Document - Canon 9150A002 | User Manual - Page 75
● Display Contrast Mode 5.1 About the User Modes ▼ ▼ Use the Set [ ] and [ ] keys to move the pointer (■) to the left for lighter contrast or to the right for darker contrast. ● Setting SCSI Transfer Speed Set the maximum value for synchronous transfer speed for the SCSI interface. [5]: 5 Mbyte - Canon 9150A002 | User Manual - Page 76
Chapter 5 User Modes How to Set the User Modes Use the following procedure to configure user mode settings. 1 Press the [Menu] key to display the user mode screens. Use the [Menu] key to cycle through the user modes in the sequence shown below. 2 Use the Set [ ] and [ ] keys to change the currently - Canon 9150A002 | User Manual - Page 77
Chapter 6 Troubleshooting This chapter describes the trouble that may occur on the DR-7080C and how to correct it. 6.1 When the Scanner Is Not Recognized 74 81 6.3 When the Scanned Image Is Not Normal 82 6.4 Display Messages 83 Error Messages 83 Scanner Status Messages 85 6.5 Troubleshooting 86 - Canon 9150A002 | User Manual - Page 78
Troubleshooting When the Scanner Is Not Recognized The following describes possible causes of your computer not recognizing the scanner. Remedy the problem can see one of these, then refer to the SCSI card's operator's manual to reset the SCSI card. Click [Start]-[ - Canon 9150A002 | User Manual - Page 79
correctly connect the scanner's power cord. Then, turn ON the scanner, and then turn ON the computer. (See p. 29.) Cause Remedy The scanner does not support the SCSI card. Replace with a SCSI card compatible with the driver application. (See p. 25.) 6 75 - Canon 9150A002 | User Manual - Page 80
Chapter 6 Troubleshooting USB Connections Cause Remedy Scanner is not correctly connected. Connect the scanner correctly with a cable that supports USB 2.0. (See p. 28.) Cause Remedy The USB 2.0 interface card is not correctly installed on the computer. Refer to the USB 2.0 interface card - Canon 9150A002 | User Manual - Page 81
6.2 Clearing Paper Jams Clearing Paper Jams A paper jam is indicated when scanning stops unexpectedly and the message shown below appears on the display panel. Use the procedure below to clear a paper jam. Clearing a Paper Jam CAUTION ■ Be careful when you clear a paper jam. You may be injured - Canon 9150A002 | User Manual - Page 82
Chapter 6 Troubleshooting 3 Remove the jammed paper. 4 If the document is jammed under the feeder guide, grasp the tab inside the scanner to open the feeder guide. Note If you are duplex scanning, the document may be jammed under the feeder guide. 78 - Canon 9150A002 | User Manual - Page 83
eject tray. After feeding the paper, raise the document feeder tray and remove the paper. 6 Close the feeder guide. Take care to avoid pinching your fingers when closing the feeder guide. 6 CAUTION 7 Close the feeder cover. Take care to avoid pinching your fingers when closing the feeder cover - Canon 9150A002 | User Manual - Page 84
Chapter 6 Troubleshooting 8 Raise the feeder. Open the feeder carefully and slowly, taking care to avoid letting the feeder fall over CAUTION backwards. 9 Remove any paper jammed inside - Canon 9150A002 | User Manual - Page 85
take the required action: ● What to check: Is the document size or thickness outside the range supported by the feeder, or is the document paper of substandard quality? What to do: See "Documents . (See p. 93.) If the rollers are worn, contact your service representative to have them replaced. 6 81 - Canon 9150A002 | User Manual - Page 86
Chapter 6 Troubleshooting When the Scanned Image Is Not Normal If there is a problem on the scanned image (image is the application, see the instruction manual for the application in use. ● Other Causes Even if the computer is correctly recognizing the scanner, and the driver and the application are - Canon 9150A002 | User Manual - Page 87
6.4 Display Messages Display Messages This section explains the error messages and scanner status messages that appear on the display panel. Error Messages The following are the messages that appear to indicate errors. Display Cause Remedy Display The feeder is raised. Lower the feeder back down - Canon 9150A002 | User Manual - Page 88
Chapter 6 Troubleshooting Display Cause Remedy Display Cause Remedy You are attempting to the document again. This is a "service call error," which indicates that the scanner has an internal problem. This error requires servicing from your service representative. Turn off the scanner. With the - Canon 9150A002 | User Manual - Page 89
6.4 Display Messages Scanner Status Messages The following messages indicate the current status of the scanner: Display Status The scanner is performing some process. Please wait. Display Status Display The scanner is in the Ready Mode. The scanner will go into the Stand-by Mode if you do not - Canon 9150A002 | User Manual - Page 90
Troubleshooting Troubleshooting Check the following points when you have problems the feeder. Cause: The ISIS/TWAIN driver "Scanning Side" setting is "Flatbed." support the Job function. Remedy 1: The Job function is not supported Panel, double-click [Scanners and Cameras] to open DR-7080C SCSI - Canon 9150A002 | User Manual - Page 91
6.5 Troubleshooting ● The Job function does not work when the [Start] key is pressed after selecting a job, and [Scan Error] is displayed. Cause 1: Another application is using the DR-7080C ISIS/TWAIN Driver. Remedy 1: Close the other application that is using the DR-7080C ISIS/TWAIN Driver. Cause - Canon 9150A002 | User Manual - Page 92
- Canon 9150A002 | User Manual - Page 93
Chapter 7 User Maintenance This chapter describes daily cleaning of the scanner. 7.1 Changing the Stamp Cartridge .......... 90 7.2 Daily Cleaning 92 Cleaning the Main Unit 92 Cleaning the Flatbed (Platen Glass) and Pressure Board 93 Cleaning the Feeder 94 Cleaning the Power Plug 98 - Canon 9150A002 | User Manual - Page 94
the stamp mark becomes smudged or faint. Contact your sales reprentative or service representative to purchase a new stamp cartridge. 1 Open the feeder cover. the tab inside the scanner, open the feeder guide. Stamp cartridge 3 Use a pair of tweezers or some similar tool to remove the old stamp - Canon 9150A002 | User Manual - Page 95
protrude outside the hole. ● Improperly installing the stamp cartridge can cause paper jams. 5 Close the feeder guide. Take care to avoid pinching your fingers when closing the feeder guide. CAUTION 6 Close the feeder cover. Take care to avoid pinching your fingers when closing the feeder cover - Canon 9150A002 | User Manual - Page 96
Chapter 7 User Maintenance Daily Cleaning To maintain high-quality scanning, you should periodically clean the following: • Main unit • Flatbed (Platen glass) • Pressure Board • Feeder CAUTION ■ Before you clean the scanner, turn OFF the scanner and computer and disconnect the power cord from the - Canon 9150A002 | User Manual - Page 97
7.2 Daily Cleaning Cleaning the Flatbed (Platen Glass) and Pressure Board A dirty flatbed (platen glass) or pressure board can cause soiling of scanned images, or document size detection errors. Clean the flatbed (platen glass) and pressure board periodically. 1 Raise the feeder. CAUTION Open the - Canon 9150A002 | User Manual - Page 98
slowly, taking care to avoid pinching your fingers. Failure to do so might result in personal injury. Cleaning the Feeder Without periodical cleaning, a problem may be caused on the scanned image or the document may become soiled. Clean the feeder periodically. 1 Open the feeder cover. Operate the - Canon 9150A002 | User Manual - Page 99
moistened with plain water and thoroughly wrung out. Next, wipe the rollers dry with a soft, dry cloth. 3 Wipe the three rollers on the feeder guide with a cloth moistened with plain water and thoroughly wrung out. Next, wipe the rollers dry with a soft, dry cloth. 4 Grasping the tab inside the - Canon 9150A002 | User Manual - Page 100
a cloth moistened with plain water and thoroughly wrung out. Next, wipe the rollers dry with a soft, dry cloth. 6 Wipe the four rollers inside the feeder guide with a cloth moistened with plain water and thoroughly wrung out. Next, wipe the rollers dry with a soft, dry cloth. 7 Close the feeder - Canon 9150A002 | User Manual - Page 101
8 Close the feeder cover. 7.2 Daily Cleaning CAUTION Take care to avoid pinching your fingers when closing the feeder cover. 9 Raise the feeder. CAUTION Open the feeder carefully and slowly, taking care to avoid letting the feeder fall over backwards. 10 Wipe the scanning glass (narrow strip - Canon 9150A002 | User Manual - Page 102
Chapter 7 User Maintenance 11 Wipe the metal next to the rubber rollers with a cloth moistened with plain water and thoroughly wrung out. Next, wipe the metal dry with a soft, dry cloth. 12 Slowly and carefully lower the feeder back down. CAUTION Lower the feeder slowly, taking care to avoid - Canon 9150A002 | User Manual - Page 103
Appendix This appendix contains the specifications and index. Specifications 100 Specifications for the Scanner 100 Options 101 Consumables 101 Exterior Dimensions 102 Index 103 - Canon 9150A002 | User Manual - Page 104
Appendix Specifications Specifications for the Scanner Type Document Size Document Thickness Document Weight Document Feeding Scanning Method Desktop ADF/flatbed scanner Width: Length: 5.5" to 12"/139.7 mm to - Canon 9150A002 | User Manual - Page 105
the functions noted above if the software supports them. ● They may not work depending on your computer's capabilities and the software you are using. Specifications are subject to change without notice. options and consumables, contact your sales representative or your service representative. 101 - Canon 9150A002 | User Manual - Page 106
Appendix Exterior Dimensions Units: inches (units in parentheses are millimeters) 23.7" (602 mm) 27.1" (688 mm) 22.6" (575 mm) 0.4" (10 mm) 13.3" (377 mm) 22.2" (565 mm) 11.7" (297 mm) 5.8" (148 mm) 11.8" (300 mm) 102 - Canon 9150A002 | User Manual - Page 107
set indicator 16 -Feeder cover 16 -Opening lever 16 -Slide guide 16 File separation 63 Flatbed 17, 64 -Opening sensor 17 -Platen board (Black 17 - I - Installation location 7 ISIS/TWAIN drivers 36 -How to display the ISIS/ TWAIN driver Help file 39 -Installation 37 - J - Job function - Canon 9150A002 | User Manual - Page 108
disc 14 Slide guide 48 Software 36 -How to use the software 39 -Installation 37 -Uninstallation 43 Specifications 100 Stamp cartridge 90 Stamp unit 21 Standard feeding 55 Stand-by Mode 70 Start key 19 Stop key 19 - T - Terminator 26 Transportation screw 15 Troubleshooting 86 Turning - Canon 9150A002 | User Manual - Page 109
. Job No. Job Title Function Scan to PC Scan to Printer Scan to Mail Scan to PC Scan to Printer Scan to Mail Scan to PC Scan to Printer Scan to Mail Scan to PC Scan to Printer Scan to Mail Scan to PC Scan to Printer Scan to Mail Scan to PC Scan to - Canon 9150A002 | User Manual - Page 110
Scan to PC Scan to Printer Scan to Mail Scan to PC Scan to Printer Scan to Mail Scan to PC Scan to Printer Scan to Mail Scan to PC Scan to Printer Scan to Mail Scan to PC Scan to Printer Scan to Mail Scan to PC Scan to Printer Scan to Mail Scan to - Canon 9150A002 | User Manual - Page 111
- Canon 9150A002 | User Manual - Page 112
ELECTRONICS INC. 1248, SHIMOKAGEMORI, CHICHIBU-SHI, SAITAMA 369-1892, JAPAN CANON U.S.A. INC. ONE CANON PLAZA, LAKE SUCCESS, N.Y. 11042, U.S.A. CANON CANADA INC. 6390 DIXIE ROAD, MISSISSAUGA, ONTARIO L5T 1P7, CANADA CANON EUROPA N.V. BOVENKERKERWEG 59-61, P.O.BOX 2262 AMSTELVEEN, THE NETHERLANDS
-
 1
1 -
 2
2 -
 3
3 -
 4
4 -
 5
5 -
 6
6 -
 7
7 -
8
-
9
-
10
-
11
-
12
-
13
-
14
-
15
-
16
-
17
-
18
-
19
-
20
-
21
-
22
-
23
-
24
-
25
-
26
-
27
-
28
-
29
-
30
-
31
-
32
-
33
-
34
-
35
-
36
-
37
-
38
-
39
-
40
-
41
-
42
-
43
-
44
-
45
-
46
-
47
-
48
-
49
-
50
-
51
-
52
-
53
-
54
-
55
-
56
-
57
-
58
-
59
-
60
-
61
-
62
-
63
-
64
-
65
-
66
-
67
-
68
-
69
-
70
-
71
-
72
-
73
-
74
-
75
-
76
-
77
-
78
-
79
-
80
-
81
-
82
-
83
-
84
-
85
-
86
-
87
-
88
-
89
-
90
-
91
-
92
-
93
-
94
-
95
-
96
-
97
-
98
-
99
-
100
-
101
-
102
-
103
-
104
-
105
-
106
-
107
-
108
-
109
-
110
-
111
-
112
 |
 |

Document Scanner
INSTRUCTIONS
Please read this manual before operating this unit. After you finish
reading this manual, store it in a safe place for future reference.
INSTRUCTIONS