Canon A650 PowerShot A650 IS Camera User Guide
Canon A650 - PowerShot IS Digital Camera Manual
 |
UPC - 013803086461
View all Canon A650 manuals
Add to My Manuals
Save this manual to your list of manuals |
Canon A650 manual content summary:
- Canon A650 | PowerShot A650 IS Camera User Guide - Page 1
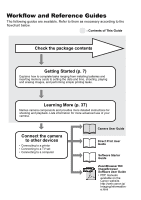
ENGLISH DIGITAL CAMERA CDI-E364-010 © 2007 CANON INC. PRINTED IN CHINA Camera User Guide Camera User Guide Getting Started Learning More Components Guide Basic Operations Commonly Used Shooting Functions Shooting Using the Mode Dial Various Shooting Methods Playback/Erasing Print Settings/ - Canon A650 | PowerShot A650 IS Camera User Guide - Page 2
use of your camera. Connect the camera to other devices • Connecting to a printer • Connecting to a TV set • Connecting to a computer Camera User Guide Direct Print User Guide Software Starter Guide ZoomBrowser EX/ ImageBrowser Software User Guide • PDF manuals available on the Canon website - Canon A650 | PowerShot A650 IS Camera User Guide - Page 3
DC4 Canon Digital Camera Solution Disk Warranty Card User Guides • Camera User Guide • Direct Print User Guide • Software Starter Guide • "Canon Customer Support" Leaflet You may not be able to achieve the full performance of this camera with the included memory card. You can use SD* memory cards - Canon A650 | PowerShot A650 IS Camera User Guide - Page 4
Settings 44 Using the LCD Monitor 49 Information Displayed on the LCD Monitor 50 Resetting Settings to Their Default Values 55 Formatting Memory Cards 56 Commonly Used Shooting Functions 57 Shooting with the Optical Zoom 57 Using the Digital Zoom/Digital Tele-Converter 58 Using the Flash - Canon A650 | PowerShot A650 IS Camera User Guide - Page 5
Image Stabilizer Function 70 Shooting Using the Mode Dial 72 Mode Dial 72 Shooting Modes for Specific Scenes 73 Movie Shooting 77 Shooting Panoramic Images (Stitch Assist 80 Program AE 82 Setting the Shutter Speed 83 Setting the Aperture 85 Manually Setting the Shutter Speed and Aperture - Canon A650 | PowerShot A650 IS Camera User Guide - Page 6
147 Protecting Images 148 Erasing All Images 149 Print Settings/Transfer Settings 150 Setting the DPOF Print Settings 150 Setting the DPOF Transfer Settings 155 Connecting to a TV 157 Shooting/Playback Using a TV 157 Troubleshooting 158 List of Messages 168 Appendix 172 Safety - Canon A650 | PowerShot A650 IS Camera User Guide - Page 7
Malfunctions 177 Battery Handling 178 Handling the Memory Card 180 Using the Power Kits (Sold Separately 182 Using the Lenses (Sold Separately 185 Using an Externally Mounted Flash (Sold Separately) . 189 Camera Care and Maintenance 191 Specifications 192 Index 202 Functions Available in - Canon A650 | PowerShot A650 IS Camera User Guide - Page 8
any malfunction of a camera or accessory, including memory cards, that results in the failure of an image to be recorded or to be recorded in a way that is machine readable. Warning Against Copyright Infringement Please note that Canon digital cameras are intended for personal use and should never - Canon A650 | PowerShot A650 IS Camera User Guide - Page 9
Getting Started z Preparations z Shooting Still Images z Viewing Still Images z Shooting Movies z Viewing Movies z Erasing z Printing z Downloading Images to a Computer z System Map - Canon A650 | PowerShot A650 IS Camera User Guide - Page 10
Getting Started 8 Preparations Preparations Installing the Batteries 1. Slide the battery cover lock (a) and hold it open while sliding the cover (b) and opening it (c). Battery Cover Lock 2. Install four batteries. Negative end (-) Positive end (+) - Canon A650 | PowerShot A650 IS Camera User Guide - Page 11
it until it clicks into place (b). „ Removing the Batteries Remove the batteries by opening the Memory Card Slot / Battery Cover and tilting the camera at an angle. „ Attaching the Wrist Strap In order to avoid dropping the camera, we recommend attaching the wrist strap before using the camera. - Canon A650 | PowerShot A650 IS Camera User Guide - Page 12
(b) and opening it (c). Battery Cover Lock 2. Insert the memory card until it clicks into place. Back Write Protect Tab (Only SD memory cards) Example: SD memory card • Confirm that the Write Protect Tab is unlocked (only SD memory cards). • Check the memory card for the correct orientation. - Canon A650 | PowerShot A650 IS Camera User Guide - Page 13
(b). Ensure that the memory card is correctly oriented before inserting it in the camera. Inserting it backward may cause the camera to fail to recognize the memory card or to malfunction. „ To Remove the Memory Card Push the memory card with your finger until the memory card clicks and then release - Canon A650 | PowerShot A650 IS Camera User Guide - Page 14
Opening the LCD Monitor The LCD monitor can be used to check an image during shooting, to play back recorded images or to adjust menu settings. It can be opened to the following range of positions. 1. Opened right to left 180 degrees. 2. Tilted forward 180 degrees toward the lens or backward - Canon A650 | PowerShot A650 IS Camera User Guide - Page 15
The Date/Time settings menu will appear the first time the power is turned on. Set the date and time as shown in Step 3 and 4. Power Button Buttons Button 1. Press the power button. 2. Select [Date/Time]. 1. Press the button. 2. Use the or button to select the (Set up) menu. 3. Use the or button - Canon A650 | PowerShot A650 IS Camera User Guide - Page 16
as the date/time. Install the batteries into the camera at time of purchase, or recharge batteries for about 4 hours using the separately-sold AC Adapter Kit ACK600. It will charge even if the camera is turned off. z The date/time settings may be lost after approximately three weeks if you remove - Canon A650 | PowerShot A650 IS Camera User Guide - Page 17
1. Press the power button. • The start-up sound will play and the start-up image will display in the LCD monitor. • Pressing the power button again turns the power off. 2. Select a shooting mode. 1. Set the mode switch to (Shooting). 2. Set the mode dial to . 3. Aim the camera at the subject - Canon A650 | PowerShot A650 IS Camera User Guide - Page 18
the file will record to the memory card. Recording: blinks green Mute Setting Pressing the DISP. button while turning the camera power on will set the mute setting to [On] to silence all camera sounds except for warning sounds. The setting can be changed with the [Mute] option in the Set up Menu. - Canon A650 | PowerShot A650 IS Camera User Guide - Page 19
17 Reviewing an Image Right After Shooting (Rec. Review) Recorded images are displayed on the LCD monitor for approximately 2 seconds immediately after shooting. Shutter Button Button You can also use when an image is being displayed. Change the image display time from [Review] in the Rec. Menu. - Canon A650 | PowerShot A650 IS Camera User Guide - Page 20
. • Use the button to move to the previous image and the button to move to the next image. • The images advance more quickly if you keep the button pressed continuously, but they will appear coarse. If you have replayed images, the last image viewed will display (Resume Playback). If the memory card - Canon A650 | PowerShot A650 IS Camera User Guide - Page 21
Button Shutter Button Mode Dial Mode Switch Button 1. Press the power button. 2. Select a shooting mode. 1. Set the mode switch to (Shooting). 2. Set the mode dial to (Movie). 3. Confirm that the camera is set to (Standard). 3. Aim the camera at the subject. Remaining Time z Do not touch the - Canon A650 | PowerShot A650 IS Camera User Guide - Page 22
will light green when the camera focuses. • The exposure, focus and white balance are automatically set when you press the button LCD monitor. 6. Press the shutter button again to stop recording. Elapsed Time • The indicator will blink green and the data will be recorded onto the memory card - Canon A650 | PowerShot A650 IS Camera User Guide - Page 23
the or button to display a movie and press the button. • Images with a icon are movies. 3. Use the or button to select button. • The movie will start playing. • If you press the FUNC./SET button during playback, you can pause and restart the movie. • You can adjust the playback volume with the - Canon A650 | PowerShot A650 IS Camera User Guide - Page 24
Getting Started 22 Erasing Erasing Button Buttons Mode Switch Button 1. Set the mode switch to (Playback). 2. Use the or button to select an image to erase and press the button. 3. Select [Erase] and press the • To exit instead of erasing, select [Cancel]. - Canon A650 | PowerShot A650 IS Camera User Guide - Page 25
connector. • See the printer's user guide for connection instructions. Canon Brand Printers DIGITAL Terminal SELPHY Series Compact Photo Printers*2 Interface Cable PIXMA Series Bubble Jet Printers *1 Since this camera uses a standard protocol (PictBridge), you can use it with other PictBridge - Canon A650 | PowerShot A650 IS Camera User Guide - Page 26
printer. 3. Set the camera's mode switch to press the power button. • The button will light blue. • A , or icon will appear in the LCD monitor if the connection is correct (the displayed icons differ according to the connected printer). • will display on movies. (Playback) and 4. Use the - Canon A650 | PowerShot A650 IS Camera User Guide - Page 27
Getting Started Items to Prepare • Camera and computer • Canon Digital Camera Solution Disk supplied with the camera • Interface cable supplied with the camera (be sure to use only the supplied cable) System Requirements Please install the software on a computer meeting the following minimum - Canon A650 | PowerShot A650 IS Camera User Guide - Page 28
the software first before connecting the camera to the computer. 1. Installing the software. „ Windows 1. Place the Canon Digital Camera Solution appears. 4. Remove the CD-ROM from the drive when your normal desktop screen appears. „ Macintosh Double-click the icon in the CDROM window. When the - Canon A650 | PowerShot A650 IS Camera User Guide - Page 29
the interface cable all the way into the connector. USB Port DIGITAL Terminal Terminal Cover Interface Cable Interface Cable 3. Preparing to download images to the computer. 1. Set the camera's mode switch to the power. The camera and computer will be able to communicate. (Playback) and turn - Canon A650 | PowerShot A650 IS Camera User Guide - Page 30
display. Preparations for downloading images are now finished. Please proceed to the Downloading Images Using the Camera (Direct Transfer) section (p. 29) (except Windows 2000). With Windows 2000, you can download images using the computer. Please refer to the Software Starter Guide for details. - Canon A650 | PowerShot A650 IS Camera User Guide - Page 31
proceed to the Downloading Images Using the Camera (Direct Transfer) section (p. 29). You can download images using the computer. Please refer to the Software Starter Guide for details. Downloading Images Using the Camera (Direct Transfer) Install the software before downloading images via the - Canon A650 | PowerShot A650 IS Camera User Guide - Page 32
images with DPOF Transfer Order settings. Select & Transfer Transfers and menu is displayed on the camera's LCD monitor. • The button will light blue. • Press the MENU button if the Direct Transfer menu fails to appear. Direct Transfer Menu „ All Images/New Images/DPOF Trans. Images 2. Use - Canon A650 | PowerShot A650 IS Camera User Guide - Page 33
images. The option selected with the button is retained even when the camera's power is turned off. The previous setting will be in effect the next time the Direct Transfer menu is displayed. The image selection screen will appear directly when the [Select & Transfer] or the [Wallpaper] option - Canon A650 | PowerShot A650 IS Camera User Guide - Page 34
Cable IFC-400PCU*1 Memory Card (32MB) AV Cable AVC-DC300*1 Canon Digital Camera Solution Disk Waterproof Case WP-DC18 Waterproof Case Weight WW-DC1 Battery and Charger Kit CBK4-300*5 „ Battery Charger CB-5AH/ CB-5AHE „ AA-size NiMH batteries NB3AH (x4) • NiMH Battery NB4-300 (set of 4 AA-size - Canon A650 | PowerShot A650 IS Camera User Guide - Page 35
Getting Started System Map 33 High-Power Flash HF-DC1 Conversion Lens Adapter LA-DC58J Wide Converter WC-DC58B Tele-converter TC-DC58C Direct Interface Cable Compact Photo Printers*2 *3 (SELPHY Series) PCMCIA Adapter USB Card Reader SD Memory Card*6 • SDC-128M • SDC-512MSH Direct Print - Canon A650 | PowerShot A650 IS Camera User Guide - Page 36
Getting Started 34 System Map Optional Accessories The following camera accessories are sold separately. Some accessories are not sold in some regions, or may no longer be available. „ Lenses, Lens Adapter • Conversion Lens Adapter LA-DC58J This adapter is required for mounting the wide converter - Canon A650 | PowerShot A650 IS Camera User Guide - Page 37
camera. Canon brand memory cards are available in 128 MB and 512 MB capacities. • Interface Cable IFC-400PCU Use this cable to connect the camera to a computer, Compact Photo Printer (SELPHY series), or to a Bubble Jet printer (refer to your Bubble Jet printer user guide). • AV Cable AVC-DC300 Use - Canon A650 | PowerShot A650 IS Camera User Guide - Page 38
- Canon A650 | PowerShot A650 IS Camera User Guide - Page 39
37 Learning More - Canon A650 | PowerShot A650 IS Camera User Guide - Page 40
38 Components Guide Components Guide „ Front View a Speaker b AF-assist Beam (p. 45) c Red-Eye Reduction Lamp (p. 89) d Self-Timer Lamp (p. 64) e Viewfinder Window (p. 39) f Flash (p. 62) g Ring (p. 186) h Ring Release Button (p. 186) i Lens j Microphone (p. 147) - Canon A650 | PowerShot A650 IS Camera User Guide - Page 41
Mount (p. 9) e DIGITAL Terminal (pp. 23, 27) f Terminal Cover g DC IN (Power Input) Terminal (p. 184) h Memory Card Slot / Battery Cover (p. 8) i Memory Card Slot / Battery Cover Lock (p. 8) j Tripod Socket Using the Viewfinder The viewfinder can be used to conserve power by turning the LCD monitor - Canon A650 | PowerShot A650 IS Camera User Guide - Page 42
) h Mode Switch (pp. 15, 18, 21) i / (Jump) Button (pp. 105, 134) j MENU Button (p. 43) k FUNC./SET Button (pp. 42, 44) l DISP. Button (p. 49) m (Exposure)/ (Single Image Erase) Button (pp. 108, 22) n (Flash)/ Button (p. 62) o Button p (Macro)/ (Manual Focus)/ Button (pp. 63, 99) q Button - Canon A650 | PowerShot A650 IS Camera User Guide - Page 43
mode/Manual focus mode/AF lock mode Blinking Yellow: Focusing difficulty (camera beeps once) Never do the following while the indicator blinks green. These actions may corrupt image data. - Shake or jolt the camera - Shut off the power, or open the memory card slot/battery cover Power Saving - Canon A650 | PowerShot A650 IS Camera User Guide - Page 44
Basic Operations Basic Operations Menus and Settings Settings for the shooting or playback modes, or camera settings such as the print, date/time, and sound settings are set using the FUNC./ SET button or the MENU button. „ Button (Func. Menu) This menu sets many of the common shooting functions - Canon A650 | PowerShot A650 IS Camera User Guide - Page 45
modes. 4 Use the or button to select an option. • Menu items followed by an ellipsis (...) can only be set after pressing the FUNC./SET button to display the next menu. Press the FUNC./SET button again to confirm the setting, then press the MENU button to return to the menu screen. 5 Press - Canon A650 | PowerShot A650 IS Camera User Guide - Page 46
(Still image) p. 67 p. 66 +/- (Flash) / Flash Output p. 116 Recording Pixels (Movie) p. 79 Rec. Menu Menu Item AF Frame // / / // // / AF Frame Size Digital Zoom (Still image) (Movie) Flash Sync Slow Synchro Flash Adjust Red-Eye Options *Default setting Contents/ Reference Page Face Detect - Canon A650 | PowerShot A650 IS Camera User Guide - Page 47
*/Off Basic Operations 45 Contents/ Reference Page p. 120 p. 110 p. 86 p. 106 p. 99 p. 100 - You can set the length of time images display after being shot (p. 17). p. 91 - Off*/Grid Lines/3:2 Guide/Both p. 122 Off*/Grid Lines Continuous*/Shoot Only/ Panning/Off p. 70 Continuous*/Off None*/WC - Canon A650 | PowerShot A650 IS Camera User Guide - Page 48
Menu Menu Item Print Select Image & Qty. Select All Images Clear All Selections Print Settings Reference Page p. 150 Set up Menu *Default setting Menu volume cannot be adjusted if [Mute] is set to [On]. Adjusts the volume of the start-up sound when the camera is turned on. Adjusts the volume of - Canon A650 | PowerShot A650 IS Camera User Guide - Page 49
the camera automatically powers down after a set period of time elapses without the camera being operated. 10 sec./20 sec./30 sec./1 min.*/2 min./3 min. Sets the length of time before the LCD monitor turns off when no camera operation is performed. p. 13 You can also select a low level format - Canon A650 | PowerShot A650 IS Camera User Guide - Page 50
, select when borderless printing an image shot in (Widescreen) mode on wide size paper using Canon compact photo printer SELPHY CP750/CP740/CP730/CP720/CP710/ CP510. As this setting will be stored to memory even when the power is turned off, to print using an image size other than , return the - Canon A650 | PowerShot A650 IS Camera User Guide - Page 51
images only) • The shooting information displays for approximately 6 sec. when a setting is changed, regardless of the selected display mode. z The LCD monitor on or off setting is retained even after the camera power is turned off. z The LCD monitor does not shut off in the or mode. z The - Canon A650 | PowerShot A650 IS Camera User Guide - Page 52
50 Basic Operations Information Displayed on the LCD Monitor Shooting Information (Shooting Mode) Grid Lines 3:2 Guide b Spot AE Point Frame/ a AF Frame c d ISO Speed White Balance Drive Mode My Colors a Flash Exposure Compensation/Flash Output Metering Mode Compression (Still image) - Canon A650 | PowerShot A650 IS Camera User Guide - Page 53
p. 126 c Stills: Recordable Shots Movies: Remaining Time/Elapsed Time pp. 19, 197, 198 Camera Shake Warning (Red) pp. 51 Manual Focus p. 97 * Displays when the shutter button is pressed halfway. Since the camera automatically readjusts for the optimal settings when using the flash, settings - Canon A650 | PowerShot A650 IS Camera User Guide - Page 54
52 Basic Operations Playback Information (Playback Mode) „ Standard a b a Displayed Image Number/Total Number of Images Folder Number-File Number Compression (Still Images) Recording Pixels (Still Images) Movie b WAVE Format Sound Red-Eye Corrected/Resized Protection Status Shooting Date/Time „ - Canon A650 | PowerShot A650 IS Camera User Guide - Page 55
-1/2000 b Aperture Value F2.8-F8.0 Recording Pixels/Frame Rate (Movies) Exposure Compensation c Flash Exposure Compensation/Flash Output White Balance My Colors d Red-Eye Correction Function AF Lock/Manual Focus Macro File Size e Still Image: Recording Pixels Movies: Movie Length „ Focus - Canon A650 | PowerShot A650 IS Camera User Guide - Page 56
(p. 194). RAW image Image recording pixel setting not recognized z Information for images shot on other cameras may not display correctly. z Overexposure Warning In the following cases, overexposed portions of the image blink. - When reviewing an image right after shooting in the LCD monitor - Canon A650 | PowerShot A650 IS Camera User Guide - Page 57
Default Values 1 Select [Reset All]. 1. Press the button. 2. Use the or button to select the menu. 3. Use the or button to select [Reset All]. 4. Press the button. 2 Accept the setting. 1. Use the or button to select [OK] 2. Press the button. z When the camera is in shooting mode and the mode dial - Canon A650 | PowerShot A650 IS Camera User Guide - Page 58
button. • To perform a low level format, use the button to select [Low Level Format] and the or button to add a check mark. • You can stop formatting a memory card when [Low Level Format] is selected by pressing the FUNC./SET button. You can still use a memory card without problem when formatting is - Canon A650 | PowerShot A650 IS Camera User Guide - Page 59
Shooting Functions 57 Commonly Used Shooting Functions Shooting with the Optical Zoom Shooting Mode See Functions Available in Each Shooting Mode (p. 214 adjust the zoom. 1 Press the zoom lever toward or . • Wide Angle: Zooms out from the subject. • Telephoto: Zooms in on the subject. Zoom Bar - Canon A650 | PowerShot A650 IS Camera User Guide - Page 60
to maximum telephoto. This enables a faster shutter speed and less chance of camera shake than a shot taken at the same angle of view with [Standard] or [Off]. * Cannot be set in mode. z The digital zoom cannot be used when the LCD monitor is turned off. z The digital zoom cannot be used in or - Canon A650 | PowerShot A650 IS Camera User Guide - Page 61
Functions 59 2 Accept the setting. 1. Use the or button to select [Standard]. 2. Press the button. 3 Press the zoom lever toward • The combined digital and optical zoom setting will display in the LCD monitor. • Press the zoom lever toward to zoom out. • The image may appear coarse depending - Canon A650 | PowerShot A650 IS Camera User Guide - Page 62
60 Commonly Used Shooting Functions Safety Zoom Zone Depending on the number of recording pixels set, you can zoom lever toward (telephoto) again. • Depending on the number of recording pixels set, the Safety Zoom zone varies as follows. Recording Pixels Optical Zoom Digital Zoom (4000×3000 - Canon A650 | PowerShot A650 IS Camera User Guide - Page 63
on the LCD monitor. • The image may appear coarse depending upon the selected recording pixels (the icon and the zoom factor appear in blue). Digital Tele-Converter The digital tele-converter feature uses digital zoom to achieve the effects of a tele-converter (a lens used in telephoto shooting). - Canon A650 | PowerShot A650 IS Camera User Guide - Page 64
Commonly Used Shooting Functions Using the Flash See Functions Available in Each Shooting Mode (p. 214). Shooting Mode * Cannot be set in and modes. 1 Press the button. 1. Use the or button to change the flash mode. • : [Off] • : [On] • : [Auto] You are recommended to shoot with the camera attached - Canon A650 | PowerShot A650 IS Camera User Guide - Page 65
Mode * Cannot be set in mode. Use this mode to the end of the lens to the subject). 1 Press the button. 1. Use the or button to use the or button to select (Normal). z Use the LCD monitor to compose close-ups in macro mode since images composed with the viewfinder may be offcenter. z Using the flash - Canon A650 | PowerShot A650 IS Camera User Guide - Page 66
64 Commonly Used Shooting Functions Using the Self-Timer See Functions Available in Each Shooting Mode (p. 214). Shooting Mode * Cannot be set in mode. You can set the time delay and the numbers of shots you wish to take in advance. 10 sec. Self-Timer: shoots 10 seconds after you press the - Canon A650 | PowerShot A650 IS Camera User Guide - Page 67
locked at the settings selected for the first shot. - If the flash is used, the interval between shots lengthens because the flash must charge. - The interval between shots may lengthen when the built-in memory of the camera fills. - Shooting will automatically cease if the memory card becomes full. - Canon A650 | PowerShot A650 IS Camera User Guide - Page 68
Select a recording pixels setting. 1. Press the button. 2. Use the or button to 89 mm (4.7 x 3.5 in.) (Small) 0.3M 640 x 480 Low Send images as e-mail attachments or shoot more images *2 or *2 ( the LCD monitor as a black border.) *1 Paper sizes vary according to region. *2 Cannot be set in - Canon A650 | PowerShot A650 IS Camera User Guide - Page 69
Mode 1 Select a compression setting. 1. Press the button. 2. Use the or button to Settings Compression Purpose Superfine High Quality Shoot higher quality images Fine Shoot normal quality images Normal Normal Shoot more images z See Image Data Sizes (Estimated) (p. 198). z See Memory Cards - Canon A650 | PowerShot A650 IS Camera User Guide - Page 70
. 3. Press the button. • The recording pixel and compression settings are fixed (2 megapixels, 1600 x 1200, ). • The area that will not print displays in gray. The digital zoom or the digital tele-converter cannot be used in this mode. For printing instructions, refer to the Direct Print User Guide. - Canon A650 | PowerShot A650 IS Camera User Guide - Page 71
the or button. 3. Press the button. 2 Select [Date Stamp]. 1. Press the button. 2. In the menu, use the or button to select [Date Stamp]. 3 Set the date and time. 1. Use the or button to select [Date] or [Date & Time]. 2. Press the button. • LCD Monitor Display - : [Off] - : [Date]/[Date & Time] - Canon A650 | PowerShot A650 IS Camera User Guide - Page 72
the camera's date/time is set beforehand (p. 13). z The date stamp cannot be deleted from the image data once it has been embedded. To imprint the date on all but size images, use the supplied software (ZoomBrowser EX or ImageBrowser) or printer settings. For details, please see the user guide for - Canon A650 | PowerShot A650 IS Camera User Guide - Page 73
[IS Mode]. 2 Accept the setting. 1. Use the or button to select [Continuous], [Shoot Only], [Panning] or [Off]. 2. Press the button. LCD Monitor Icons [Continuous] [Shoot Only] [Panning] [Converter] setting in Rec. menu Reference Page None WC-DC58B/ TC-DC58C p. 200 z Camera shake may not be - Canon A650 | PowerShot A650 IS Camera User Guide - Page 74
Using the Mode Dial Shooting Using the Mode Dial Mode Dial Creative Zone Auto Image Zone „ Auto (p. 15) The camera automatically selects settings. „ Image Zone (pp. 73-81) When a shooting mode appropriate for the shooting conditions is selected, the camera automatically adjusts settings - Canon A650 | PowerShot A650 IS Camera User Guide - Page 75
: Manually Setting the Shutter Speed and Aperture : Register regularly used shooting modes and settings. Shooting Modes for Specific Scenes See Functions Available in Each Shooting Mode (p. 214). Shooting Mode When a shooting mode appropriate for specific scenes is selected, the camera automatically - Canon A650 | PowerShot A650 IS Camera User Guide - Page 76
for the scene. 1 Set the mode dial to . 2 Select a shooting mode. 1. Use the or button to select a shooting mode. Night Scene Allows you to capture people against the backdrop of an evening sky or night scene. The flash is directed at the person and the shutter speed is slow, so both the - Canon A650 | PowerShot A650 IS Camera User Guide - Page 77
Shooting Using the Mode Dial 75 Indoor Prevents camera shake and maintains the subject's true color when shooting under fluorescent or tungsten lighting. Foliage Shoots trees and leaves-such as new growth, autumn leaves - Canon A650 | PowerShot A650 IS Camera User Guide - Page 78
shake when shooting. Settings will be fixed at recording pixels (1600 x 1200 pixels). z The shutter speed is slow in or mode. Always use a tripod to avoid camera shake. z In , , , or mode, the ISO speed may increase and cause noise in the image depending on the scene being shot. z In mode, noise - Canon A650 | PowerShot A650 IS Camera User Guide - Page 79
SDC-512MSH). The digital zoom can be used while shooting in this mode. (p. 57) • Maximum Size: 4 GB* Compact Since there are few recording pixels and also the data size is small, this mode is convenient for sending movies as e-mail attachments or when the memory card capacity is low. • Maximum Clip - Canon A650 | PowerShot A650 IS Camera User Guide - Page 80
maximum recording capacity is reached - When the built-in memory or memory card becomes full z You are recommended to use a memory card that has been formatted in your camera to shoot movies (p. 56). The memory card supplied with the camera may be used without further formatting. z Be careful of the - Canon A650 | PowerShot A650 IS Camera User Guide - Page 81
the recording pixels when the movie mode is set to (Standard) (frame rate is fixed). 1 Select the number of recording pixels. 1. Press the button. 2. Use the or button to select and the or length. z See Image Data Sizes (Estimated) (p. 198). z See Memory Cards and Estimated Capacities (p. 197). - Canon A650 | PowerShot A650 IS Camera User Guide - Page 82
one panoramic image on a computer. The overlapping seams of several adjacent images can be joined into a single panoramic image. 1 Set the mode dial to . 2 Select a shooting direction. 1. Use the or button to select a shooting direction. : Left to right horizontally : Right to left horizontally - Canon A650 | PowerShot A650 IS Camera User Guide - Page 83
. 6 Press the button after taking the last shot. z You cannot display the images on a TV when shooting in Stitch Assist mode. z The settings for the first image are applied to the second image onward (except for Macro setting). z Use PhotoStitch, a supplied software program, to merge the images on - Canon A650 | PowerShot A650 IS Camera User Guide - Page 84
the ISO speed, exposure compensation and white balance. 1 Set the mode dial to . 2 Shoot. When a correct exposure cannot be obtained, the shutter speed and aperture values are shown in red on the LCD monitor when the shutter button is pressed halfway. Use the following shooting methods to obtain the - Canon A650 | PowerShot A650 IS Camera User Guide - Page 85
instantaneous image of a moving subject, while slower speeds create a flowing effect and allow you to shoot without a flash in dark areas. 1 Set the mode dial to . 2 Configure the shutter speed. • Use the or button to change the shutter speed. Shutter Speed 3 Shoot. • If the aperture value is shown - Canon A650 | PowerShot A650 IS Camera User Guide - Page 86
shutter speed is preset to a speed higher than 1/500 second, the camera automatically resets the shutter speed to 1/500 second during shooting. Shutter Speed Display z The following shutter speeds can be set. 1/160 indicates 1/160 second. Also, 0"3 indicates 0.3 second and 2" indicates 2 seconds - Canon A650 | PowerShot A650 IS Camera User Guide - Page 87
Shooting Using the Mode Dial 85 Setting the Aperture See Functions Available in Each Shooting Mode (p. 214). Shooting Mode The aperture adjusts the amount of light entering through the lens. When you set the aperture value, the camera automatically selects a shutter speed to match the brightness. - Canon A650 | PowerShot A650 IS Camera User Guide - Page 88
be reset to match the synchronized flash speed. Aperture Value Display z The larger the aperture value, the smaller the lens aperture. F2.8 F3.2 F3.5 F4.0 F4.5 F4.8 F5.0 F5.6 F6.3 F7.1 F8.0 Safety Shift With and modes, if [Safety Shift] is turned [On] in the Rec. menu, the shutter speed or aperture - Canon A650 | PowerShot A650 IS Camera User Guide - Page 89
in Each Shooting Mode (p. 214). Shooting Mode You can manually set the shutter speed and aperture to shoot images. 1 Set the mode dial to . 2 Configure the shutter speed and aperture setting. 1. Use the button to select shutter speed or aperture. 2. Use the or button to change the option. 3 Shoot - Canon A650 | PowerShot A650 IS Camera User Guide - Page 90
214). In this mode, the camera shoots continuously while the shutter button is held down. If you use the recommended memory card, you can shoot continuously (smooth continuous shooting) at a set shooting interval until the memory card is full (p. 197). *Recommended Memory Card: Super high-speed SDC - Canon A650 | PowerShot A650 IS Camera User Guide - Page 91
shots lengthens when the built-in memory of the camera fills. z If the flash is used, the interval between shots lengthens because the flash must charge. Setting the flash. 1 Select [Red-Eye]. 1. Press the button. 2. In the menu, use the or button to select [Red-Eye]. 2 Accept the setting. 1. Use the - Canon A650 | PowerShot A650 IS Camera User Guide - Page 92
indoor lighting, this function reduces the effect of background darkening when the flash fires. 1 Select [Slow Synchro]. 1. Press the button. 2. In the menu, use the or button to select [Slow Synchro]. 2 Set Slow Synchro. 1. Use the or button to select [On] or [Off]. 2. Press the button. z In - Canon A650 | PowerShot A650 IS Camera User Guide - Page 93
expressions or whether a subject's eyes are closed. It is recommended to set [Review] to [Hold] in the menu. 1 Select [Review Info]. 1. Press the button. 2. In the menu, use the or button to select [Review Info]. 2 Accept the setting. 1. Use the or button to select [Focus Check]. 2. Press the button - Canon A650 | PowerShot A650 IS Camera User Guide - Page 94
92 Various Shooting Methods 3 Shoot. • The image is displayed. • Frames are displayed as follows. Image Shot Frame color Content Orange Displays the range of the image displayed at bottom right. White The frame is displayed at a position at which the image - Canon A650 | PowerShot A650 IS Camera User Guide - Page 95
camera focuses. You can set the AF frame in the following ways. Face Detect AiAF You can have the camera automatically detect the position of a face and use this data to set exactly where you want it. Shooting mode: / / / The camera sets the focus from an AF frame FlexiZone you select. This is - Canon A650 | PowerShot A650 IS Camera User Guide - Page 96
Shooting Methods 2 Accept the setting. 1. Use the or button to select [Face Detect], [AiAF], [Center] or [FlexiZone]. 2. Press the button. • Changing the AF Frame Size (p. 95) • Changing the AF Frame Position (p. 96) [Face Detect] and [FlexiZone] cannot be used when the LCD monitor is turned off - Canon A650 | PowerShot A650 IS Camera User Guide - Page 97
. 1 Select [AF Frame Size]. 1. Press the button. 2. In the menu, use the or button to select [AF Frame Size]. 2 Accept the setting. 1. Use the or button to select [Normal] or [Small]. 2. Press the button. The setting changes to [Normal] when the digital zoom, digital tele-converter or (p. 99) is - Canon A650 | PowerShot A650 IS Camera User Guide - Page 98
remains in effect even after the camera power is switched off). • Continuing to press the button causes the AF frame to return to its original position in the center (and it also switches between the settings categories shown above). z When the metering option is set to [Spot], you can make the - Canon A650 | PowerShot A650 IS Camera User Guide - Page 99
Manual Focus, Safety MF) See Functions Available in Each Shooting Mode (p. 214). Shooting Mode * Cannot be used in mode. It may be difficult to focus on the following types of subjects. • Subjects with extremely low Shooting with the Focus Lock 1 Aim the camera so that an object at the same focal - Canon A650 | PowerShot A650 IS Camera User Guide - Page 100
the shot as desired and shoot. To Release the AF Lock Press the button and use the or button to select (Normal). z Since AF frames do not display in mode, aim the camera so that the focus is on the target subject. z When shooting with the focus lock or AF lock using the LCD monitor, setting - Canon A650 | PowerShot A650 IS Camera User Guide - Page 101
of the AF frame displayed immediately prior to setting the manual focus will display magnified. * The image will not appear magnified in mode, when the digital zoom or digital tele-converter is activated or when a TV is used as the display. * Can also be set so that the image displayed is not - Canon A650 | PowerShot A650 IS Camera User Guide - Page 102
in or mode. First, manual focus is used to roughly focus, then from that focus position the camera automatically focuses more accurately. 1 Select [Safety MF]. 1. Press the button. 2. In the menu, use the or button to select [Safety MF]. 2 Accept the setting. 1. Use the or button to select - Canon A650 | PowerShot A650 IS Camera User Guide - Page 103
set the exposure and focus separately. This is effective when the contrast is too strong between the subject and background or when a subject is backlit. 1 Press the button and select . 2 Aim the camera exposure setting will lock and will display. 4 Re-aim the camera to compose the shot as desired - Canon A650 | PowerShot A650 IS Camera User Guide - Page 104
changed without altering the exposure to shoot images (Program Shift). 1 Aim the camera at the subject on which you wish to lock the exposure. 2 Press the shutter button halfway and press the button. • The exposure setting will lock and will display. 3 Change the shutter speed and aperture value - Canon A650 | PowerShot A650 IS Camera User Guide - Page 105
halfway and press the button. • The flash will pre-fire and will display. 4 Re-aim the camera to compose the shot as desired and press the shutter button fully. To Release the FE Lock Operate a button other than the or button. The FE lock cannot be used when the auto flash feature is set to [Off]. - Canon A650 | PowerShot A650 IS Camera User Guide - Page 106
Available in Each Shooting Mode (p. 214). Shooting Mode * Only can be set. Raise the ISO speed to use a fast shutter speed when you wish to reduce the effects of camera shake or avoid blurry subjects, or to turn the flash off when shooting in a dark area. Auto {* - {* {* {* - High ISO Auto - Canon A650 | PowerShot A650 IS Camera User Guide - Page 107
2. Use the or buttons to change the setting. 3. Press the button. • Selecting puts priority on image quality in setting the optimal camera automatically applies noise reduction processing when you shoot at a high ISO speed. z If the camera is set at or , the ISO speed automatically set by the camera - Canon A650 | PowerShot A650 IS Camera User Guide - Page 108
mode. z Depending on shooting conditions, the camera shake warning icon ( ) may not go out even if the ISO speed is increased. 1 Select [Auto ISO Shift]. 1. Press the button. 2. In the menu, use the or button to select [Auto ISO Shift]. 2 Accept the setting. 1. Use the or button to select [ button - Canon A650 | PowerShot A650 IS Camera User Guide - Page 109
to its original condition. • When the AE lock is activated after the ISO speed is raised, the ISO speed will not return to its original setting even if you release the shutter button. 5 Press the shutter button all the way down (press fully). Auto 3 Press the shutter button halfway. • The ISO - Canon A650 | PowerShot A650 IS Camera User Guide - Page 110
making the subject too bright in night shots or when shot against a dark background. 1 Turn on the LCD monitor. 2 Press repeatedly to display the exposure compensation bar. 3 Configure the setting. 1. Use the or button to select a compensation setting. 2. Press . • Each press of the button switches - Canon A650 | PowerShot A650 IS Camera User Guide - Page 111
conditions, including backlit scenes. The camera divides images into several zones direct light, and the backlighting, and adjusts the settings to the correct exposure for the main subject. spot metering frame to the center of the LCD monitor. Causes the position of the spot metering frame to - Canon A650 | PowerShot A650 IS Camera User Guide - Page 112
Frame 1 Select [Spot AE Point]. 1. Press the button. 2. In the menu, use the or button to select [Spot AE Point]. 2 Accept the setting. 1. Use the or button to select [Center] or [AF Point]. 2. Press the button. • The display on the LCD monitor will appear as follows. - [Center]: spot AE point frame - Canon A650 | PowerShot A650 IS Camera User Guide - Page 113
by reducing the bluish tone. For recording with the optimal white balance data retained in the camera from a white-colored object, such as white paper or cloth. 1 Select a white balance setting. 1. Press the button. 2. Use the or button to select and the or button to change the option. 3. Press the - Canon A650 | PowerShot A650 IS Camera User Guide - Page 114
light (such as a mercury-vapor lamp) 1 Select . 1. Press the button. 2. Use the or button to select and choose with the or button. 2 Aim the camera at a piece of white paper or cloth and press . • If you are viewing it with the LCD monitor, ensure that the center frame is completely filled with the - Canon A650 | PowerShot A650 IS Camera User Guide - Page 115
data with the flash set to , make sure that you also use the flash when you shoot. z Since the white balance data cannot be read in Stitch Assist mode, preset the white balance in another shooting mode beforehand. z Recorded white balance data will be retained even when the camera's power is turned - Canon A650 | PowerShot A650 IS Camera User Guide - Page 116
image when it is shot. My Colors Off Vivid Neutral Sepia Records normally with this setting. Emphasizes the contrast and Use this option to adjust contrast, sharpness and saturation before shooting. Configuring My Colors Settings ( / / / ) 1 Select a My Colors setting. 1. Press the button. 2. Use - Canon A650 | PowerShot A650 IS Camera User Guide - Page 117
Select the mode. 1. Press the button. 2. Use the or button to select [Contrast], [Sharpness] or [Saturation]. 3. Use the or button to adjust the setting. • The adjustment results show in the LCD monitor. • If you press the DISP. button, you will return to the screen where you can select a My Colors - Canon A650 | PowerShot A650 IS Camera User Guide - Page 118
. 1 Select [Flash Adjust]. 1. Press the button. 2. In the menu, use the or button to select [Flash Adjust]. 2 Accept the setting. 1. Use the or button to select [Auto] or [Manual]. 2. Press the button. • Flash compensation can be set to [Manual] (p. 117). • Flash output can be set to [Auto - Canon A650 | PowerShot A650 IS Camera User Guide - Page 119
exposure compensation function for balanced exposure of the background when shooting with a flash. In and shooting modes, please set [Flash Adjust] to [Auto]. 1 Adjust the flash compensation setting. 1. Press the button. 2. Use the or and the or the option. button to select button to change - Canon A650 | PowerShot A650 IS Camera User Guide - Page 120
Each Shooting Mode (p. 214). Shooting Mode When shooting, the flash output can be controlled in three steps, up to FULL. In and shooting modes, please set [Flash Adjust] to [Manual]. 1 Configure the flash output setting. 1. Press the button. 2. Use the or and the or the option. button to - Canon A650 | PowerShot A650 IS Camera User Guide - Page 121
1st-curtain is used when shooting. The flash fires right before the shutter closes. Compared with the 1st-curtain, the flash fires later and behind. 1 Select [Flash Sync]. 1. Press the button. 2. In the menu, use the or button to select [Flash Sync]. 2 Accept the setting. 1. Use the or button to - Canon A650 | PowerShot A650 IS Camera User Guide - Page 122
in the scene. In and shooting modes, ensure that the flash adjustment setting is configured to [Auto] in advance (p. 116). 1 Select [Safety FE]. 1. Press the button. 2. In the menu, use the or button to select [Safety FE]. 2 Accept the setting. 1. Use the or button to select [On] or [Off]. 2. Press - Canon A650 | PowerShot A650 IS Camera User Guide - Page 123
functions can be registered. Menu Item Page Menu Item Page Not Assigned - Digital Tele-converter p. 61 White Balance p. 111 DISP. Overlay p. 122 Custom White Balance p. 112 Display Off p. 122 1 Select [Set button]. 1. Press the button. 2. In the menu, use the or button to select - Canon A650 | PowerShot A650 IS Camera User Guide - Page 124
[Grid Lines] can be set. You can display vertical and horizontal grid lines, a 3:2 print area guide, or both on the LCD monitor while shooting to help check the position of your subject. Off - Grid Lines 3:2 Guide Displays grid lines to divide the screen into 9 parts. Helps confirm the vertical - Canon A650 | PowerShot A650 IS Camera User Guide - Page 125
1 Select [Disp. Overlay]. 1. Press the button. 2. In the menu, use the or button to select [Disp. Overlay]. Various Shooting Methods 123 2 Accept the setting. 1. Use the or button to select [Off], [Grid Lines], [Both] or [3:2 Guide]. 2. Press the button. z Only grid lines can be configured for the - Canon A650 | PowerShot A650 IS Camera User Guide - Page 126
Shooting mode Items which can be set in , , and modes (p. 214) - Rec. menu settings - Zoom location - Manual focus location • To change some of the settings saved in (other than shooting mode), select . 2 Select [Save Settings]. 1. Press the button. 2. In the menu, use the or button to select [Save - Canon A650 | PowerShot A650 IS Camera User Guide - Page 127
image shot with the camera held vertically and automatically rotates it to the correct orientation when viewing it in the LCD monitor. 1 Select [Auto Rotate]. 1. Press the button. 2. Use the or menu. 3. Use the or [Auto Rotate]. button to select the button to select 2 Accept the setting. 1. Use - Canon A650 | PowerShot A650 IS Camera User Guide - Page 128
Various Shooting Methods When the camera is held vertically to shoot, the Intelligent Orientation sensor judges the upper end to specify a date and time if you wish to create a Auto Create new folder using a shooting time after the specified date and time. Creating a Folder the Next Time You - Canon A650 | PowerShot A650 IS Camera User Guide - Page 129
. • will be displayed on the LCD monitor when shooting. will disappear from the screen when a new folder is created. Setting the Day or Time for Automatic Folder Creation. 1 Select [Create Folder]. 1. Press the button. 2. Use the or button to select the menu. 3. Use the or button to select [Create - Canon A650 | PowerShot A650 IS Camera User Guide - Page 130
the 7-digit number for the last recorded folder and image on the memory card is utilized as the basis for new images. 1 Select [File Numbering]. 1. Press the button. 2. Use the or button to select the menu. 3. Use the or button to select [File Numbering]. 2 Accept the setting. 1. Use the or - Canon A650 | PowerShot A650 IS Camera User Guide - Page 131
folder. New Folder Created Memory Card 1 Memory Card Exchanged for Another Memory Card 1 Memory Card 2 Continuous Auto Reset Memory Card 1 Memory Card 1 Memory Card 2 • Images may be • Please refer to the Software Starter Guide for information regarding folder structures or image types. - Canon A650 | PowerShot A650 IS Camera User Guide - Page 132
at the top right of the screen. • Images can be magnified up to a factor of 10x. Approximate location of the displayed area 2 Use the , , or button to move the image around. • If you press the FUNC./SET button while in magnified display, the camera switches to image advance mode and will - Canon A650 | PowerShot A650 IS Camera User Guide - Page 133
if you press the zoom lever toward while in index playback and you can switch the display between sets of nine images. • Use the or button to move to the previous or next set of 9 images. • Hold the FUNC./SET button down and press the or button to jump to the first or last - Canon A650 | PowerShot A650 IS Camera User Guide - Page 134
magnification, move the display position, and switch between display frames (p. 133). Changing the Display Magnification 1 Press the zoom lever toward . • The bottom right of the screen is magnified. - Canon A650 | PowerShot A650 IS Camera User Guide - Page 135
frame. Changing the Display Position 1 Press the zoom lever toward . • The bottom right of the screen is magnified. 2 Use the , , or button to change the display position. • Pressing the FUNC./SET button will return the orange colored frame to its original position. If multiple frames are displayed - Canon A650 | PowerShot A650 IS Camera User Guide - Page 136
have many images recorded onto a memory card, it is handy to use the five search keys below to jump over images to find the object of your search. Jump 10 Images Jumps over 10 images at a time. Jump 100 Images Jumps over 100 images at a time. Jump Shot Date Jumps to the first image - Canon A650 | PowerShot A650 IS Camera User Guide - Page 137
cannot be played in the index playback mode. 1 Display the movie file. 1. Use the or button to select a movie. 2. Press the button. • Images with the last frame displayed. Press the FUNC./SET button to display the movie control panel. Time movie was shot Volume Level (Adjust it with the or - Canon A650 | PowerShot A650 IS Camera User Guide - Page 138
to select and press the FUNC./SET button. Exit Ends playback and returns to single image playback Print Prints (An icon will display when a printer is connected. See the Direct Print User Guide for details.) Play Play Slow Motion Slow Motion Playback (You can use the button to slow down or - Canon A650 | PowerShot A650 IS Camera User Guide - Page 139
the 90°/270°/original orientations with each press of the FUNC./SET button. • This also can be set in the index playback mode. When images are downloaded to a computer, the orientation of images rotated by the camera will depend upon the software used to download the images. As the orientation of an - Canon A650 | PowerShot A650 IS Camera User Guide - Page 140
previous image display from the left and the button to have the next image display from the right. 1 Select [Transition]. 1. Press the button. 2. In the menu, use the or button to select [ Transition]. 2 Accept the setting. 1. Use the or button to select a transition effect. 2. Press the button. - Canon A650 | PowerShot A650 IS Camera User Guide - Page 141
in the memory card. The LCD monitor displays each image for approximately 3 seconds. 1 Select [Auto Play]. 1. Press the button. 2. In the menu, use the or SET button - Fast forward/Rewind: Press the or button (holding down the button will increase the speed of the Fast Forward) - Stop: Press the MENU - Canon A650 | PowerShot A650 IS Camera User Guide - Page 142
may not turn out as you intended. Examples: - Faces near the screen edges or faces that appear extremely small, large, dark or bright in Press the button. 2. In the menu, use the or button to select [ Red-Eye Correction]. 3. Press the button. 2 Select an image. 1. Use the or button to select the - Canon A650 | PowerShot A650 IS Camera User Guide - Page 143
File] is selected, proceed to the Step 5. 5 Display the saved image. 1. Press the button. 2. Use the or button to select [Yes]. 3. Press the button. • Selecting [No] returns to the Play menu. z Red-eye correction cannot be performed on movies. z Overwriting cannot be performed on protected images. - Canon A650 | PowerShot A650 IS Camera User Guide - Page 144
142 Playback/Erasing z When there is not enough space left on the memory card, red-eye correction cannot be performed. z Although you can apply red-eye correction any on images that have already been corrected once with the (Red-Eye Correction) function, use the [Add Frame] option to correct them. - Canon A650 | PowerShot A650 IS Camera User Guide - Page 145
A green frame will display. Playback/Erasing 143 2 Adjust the position of the frame. 1. Use the , , or button to move the frame. • Size of the frame can be press the FUNC./SET button. • Up to 35 additional frames can be added. • To end the adding of correction frames, press the MENU button. To - Canon A650 | PowerShot A650 IS Camera User Guide - Page 146
, , or button to select [Remove Frame]. 2. Press the button. 2 Adjust the position of the frame. 1. Use the or button to select a frame to remove. • The selected frame will appear in green. 3 Delete the frame. 1. Press the button. • The selected frame will - Canon A650 | PowerShot A650 IS Camera User Guide - Page 147
image to resize. 2. Press the button. • The FUNC./SET button is not selectable for images that cannot be resized. 3 Select a resolution. 1. Use the or button to select , or . 2. Press the button. • Some recording pixel settings cannot be selected depending on the available space of the memory card. - Canon A650 | PowerShot A650 IS Camera User Guide - Page 148
saved in a new file. • If you wish to continue resizing of another image, repeat Step 2. 5 Display the saved image. 1. Press the button. 2. Use the or button to select [Yes]. 3. Press the button. • Selecting [No] returns to the Play menu. Movies and images shot in Widescreen mode cannot be resized. - Canon A650 | PowerShot A650 IS Camera User Guide - Page 149
]. 1. Press the button. 2. In the menu, use the or button to select [ Sound Memo]. 3. Press the button. 2 Select an image. 1. Use the or button to select an image to Use the or button to select . 2. Press the button. • The elapsed time and the remaining time display. • Pressing the FUNC./SET - Canon A650 | PowerShot A650 IS Camera User Guide - Page 150
[Protect]. 1. Press the button. 2. In the menu, use the or button to select [ Protect]. 3. Press the button. 2 Protect the image. 1. Use the or button to select an image to protect. 2. Press the button. • Pressing the FUNC./SET button again cancels the setting. • You can also protect images in - Canon A650 | PowerShot A650 IS Camera User Guide - Page 151
[Erase all]. 1. Press the button. 2. In the menu, use the or button to select [ Erase All]. 3. Press the button. 2 Erase the images. 1. Use the or button to select [OK]. 2. Press the button. • To exit instead of erasing, select [Cancel]. Please format the memory card when you want to erase not only - Canon A650 | PowerShot A650 IS Camera User Guide - Page 152
the camera. The settings used on the camera comply with the Digital Print Order Format (DPOF) standards. This is extremely convenient for printing on a direct print compatible printer, or for sending the images to a photo developing service that supports DPOF. The icon may display for a memory card - Canon A650 | PowerShot A650 IS Camera User Guide - Page 153
Print Settings/Transfer Settings 151 1 Select [Print Settings]. 1. Set the mode switch to . 2. Press the button. 3. Use the or button to select the menu. 4. Use the or button to select [Print Settings]. 5. Press the button. 2 Accept the setting. 1. Use the or button to select [Print Type], [Date], [ - Canon A650 | PowerShot A650 IS Camera User Guide - Page 154
152 Print Settings/Transfer Settings Single Images 1 Select [Select Images & Qty.]. 1. Set the mode switch to . 2. Press the button. 3. Use the or button to select the menu. 4. Use the or button to select [Select Images & Qty.]. 5. Press the button. • Selecting [Clear All Selections] cancels all - Canon A650 | PowerShot A650 IS Camera User Guide - Page 155
that [Print] is selected, and when the FUNC./SET button is pressed, printing will begin. All the Images on a Memory Card 1 Select [Select All Images]. 1. Set the mode switch to . 2. Press the button. 3. Use the or button to select the menu. 4. Use the or button to select [Select All Images - Canon A650 | PowerShot A650 IS Camera User Guide - Page 156
154 Print Settings/Transfer Settings 2 Select [OK]. 1. Use the or button to select [OK]. 2. Press the button. z The output of some printers or photo developing services may not reflect the specified print settings. z Print settings cannot be set for movies. z Images are printed in order according to - Canon A650 | PowerShot A650 IS Camera User Guide - Page 157
Refer to the Software Starter Guide for instructions on how to transfer images to your computer. The settings used on the camera comply with the DPOF standards. The icon may display for a memory card with transfer settings set by a different DPOF-compliant camera. These settings will be overwritten - Canon A650 | PowerShot A650 IS Camera User Guide - Page 158
156 Print Settings/Transfer Settings All the Images on a Memory Card 1 Select [Transfer Order]. 1. Set the mode switch to . 2. Press the button. 3. In the menu, use the or button to select [ Transfer Order]. 4. Press the button. 2 Select [Mark all]. 1. Use the or button to select [Mark all]. 2. - Canon A650 | PowerShot A650 IS Camera User Guide - Page 159
Using a TV You can use the supplied AV cable to shoot or playback images using a TV. 1 Turn off the camera and the TV. 2 Connect the AV cable to the camera camera. z The video output signal can be switched (NTSC or PAL) to accommodate different regional standards (p. 47). The default setting varies - Canon A650 | PowerShot A650 IS Camera User Guide - Page 160
alkaline type. batteries or Canon AA-size NiMH batteries (p. 178). Battery charge is low and z Replace the camera batteries with 4 the camera will not operate. unused or fully charged batteries ("Change the batteries" message displays). (p. 8). z Use the AC Adapter Kit ACK600 (sold separately - Canon A650 | PowerShot A650 IS Camera User Guide - Page 161
from or SDHC memory card's write formatting the memory card, slide the protect tab is set to "Write write protect tab upward (p. 180). protect". The Date/Time menu appears. The lithium date battery z Replace the lithium date battery charge is depleted. (p. 14). LCD monitor Not displayed - Canon A650 | PowerShot A650 IS Camera User Guide - Page 162
other than (flash off) (p. 62). z Set the self-timer and attach the camera to a tripod or other device (p. 64). appears. This displays when using a z These settings will be overwritten by memory card that has print those set by your camera settings or transfer settings (pp. 150, 155). set by other - Canon A650 | PowerShot A650 IS Camera User Guide - Page 163
56). z If reformatting does not work, the memory card logic circuits may be damaged. Consult the nearest Canon Customer Support Help Desk. SD memory card or SDHC z Slide the write protect tab upward memory card is write (p. 180). protected. LCD monitor is closed. z When the shooting mode is - Canon A650 | PowerShot A650 IS Camera User Guide - Page 164
with the subject at the correct focusing distance (p. 192). z The camera may be set to an unintended function (such as (macro) or (manual focus)). Cancel the setting. The subject is hard to focus z Use the focus lock, AF lock or manual on. focus to shoot (p. 97). Subject in recorded image is - Canon A650 | PowerShot A650 IS Camera User Guide - Page 165
digital cameras and does not insects in the air. This is constitute a malfunction. particularly noticeable when shooting using the wide angle or when you increase the aperture value in the aperture-priority mode. Eyes appear red. Light is reflected back from z Turn [On] the Red-Eye setting - Canon A650 | PowerShot A650 IS Camera User Guide - Page 166
to memory card takes a long time. Memory card was formatted z Use a memory card formatted in your in another device. camera (p. 56). Lens will not retract. Memory card slot/battery z After closing the memory card slot/ cover was opened with battery cover, turn the power on then power on - Canon A650 | PowerShot A650 IS Camera User Guide - Page 167
images shot with another played back may play back if they are camera or images edited added to the camera using the with a computer. supplied software program ZoomBrowser EX or ImageBrowser. See ZoomBrowser EX/ ImageBrowser Software User Guide (PDF). File name was changed with z Set the - Canon A650 | PowerShot A650 IS Camera User Guide - Page 168
z Use a memory card formatted in your in another device. camera (p. 56). Battery Batteries consumed quickly. Battery is not being used to z See Battery Handling Precautions its full capacity. (p. 178) Batteries are not the right z Use only unused AA-size alkaline type. batteries or Canon - Canon A650 | PowerShot A650 IS Camera User Guide - Page 169
Troubleshooting 167 Printing with a direct print compatible printer Cannot print The camera and printer are z Securely connect the camera and not properly connected. printer with the specified cable. The printer power is not turned on. z Turn on the printer power. The print connection method - Canon A650 | PowerShot A650 IS Camera User Guide - Page 170
, if this error message appears even when using the supplied memory card, contact your Canon Customer Support Help Desk as there may be a problem with the camera. Memory card full Memory card is full of images and no more can be recorded or saved, or no more image settings, sound recorder files - Canon A650 | PowerShot A650 IS Camera User Guide - Page 171
charge is insufficient to operate the camera. Replace batteries immediately with unused AA-size alkaline batteries or fully charged Canon AA-size NiMH batteries. Also refer to Battery Handling Precautions (p. 178). No image. No images recorded on memory card. Image too large. You attempted to - Canon A650 | PowerShot A650 IS Camera User Guide - Page 172
not save a part of the print or transfer settings. Unselectable image. You attempted to set the print settings for a non-JPEG image. Communication error The computer was unable to download the image due to the large amount of images (approx. 1000) stored on the memory card. Use a USB card reader or - Canon A650 | PowerShot A650 IS Camera User Guide - Page 173
the lens. Exx (xx: number) Camera detected error. Turn the power off and then back on, then shoot or play back. A problem exists if the error code reappears. Note the number and contact your Canon Customer Support Help Desk. If an error code displays directly after taking a picture, the shot may - Canon A650 | PowerShot A650 IS Camera User Guide - Page 174
pages are intended to instruct you in the safe and correct operation of the camera and its accessories to prevent injuries or damage to yourself, other persons and equipment. z Equipment refers to the camera, battery, battery charger (sold separately) and compact power adapter (sold separately). - Canon A650 | PowerShot A650 IS Camera User Guide - Page 175
Continued use of the equipment may result in fire or electrical shock. Immediately turn the camera power off and remove the camera batteries or unplug the battery charger or compact power adapter from the power outlet. Please consult your camera distributor or the closest Canon Customer Support Help - Canon A650 | PowerShot A650 IS Camera User Guide - Page 176
damage, alter or place heavy items on the power cord. z Use only recommended power accessories. z Remove the power cord on a regular periodic basis and wipe away battery charger and compact power adapter from both the camera and the power outlet after recharging or when not in use to avoid fire and - Canon A650 | PowerShot A650 IS Camera User Guide - Page 177
when using the flash. z Keep objects that are sensitive to magnetic fields (such as credit cards) away from the speaker of the camera. Such items may lose data or stop working. z Exercise due caution when screwing on the separately sold wide converter, tele-converter lens and conversion lens adapter - Canon A650 | PowerShot A650 IS Camera User Guide - Page 178
. z When not using the camera for extended periods of time, remove the batteries from the camera or battery charger and store the equipment in a safe place. If the batteries are left inside the camera, damage caused by leakage may occur. z Do not connect compact power adapters or battery chargers to - Canon A650 | PowerShot A650 IS Camera User Guide - Page 179
data. Avoid Condensation Related Problems z When moving the equipment external and internal surfaces. If Condensation Forms Inside the Camera z Stop using the camera immediately. Continued use may damage the equipment. Remove the memory card and batteries or compact power adapter from the camera - Canon A650 | PowerShot A650 IS Camera User Guide - Page 180
is low. If using the camera for an extended period, replace the batteries as soon as possible. Change the batteries Batteries are depleted and the camera can no longer operate. Replace the batteries immediately. Battery Handling Precautions z This camera uses AA-size alkaline batteries or Canon AA - Canon A650 | PowerShot A650 IS Camera User Guide - Page 181
the amount of time the camera can be used may be reduced. z At low temperatures, battery performance may be reduced and the low battery icon ( ) defective seals. Do not use batteries with defective seals. Never use batteries that look like this. Batteries with all or part of the seal (electrical - Canon A650 | PowerShot A650 IS Camera User Guide - Page 182
use or store memory cards in the following locations. • Locations subject to dust or sand • Locations subject to high humidity and high temperatures z Since some or all of the data recorded on the memory card may be corrupted or erased by electrical noise, static electricity, camera or memory card - Canon A650 | PowerShot A650 IS Camera User Guide - Page 183
cards that have been formatted in your camera. • The memory card supplied with the camera may be used without further formatting. • When the camera is malfunctioning, a corrupted memory card might be the cause. Reformatting the memory card may solve the problem. • When a non-Canon brand memory card - Canon A650 | PowerShot A650 IS Camera User Guide - Page 184
power outlet Charge Indicator • After inserting the batteries, plug the charger (CB-5AH) into an outlet, or attach the power -5AH/CB-5AHE battery charger can only be used to charge Canon AA-size NiMH batteries NB-3AH and NB2AH. not recharge the batteries until the LCD monitor displays the "Change the - Canon A650 | PowerShot A650 IS Camera User Guide - Page 185
end of their lifespan. Replace them with new batteries. If you are purchasing new batteries, look for Canon AA-size NiMH batteries. z Leaving batteries in the camera or charger may result in damage from battery leakage. When not in use, remove the batteries from the camera or charger and store them - Canon A650 | PowerShot A650 IS Camera User Guide - Page 186
recharging will take approximately two hours (as determined by testing at Canon facilities). Charge batteries in an environment where the temperature is in be used. Using the AC Adapter Kit ACK600 It is best to power the camera with AC Adapter Kit ACK600 (sold separately) when you are using it for - Canon A650 | PowerShot A650 IS Camera User Guide - Page 187
TC-DC58C This lens is used for taking telephoto shots. The lens changes the focal length of the camera body's lens by a factor of 2x (the thread diameter is 58 mm). It is not possible to attach a lens hood or filter to the wide converter or tele-converter. „ Conversion Lens Adapter LA-DC58J This - Canon A650 | PowerShot A650 IS Camera User Guide - Page 188
186 Appendix Attaching a Lens 1 Be sure that the camera is turned off. 2 Press the ring release button and hold it down (a), and turn the ring in the direction of the arrow (b). Ring Ring Release Button 3 When the mark on the camera and the mark on the ring are aligned, lift off the ring. - Canon A650 | PowerShot A650 IS Camera User Guide - Page 189
direction with holding down the ring release button. 5 Set the lens on the adapter, and turn it in the indicated direction to attach it securely. z Completely remove all dust and dirt from conversion lenses with a lens blower brush before use. The camera may focus on any dirt that remains. z Be - Canon A650 | PowerShot A650 IS Camera User Guide - Page 190
]. 1. Press the button. 2. In the menu, use the or button to select [Converter]. 3 Accept the setting. 1. Use the or button to select [WC-DC58B] or [TC-DC58C]. 2. Press the button. • Select the attached converter. When you remove the converter from the camera, return the converter setting to [Off]. - Canon A650 | PowerShot A650 IS Camera User Guide - Page 191
mode - When Flash Sync is set to [2nd-curtain] - When Flash Adjust is set to [Manual] z The flash charge time will lengthen as the battery charge gets weaker. Always set the power/mode switch to [OFF] when you finish using the flash. z Be careful not to touch the flash window or sensor windows with - Canon A650 | PowerShot A650 IS Camera User Guide - Page 192
flash fires for the first shot, it does not fire for subsequent shots. z Fasten the attachment screws securely so that they do not loosen. Failure to do so may lead to the dropping of the camera and flash the flash. z Non-Use over Extended Periods Leaving batteries in the High-Power Flash could - Canon A650 | PowerShot A650 IS Camera User Guide - Page 193
dirt by wiping the lens lightly with a soft cloth. Never use organic solvents on the camera body or lens. If dirt remains, contact the closest Canon Customer Support Help Desk as listed on the customer support list supplied with your camera. Viewfinder and LCD Monitor Use a lens blower brush to - Canon A650 | PowerShot A650 IS Camera User Guide - Page 194
192 Appendix Specifications All data is based on Canon's standard testing methods. Subject to change without notice. PowerShot A650 IS (W): Max. wide angle (T): Max. telephoto Camera Effective Pixels : Approx. 12.1 million Image Sensor : 1/1.7-inch type CCD (Total number of pixels: Approx. 12 - Canon A650 | PowerShot A650 IS Camera User Guide - Page 195
Output Sensitivity, Recommended Exposure Index) : Auto*, High ISO Auto*, ISO 80/100/200/400/ 800/1600 * Camera automatically sets the optimal speed when Auto or High ISO Auto is set. White Balance : Auto, Day Light, Cloudy, Tungsten, Fluorescent, Fluorescent H, Underwater or Custom Built-in - Canon A650 | PowerShot A650 IS Camera User Guide - Page 196
memory card/SDHC memory card/ MultiMediaCard/MMCplus card/HC MMCplus card File Format : Design rule for camera file system and DPOF compliant Data Type (Still images) : Exif 2.2 (JPEG)* Sound memos: WAVE (monaural) * This digital camera supports .) *1 Using super high-speed memory cards (SDC-512 - Canon A650 | PowerShot A650 IS Camera User Guide - Page 197
. 10x (max.) in LCD monitor, advance or reverse Settings MTP, PTP Power Source : 2 AA-size alkaline batteries 2 AA-size NiMH batteries NB4-300 (sold separately) AC Adapter Kit ACK600 (sold separately) Operating Temperatures : 0 - 40 °C (32 - 104 °F) (0 - 35 °C (32 - 95 °F) when NB-3AH is used - Canon A650 | PowerShot A650 IS Camera User Guide - Page 198
telephoto end shots at 30 second intervals with the flash fired once every two shots and the camera power turned off after every tenth shot. Power is left off for a sufficient amount of time*, then the power is turned back on and the testing procedure is repeated. • A Canon-brand memory card is used - Canon A650 | PowerShot A650 IS Camera User Guide - Page 199
Appendix 197 Memory Cards and Estimated Capacities : Memory card included with the camera Recording Pixels (Large) 4000 x 3000 pixels (Medium 1) 3264 88) when memory card has been formatted with a low level format. • This reflects standard shooting criteria established by Canon. Actual results may - Canon A650 | PowerShot A650 IS Camera User Guide - Page 200
198 Appendix Movie †:Memory card included with the camera Standard Recording Pixels /Frame Rate 640 x 480 pixels 30 frames/sec. 640 x 480 pixels 30 frames/sec., LP 320 x 240 pixels 30 frames/sec. 32MB - Canon A650 | PowerShot A650 IS Camera User Guide - Page 201
0.06 in.) Approx. 1.5 g (0.05 oz.) SD Memory Card Interface Dimensions Weight Compatible with SD memory card standards 32.0 x 24.0 x 2.1 mm (1.3 x 0.9 x 0.1 in.) Approx. 2 g (0.07 oz.) NiMH Battery NB-3AH (Supplied with the separately sold NiMH Battery NB4-300 set or the Battery and Charger Kit - Canon A650 | PowerShot A650 IS Camera User Guide - Page 202
four NB-3AH batteries *2 When charging two NB-3AH batteries loaded one on each side of the battery charger Compact Power Adapter CA-PS500 (Included with the separately sold AC Adapter Kit ACK600) Rated Input Rated Output Operating Temperatures Dimensions Weight 100 - 240 V AC (50/ 60 Hz) 4.3 V DC - Canon A650 | PowerShot A650 IS Camera User Guide - Page 203
Weight Approx. 32 g (1.13 oz.) (W): Max. wide angle (T): Max. telephoto *1 When mounted on PowerShot A650 IS (Max. wide angle) *2 From front of the mounted tele-converter. *3 Conversion Lens Adapter LA-DC58J is required when mounted on PowerShot A650 IS *4 When mounted on PowerShot A650 IS (Max - Canon A650 | PowerShot A650 IS Camera User Guide - Page 204
Compact Power Adapter 184 200 Compression 67 Continuous Shooting 88 Correction Frames Add 143 Removing 144 Create Folder 126 Creating an Image Destination 126 Creative Zone 73 Custom Setting 123 Custom White Balance 112 D Date/Time Setting 13 Default Values 55 Detailed 52 , Digital Tele - Canon A650 | PowerShot A650 IS Camera User Guide - Page 205
Information 50 Using the LCD Monitor ......... 49 Lens Conversion Lens Adapter ... 185 Tele-converter 185 Wide Converter 185 List of Messages 168 M Macro 63 Magnifying Images 130 Maintenance 191 Manual Focus 97 Shooting Mode 87 White Balance 111 Manual Focus 99 Memory Card 1 Estimated - Canon A650 | PowerShot A650 IS Camera User Guide - Page 206
Warning 54 P , Play Menu 46 Playback 18 21 Using a TV 157 Playback Information 52 Playback Mode 52 Playback Vol 47 Portrait 73 Postcard 68 , Power Compact Power Adapter .. 184 200 , Rechargeable Batteries ...... 182 Power Button 15 40 Power Saving Function 41 Print Menu 46 , , , Print - Canon A650 | PowerShot A650 IS Camera User Guide - Page 207
Spot Metering Frame 109 Standard 52 Start-up Image 47 Start-up Vol 46 Stitch Assist 80 System Requirements 25 T Telephoto 57 Transition Effects 138 Troubleshooting 158 V Video Output System 47 Volume 46 W White Balance 111 Wide Angle 57 , Wide Converter 185 Wrist Strap 1 9 Index 205 - Canon A650 | PowerShot A650 IS Camera User Guide - Page 208
206 Index NOTE - Canon A650 | PowerShot A650 IS Camera User Guide - Page 209
NOTE Index 207 - Canon A650 | PowerShot A650 IS Camera User Guide - Page 210
208 Index NOTE - Canon A650 | PowerShot A650 IS Camera User Guide - Page 211
NOTE Index 209 - Canon A650 | PowerShot A650 IS Camera User Guide - Page 212
210 Index NOTE - Canon A650 | PowerShot A650 IS Camera User Guide - Page 213
NOTE Index 211 - Canon A650 | PowerShot A650 IS Camera User Guide - Page 214
the equipment off and on, the user is encouraged to try to correct the digital camera must be used with this equipment in order to comply with Class B limits in Subpart B of Part 15 of the FCC rules. Do not make any changes or modifications to the equipment unless otherwise specified in the manual - Canon A650 | PowerShot A650 IS Camera User Guide - Page 215
permission of Canon. • Canon makes no warranties for damages resulting from corrupted or lost data due to a mistaken operation or malfunction of the camera, the software, SD memory cards and SDHC memory cards (SD cards), personal computers, peripheral devices, or use of nonCanon SD cards. Trademark - Canon A650 | PowerShot A650 IS Camera User Guide - Page 216
320 x 240, 30 fps - (Movies) 160 x 120, 15 fps - Av/Tv Setting Program Shift AE/FE Lock Image Area (during Macro Mode) Manual Focus Auto Flash On Off Off LCD Monitor Display Status No Information Information View Switch Direction Selection (right - Canon A650 | PowerShot A650 IS Camera User Guide - Page 217
Functions Available in Each Shooting Mode 215 Page p. 108 p. 104 p. 111 { { { { { { { { { { { { { { { { { { { { { { { { { { p. 64 p. 64 p. 114 p. 117 p. 118 p. 109 2) pp. 66-67 p. 79 pp. 83, 85 p. 102 pp. 101, 103 p. 63 - Canon A650 | PowerShot A650 IS Camera User Guide - Page 218
Can be selected, or automatically set by the camera. In Stitch Assist, in principle, only the first shot can be selected. : Can be configured. (values conforming to custom shooting modes can be set) - : Cannot be selected : Cannot be cancelled even when the power is turned off. (1) Widescreen is - Canon A650 | PowerShot A650 IS Camera User Guide - Page 219
Functions Available in Each Shooting Mode 217 Page p. 95 {{{{ {{{{ - p. 58 - p. 119 - {5) {5) - {5 p. 90 p. 116 p. 89 p. 120 p. 110 p. 86 p. 106 p. 99 p. 100 7) { { p 45 p. 17 { { { { { { { { { { { { { { { { { { { { { { { { { { p. 91
-
 1
1 -
 2
2 -
 3
3 -
 4
4 -
 5
5 -
 6
6 -
 7
7 -
8
-
9
-
10
-
11
-
12
-
13
-
14
-
15
-
16
-
17
-
18
-
19
-
20
-
21
-
22
-
23
-
24
-
25
-
26
-
27
-
28
-
29
-
30
-
31
-
32
-
33
-
34
-
35
-
36
-
37
-
38
-
39
-
40
-
41
-
42
-
43
-
44
-
45
-
46
-
47
-
48
-
49
-
50
-
51
-
52
-
53
-
54
-
55
-
56
-
57
-
58
-
59
-
60
-
61
-
62
-
63
-
64
-
65
-
66
-
67
-
68
-
69
-
70
-
71
-
72
-
73
-
74
-
75
-
76
-
77
-
78
-
79
-
80
-
81
-
82
-
83
-
84
-
85
-
86
-
87
-
88
-
89
-
90
-
91
-
92
-
93
-
94
-
95
-
96
-
97
-
98
-
99
-
100
-
101
-
102
-
103
-
104
-
105
-
106
-
107
-
108
-
109
-
110
-
111
-
112
-
113
-
114
-
115
-
116
-
117
-
118
-
119
-
120
-
121
-
122
-
123
-
124
-
125
-
126
-
127
-
128
-
129
-
130
-
131
-
132
-
133
-
134
-
135
-
136
-
137
-
138
-
139
-
140
-
141
-
142
-
143
-
144
-
145
-
146
-
147
-
148
-
149
-
150
-
151
-
152
-
153
-
154
-
155
-
156
-
157
-
158
-
159
-
160
-
161
-
162
-
163
-
164
-
165
-
166
-
167
-
168
-
169
-
170
-
171
-
172
-
173
-
174
-
175
-
176
-
177
-
178
-
179
-
180
-
181
-
182
-
183
-
184
-
185
-
186
-
187
-
188
-
189
-
190
-
191
-
192
-
193
-
194
-
195
-
196
-
197
-
198
-
199
-
200
-
201
-
202
-
203
-
204
-
205
-
206
-
207
-
208
-
209
-
210
-
211
-
212
-
213
-
214
-
215
-
216
-
217
-
218
-
219
 |
 |
Camera User Guide
Camera User Guide
CDI-E364-010
© 2007 CANON INC.
PRINTED IN CHINA
ENGLISH
DIGITAL CAMERA
Ensure that you read the Safety Precautions (p. 172-p. 181).
Getting Started
Learning More
Components Guide
Basic Operations
Commonly Used Shooting Functions
Shooting Using the Mode Dial
Various Shooting Methods
Playback/Erasing
Print Settings/Transfer Settings
Connecting to a TV
Troubleshooting
List of Messages
Appendix