Canon Digital Rebel EOS Utility for Macintosh Instruction Manual (for EOS DIG
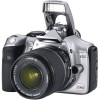
Canon Digital Rebel - EOS 6.3MP Digital Rebel Camera Manual
 |
UPC - 013803028997
View all Canon Digital Rebel manuals
Add to My Manuals
Save this manual to your list of manuals |
Canon Digital Rebel manual content summary:
- Canon Digital Rebel | EOS Utility for Macintosh Instruction Manual (for EOS DIG - Page 1
1D Mk II 1Ds 1D 5D 30D 20D 10D REBELXTi 400D REBELXT 350D REBEL 300D D60 D30 Instruction Manual O Content of this Instruction Manual O EU is used for EOS Utility. O Each camera model is displayed as an icon. Example: EOS DIGITAL REBEL XTi/400D DIGITAL REBELXTi 400D O displays the relevant - Canon Digital Rebel | EOS Utility for Macintosh Instruction Manual (for EOS DIG - Page 2
SOFTWARE. No updates, fixes or support will be made available for the SOFTWARE. 4. LIMITED WARRANTY AND LIMITATION OF LIABILITY: It is your responsibility to choose, maintain and match the hardware and software components of your computer system. Thus Canon does not guarantee uninterrupted service - Canon Digital Rebel | EOS Utility for Macintosh Instruction Manual (for EOS DIG - Page 3
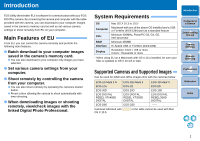
(hereinafter EU) is software for communication with your EOS DIGITAL camera. By connecting the camera and computer with the cable provided with the camera, you can download to your computer images saved in the camera's memory card as well as set various camera settings or shoot remotely from EU on - Canon Digital Rebel | EOS Utility for Macintosh Instruction Manual (for EOS DIG - Page 4
¿ p.23 ¿ p.24 ¿ p.25 ¿ p.26 ¿ p.27 ¿ p.29 Introduction Remote shooting O To shoot by controlling the camera from a computer O To shoot by operating the camera O To shoot with the timer ¿ p.40 ¿ p.42 ¿ p.42 Functions for use with the other accessories sold separately O To shoot with the Wireless - Canon Digital Rebel | EOS Utility for Macintosh Instruction Manual (for EOS DIG - Page 5
Selected Images to Your Computer...... 11 Downloading Images with a Card Reader 12 Downloading Images Using Digital Photo Professional ... 12 Downloading Images Using ImageBrowser .......... 12 Downloading Images without Using Canon Software... 12 Quitting EU 13 Introduction Contents at - Canon Digital Rebel | EOS Utility for Macintosh Instruction Manual (for EOS DIG - Page 6
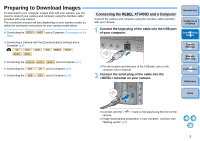
model, so follow the connection instructions for your camera model below. O Connecting the REBELXTi 400D and a Computer (Description on the right) O Connecting a Camera with the [Communication] settings and a Computer (p.6) 5D 30D 20D 10D REBELXT 350D REBEL 300D O Connecting the 1D Mk II - Canon Digital Rebel | EOS Utility for Macintosh Instruction Manual (for EOS DIG - Page 7
with the [Communication] Settings and a Computer 5D 30D 20D 10D REBELXT 350D REBEL 300D Set the [Communication] settings on the camera's menu first, and then connect your camera and computer. Setting the [Communication] Settings For the camera and computer to be able to communicate, set the - Canon Digital Rebel | EOS Utility for Macintosh Instruction Manual (for EOS DIG - Page 8
computer User's Manual. 2 Attach the cable protector to the plug with the < > mark, and then connect to the < > terminal on your camera. O a 4-pin - 4-pin type Canon interface cable (sold separately). Introduction Contents at a Glance 1 Downloading Images 2Camera Settings 3Remote Shooting 4 - Canon Digital Rebel | EOS Utility for Macintosh Instruction Manual (for EOS DIG - Page 9
need to use a 4-pin - 6-pin type Canon interface cable (sold separately). Introduction Contents at a Glance 1 Downloading Images 2Camera Settings 3Remote Shooting 4 Preferences Reference Index O Connect with the < > mark on the plug facing the back of the camera. O Both plugs of the cable are - Canon Digital Rebel | EOS Utility for Macintosh Instruction Manual (for EOS DIG - Page 10
computer can now communicate. Continue with "Batch Downloading Images to Your Computer" (p.10). O If you set the camera's power switch to < ON >, EU may start up automatically depending on your computer system. O With the 30D REBELXTi 400D , the camera's LCD monitor blinks when EU starts up. Index - Canon Digital Rebel | EOS Utility for Macintosh Instruction Manual (for EOS DIG - Page 11
to your computer all the images saved in your camera's memory card. The downloaded images are sorted by date into folders and are then displayed in the main window of Digital Photo Professional (RAW image processing, viewing and editing software) (hereinafter DPP), which is linked to start up - Canon Digital Rebel | EOS Utility for Macintosh Instruction Manual (for EOS DIG - Page 12
Your Computer From the images saved in your camera's memory card, you can select the ones you want and download them to your computer. 1 Click [Lets you select and download images]. ¿ A viewer window appears and the images in the memory card are displayed. 2 View and click to select the images to - Canon Digital Rebel | EOS Utility for Macintosh Instruction Manual (for EOS DIG - Page 13
computer shot images in a memory card inside a third-party card reader connected to your computer. For detailed instructions, refer to "Downloading Images Using Your Card Reader" in the "Digital Photo Professional Instruction Manual" (PDF electronic manual). Downloading Images Using ImageBrowser You - Canon Digital Rebel | EOS Utility for Macintosh Instruction Manual (for EOS DIG - Page 14
The window closes and EU quits. 2 Turn the camera's power switch to < OFF >. 3 Disconnect the cable from the camera and computer. O Do not pull on the cable; hold the plug and pull out. Introduction Contents at a Glance 1 Downloading Images 2Camera Settings 3Remote Shooting 4 Preferences Reference - Canon Digital Rebel | EOS Utility for Macintosh Instruction Manual (for EOS DIG - Page 15
Description of Personal Functions 30 Checking Settings and Application to Camera 37 Saving and Loading Settings 37 Saving Settings to Your Computer 37 Loading Settings and Applying to the Camera ....... 38 Introduction Contents at a Glance 1 Downloading Images 2Camera Settings 3Remote Shooting - Canon Digital Rebel | EOS Utility for Macintosh Instruction Manual (for EOS DIG - Page 16
computer, and then start up EU (p.5, p.9). 2 Click [Camera settings/Remote shooting]. ¿ The camera settings/remote shooting window appears. ¿ The basic settings window appears. Introduction Contents at a Glance 1 Downloading Images 2Camera Settings 3Remote Shooting 4 Preferences Reference Index - Canon Digital Rebel | EOS Utility for Macintosh Instruction Manual (for EOS DIG - Page 17
Window]. Available Settings by Camera Model 5D 20D Setting 1D Mk II N 1Ds 1Ds Mk II 1D 1D Mk II 30D REBELXTi 400D 10D REBELXT REBEL 350D 300D D60 D30 Owner's name { { { { Date/time { { { { Card initialization - { { { Firmware - - { - Personal functions { { - - Owner - Canon Digital Rebel | EOS Utility for Macintosh Instruction Manual (for EOS DIG - Page 18
, and then start up EU (p.5, p.9). 2 Click [Camera settings/Remote shooting]. 3 Click the [ ] button. ¿ The camera settings/remote shooting window appears. ¿ The shot settings window appears. Introduction Contents at a Glance 1 Downloading Images 2Camera Settings 3Remote Shooting 4 Preferences - Canon Digital Rebel | EOS Utility for Macintosh Instruction Manual (for EOS DIG - Page 19
[Main Window]. Available Settings by Camera Model Setting 5D 20D 1Ds Mk II 1Ds 30D 1D Mk II N REBELXT 1D Mk 300D D60 up the camera's functions. D30 , you cannot set Introduction Contents at a Glance 1 Downloading Images 2Camera Settings 3Remote Shooting 4 Preferences Reference Index 18 - Canon Digital Rebel | EOS Utility for Macintosh Instruction Manual (for EOS DIG - Page 20
the Camera 1D Mk II N 5D 30D REBELXTi 400D You can set and apply Picture Styles to the camera, in the same way as operating from the camera. You camera as user-defined settings you have downloaded from the Canon's website or created with Picture Style Editor (Picture Style file creating software - Canon Digital Rebel | EOS Utility for Macintosh Instruction Manual (for EOS DIG - Page 21
Contents at a Glance 5 Click the [Apply] button. 1 Downloading Images 2Camera Settings 3Remote Shooting 4 Preferences ¿ The [Confirm settings] settings and click the [OK] button. ¿ The settings are registered in the camera. 7 Click the [Close] button. ¿ The [Picture Style settings] dialog box - Canon Digital Rebel | EOS Utility for Macintosh Instruction Manual (for EOS DIG - Page 22
the same way as operating from the camera. 1 Click [Picture Style] (p.19). ¿ The [Picture Style] window appears. 2 Click [Settings]. 4 Select a Picture Style from the [User defined Picture Style] list box. Introduction Contents at a Glance 1 Downloading Images ¿ If you select [Monochrome], the - Canon Digital Rebel | EOS Utility for Macintosh Instruction Manual (for EOS DIG - Page 23
Applying Picture Style Files to the Camera You can register up to three Picture Style files downloaded from the Canon's website or created with PSE and saved to your computer, as user-defined settings in your camera. 1 Click [Picture Style] (p.19). ¿ The [Picture Style] window appears. 2 Click [ - Canon Digital Rebel | EOS Utility for Macintosh Instruction Manual (for EOS DIG - Page 24
For details on using PSE, refer to the "Picture Style Editor Instruction Manual" (PDF electronic manual). Registering Personal White Balance in the Camera 1D Mk II N 1Ds Mk II 1D Mk II 1Ds 1D With RAW Image Task (RAW image processing software), you can adjust the white balance of shot RAW images - Canon Digital Rebel | EOS Utility for Macintosh Instruction Manual (for EOS DIG - Page 25
the white balance for your shot. O For selecting personal white balance, refer to "Selecting the White Balance" in the camera's Instruction Manual provided with your camera. Setting JPEG Quality and Applying to the Camera 1D Mk II N 1Ds Mk II 1D Mk II You can set the JPEG image quality and apply it - Canon Digital Rebel | EOS Utility for Macintosh Instruction Manual (for EOS DIG - Page 26
1Ds Mk II 1D Mk II 5D 30D 20D REBELXTi 400D REBELXT 350D You can adjust white balance, in the same way as operating from the camera. 1 Click [WB SHIFT]. ¿ The in step 2. Introduction Contents at a Glance 1 Downloading Images 2Camera Settings 3Remote Shooting 4 Preferences Reference Index 25 - Canon Digital Rebel | EOS Utility for Macintosh Instruction Manual (for EOS DIG - Page 27
the Camera 1Ds Mk II 1D Mk II 1Ds 1D With RAW Image Task (RAW image processing software), you camera. O For selecting processing parameters, refer to "Setting the Processing Parameters" in the camera's Instruction Manual provided with your camera. Introduction Contents at a Glance 1 Downloading - Canon Digital Rebel | EOS Utility for Macintosh Instruction Manual (for EOS DIG - Page 28
1 Click [Color Matrix]. 2 Click the color matrix to be set in the camera. Introduction Contents at a Glance 1 Downloading Images ¿ The settings are applied to the camera and the display returns to the shot settings window. 2Camera Settings 3Remote Shooting 4 Preferences Reference ¿ The - Canon Digital Rebel | EOS Utility for Macintosh Instruction Manual (for EOS DIG - Page 29
the [Color Matrix] list box. 4 Select the setting to be set from each list box. Introduction Contents at a Glance 1 Downloading Images 5 Click the [Apply to Camera] button. 2Camera Settings 3Remote Shooting ¿ The [Confirm settings] dialog box appears. 6 Check the settings and click the [OK - Canon Digital Rebel | EOS Utility for Macintosh Instruction Manual (for EOS DIG - Page 30
and apply them directly to the camera. 4 Checkmark the box [ ] and specify the required settings (p.30 to p.36). 1 Display the range of settings are ignored. 5 Check the settings and save them on your computer if necessary (p.37). 6 Click the [OK] button. ¿ The settings are applied to the camera - Canon Digital Rebel | EOS Utility for Macintosh Instruction Manual (for EOS DIG - Page 31
camera's Instruction Manual provided with your camera range will be 1/2000 to 1/ 60 sec. O This makes shutter speed selection faster and prevents a slow-speed sync. in aperture-priority AE mode with the flash flash sync speed is set in the Program AE mode, a shutter speed range and the range of 1/400 - Canon Digital Rebel | EOS Utility for Macintosh Instruction Manual (for EOS DIG - Page 32
example, if you set 1.4 for the largest aperture (minimum f/ number) and 8.0 for the smallest aperture (maximum f/number), the usable aperture range will be f/1.4 to f/8.0. O You can better control the apertures used by setting the range of usable apertures. O If you set the maximum and/or minimum - Canon Digital Rebel | EOS Utility for Macintosh Instruction Manual (for EOS DIG - Page 33
must be disabled. For information on clearing and resetting Personal Functions, refer to "Clearing and Resetting Personal Functions" in the camera's Instruction Manual provided with the camera. O Even if the shooting and metering modes selected by P.Fn-06 are excluded by the restrictions in P.Fn-01 - Canon Digital Rebel | EOS Utility for Macintosh Instruction Manual (for EOS DIG - Page 34
Aperture Shutter Speed Standard program line Program line shifted toward a faster shutter speed. Program line shifted toward a slower shutter speed. With EF50mm f/1.4 USM O The program shift amount remains in effect until you set it back to the standard program manually or replace the battery - Canon Digital Rebel | EOS Utility for Macintosh Instruction Manual (for EOS DIG - Page 35
shots in P.Fn-20. If you do not use P.Fn-20, once the camera focuses on the subject, continuous shooting will continue until the capacity of the memory card is reached. O P.Fn-16 cannot be used with manual focus lenses or with lenses that are too slow to be used with autofocusing. O Do not use this - Canon Digital Rebel | EOS Utility for Macintosh Instruction Manual (for EOS DIG - Page 36
, this function selects quiet camera operation when you release the bulb shots for long periods, the battery becomes exhausted more quickly and the number much as about 20 percent when the aperture needs to be stopped down by no Downloading Images 2Camera Settings 3Remote Shooting 4 Preferences Reference - Canon Digital Rebel | EOS Utility for Macintosh Instruction Manual (for EOS DIG - Page 37
, refer to "Shooting Information Display" in the camera's Instruction Manual. O To verify whether the image is the original, you will need the one of the following EOS accessories: Original Data Security Kit OSK-E3 (sold separately), Data Verification Kit DVK-E2 (sold separately), or DVK-E1 (sold - Canon Digital Rebel | EOS Utility for Macintosh Instruction Manual (for EOS DIG - Page 38
Functions and whether they have been applied to the camera. 1 Specify the Personal Functions (p.30 to p.36). 2 Select the [Combination] from the Downloading Images 2Camera Settings 3Remote Shooting 4 Preferences Reference Index The Personal Function settings file is not compatible with a camera - Canon Digital Rebel | EOS Utility for Macintosh Instruction Manual (for EOS DIG - Page 39
[Personal functions] dialog box closes, and the display returns to the basic settings window. ¿ When a Personal Function is applied to the camera, < > appears on the LCD panel. Introduction Contents at a Glance 1 Downloading Images 2Camera Settings 3Remote Shooting 4 Preferences Reference Index 38 - Canon Digital Rebel | EOS Utility for Macintosh Instruction Manual (for EOS DIG - Page 40
timer shooting. Remote Shooting by Controlling the Camera from Your Computer 40 Displays and Settings by Camera Model 41 Shooting by Operating the Camera 42 Timer-controlled Shooting 42 Interval Timer Shooting 42 Timer Shooting 42 Introduction Contents at a Glance 1 Downloading Images 2Camera - Canon Digital Rebel | EOS Utility for Macintosh Instruction Manual (for EOS DIG - Page 41
such as for studio shooting. 2 Set the camera. 1 Click [Camera settings/Remote shooting]. Select the icon for the desired setting (p.56) Introduction Contents at a Glance 1 Downloading Images 2Camera Settings ¿ The camera settings/remote shooting window appears. Sets the maximum value Sets - Canon Digital Rebel | EOS Utility for Macintosh Instruction Manual (for EOS DIG - Page 42
both your computer and the memory card (p.46). O For a list of camera settings/remote shooting functions, refer to p.56. Displays and Settings by Camera Model Display/ Setting 1D Mk II N 1Ds Mk II 1D Mk II 1Ds 5D 20D REBELXTi REBELXT REBEL 30D 10D 400D 350D 300D 1D D60 D30 Display Setting - Canon Digital Rebel | EOS Utility for Macintosh Instruction Manual (for EOS DIG - Page 43
capacity of the memory card. You can check the shot images immediately in Digital Photo Professional (hereinafter DPP), which is linked to start up automatically. 1 Display the camera settings/remote shooting window (p.40). 2 Set the camera camera seconds and 99 minutes and seconds and 99 minutes and - Canon Digital Rebel | EOS Utility for Macintosh Instruction Manual (for EOS DIG - Page 44
window to make them easier to use. Preferences 44 Basic Settings 44 Destination Folder 45 File Name 45 Download Images 46 Remote Shooting 46 Linked Software 46 Introduction Contents at a Glance 1 Downloading Images 2Camera Settings 3Remote Shooting 4 Preferences Reference Index 43 - Canon Digital Rebel | EOS Utility for Macintosh Instruction Manual (for EOS DIG - Page 45
for [Startup Action], the viewer window (p.11) appears. O When [Show [Camera settings/Remote shooting] screen] is set for [Startup Action], the camera settings/remote shooting window (p.15) appears. O When [Execute [Starts to download images]] is set for [Startup Action], the [Save File] dialog box - Canon Digital Rebel | EOS Utility for Macintosh Instruction Manual (for EOS DIG - Page 46
downloaded from your camera or of images shot remotely. File Name You can specify the file name of images downloaded from your camera or of images shot remotely. Introduction Contents at a Glance 1 Downloading After you checkmark any of [Download Images], [Remote Shooting], or [Monitor Folder], a - Canon Digital Rebel | EOS Utility for Macintosh Instruction Manual (for EOS DIG - Page 47
can set the images from the list box that are downloaded when [Starts to download images] in the main window is clicked. Remote Shooting You can also save remotely shot images to the memory card inside the camera, and regardless of the camera's position at the time the shot is taken, activate the - Canon Digital Rebel | EOS Utility for Macintosh Instruction Manual (for EOS DIG - Page 48
with the Accessories 51 Folder Structure and File Names in the Memory Card ... 52 Uninstalling the Software 53 List of Main Window Functions 54 List of Viewer Window Functions 55 List of Camera Settings/Remote Shooting Window Functions 56 Index 57 About This Instruction Manual 58 Trademark - Canon Digital Rebel | EOS Utility for Macintosh Instruction Manual (for EOS DIG - Page 49
ON > (p.9). O EU and the camera may not communicate normally with a cable other than the EOS DIGITAL camera-dedicated Canon interface cable (p.5 to p.9). O Connect your camera and computer directly with the interface cable provided with your camera. Do not connect the camera via a hub; doing so may - Canon Digital Rebel | EOS Utility for Macintosh Instruction Manual (for EOS DIG - Page 50
to the computer User's Manual for more information on sleep mode. Remotely shot images using EU do not display in DPP O In Digital Photo Professional, select the [Tools] menu [Sync folder with EOS Utility]. Introduction Contents at a Glance 1 Downloading Images 2Camera Settings 3Remote Shooting - Canon Digital Rebel | EOS Utility for Macintosh Instruction Manual (for EOS DIG - Page 51
E1/E1A) This is a function for checking your images with Digital Photo Professional (hereinafter DPP) in real time using the Wireless File Transmitter WFT-E1/E1A (sold separately). For setting the WFT-E1/E1A, refer to the Instruction Manual provided with the WFT-E1/E1A. 2 Click the [Browse] button - Canon Digital Rebel | EOS Utility for Macintosh Instruction Manual (for EOS DIG - Page 52
using each software, refer to the software instruction manual for the software. For Picture Style files, refer to p.22. 3 Click the software you want to start up. 1 Connect your camera and computer, and then start up EU (p.5, p.9). 2 Click the [Accessories] tab. ¿ The clicked software starts up - Canon Digital Rebel | EOS Utility for Macintosh Instruction Manual (for EOS DIG - Page 53
in the memory card's [DCIM] folder with the following folder structure and file names. Refer to the following when copying images to your computer using a card reader. DCIM xxxCANON or xxxEOS5D Cameras other than the 1D series File name Image type/Camera used IMG_YYYY.JPG JPEG image 5D 30D - Canon Digital Rebel | EOS Utility for Macintosh Instruction Manual (for EOS DIG - Page 54
cannot reinstall the software until you have emptied the Trash. 1 Display the folder in which the software is saved. O Open the [Canon Utilities] folder. 2 Drag the [EOS Utility] folder to Contents at a Glance 1 Downloading Images 2Camera Settings 3Remote Shooting 4 Preferences Reference Index 53 - Canon Digital Rebel | EOS Utility for Macintosh Instruction Manual (for EOS DIG - Page 55
List of Main Window Functions Control camera tab sheet Accessories tab sheet (p.10) (p.11, p.55) (p.40, p.56) (p.50) (p.44) Quits EU (p.13) (p.51) Introduction Contents at a Glance 1 Downloading Images 2Camera Settings 3Remote Shooting 4 Preferences Reference Index 54 - Canon Digital Rebel | EOS Utility for Macintosh Instruction Manual (for EOS DIG - Page 56
the image displayed Starts up the linked software Deletes the image Switches between the camera settings/ remote shooting window Images already transferred to information display Introduction Contents at a Glance 1 Downloading Images 2Camera Settings 3Remote Shooting 4 Preferences Reference - Canon Digital Rebel | EOS Utility for Macintosh Instruction Manual (for EOS DIG - Page 57
Camera setting can be checked and changed Panel 2: Camera settings can be checked * To enable this function, checkmark [Rotate image] in the [Remote Shooting] window (p.46) in preferences. Aperture at a Glance 1 Downloading Images 2Camera Settings 3Remote Shooting 4 Preferences Reference Index 56 - Canon Digital Rebel | EOS Utility for Macintosh Instruction Manual (for EOS DIG - Page 58
44 Basic Settings 44 Destination Folder Settings 45 Download Images Settings 46 File Name Settings 45 Linked Software Settings 46 Remote Shooting Settings 46 Starting up EOS Utility 9 Supported Cameras 2 Supported Images 2 System Requirements 2 T Timer Shooting 42 U Uninstalling the - Canon Digital Rebel | EOS Utility for Macintosh Instruction Manual (for EOS DIG - Page 59
this Instruction Manual. O The software screens and displays printed in this Instruction Manual may differ slightly from the actual software. O The content of this Instruction Manual has been reviewed thoroughly. However, if you should notice any errors or omissions, please contact a Canon Service
-
 1
1 -
 2
2 -
 3
3 -
 4
4 -
 5
5 -
 6
6 -
 7
7 -
8
-
9
-
10
-
11
-
12
-
13
-
14
-
15
-
16
-
17
-
18
-
19
-
20
-
21
-
22
-
23
-
24
-
25
-
26
-
27
-
28
-
29
-
30
-
31
-
32
-
33
-
34
-
35
-
36
-
37
-
38
-
39
-
40
-
41
-
42
-
43
-
44
-
45
-
46
-
47
-
48
-
49
-
50
-
51
-
52
-
53
-
54
-
55
-
56
-
57
-
58
-
59
 |
 |
1
2
3
4
Introduction
Contents at
a Glance
Downloading
Images
Camera
Settings
Remote
Shooting
Reference
Preferences
Index
Communication Software for the Camera
EOS Utility
Ver. 2.4
Instruction Manual
1D Mk II N
1Ds Mk II
1D Mk II
1Ds
1D
5D
30D
20D
10D
REBELXTi
400D
REBELXT
350D
REBEL
300D
D60
D30
O
Content of this Instruction Manual
O
EU is used for EOS Utility.
O
Each camera model is displayed as an icon.
Example: EOS DIGITAL REBEL XTi/400D DIGITAL
J
O
displays the relevant camera model.
O
In this manual, the windows used in the examples
are from Mac OS X 10.4.
O
The
or
is used as
an example for windows and parts displayed when
the camera is connected.
O
The selection sequence of menus is displayed in
X
procedures.
(Example: Select the [Window] menu
X
[Main Window].)
O
Square brackets are used to indicate items such as
menu names, button names and window names
that appear on the computer screen.
O
Text inside < > indicates a camera switch name or
icon, or a keyboard key name.
O
**
indicates a reference page.
Click to move to the relevant page.
O
: Marks information that should be read before use.
O
: Marks additional information you may find helpful.
REBELXTi
400D
1D Mk II N
30D
REBELXTi
400D
© CANON INC. 2008
CT1-7155EUbME-000
O
Switching Between Pages
O
Click on arrows on the bottom right of the screen.
: next page
: previous page
: return to a page you had previously displayed
O
Click on the chapter headings on the right side of
the screen to switch to the contents page of that
chapter. Also, click the item you want to read about
on the table of contents to move to the relevant
page.