Canon MF6550 MF6500 Series Scanner Drivere Guide
Canon MF6550 - ImageCLASS B/W Laser Manual
 |
UPC - 013803056044
View all Canon MF6550 manuals
Add to My Manuals
Save this manual to your list of manuals |
Canon MF6550 manual content summary:
- Canon MF6550 | MF6500 Series Scanner Drivere Guide - Page 1
Introduction 1 Scanning a Document 2 Troubleshooting 3 Appendix 4 Scanner Driver Guide MF6500 Series Back Previous Next TOP Table of Contents Index Please read this guide before operating this equipment. After you finish reading this guide, store it in a safe place for future reference. - Canon MF6550 | MF6500 Series Scanner Drivere Guide - Page 2
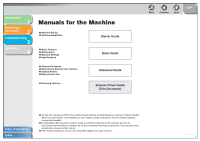
Features Basic Guide Advanced Guide Scanner Driver Guide (This Document) Back Previous Next TOP Table of Contents ● To view the manuals in PDF format, Adobe Reader/Adobe Acrobat Reader is required. If Adobe Reader/ Adobe Acrobat Reader is not installed on your system, please download it from - Canon MF6550 | MF6500 Series Scanner Drivere Guide - Page 3
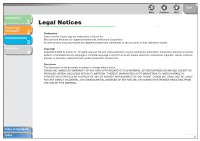
2 Troubleshooting 3 Appendix 4 Legal Notices Back Previous Next TOP Trademarks Canon and the Canon logo are trademarks of Canon Inc. Microsoft and Windows are registered trademarks of Microsoft Corporation. All other product and brand names are registered trademarks, trademarks or service - Canon MF6550 | MF6500 Series Scanner Drivere Guide - Page 4
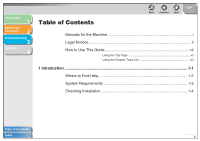
Introduction 1 Scanning a Document 2 Troubleshooting 3 Appendix 4 Table of Contents Back Previous Next TOP Manuals for the Machine i Legal Notices ii How to Use This Guide vii Using the Top Page vii Using the Chapter Topic List viii 1 Introduction ...1-1 Where to Find Help 1-2 System - Canon MF6550 | MF6500 Series Scanner Drivere Guide - Page 5
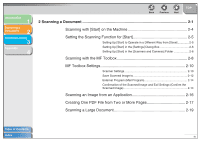
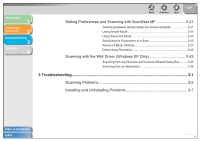
2 Troubleshooting 3 Appendix 10 Scanner Settings 2-10 Save Scanned Image to 2-12 External Program (Mail Program 2-14 Confirmation of the Scanned Image and Exif Settings (Confirm the Scanned Image 2-14 Scanning an Image from an Application 2-16 Creating One PDF File from Two or More Pages - Canon MF6550 | MF6500 Series Scanner Drivere Guide - Page 6
Resolution 2-42 Scanning with the WIA Driver (Windows XP Only 2-43 Scanning from the [Scanner and Camera Wizard] Dialog Box ......... 2-43 Scanning from an Application 2-46 3 Troubleshooting...3-1 Scanning Problems 3-2 Installing and Uninstalling Problems 3-7 Table of Contents Index v - Canon MF6550 | MF6500 Series Scanner Drivere Guide - Page 7
Introduction 1 Scanning a Document 2 Troubleshooting 3 Appendix 4 Back Previous Next TOP 4 Appendix...4-1 Scanner Specifications 4-2 Glossary ...4-3 Index ...4-9 Table of Contents Index vi - Canon MF6550 | MF6500 Series Scanner Drivere Guide - Page 8
4 How to Use This Guide ■ Using the Top Page Introduction 1 Scanning a Document 2 Troubleshooting 3 Appendix 4 Scanner Driver Guide MF6500 Series Back Previous Next TOP Back Previous Next TOP Returns to the last page opened. Displays the previous or next page. Returns to the top - Canon MF6550 | MF6500 Series Scanner Drivere Guide - Page 9
Chapter Topic List Introduction 1 Scanning a Document 2 Troubleshooting 3 Appendix 4 1 Introduction Back Previous Next TOP Where to Find Help 1-2 System Requirements 1-3 Checking Installation 1-4 Back Previous Next TOP Returns to the last page opened. Displays the previous or next - Canon MF6550 | MF6500 Series Scanner Drivere Guide - Page 10
a Document 2 Troubleshooting 3 Appendix 4 Back Previous Next TOP The following symbols are used throughout the manuals for the machine operating restrictions and how to avoid minor difficulties. In addition, this guide uses a distinctive notation to identify buttons: - Menu items you select - Canon MF6550 | MF6500 Series Scanner Drivere Guide - Page 11
Introduction 1 Scanning a Document 2 Troubleshooting 3 Appendix 4 1 Introduction Back Previous Next TOP Where to Find Help 1-2 System Requirements 1-3 Checking Installation 1-4 Table of Contents Index 1-1 - Canon MF6550 | MF6500 Series Scanner Drivere Guide - Page 12
you encounter a problem during installation of the driver software or while operating your machine, consult the following: In This Manual See Chapter 3, "Troubleshooting." In the Basic Guide See Chapter 12, "Troubleshooting." In the Advanced Guide See Chapter 7, "Troubleshooting." Readme.txt File - Canon MF6550 | MF6500 Series Scanner Drivere Guide - Page 13
Troubleshooting 3 Appendix 4 System Requirements General - IBM or IBM-compatible PC - PC equipped with a USB port and the USB class driver installed Microsoft Windows 98, 98SE CPU: Intel Pentium® processor or higher Memory: 128 MB or more Microsoft Windows more Microsoft Windows XP (32-bit version) - Canon MF6550 | MF6500 Series Scanner Drivere Guide - Page 14
Introduction 1 Scanning a Document 2 Troubleshooting 3 Appendix 4 Checking Installation Check if the driver is installed successfully. 1. Open the [Scanners and Cameras] folder (Windows 98/2000: the [Scanners and Cameras Properties] dialog box). Click [start] on the Windows task bar → select [ - Canon MF6550 | MF6500 Series Scanner Drivere Guide - Page 15
Introduction 1 Scanning a Document 2 Troubleshooting 3 Appendix 4 2 Scanning a Document Back Previous Next TOP [Start] in the [Scanners and Cameras] Folder 2-6 Scanning with the MF Toolbox 2-8 MF Toolbox Settings 2-10 Scanner Settings 2-10 Save Scanned Image to 2-12 Table of Contents - Canon MF6550 | MF6500 Series Scanner Drivere Guide - Page 16
2 Troubleshooting 3 Appendix 4 Table of Contents Index Back Previous Next TOP External Program (Mail Program 2-14 Confirmation of the Scanned Image and Exif Settings (Confirm the Scanned Image 2-14 Scanning an Image from an Application 2-16 Creating One PDF File from Two or More Pages - Canon MF6550 | MF6500 Series Scanner Drivere Guide - Page 17
Introduction 1 Scanning a Document 2 Troubleshooting 3 Appendix 4 Back Previous Next TOP Scanning with the WIA Driver (Windows XP Only 2-43 Scanning from the [Scanner and Camera Wizard] Dialog Box 2-43 Scanning from an Application 2-46 Table of Contents Index 2-3 - Canon MF6550 | MF6500 Series Scanner Drivere Guide - Page 18
data to your computer using the operation panel of the machine. NOTE Your machine must be connected via USB and the USB scanner driver must be loaded to scan. This machine does not support network scanning. 1. Set documents. 2. Press [SCAN] on the machine. 3. Press [Start] on the machine. If you - Canon MF6550 | MF6500 Series Scanner Drivere Guide - Page 19
Introduction 1 Scanning a Document 2 Troubleshooting 3 Appendix 4 Back Previous Next TOP Setting Setting Up [Start] to Operate in a Different Way from [Save] 1. On the Windows desktop, double-click the [Canon MF Toolbox 4.9] icon to open the MF Toolbox. You can also open the MF Toolbox by - Canon MF6550 | MF6500 Series Scanner Drivere Guide - Page 20
Introduction 1 Scanning a Document 2 Troubleshooting 3 Appendix 4 ■ Setting Up [Start] Windows task bar → select [Control Panel] → [Scanners and Cameras] (Windows 98/Me/2000: [Start] → [Settings] → [Control Panel] → double-click [Scanners and Cameras]). 2. Click the corresponding scanner driver - Canon MF6550 | MF6500 Series Scanner Drivere Guide - Page 21
event] → select the operation for [Start] in [Actions] → click [OK]. Back Previous Next TOP On Windows 98/Me/2000: Select the [Events] tab → select the option corresponding to your machine from [Scanner events] → select the operation for [Start] in [Send to this application] → click [OK]. NOTE - Canon MF6550 | MF6500 Series Scanner Drivere Guide - Page 22
Introduction 1 Scanning a Document 2 Troubleshooting 3 Appendix 4 Back Previous Next Scanning with the MF Toolbox You can scan a document using the buttons on the MF Toolbox. 1. Set documents. 2. On the Windows desktop, double-click the [Canon MF Toolbox 4.9] icon to open the MF Toolbox. - Canon MF6550 | MF6500 Series Scanner Drivere Guide - Page 23
Troubleshooting 3 Appendix 4 4. Specify the required settings. For details, see "MF Toolbox Settings," on p. 2-10. If you want to keep the same settings for future scans, click [Apply] before clicking [Start]. 5. Click [Start]. If you select [Display the Scanner Driver the scanned image will be - Canon MF6550 | MF6500 Series Scanner Drivere Guide - Page 24
2 Troubleshooting 3 Appendix 4 MF Toolbox Settings Example: [Mail] dialog box Back Previous Next TOP ■ Scanner Settings You can specify the scanning mode, resolution, document size, and file size of the scanned image. [Select Source] Selects where the document is placed ([Platen Glass - Canon MF6550 | MF6500 Series Scanner Drivere Guide - Page 25
the size of the document to be scanned. Selecting [Custom] opens the [Paper Size Settings] dialog box which enables you to set the custom paper size. When scanning using the [Save], [PDF], [Scan-1] or [Scan-2] buttons and [Platen Glass] is selected in [Select Source], you can also scan large size - Canon MF6550 | MF6500 Series Scanner Drivere Guide - Page 26
Introduction 1 Scanning a Document 2 Troubleshooting 3 Appendix 4 [Upper Limit of Attached File] [Image Quality] [Display the Scanner Driver] Selects an approximate upper size limit (after compression) for the image you will send. For an ordinary mail message, [150 KB] is recommended. You can - Canon MF6550 | MF6500 Series Scanner Drivere Guide - Page 27
Troubleshooting 3 Appendix 4 NOTE - The type of file which can be saved with each button is shown below. BMP JPEG/ Exif TIFF PDF PDF (Multiple Pages) PDF (Add Page from Two or More Pages," on p. 2-17). [Save Scanned Image to] Shows the location to save the scanned images. To change the - Canon MF6550 | MF6500 Series Scanner Drivere Guide - Page 28
to which you want to attach the scanned image. The MF Toolbox is compatible with e-mail software such as Outlook Express, Microsoft Outlook, EUDORA and Netscape Messenger. Click [Set] → select the application to use → click [OK]. If [None (Attach Manually)] is displayed, you have to attach the - Canon MF6550 | MF6500 Series Scanner Drivere Guide - Page 29
to save the scanned Image to] image. [Add Scanned Image to] This item appears instead of [Save Scanned Image to] when [PDF (Add Page)] is selected in [Save forward the scanned images to the application. Cancels the operation and returns to the previous window. Deletes all the images scanned in - Canon MF6550 | MF6500 Series Scanner Drivere Guide - Page 30
XP only) compliant application and use the image in that application. The following is an example of the procedure. 1. Set documents. 2. Open the application you want to use. 3. Select the command to scan. 4. Select the scanner driver to be used. With Windows XP, you can use the ScanGear MF or - Canon MF6550 | MF6500 Series Scanner Drivere Guide - Page 31
1 Scanning a Document 2 Troubleshooting 3 Appendix 4 Back Previous Next TOP Creating One PDF File from Two or More Pages You can scan two or more pages and make them into one PDF file. 1. Set documents. 2. Double-click the [Canon MF Toolbox 4.9] icon on the Windows desktop to open the MF - Canon MF6550 | MF6500 Series Scanner Drivere Guide - Page 32
Introduction 1 Scanning a Document 2 Troubleshooting 3 Appendix 4 7. Click [Start]. When you set the document on the platen glass, the following dialog box appears as each page is scanned. To continue to scan, place the next page and click [Next]. When scanning is completed, click [Finish]. - Canon MF6550 | MF6500 Series Scanner Drivere Guide - Page 33
Troubleshooting 3 Appendix 4 Back Previous Next TOP Scanning a Large Document You can scan a document larger than the platen glass and [Platen Grass] is selected in [Select Source]. 1. Set a document on the platen glass. 2. Double-click the [Canon MF Toolbox 4.9] icon on the Windows desktop to - Canon MF6550 | MF6500 Series Scanner Drivere Guide - Page 34
Scanning a Document 2 Troubleshooting 3 Appendix 4 6. Follow the on-screen instructions to scan the left side and the right side of the document separately. 7. Adjust the position of the right side of the scanned image for synthesis → click [Next]. To make adjustment, click the image and move - Canon MF6550 | MF6500 Series Scanner Drivere Guide - Page 35
a Document 2 Troubleshooting 3 Appendix 4 Back Previous Next TOP Setting Preferences and Scanning with ScanGear MF The ScanGear MF enables you to preview the image to be scanned and make detailed adjustments for the image. To use the ScanGear MF, select [Display the Scanner Driver] in the - Canon MF6550 | MF6500 Series Scanner Drivere Guide - Page 36
see "[Color Settings] Tab," on p. 2-40. 3. Click [Preview]. A preview of the scanned image appears in the preview window. 4. Select the use for the scanned image in [Select Purpose]. You can select from [Print (300dpi)], [Image display (150dpi)], or [OCR (300dpi)], depending on the document type you - Canon MF6550 | MF6500 Series Scanner Drivere Guide - Page 37
2 Troubleshooting 3 Appendix [Unit] Selects the use for the scanned image from [Print] or [Image Display]. This setting is available with [Advanced Remove Cropping Frame) Removes the selected cropping frames. (Left Rotate) Rotates the image 90 degrees left. (Right Rotate) Rotates the image - Canon MF6550 | MF6500 Series Scanner Drivere Guide - Page 38
Next TOP 3. Click [Preview]. NOTE - Selecting the range in the preview window and clicking [Zoom] reloads the selected image to be enlarged. - To delete the displayed preview image, click . 4. If you want to scan only part of the document, specify the parameters. For details, see "Specifying the - Canon MF6550 | MF6500 Series Scanner Drivere Guide - Page 39
Introduction 1 Scanning a Document 2 Troubleshooting 3 Appendix 4 Advanced Mode Toolbar (Clear) Deletes the preview image from the preview area. It also resets the toolbar settings and color settings. (Crop) Specifies the parameter of a scan. (Move) Moves the enlarged image on the screen - Canon MF6550 | MF6500 Series Scanner Drivere Guide - Page 40
image, click in [Input Settings]. - When using the ADF, creating a new cropping frame will erase an existing one. Creating Multiple Cropping Frames (Only when Using the Platen Glass following: - Click [Delete] on the keyboard. - Click (Remove Cropping Frame) on the toolbar. - Right-click on the - Canon MF6550 | MF6500 Series Scanner Drivere Guide - Page 41
Troubleshooting 3 Appendix 4 ■ Advanced Mode Settings Table of Contents Index Back Previous Next TOP Favorite Settings Favorite Settings enables you to save a set of settings (Input Settings, Output Settings, Image the default settings. The preview image will be cleared. Opens the [Add/Delete - Canon MF6550 | MF6500 Series Scanner Drivere Guide - Page 42
Scanning a Document 2 Troubleshooting 3 Appendix 4 Table of Contents Index Input Settings [Original Input Method] Selects where the document is placed from [Platen Glass], [ADF (1-sided)] or [ADF (2sided)]. NOTE If you change this setting after previewing, the preview image will be deleted - Canon MF6550 | MF6500 Series Scanner Drivere Guide - Page 43
Introduction 1 Scanning a Document 2 Troubleshooting 3 Appendix 4 [Grayscale]: To scan black and white photos or monochrome images. The image is expressed in a 0-255 scale of black and white. [Color]: To scan color photos. The image is expressed in 256 levels (8 bit) of R(ed), G(reen) and B( - Canon MF6550 | MF6500 Series Scanner Drivere Guide - Page 44
Troubleshooting 3 Appendix 4 Table of Contents Index Image Settings [Auto Tone] Set to [ON] to automatically adjust the tone of the image. You can apply this setting when the preview image (moire) when scanning printed photographs and pictures. NOTE may remove delicate parts of the image. NOTE - Canon MF6550 | MF6500 Series Scanner Drivere Guide - Page 45
Introduction 1 Scanning a Document 2 Troubleshooting 3 Appendix 4 [Fading Correction] Rebuilds the color quality that has faded over time. It also increases saturation of dullcolored originals to reproduce a vivid image. You can apply this setting when the preview image is displayed. [None]: - Canon MF6550 | MF6500 Series Scanner Drivere Guide - Page 46
Introduction 1 Scanning a Document 2 Troubleshooting 3 Appendix 4 Color Settings Using Color Settings buttons, you can adjust the brightness and contrast of the whole image, specify highlights and shadows, and adjust the contrast and balance in an image. The buttons displayed differ depending - Canon MF6550 | MF6500 Series Scanner Drivere Guide - Page 47
Introduction 1 Scanning a Document 2 Troubleshooting 3 Appendix 4 [Channel] [Brightness] [Contrast] [Reset] Select a Color Mode]. Adjust the brightness of the image by moving the slider or entering values (-127 to 127). Adjust the contrast of the image by moving the slider or entering values - Canon MF6550 | MF6500 Series Scanner Drivere Guide - Page 48
Introduction 1 Scanning a Document 2 Troubleshooting 3 Appendix 4 [Channel] (Black-point eyedropper tool) (Mid-point button, then click a point in the preview image (or inside the focal crop) to specify the highlighted point. You can also enter a value (10 to 255) or move the slider to an - Canon MF6550 | MF6500 Series Scanner Drivere Guide - Page 49
Introduction 1 Scanning a Document 2 Troubleshooting 3 Appendix 4 ● Tone Curve Settings This dialog box enables you to adjust the brightness of a specific area of an image by selecting the type of the tone curve. The tone curve is a graph showing the balance of tone input and output. Back - Canon MF6550 | MF6500 Series Scanner Drivere Guide - Page 50
2 Troubleshooting 3 Appendix 4 ● Final Review This dialog box enables you to confirm the color settings. Back Previous Next TOP ● Threshold This dialog box enables you to adjust the threshold. By adjusting the threshold, you can sharpen characters in a text document and reduce back-printing - Canon MF6550 | MF6500 Series Scanner Drivere Guide - Page 51
are expressed as a value between 0 and 255 but the brightness of black and white images is expressed in terms of either black or white, including the parts of an image which are a color between the two. The boundary at which black and white is divided is called "threshold". Back Previous Next - Canon MF6550 | MF6500 Series Scanner Drivere Guide - Page 52
Introduction 1 Scanning a Document 2 Troubleshooting 3 Appendix 4 [Preferences] Dialog Box Clicking [Preferences preview images. [Execute Auto Cropping on Previewed Images]: The image will be automatically cropped to match the document size. [Display the Last Frame on Previewed Images]: - Canon MF6550 | MF6500 Series Scanner Drivere Guide - Page 53
Troubleshooting 3 Appendix 4 ● [Scan] Tab [Scan without Enables you to scan in a specific color mode Using ScanGear's when using an application that will not Window] display the [ScanGear MF] dialog box (such as OCR software box quits automatically after the image is scanned. Some applications - Canon MF6550 | MF6500 Series Scanner Drivere Guide - Page 54
2 Troubleshooting 3 Appendix 4 ● [Color Settings] Tab [Color Correction] Selects the type of color correction. [Recommended]: Vividly reproduces the tone of a document on the screen. Back Previous Next TOP [Color Matching]: Select to automatically match the scanner, monitor and color printer - Canon MF6550 | MF6500 Series Scanner Drivere Guide - Page 55
Introduction 1 Scanning a Document 2 Troubleshooting 3 Appendix 4 ● [Scanner] Tab [Select Folder Click [Browse] and specify the folder in Where Temporary which the files are saved. Files are Saved] Back Previous Next TOP [Sound Settings] Sets the scanner to play music during scanning or - Canon MF6550 | MF6500 Series Scanner Drivere Guide - Page 56
2 Troubleshooting 3 Appendix 4 ■ Determining Resolution The data in the image you scan Images for Printing Images to be printed should be scanned at a resolution which corresponds to the resolution of the printer. NOTE With a color printer, the colors are expressed as a certain percentage of ink - Canon MF6550 | MF6500 Series Scanner Drivere Guide - Page 57
Troubleshooting 3 Appendix 4 Back Previous Next TOP Scanning with the WIA Driver (Windows XP Only) NOTE The WIA driver does not support 2-sided scanning. ■ Scanning from the [Scanner and Camera Wizard] Dialog Box 1. Open the [Scanners the paper source. You can select from [Flatbed] or [Document - Canon MF6550 | MF6500 Series Scanner Drivere Guide - Page 58
Introduction 1 Scanning a Document 2 Troubleshooting 3 Appendix 4 6. Specify the scanned area. If you have selected [Flatbed] as the paper source, click [Preview] → drag to specify the scanned area. If you have selected [Document Feeder] as the paper source, select the page size from the drop- - Canon MF6550 | MF6500 Series Scanner Drivere Guide - Page 59
Introduction 1 Scanning a Document 2 Troubleshooting 3 Appendix 4 9. Click [Next >] to start scanning. Back Previous Next 10. Click [Next >]. TOP If you want to publish these pictures to a Web site or order printouts online, select the corresponding option. 11. Click [Finish]. Table - Canon MF6550 | MF6500 Series Scanner Drivere Guide - Page 60
Troubleshooting 3 Appendix 4 ■ Scanning from an Application With the WIA driver dialog box open, follow the procedure below. On how to display the WIA driver, see "Scanning an Image Feeder] as the paper source, select the page size in [Page size]. 6. Click [Scan]. 1. Select the paper source. You - Canon MF6550 | MF6500 Series Scanner Drivere Guide - Page 61
Introduction 1 Scanning a Document 2 Troubleshooting 3 Appendix 4 Advanced Properties Back Previous Next TOP [ on the type of picture you select. Appearance Shows the preview of sample image. [Brightness] Specifies the brightness (-127 to 127). [Contrast] Specifies the contrast - Canon MF6550 | MF6500 Series Scanner Drivere Guide - Page 62
Introduction 1 Scanning a Document 2 Troubleshooting 3 Appendix 4 3 Troubleshooting Back Previous Next TOP Scanning Problems 3-2 Installing and Uninstalling Problems 3-7 Table of Contents Index 3-1 - Canon MF6550 | MF6500 Series Scanner Drivere Guide - Page 63
, see Chapter 7, "Troubleshooting," in the Advanced Guide. Q Is the Error indicator blinking? A If the Error indicator is blinking, see Chapter 7, "Troubleshooting," in the Advanced Guide. Q Is the document placed correctly? A Remove the document and place it on the platen glass or in the - Canon MF6550 | MF6500 Series Scanner Drivere Guide - Page 64
unable to scan images. If this happens, remove the software, then reinstall it. (See "Installing/Uninstalling Software," in the Starter Guide.) Q Is the machine recognized in [Scanners and Cameras] of the [Control Panel] folder? A Make sure the corresponding scanner driver icon is displayed - Canon MF6550 | MF6500 Series Scanner Drivere Guide - Page 65
placed at one time on the platen glass will be scanned. Click a button on the MF Toolbox and, in the settings dialog box, select [Display the Scanner Driver] to open the ScanGear MF. In the [Preferences] dialog box of Advanced Mode, clear the [Automatically Quit ScanGear after Scanning - Canon MF6550 | MF6500 Series Scanner Drivere Guide - Page 66
2 Troubleshooting 3 Appendix MF Toolbox dialog box, click [Set] to register the application manually. (See "External Program (Mail Program)," on p. 2-14.) restart your computer after changing the settings? A If you open [Scanners and Cameras] in the [Control Panel] folder and change the - Canon MF6550 | MF6500 Series Scanner Drivere Guide - Page 67
clean? A Clean the platen glass, the platen glass cover and the ADF scanning area. Q Is the image size too small? A Some applications do not display an image properly at small sizes. Try displaying the image at 100% magnification. Q Does the monitor display color set at below 16 bits - Canon MF6550 | MF6500 Series Scanner Drivere Guide - Page 68
1 Scanning a Document 2 Troubleshooting 3 Appendix 4 Back Previous Next TOP Installing and Uninstalling Problems Cannot install the software. Q Have you followed the instructions to install the software? A Try reinstalling the software. If an error occurred and installation was not - Canon MF6550 | MF6500 Series Scanner Drivere Guide - Page 69
will continue trouble-free. Cannot use the software after upgrading to Windows XP. Q Have you upgraded Windows 98/Me/2000 to Windows XP without removing the software? A Remove the software, then reinstall it. (See "Installing/Uninstalling Software," in the Starter Guide.) In [Device - Canon MF6550 | MF6500 Series Scanner Drivere Guide - Page 70
Introduction 1 Scanning a Document 2 Troubleshooting 3 Appendix 4 4 Appendix Back Previous Next TOP Scanner Specifications 4-2 Glossary 4-3 Index ...4-9 Table of Contents Index 4-1 - Canon MF6550 | MF6500 Series Scanner Drivere Guide - Page 71
Introduction 1 Scanning a Document 2 Troubleshooting 3 Appendix 4 Scanner Specifications Type Color scanner Max Scanning Size 8 ½" x 14" ( USB 2.0 System Requirements Windows 98/98SE/Me/ 2000 Professional/ XP (32-bit version) Device Driver TWAIN and WIA (Windows XP only) compliant NOTE - Canon MF6550 | MF6500 Series Scanner Drivere Guide - Page 72
areas; increasing it darkens the dark areas and lightens the light areas. Control Panel The set of Windows programs you can use to change system, hardware, software, and Windows settings. Crop The action of selecting only part of an image for use. Using the Crop button on the ScanGear MF toolbar - Canon MF6550 | MF6500 Series Scanner Drivere Guide - Page 73
computer and an external device interact. For example, the scanner driver supplies OS with information and features of the installed scanner. See also Scanner driver. Back Previous Next TOP E Exif The Exchangeable Image File (Exif) format is a Japan Electronic Industry Development Association - Canon MF6550 | MF6500 Series Scanner Drivere Guide - Page 74
Scanning a Document 2 Troubleshooting 3 Appendix 4 G Gamma Correction Method for changing the brightness of an image. With gamma correction, the brightness of parts of an image in the middle of the tonal range is changed without changing the lightest or darkest areas of the image, which means - Canon MF6550 | MF6500 Series Scanner Drivere Guide - Page 75
area The area at the left of the ScanGear MF main window. When the Preview button is clicked, the item(s) on the platen glass of the scanner are scanned, and the results are displayed as the preview image in this area. At this stage, the scanned image is not passed on to the host application program - Canon MF6550 | MF6500 Series Scanner Drivere Guide - Page 76
of differences in manufacturer or model. For example, with TWAIN-compatible image-processing software, you can start the scanner's TWAIN driver from the software's menu, scan the document and return the scanned image to its original image-processing software. Table of Contents Index 4-7 - Canon MF6550 | MF6500 Series Scanner Drivere Guide - Page 77
Image Acquisition) Standard for downloading images from scanners or digital cameras. The machine includes a TWAIN-compliant driver and a WIA-compliant driver. The WIA driver can only be used with Windows XP. With either driver, you can scan documents with the machine in applications which support - Canon MF6550 | MF6500 Series Scanner Drivere Guide - Page 78
a Document 2 Troubleshooting 3 Appendix 4 Review 2-36 G Gamma 2-40 Grain Correction 2-31 H Histogram 2-33 I Image Settings 2-30 Input Settings 2-28 Installing and uninstalling problems 3-7 Back Previous Next TOP M MF Toolbox Save Scanned Image to 2-12 scanner settings 2-10 settings 2-10 - Canon MF6550 | MF6500 Series Scanner Drivere Guide - Page 79
2-23 using 2-21 Software checking installation 1-4 problems during installing and uninstalling 3-7 Specifications scanner 4-2 Stitch-assist 2-19 System requirements 1-3 T Threshold 2-36 Tone Curve 2-35 Tone Curve/Threshold drop-down list 2-37 Troubleshooting 3-1 TWAIN driver 2-16 U Unsharp Mask - Canon MF6550 | MF6500 Series Scanner Drivere Guide - Page 80
Introduction 1 Scanning a Document 2 Troubleshooting 3 Appendix 4 Table of Contents Index CANON INC. 30-2, Shimomaruko 3-chome, Ohta-ku, Tokyo 146-8501, Japan CANON U.S.A., INC. One Canon Plaza, Lake Success, NY 11042, U.S.A. CANON CANADA INC. 6390 Dixie Road Mississauga, Ontario L5T 1P7,
-
 1
1 -
 2
2 -
 3
3 -
 4
4 -
 5
5 -
 6
6 -
 7
7 -
8
-
9
-
10
-
11
-
12
-
13
-
14
-
15
-
16
-
17
-
18
-
19
-
20
-
21
-
22
-
23
-
24
-
25
-
26
-
27
-
28
-
29
-
30
-
31
-
32
-
33
-
34
-
35
-
36
-
37
-
38
-
39
-
40
-
41
-
42
-
43
-
44
-
45
-
46
-
47
-
48
-
49
-
50
-
51
-
52
-
53
-
54
-
55
-
56
-
57
-
58
-
59
-
60
-
61
-
62
-
63
-
64
-
65
-
66
-
67
-
68
-
69
-
70
-
71
-
72
-
73
-
74
-
75
-
76
-
77
-
78
-
79
-
80
 |
 |

1
2
3
4
Table of Contents
Index
How to Use This Guide
TOP
Back
Previous
Next
Scanner Driver Guide
Introduction
Scanning a
Document
Troubleshooting
Appendix
Please read this guide before operating this equipment.
After you finish reading this guide, store it in a safe place
for future reference.
MF6500 Series