Canon PIXMA MG6822 Getting Started Guide
Canon PIXMA MG6822 Manual
 |
View all Canon PIXMA MG6822 manuals
Add to My Manuals
Save this manual to your list of manuals |
Canon PIXMA MG6822 manual content summary:
- Canon PIXMA MG6822 | Getting Started Guide - Page 1
messages and follow the on-screen instructions. ES Lea los mensajes y siga las instrucciones que aparezcan en pantalla. a b 4 4 Video Tutorials Tutoriales en vídeo Setup Configuración RMC (Regulatory Model Code): K10427 1 3 1 EN Turn on the printer. Do not connect a USB cable yet. ES Encienda la - Canon PIXMA MG6822 | Getting Started Guide - Page 2
Wireless LAN connection Conexión LAN inalámbrica USB connection Conexión USB EN Getting Started 2 ES Guía de inicio 2 EN If the screen above appears, the printer setup is complete. ES Si aparece la pantalla anterior, se ha completado la configuración de la impresora. Google Cloud Print Windows - Canon PIXMA MG6822 | Getting Started Guide - Page 3
the software you want to install and click Next. USB Connection Connect the printer to your computer with a USB cable. This is the easiest way. You only can connect one printer. * Prepare a USB cable separately. h Open the downloaded file and click Start Setup. i Follow the on-screen instructions - Canon PIXMA MG6822 | Getting Started Guide - Page 4
éfono inteligente/tableta e instalar el software. ¿Ha finalizado todos los pasos de la Guía de inicio 1? Lea este manual después de completar la instalación de la impresora de acuerdo con la Guía de inicio 1. Teléfono inteligente/Tableta (iOS/Android) 1. Instale Canon PRINT Inkjet/SELPHY en su tel
-
 1
1 -
 2
2 -
 3
3 -
 4
4
 |
 |
1
2
3
4
5
XXXXXXXX
© CANON INC. 2015
a
b
CD-ROM (Windows)
1
3
2
5
3
4
6
7
5
1
6
7
3
1
4
2
2
2
4
1
b
a
b
b
b
a
a
b
b
a
a
b
b
a
a
(A)
1
a
b
3
4
b
a
a
b
ES
EN
ES
ES
ES
ES
ES
ES
ES
ES
ES
EN
EN
EN
EN
EN
EN
EN
EN
EN
ES
EN
ES
ES
ES
EN
EN
EN
ES
EN
ES
EN
ES
EN
ES
EN
Manuales
ESPAÑOL
Guía de inicio 1
Retire la cinta y los materiales de protección del exterior de la impresora.
Retire la cinta naranja y el material de protección.
Retire el envoltorio protector.
Compruebe que todas las lámparas están encendidas.
Tire del cassette hasta que se detenga.
Quite la tapa naranja.
Encienda la impresora.
No conecte aún un cable USB.
Introduzca y empuje hacia abajo el depósito de tinta
firmemente hasta que encaje en su sitio.
Cargue papel con el lado de impresión hacia abajo.
También se puede cargar papel tamaño Carta.
Empuje el cassette hacia dentro hasta que
]
y
[
estén alineados.
No presione la guía del papel demasiado contra el
borde del papel, ya que el papel puede atascarse.
Si imprime con la bandeja de salida del papel (A)
cerrada, provocará un error.
Si aparece un mensaje de error, asegúrese de que los
depósitos de tinta están instalados correctamente.
Parte posterior
¡No toque esta pieza hasta que se detenga!
Lentamente.
Retire totalmente la cinta naranja.
Lea los mensajes y siga las instrucciones que
aparezcan en pantalla.
Tutoriales en vídeo
Configuración
Manuals
ENGLISH
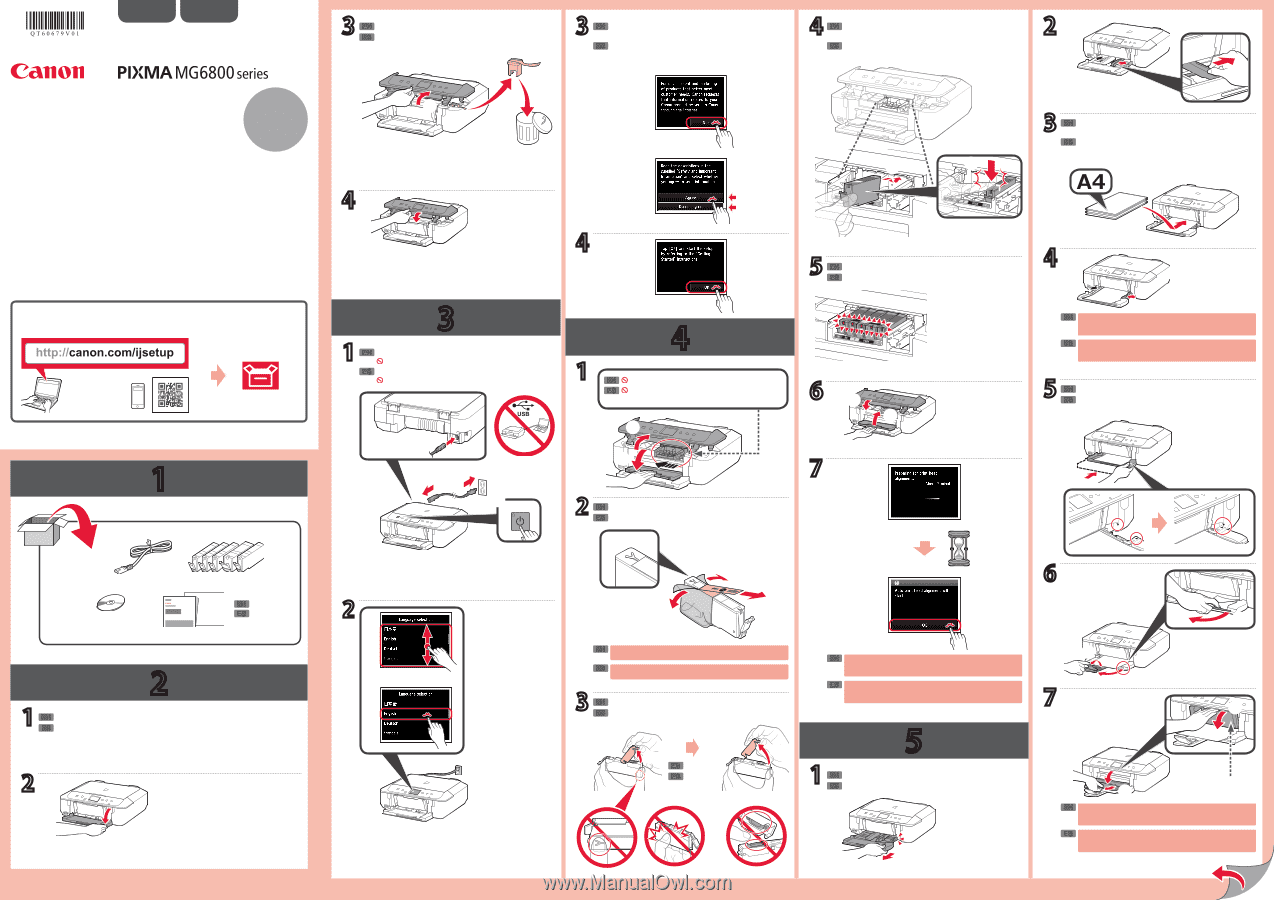
Getting Started 1
Remove the tape and packing materials from outside the printer.
Remove the orange tape and protective material.
Remove the protective wrap.
Check that all lamps are lit.
Pull out the cassette until it stops.
Pull off the orange cap.
Turn on the printer.
Do not connect a USB cable yet.
Insert and push down the ink tank
firmly until it snaps
into place.
Load paper with the print side facing down.
Letter size paper can also be loaded.
Push in the cassette until
]
and
[
line up.
Do not press the paper guide too tightly against the
edge of the paper, or the paper may jam.
Printing with the paper output tray (A) closed, causes an
error.
If an error message appears, make sure the ink tanks
are installed correctly.
Back
Do not touch this part until it stops!
Slowly.
Remove the orange tape completely.
Read the messages and follow the on-screen
instructions.
Video Tutorials
Setup
QT6-0679-V01
PRINTED IN XXXXXXXX
RMC (Regulatory Model Code): K10427