Canon PIXMA MP240 Getting Started
Canon PIXMA MP240 Manual
 |
View all Canon PIXMA MP240 manuals
Add to My Manuals
Save this manual to your list of manuals |
Canon PIXMA MP240 manual content summary:
- Canon PIXMA MP240 | Getting Started - Page 1
Photo All-In-One Foto todo en uno MP240 series Getting Started =Read Me First= Guía de inicio =Léame primero= Make sure to read this manual before using the machine. Please keep it in hand for future reference. Asegúrese de leer este manual antes de utilizar el equipo. Guárdelo para futuras - Canon PIXMA MP240 | Getting Started - Page 2
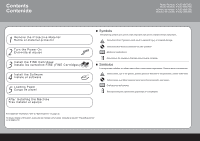
los cartuchos FINE (FINE Cartridges) 4 Install the Software Instale el software 5 Loading Paper Carga de papel After Installing the Machine Tras instalar el equipo ■ Symbols The following symbols are used to mark important instructions. Observe these instructions. Instructions that, if ignored - Canon PIXMA MP240 | Getting Started - Page 3
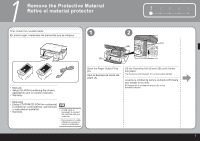
que se incluyen 2 (C) (B) (A) • Manuals • Setup CD-ROM (containing the drivers, applications and on-screen manuals) • Warranty • Manuales • [Setup CD-ROM/CD-ROM de instalación] (contiene los controladores, aplicaciones y manuales en pantalla) • Garantía • A USB cable is necessary to connect the - Canon PIXMA MP240 | Getting Started - Page 4
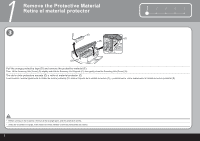
12345 (C) (D) Pull the orange protective tape (D) and remove the protective material (E). Then, lift the Scanning Unit (Cover) (B) slightly and fold the Scanning Unit Support (C), then gently close the Scanning Unit (Cover) (B). Tire de la cinta protectora naranja (D) y retire el material protector - Canon PIXMA MP240 | Getting Started - Page 5
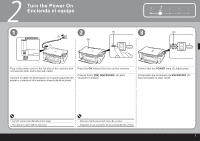
the POWER lamp (C) lights green. Compruebe que la lámpara de ENCENDIDO (C) está iluminada en color verde. • Do NOT connect the USB cable at this stage. • NO conecte el cable USB en este punto. • Make sure that the Document Cover (B) is closed. • Asegúrese de que la Cubierta de documentos (B) est - Canon PIXMA MP240 | Getting Started - Page 6
Instale los cartuchos FINE (FINE Cartridges) 1 (A) (D) (E) Lift the Scanning Unit (Cover) (A) until it locks into place. The Scanning Unit Support (D) is fixed automatically. The FINE Cartridge Holder (E) comes out to the center. (This is where you install the cartridges.) Levante la Unidad de - Canon PIXMA MP240 | Getting Started - Page 7
1 234 5 2 3 (F) Open the Ink Cartridge Locking Cover ( ) on the right side. Pinch (F) firmly and pull up the cover. Abra la Cubierta de bloqueo del cartucho de tinta ( ) situada a la derecha. Sujete firmemente (F) y levante la cubierta. (G) After removing the Black FINE Cartridge from its box, - Canon PIXMA MP240 | Getting Started - Page 8
) until you hear a click to close the Ink Cartridge Locking Cover ( ) completely. View the Ink Cartridge Cover ( ) straight on and check that it (FINE Cartridge) de color ( ) en la ranura izquierda ( ) de la misma forma. • Install the Black cartridge into the right holder, and the Color one into - Canon PIXMA MP240 | Getting Started - Page 9
Unit (Cover) (A) slightly and fold the Scanning Unit Support (D), then gently close the Scanning Unit (Cover) (A). Levante ligeramente la Unidad de FINE (FINE Cartridges), no los extraiga si no es necesario. • If the Alarm lamp (I) lights orange, make sure that the FINE Cartridges are correctly - Canon PIXMA MP240 | Getting Started - Page 10
by connecting it to a computer, software including the printer driver needs to be copied (installed) to the computer's hard disk. The screens below are based on Windows Vista operating system Ultimate Edition (hereafter referred to as "Windows Vista") and Mac OS X v.10.5.x. Para utilizar este equipo - Canon PIXMA MP240 | Getting Started - Page 11
Windows If the Found New Hardware or Found New Hardware Wizard screen appears: 1 Si aparece la pantalla [Found New Hardware/Nuevo hardware encontrado] o [Found New Hardware Wizard/Asistente para hardware nuevo encontrado]: 1 2 34 5 (A) 1 Remove the USB cable connected to your computer. The - Canon PIXMA MP240 | Getting Started - Page 12
Encienda el ordenador y, a continuación, inserte el [Setup CD-ROM/CD-ROM de instalación] en la unidad de CD-ROM. El programa de instalación debería arrancar automáticamente. Windows Vista Go to Step . Vaya al paso . Cuando aparezca el contenido del CD-ROM, haga doble clic en [MSETUP4.EXE]. 10 - Canon PIXMA MP240 | Getting Started - Page 13
Windows Easy Install. The drivers, application software, and on-screen manuals are installed automatically. software de la aplicación y los manuales en pantalla se instalan automáticamente. • If you want to select particular items to install, click Custom Install and follow the on-screen instructions - Canon PIXMA MP240 | Getting Started - Page 14
4 Windows 6 7 Click Install. Move the cursor over items to display explanations. Haga clic en /Sí] en la pantalla [License Agreement/Contrato de licencia]. Comienza la instalación. • Follow any on-screen instructions to install the software. • Siga las instrucciones en pantalla para instalar el - Canon PIXMA MP240 | Getting Started - Page 15
1 2 34 5 8 USB When the Printer Connection screen appears, connect one end of the USB cable to the computer, the other to the machine, then TURN THE MACHINE ON. Cuando aparezca la pantalla [Printer Connection/Conexión de impresora], conecte uno de los extremos del cable USB al ordenador y el otro al - Canon PIXMA MP240 | Getting Started - Page 16
4 Windows 9 10 Click Next. Haga clic en [Next/Siguiente]. Click Next. It may is not satisfactory after installing the MP driver, you may need to align the Print Head. Refer to "When Printing Becomes Faint or Colors Are Incorrect" in the on-screen manual: Basic Guide. • Si las líneas rectas no - Canon PIXMA MP240 | Getting Started - Page 17
1 2 34 5 11 Serial No. Click Next. If connected to the Internet, the user registration page appears. Follow the on-screen instructions to register your product. You will need your product serial number, which is located on the inside of the machine. Haga clic en [Next/Siguiente]. - Canon PIXMA MP240 | Getting Started - Page 18
4 12 Windows 13 When the Extended Survey Program screen appears, confirm the message. haga clic en [Restart/Reiniciar]. A continuación, extraiga el [Setup CD-ROM/CD-ROM de instalación] y guárdelo en un lugar seguro. Next, read "5 Loading Paper" on page 23! ¡A continuación, consulte la sección "5 - Canon PIXMA MP240 | Getting Started - Page 19
5 3 Connect one end of the USB cable to the computer and the other to the machine. Make sure the machine is turned on. Conecte uno de los extremos del cable USB al ordenador y el otro extremo al equipo. Asegúrese de que el equipo está encendido. Turn on the computer, then insert the Setup CD-ROM - Canon PIXMA MP240 | Getting Started - Page 20
your administrator name or password, click Help, then follow the on-screen instructions. Introduzca su nombre de administrador y contraseña. Haga clic en [OK/Aceptar en pantalla. Click Easy Install. The drivers, application software, and on-screen manuals are installed automatically. Haga clic en [ - Canon PIXMA MP240 | Getting Started - Page 21
. Installation starts. Si está de acuerdo, haga clic en [Yes/Sí] en la pantalla [License Agreement/ Contrato de licencia]. Comienza la instalación. • Follow any on-screen instructions to install the software. • Siga las instrucciones en pantalla para instalar el - Canon PIXMA MP240 | Getting Started - Page 22
lines are misaligned or print quality is not satisfactory after installing the MP driver, you may need to align the Print Head. Refer to "When Printing Becomes Faint or Colors Are Incorrect" in the on-screen manual: Basic Guide. • Si las líneas rectas no están alineadas o la calidad de impresión no - Canon PIXMA MP240 | Getting Started - Page 23
1 2 34 5 10 Serial No. Click Next. If connected to the Internet, the user registration page appears. Follow the on-screen instructions to register your product. You will need your product serial number, which is located on the inside of the machine. Haga clic en [Next/Siguiente]. - Canon PIXMA MP240 | Getting Started - Page 24
For details, refer to "Saving Scanned Data" in the on-screen manual: Basic Guide. • Si utiliza Mac OS X v.10.3.9, antes de utilizar el panel consulte "Almacenamiento de datos escaneados" en el manual en pantalla: Guía básica. Next, read "5 Loading Paper" on page 23! ¡A continuación, consulte la - Canon PIXMA MP240 | Getting Started - Page 25
Open the Paper Support (A) and pull it out. Abra el Soporte del papel (A) y extráigalo. (B) (B) Move the Paper Guide (B) to both edge, and load paper in the • For details on how to handle paper, refer to "Loading Paper" in the on-screen manual: Basic Guide. • Si desea obtener más información - Canon PIXMA MP240 | Getting Started - Page 26
and application software. Basic Guide (on-screen manual) Describes the basic operations and gives an introduction to other functions available. Advanced Guide (on-screen manual) Describes various operating procedures to make full use of the machine. Also includes "Troubleshooting" information for - Canon PIXMA MP240 | Getting Started - Page 27
Solution Menu from the Canon Solution Menu icon on the desktop (Windows) or on the Dock (Macintosh). If you have a problem with machine settings, click the Change settings or find solutions to problems. icon in Solution Menu to open My Printer. Abra varias aplicaciones y manuales en pantalla con un - Canon PIXMA MP240 | Getting Started - Page 28
without borders. Scanned images can be corrected/enhanced easily. Use them to create your own calendar etc. easily. For detailed operating procedures and functions, refer to the on-screen manuals. Este equipo le permite imprimir de varias formas utilizando el MPdriver y el software de la aplicaci - Canon PIXMA MP240 | Getting Started - Page 29
the Color button or the Black button. For various copying procedures, refer to "Copying" in the on-screen manual: Basic Guide. Puede copiar un documento coloc consulte "Copia" en el manual en pantalla: Guía básica. 1 2 (A) Load a sheet of A4 or Letter-sized plain paper. Cargue una hoja de papel - Canon PIXMA MP240 | Getting Started - Page 30
(B). Close the Document Cover (A), then press the Black button (C) for black & white copying, or the Color button (D) for on the original with pressure exceeding 4.4 lb / 2.0 kg. Doing so may cause the scanner to malfunction or the Platen Glass to break. • No coloque ningún objeto que pese más - Canon PIXMA MP240 | Getting Started - Page 31
10 x 15 cm]. Las pantallas se basan en Windows Vista. 1 2 In Solution Menu, click One-Click to Photo Print. Easy-PhotoPrint EX starts. En Solution Menu, haga clic en [One-Click to Photo more information refer to the on-screen manual: Advanced Guide. • Para abrir Solution Menu, consulte "Solution - Canon PIXMA MP240 | Getting Started - Page 32
un ordenador 3 4 Load a sheet of photo paper in portrait orientation. Load paper with the printing side facing up. Cargue una clic en [Print/Imprimir]. Comenzará la impresión. • For details, refer to "5 Loading Paper" on page 23. • Si desea obtener más información, consulte la sección "5 Carga - Canon PIXMA MP240 | Getting Started - Page 33
staining your hands or clothes with ink, it is recommended that you clean the Ink Cartridge Locking Cover (A) and the inside of the tray (B) with a dry cloth as required. If the Scanning Unit (Cover) is left open for more than 10 minutes, the FINE Cartridge Holder move to the right automatically - Canon PIXMA MP240 | Getting Started - Page 34
MP240: Approx. 5.5 kg (Approx. 12.2 lb) * With the FINE Cartridges installed. Nozzles: Black: 320 nozzles Cyan/Magenta/Yellow: 384 x 3 nozzles Copy Specifications Multiple copy 1 - 9, 20 pages Reduction/Enlargement Fit-to-page Scan Specifications Scanner driver TWAIN / WIA (Windows - Canon PIXMA MP240 | Getting Started - Page 35
funciones no estén disponibles con Windows Media Center. • Para pasar de Windows XP a Windows Vista, desinstale primero el software incluido con la impresora Canon Inkjet. Requisitos del sistema adicionales para los manuales en pantalla ■ Acerca de este manual En este manual, la mayoría de las - Canon PIXMA MP240 | Getting Started - Page 36
The following ink cartridges are compatible with this product. Los siguientes cartuchos de tinta son compatibles con este producto. www.usa.canon.com QT5-1645-V01 XXXXXXXX ©CANON INC.2008 PRINTED IN VIETNAM
-
 1
1 -
 2
2 -
 3
3 -
 4
4 -
 5
5 -
 6
6 -
 7
7 -
8
-
9
-
10
-
11
-
12
-
13
-
14
-
15
-
16
-
17
-
18
-
19
-
20
-
21
-
22
-
23
-
24
-
25
-
26
-
27
-
28
-
29
-
30
-
31
-
32
-
33
-
34
-
35
-
36
 |
 |

ENGLISH
ESPAÑOL
MP240
series
Asegúrese de leer este manual antes de utilizar el equipo. Guárdelo para futuras consultas.
Guía de inicio
=Léame primero=
Make sure to read this manual before using the machine. Please keep it in hand for future reference.
Getting Started
=Read Me First=
Photo All-In-One
Foto todo en uno