Canon PIXMA MX340 MX340 series Getting Started
Canon PIXMA MX340 Manual
 |
View all Canon PIXMA MX340 manuals
Add to My Manuals
Save this manual to your list of manuals |
Canon PIXMA MX340 manual content summary:
- Canon PIXMA MX340 | MX340 series Getting Started - Page 1
Office All-In-One Equipo multifunción de oficina series Getting Started Read Me First Guía de inicio Léame en primer lugar Make sure to read this manual before using the machine. Please keep it in hand for future reference. Asegúrese de leer este manual antes de usar el equipo. Consérvelo a mano - Canon PIXMA MX340 | MX340 series Getting Started - Page 2
Document Prohibited actions. Instructions including important information. Informational notes. Operations that take some time to complete. Indicates operations in Windows Corporation en EE UU y/u otros países. • Macintosh, Mac y AirPort son marcas comerciales de Apple Inc., registradas en EE - Canon PIXMA MX340 | MX340 series Getting Started - Page 3
inglés. Para obtener más información sobre cómo abrir los manuales en pantalla, consulte la página 84. • Getting Started (this manual) • Network Setup Troubleshooting Describes how to set up and use your machine. Basic Guide Describes basic operations and media, and gives an introduction to other - Canon PIXMA MX340 | MX340 series Getting Started - Page 4
Setup) P.55 Wireless Setup Using WCN (Windows Connect Now) P.59 Install the Software (3) P.66 Install the Software (3) (Registration) P.73 Install the Software (3) (Information) P.78 11 Use from Additional Computers P.82 12 Try Using the Machine P.83 Try Copying P.85 Print Photos Cartridges) - Canon PIXMA MX340 | MX340 series Getting Started - Page 5
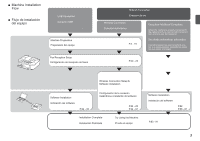
desde los que utilizar el equipo) P.20 - 23 Wireless Connection Setup & Software Installation Software Installation Instalación del software P.24 - 33 Configuración de la conexión inalámbrica e instalación del software P.24 - 25 P.34 - 81 Installation Complete Instalación finalizada - Canon PIXMA MX340 | MX340 series Getting Started - Page 6
LAN setup cable is temporarily required for wireless setup. Wireless LAN setup cable Cable de configuración LAN inalámbrica El cable de configuración LAN inalámbrica suministrado se necesita temporalmente para la configuración inalámbrica. A commercial access point or router that supports IEEE802 - Canon PIXMA MX340 | MX340 series Getting Started - Page 7
(FINE Cartridges) Telephone line cable Cable de línea telefónica Power cord Cable de alimentación Wireless LAN setup cable This cable can be used not only for wireless connection setup but also for USB connection. Setup CD-ROM (containing the drivers, applications and on-screen manuals) Cable - Canon PIXMA MX340 | MX340 series Getting Started - Page 8
Remove the Protective Material Retirada del material protector 21 2 A Remove all the protective materials and orange tape from the outside of the machine. Open the Paper Output Tray (A). • The tape and protective materials may differ in shape and position from what they actually are. Retire la - Canon PIXMA MX340 | MX340 series Getting Started - Page 9
3 D D C B Lift the Scanning Unit (Cover) (B) and fix it with the Scanning Unit Support (C). Close the Document Cover (D) and lift it with the Scanning Unit (Cover). 4 F E Remove the orange tape (E) carefully. The protective material (F) is removed along with the orange tape. Levante - Canon PIXMA MX340 | MX340 series Getting Started - Page 10
5 1 2 3 Lift the Scanning Unit (Cover) slightly (1) and fold the Scanning Unit Support (2), then gently close the Scanning Unit (Cover) (3). Levante la unidad de escaneado (cubierta) ligeramente (1) y pliegue el soporte de la unidad de escaneado (2) para cerrar después - Canon PIXMA MX340 | MX340 series Getting Started - Page 11
send faxes after installing the machine, check the telephone line type. For details, refer to "Confirming the Telephone Line Connection" in the on-screen manual: Basic Guide. Para utilizar el equipo como fax, se debe conectar una línea telefónica. En esta sección se describe el método básico para - Canon PIXMA MX340 | MX340 series Getting Started - Page 12
1 B 2 Only when connecting a telephone: 1 C Sólo al conectar un teléfono: 2 A Connect one end of supplied telephone line cable (A) to the lower connector labeled "L" on the machine, and then connect the other end to the telephone jack on - Canon PIXMA MX340 | MX340 series Getting Started - Page 13
cord into the connector on the left side of the machine and into the wall outlet. • Do NOT connect the Wireless LAN setup cable (USB cable) at this stage. • Make sure that the Document Cover (A) is closed. • Do not install the machine where an object may fall on it. The object may fall - Canon PIXMA MX340 | MX340 series Getting Started - Page 14
2B 3 C D 4E Press the ON button (B) to turn on the machine. Use the [ or ] button (C) on the Operation Panel to select the language for the LCD (Liquid Crystal Display) (D), then press the OK button. Make sure that the above screen is displayed and go to the next step. • If an unintended - Canon PIXMA MX340 | MX340 series Getting Started - Page 15
lights up or flashes may cause drying and clogging of the FINE Cartridges, resulting in poor printing. If your machine is used as fax botón ACTIVADO (ON) esté encendida o parpadee, los cartuchos FINE (FINE Cartridges) se pueden secar y obstruir teniendo como resultado una impresión de mala calidad - Canon PIXMA MX340 | MX340 series Getting Started - Page 16
Instalación de los cartuchos FINE (FINE Cartridges) 5 1 E F E A Lift the Scanning Unit (Cover) (A) and fix it with the Scanning Unit Support (D). Close the Document Cover (E) and lift it with the Scanning Unit (Cover). D G • Do not touch the buttons or LCD (F) on the Operation Panel (G). May - Canon PIXMA MX340 | MX340 series Getting Started - Page 17
Holder (H) moves to the installation position. Follow the next procedure to insert the Black and Color FINE Cartridges into their corresponding slots and . I Open the Ink Cartridge Locking Cover on the right side. Pinch (I) firmly and pull up the cover. Asegúrese de que el soporte de cartucho - Canon PIXMA MX340 | MX340 series Getting Started - Page 18
of the arrow and remove it carefully. • Handle the FINE Cartridges carefully. Do not drop or apply excessive pressure to them. • Be sure to use the supplied FINE Cartridges. • Be careful not to stain your hands or surrounding work area with ink on the removed protective tape. • Do not touch the - Canon PIXMA MX340 | MX340 series Getting Started - Page 19
in a well-lit environment. • Install the Black FINE Cartridge into the right slot , and the Color FINE Cartridge into the left slot . Push down of the Ink Cartridge Locking Cover until you hear a click to close it completely. View the Ink Cartridge Locking Cover straight on and check that it is - Canon PIXMA MX340 | MX340 series Getting Started - Page 20
to the next step. • It takes about 1 - 2 minutes before the LCD changes. • Once you have installed the FINE Cartridges, do not remove them unnecessarily. • If an error message is displayed on the LCD, make sure that the FINE Cartridges are correctly installed. • The LCD will turn off if the machine - Canon PIXMA MX340 | MX340 series Getting Started - Page 21
Support Move the Paper Guides (A). (B) to both edges. Load paper in the center of the Rear Tray (C). Load paper in portrait orientation with the printing side facing up. Slide the left and right Paper Guides Paper" in the on-screen manual: Basic Guide after installation is complete. Abra el - Canon PIXMA MX340 | MX340 series Getting Started - Page 22
The following four modes are available for receiving faxes. Select a receive mode according to your needs. You can change the receive mode any time. Refer to the on-screen manual: Basic Guide. • Even when a telephone is connected to the machine, the telephone's ringtone may not sound for an incoming - Canon PIXMA MX340 | MX340 series Getting Started - Page 23
a fax only. • Si desea utilizar una línea de fax dedicada. • Si desea usar sólo el fax. • If you use Distinctive Ring Pattern Detection (DRPD) service • Si utiliza un servicio de detección de patrones de sonido (DRPD) Receive Mode Modo de recepción TEL priority mode Modo prioridad tel. Voice calls - Canon PIXMA MX340 | MX340 series Getting Started - Page 24
TEL priority mode Modo prioridad tel. When a fax call arrives: Si recibe una llamada de fax: While the telephone's ringtone sounds, pick up the handset. When the fax reception starts, replace the handset. If an answering machine is connected, the fax is received automatically. Mientras suene el - Canon PIXMA MX340 | MX340 series Getting Started - Page 25
1 A B 2 C 3 Press the FAX button (A), then press the Menu button (B). The Fax settings screen is displayed. Use the [ or ] button (C) to select Receive mode set., then press the OK button. The Receive mode set. screen is displayed. Select a receive mode, then press the OK button. The - Canon PIXMA MX340 | MX340 series Getting Started - Page 26
on page 26. Conexión USB USB cable Cable USB Vaya a "9 Instalación del software (1)" en la página 26. • Want to connect to computers without using cables. • Want to use from multiple computers. Wireless Connection • Si desea conectar a ordenadores sin usar cables. • Si desea utilizar desde - Canon PIXMA MX340 | MX340 series Getting Started - Page 27
If it is uncertain whether your device (access point, router, etc.) supports wireless connection, refer to the manual supplied with the device, or contact its manufacturer. If your device supports wireless connection, check if it supports IEEE802.11b/g. ¿Qué es una red? Un sistema de intercambio de - Canon PIXMA MX340 | MX340 series Getting Started - Page 28
the Setup CD-ROM during restarting. The installation resumes once your computer has restarted. • Mac OS 9, Mac OS X Classic environments, or Mac OS X v.10.4.10 or earlier are not supported. • Para poder utilizar el equipo conectado a un ordenador, se debe copiar (instalar) el software, incluidos - Canon PIXMA MX340 | MX340 series Getting Started - Page 29
: □ Si se conecta el equipo mediante un cable USB antes de instalar el software: For Windows 7 1. Remove the USB cable connected to your computer. 2. Proceed to on page 28. For Windows Vista/Windows XP/Windows 2000 The dialog box on the left may appear. 1. Remove the USB cable connected to your - Canon PIXMA MX340 | MX340 series Getting Started - Page 30
you have already connected the cable, disconnect it now. Turn on the computer, then insert the Setup CD-ROM into the CD-ROM drive. If you are using Windows, the setup program starts automatically. For Windows • If the program does not start automatically, double-click the CD-ROM icon in Computer or - Canon PIXMA MX340 | MX340 series Getting Started - Page 31
Windows 7/Windows Vista Windows XP/Windows 2000 Click Run Msetup4.exe on the AutoPlay screen, then click Continue or Yes on the User Account Control dialog box. If the User the help button, then follow the on-screen instructions. Haga doble clic en el icono Setup de la carpeta del CD-ROM para pasar - Canon PIXMA MX340 | MX340 series Getting Started - Page 32
. For Windows 7/Windows Vista SP1 or later • You can install the XPS Printer Driver from Custom Install. When installing the XPS Printer Driver, select the MP Drivers at the same time. • For details on useful functions of the XPS Printer Driver, refer to the on-screen manual: Advanced Guide after - Canon PIXMA MX340 | MX340 series Getting Started - Page 33
the Installation Información importante para la instalación 6 Select Use the printer via USB, then click Next. Follow any on-screen instructions to proceed with the software installation. □ USB Port □ Puerto USB When the Printer Connection screen appears, connect the machine to the computer with - Canon PIXMA MX340 | MX340 series Getting Started - Page 34
□ Información necesaria para el registro de usuario (User Registration) B □ If the Extended Survey Program screen machine (as shown in the illustration). Serial No • If the power is on, the FINE Cartridge Holder will move when the Scanning Unit (Cover) (B) is opened. If you can agree to - Canon PIXMA MX340 | MX340 series Getting Started - Page 35
instruction to restart the computer. For Macintosh: It is necessary to restart the computer before scanning using the Operation Panel on the machine for the first time. For Windows ! Setup is complete. Proceed to page 84 for information regarding the Solution Menu and the on-screen manual or - Canon PIXMA MX340 | MX340 series Getting Started - Page 36
de acceso o router inalámbrico, etc. An "Ad-hoc connection," which establishes a direct connection to the computer over a wireless connection without using an access point, is not supported. Be sure to prepare an access point. Antes de conectar el equipo a la red, se debe conectar el ordenador - Canon PIXMA MX340 | MX340 series Getting Started - Page 37
appears or if you have trouble with the network connection, refer to the printed manual: Network Setup Troubleshooting. □ If your access point or router supports WPS (Wi-Fi Protected Setup): □ Si el punto de acceso o el router admiten WPS (Wi-Fi Protected Setup): The wireless connection can be set - Canon PIXMA MX340 | MX340 series Getting Started - Page 38
, a warning message may appear that Canon software is attempting to access the network. If such a warning message appears, set the security software to always allow access. • Mac OS 9, Mac OS X Classic environments, or Mac OS X v.10.4.10 or earlier are not supported. • Para poder utilizar el equipo - Canon PIXMA MX340 | MX340 series Getting Started - Page 39
el equipo mediante un cable de configuración LAN inalámbrica antes de instalar el software: For Windows 7 1. Remove the Wireless LAN setup cable connected to your computer. 2. Proceed to on page 38. For Windows Vista/Windows XP/Windows 2000 The dialog box on the left may appear. 1. Remove the - Canon PIXMA MX340 | MX340 series Getting Started - Page 40
1 Do not connect the Wireless LAN setup cable yet. Software installation requires temporary use of the Wireless LAN setup cable. Turn on the computer, then insert the Setup CD-ROM into the CD-ROM drive. If you are using Windows, the setup program starts automatically. For Windows • If the program - Canon PIXMA MX340 | MX340 series Getting Started - Page 41
Windows 7/Windows Vista Windows XP/Windows 2000 Click Run Msetup4.exe on the AutoPlay screen, then click Continue or Yes on the User Account Control dialog box. If the User the help button, then follow the on-screen instructions. Haga doble clic en el icono Setup de la carpeta del CD-ROM para pasar - Canon PIXMA MX340 | MX340 series Getting Started - Page 42
. For Windows 7/Windows Vista SP1 or later • You can install the XPS Printer Driver from Custom Install. When installing the XPS Printer Driver, select the MP Drivers at the same time. • For details on useful functions of the XPS Printer Driver, refer to the on-screen manual: Advanced Guide after - Canon PIXMA MX340 | MX340 series Getting Started - Page 43
Next. Follow any on-screen instructions to proceed with the software installation. When the Printer Detection screen appears, click Next. • If the Printer Connection screen appears instead of the screen above, the connection method is not correctly selected in . − For Windows Click Cancel and start - Canon PIXMA MX340 | MX340 series Getting Started - Page 44
7 Make sure the machine is turned on, then click OK. 8 When the Set Up New Printer screen appears, click Next. • If the Detected Printers List screen appears, click Set Up New Printer. Compruebe que el equipo está encendido y, a continuación, haga clic en OK. Cuando aparezca la pantalla - Canon PIXMA MX340 | MX340 series Getting Started - Page 45
to - on page 45. When the Connect Cable screen appears, connect the machine to the computer with the Wireless LAN setup cable. For Macintosh: • Follow the on-screen instructions and click Next. Cuando aparezca la pantalla Conexión del cable (Connect Cable), conecte el equipo al ordenador mediante - Canon PIXMA MX340 | MX340 series Getting Started - Page 46
on page 46. • If the target access point is not displayed on the Detected Access Points List or Access Points screen, refer to the printed manual: Network Setup Troubleshooting. • For details on how to check the access point name/network name (SSID) and network key, refer to the - Canon PIXMA MX340 | MX340 series Getting Started - Page 47
10 - B □ If the Confirm Connection Access Point screen appears □ Si aparece la pantalla Comprobación del punto de acceso de la conexión (Confirm Connection Access Point) Make sure that the target access point is displayed, then click Yes. If you are using Macintosh, a screen asking for permission to - Canon PIXMA MX340 | MX340 series Getting Started - Page 48
Disconnect Cable screen appears, remove the Wireless LAN setup cable, then click Next. • If the Automatic Setup or Auto Setup screen appears, click OK, then perform - . When the Setup Completion screen appears, click Complete or OK. Go to "Install the Software (2) (Information)" on page 51! Go to - Canon PIXMA MX340 | MX340 series Getting Started - Page 49
) This section describes how to register the machine on a Macintosh computer. 1 Windows users: read "Install the Software (2) (Information)" on page 51. When the Register Printer and Scanner screen appears, click Register Printer. En esta sección se describe cómo registrar el equipo en un - Canon PIXMA MX340 | MX340 series Getting Started - Page 50
on page 49. • The alphanumeric characters after Canon MX340 series is the machine's Bonjour service name or MAC address. • If the machine has not been detected, make sure of the following. − The machine is turned on. − The firewall function of any security software is turned off. − The computer is - Canon PIXMA MX340 | MX340 series Getting Started - Page 51
- B Mac OS X v.10.4.11 1 2 3 4 When the Printer List window appears, click Add. • When the You have no printers available. screen appears, click Add. Click More Printers in the Printer Browser window. Select Canon IJ Network in the popup menu, select Canon MX340 series in the list of printers - Canon PIXMA MX340 | MX340 series Getting Started - Page 52
on the Register Printer and Scanner screen. Next, read "Install the Software (2) (Information)" on page 51! Cuando aparezca la pantalla Registro de la impresora y del escáner (Register Printer and Scanner), haga clic en Registrar el escáner (Register Scanner). Seleccione Canon MX340 series en la - Canon PIXMA MX340 | MX340 series Getting Started - Page 53
Install the Software (2) (Information) Instalación del software (2) (Información) 1 Click Next. Follow any on-screen instructions to proceed with the software installation. Haga clic en Siguiente (Next). Siga cualquier instrucción en pantalla para llevar a cabo la instalación del software. 51 - Canon PIXMA MX340 | MX340 series Getting Started - Page 54
□ Necessary Information for the User Registration □ Información necesaria para el registro de usuario (User Registration) A □ If the (as shown in the illustration). Serial No • If the power is on, the FINE Cartridge Holder will move when the Scanning Unit (Cover) (A) is opened. If you can agree - Canon PIXMA MX340 | MX340 series Getting Started - Page 55
. If Restart is displayed, follow the instruction to restart the computer. For Macintosh: It is necessary to restart the computer before scanning using the Operation Panel on the machine for the first time. For Windows: Solution Menu starts automatically. • Remove the Setup CD-ROM and keep it in - Canon PIXMA MX340 | MX340 series Getting Started - Page 56
Using the Machine from Additional Computers Now that the wireless connection of the machine is complete, it can be used from additional computers on the same network. Install software including the drivers on the computer from which you want to use the machine. Other settings are not required. For - Canon PIXMA MX340 | MX340 series Getting Started - Page 57
inalámbrica mediante WPS (Wi-Fi Protected Setup) Read this section only when setting up a wireless connection by using the WPS (Wi-Fi Protected Setup). 1 A If not using WPS, the following procedure is not necessary. • For details on WPS, refer to the manual of your access point. Use the Menu - Canon PIXMA MX340 | MX340 series Getting Started - Page 58
/inactiva (WLAN active/inactive) y, a continuación, pulse el botón OK. Aparece la pantalla WLAN activa/inactiva (WLAN active/inactive). Seleccione LAN inal. activa (Wireless LAN active) y, a continuación, pulse el botón OK. Cuando se activa la conexión inalámbrica, la luz de Wi-Fi (C) es azul. Se - Canon PIXMA MX340 | MX340 series Getting Started - Page 59
the access point. If another error appears, refer to the printed manual: Network Setup Troubleshooting. Seleccione Conf. LAN inalámb. (Wireless LAN setup) y, a continuación, pulse el botón OK. Aparece la pantalla Config. LAN inalám. (Wireless LAN setup). Seleccione WPS y, a continuación, pulse el - Canon PIXMA MX340 | MX340 series Getting Started - Page 60
appears, press the OK button, then start over from . • If another error appears, refer to the printed manual: Network Setup Troubleshooting. Press the COPY button (D). The copy standby screen is displayed. Next, read "Install the Software (3)" on page 66! Mantenga pulsado el botón WPS del punto de - Canon PIXMA MX340 | MX340 series Getting Started - Page 61
, the following procedure is not necessary. Proceed with the setup according to your operating system. Wireless Setup Using WCN (Windows Connect Now) Configuración inalámbrica mediante WCN (Windows Connect Now) Windows Vista Go to - on page 60. Windows 7 Go to - on page 62. • Before setting up - Canon PIXMA MX340 | MX340 series Getting Started - Page 62
the device or computer using a USB flash drive. En el menú Inicio (Start) de Windows, haga clic en Red (Network). Se abre la carpeta Red (Network). Haga clic en Agregar un dispositivo inalámbrico (Add a wireless device) en el menú. Aparecerá la pantalla Agregar un dispositivo inalámbrico a la red - Canon PIXMA MX340 | MX340 series Getting Started - Page 63
nombre de la red (SSID) y, a continuación, haga clic en Siguiente (Next). • Si aparece el cuadro de diálogo Control de cuentas de usuario (User Account Control), haga clic en Continuar (Continue). Si vuelve a aparecer el mismo cuadro de diálogo en pasos posteriores, haga clic en Continuar (Continue - Canon PIXMA MX340 | MX340 series Getting Started - Page 64
1 - B Windows 7 1 2 3 4 Click Start > Control Panel > View network status and tasks > Manage wireless networks. Select the network name (SSID) from the list and right-click it, then select Properties. Select Copy this network profile to a USB flash drive. Follow the on-screen instructions to - Canon PIXMA MX340 | MX340 series Getting Started - Page 65
2 A 3 B 4 Use the Menu button (A) to select Device settings. Use the [ or ] button (B) to select LAN settings, then press the OK button. The LAN settings screen is displayed. Select WLAN active/inactive, then press the OK button. The WLAN active/inactive screen is displayed. Utilice el botón - Canon PIXMA MX340 | MX340 series Getting Started - Page 66
connection is enabled, the Wi-Fi lamp (C) lights blue. The LAN settings screen is displayed. Select Wireless LAN setup, then press the OK button. The Wireless LAN setup screen is displayed. Select WCN, then press the OK button. The Connect USB drive on which LAN details are saved and press - Canon PIXMA MX340 | MX340 series Getting Started - Page 67
from the machine. The LAN settings screen is displayed. Press the COPY button (E). The copy standby screen is displayed. Next, read "Install the Software (3)" on page 66! Conecte la unidad USB flash al puerto de impresión directa (conector USB) (D) en la parte frontal del equipo y, a continuaci - Canon PIXMA MX340 | MX340 series Getting Started - Page 68
message may appear that Canon software is attempting to access the network. If such a warning message appears, set the security software to always allow access. • Mac OS 9, Mac OS X Classic environments, or Mac OS X v.10.4.10 or earlier are not supported. □ For Spanish Users in the U.S.A.: □ Para - Canon PIXMA MX340 | MX340 series Getting Started - Page 69
(A) lights blue. • It is not necessary to connect the machine to the computer with the Wireless LAN setup cable. □ Easy-WebPrint EX Si utiliza Internet Explorer 7 o posterior, puede utilizar el software de impresión para web Easy-WebPrint EX. Para instalarlo, es necesario estar conectado a Internet - Canon PIXMA MX340 | MX340 series Getting Started - Page 70
CD-ROM contents appear, double-click MSETUP4.EXE. Encienda el ordenador y, a continuación, introduzca el Setup CD-ROM en la unidad de CD-ROM. Si usa Windows, el programa de instalación se inicia automáticamente. Para Windows • Si el programa no se inicia automáticamente, haga doble clic en el icono - Canon PIXMA MX340 | MX340 series Getting Started - Page 71
Windows 7/Windows Vista Windows XP/Windows 2000 Click Run Msetup4.exe on the AutoPlay screen, then click Continue or Yes on the User Account Control dialog box. If the User the help button, then follow the on-screen instructions. Haga doble clic en el icono Setup de la carpeta del CD-ROM para pasar - Canon PIXMA MX340 | MX340 series Getting Started - Page 72
. For Windows 7/Windows Vista SP1 or later • You can install the XPS Printer Driver from Custom Install. When installing the XPS Printer Driver, select the MP Drivers at the same time. • For details on useful functions of the XPS Printer Driver, refer to the on-screen manual: Advanced Guide after - Canon PIXMA MX340 | MX340 series Getting Started - Page 73
Next. Follow any on-screen instructions to proceed with the software installation. When the Printer Detection screen appears, click Next. • If the Printer Connection screen appears instead of the screen above, the connection method is not correctly selected in . − For Windows Click Cancel and start - Canon PIXMA MX340 | MX340 series Getting Started - Page 74
OK. When the Detected Printers List dialog box appears, select Canon MX340 series, then click Next. • If the machine is not detected, Set Up New Printer dialog box is displayed. Refer to the printed manual: Network Setup Troubleshooting. Make sure there is no problem, then click Redetect. When - Canon PIXMA MX340 | MX340 series Getting Started - Page 75
) This section describes how to register the machine on a Macintosh computer. 1 Windows users: read "Install the Software (3) (Information)" on page 78. When the Register Printer and Scanner screen appears, click Register Printer. En esta sección se describe cómo registrar el equipo en un - Canon PIXMA MX340 | MX340 series Getting Started - Page 76
• The alphanumeric characters after Canon MX340 series is the machine's Bonjour service name or MAC address. • If the software is turned off. − The computer is connected to the access point. □ Consulte las demás instrucciones de instalación en la sección que trate de su sistema operativo. Mac - Canon PIXMA MX340 | MX340 series Getting Started - Page 77
B Mac OS X v.10.4.11 1 1 2 Select Canon MX340 series and click Add. Go to on page 76. When the Printer List window appears, click Add. • When the You have no printers available. screen appears, click Add. Click More Printers in the Printer Browser window. Seleccione Canon MX340 series y haga - Canon PIXMA MX340 | MX340 series Getting Started - Page 78
Network in the pop-up menu, select Canon MX340 series in the list of printers, then click Add. Make sure that Canon MX340 series is added to the list of printers. Go to . When the Register Printer and Scanner screen appears, click Register Scanner. Seleccione Canon IJ Network en el menú emergente - Canon PIXMA MX340 | MX340 series Getting Started - Page 79
series on the Scan-from-PC Settings screen, then click OK. Click Next on the Register Printer and Scanner screen. Next, read "Install the Software (3) (Information)" on page 78! Seleccione Canon MX340 series en la pantalla Conf. de escaneo desde PC (Scan-from-PC Settings) y, a continuación, haga - Canon PIXMA MX340 | MX340 series Getting Started - Page 80
Install the Software (3) (Information) Instalación del software (3) (Información) 1 Click Next. Follow any on-screen instructions to proceed with the software installation. Haga clic en Siguiente (Next). Siga cualquier instrucción en pantalla para llevar a cabo la instalación del software. 78 - Canon PIXMA MX340 | MX340 series Getting Started - Page 81
□ Necessary Information for the User Registration □ Información necesaria para el registro de usuario (User Registration) A □ If the (as shown in the illustration). Serial No • If the power is on, the FINE Cartridge Holder will move when the Scanning Unit (Cover) (A) is opened. If you can agree - Canon PIXMA MX340 | MX340 series Getting Started - Page 82
Exit to complete the installation. If Restart is displayed, follow the instruction to restart the computer. For Macintosh: It is necessary to restart the computer before scanning using the Operation Panel on the machine for the first time. • Remove the Setup CD-ROM and keep it in a safe place. • The - Canon PIXMA MX340 | MX340 series Getting Started - Page 83
Using the Machine from Additional Computers Now that the wireless connection of the machine is complete, it can be used from additional computers on the same network. Install software including the drivers on the computer from which you want to use the machine. Other settings are not required. For - Canon PIXMA MX340 | MX340 series Getting Started - Page 84
ordenadores adicionales 11 If the machine is already connected to a wireless connection, it can be used from additional computers on the Insert the Setup CD-ROM into the computer from which you want to use the machine. 2 Follow the on-screen instructions to install the software. Other settings - Canon PIXMA MX340 | MX340 series Getting Started - Page 85
are installed on the computer along with the drivers. You can print creative items by correcting/ enhancing photos using the application software. For details on how to use the application software and the machine, refer to the on-screen manual. Utilice el panel de control del equipo para imprimir - Canon PIXMA MX340 | MX340 series Getting Started - Page 86
For example, • Open the on-screen manual with a single click. • Open various application software with a single click. How to open the on-screen manual Click this button to open the on-screen manual. How to start Solution Menu Click this icon on the desktop (Windows) or on the Dock (Macintosh) to - Canon PIXMA MX340 | MX340 series Getting Started - Page 87
copy. • For details, refer to "6 Load Paper" on page 19. • The machine may make operating noise when feeding paper. This is normal operation. Open the Document Cover (B). Cargue papel normal de tamaño A4 o Carta. Asegúrese de que la bandeja de salida del papel (A) esté abierta. En esta sección se - Canon PIXMA MX340 | MX340 series Getting Started - Page 88
to the document by pressing on it with a force exceeding 4.4 lb/2.0 kg. The scanner may malfunction or the glass may break. Close the Document Cover, paper other than plain paper, refer to "Copying" in the on‑screen manual: Advanced Guide. Coloque el documento boca abajo y alinéelo con la marca de - Canon PIXMA MX340 | MX340 series Getting Started - Page 89
to "6 Load Paper" on page 19. Start Solution Menu from the Canon Solution Menu icon on the desktop (Windows) or on the Dock (Macintosh), then click One-Click to Photo Print. Easy-PhotoPrint EX starts. • The screens are based on Windows Vista. • For details on starting Solution Menu, refer to page - Canon PIXMA MX340 | MX340 series Getting Started - Page 90
/Print. When a photo is selected, the number of copies is set to "1". Click Print. If you are using Windows, printing will start. If you are using Macintosh, click Print on the Print dialog box to start printing. For more information, refer to the on-screen manual: Advanced Guide. Seleccione la - Canon PIXMA MX340 | MX340 series Getting Started - Page 91
how to send a fax in black and white from the ADF (Auto Document Feeder) (B). • Make sure that the telephone line type is set correctly. For the setting procedure, refer to "Preparing for Faxing" in the on-screen manual: Basic Guide. • The setting may not be available depending on the country - Canon PIXMA MX340 | MX340 series Getting Started - Page 92
(C), then move the Document Guides (D) to both edges. • For details on supported documents and settings for image quality, density (brightness), etc., refer to the on-screen manual: Basic Guide. Insert the document until a beep sounds, then slide the left and right Document Guides against both ends - Canon PIXMA MX340 | MX340 series Getting Started - Page 93
this section. • For details on sender information, refer to "Specifying the Basic Settings for Faxing" in the on-screen manual: Basic Guide. For other procedures to send faxes, refer to "Faxing" in the on-screen manual: Basic Guide. Utilice el teclado numérico (E) para introducir el número de fax - Canon PIXMA MX340 | MX340 series Getting Started - Page 94
Maintenance Mantenimiento 13 After a period of use, the inside of the machine may become stained with ink. To avoid staining your hands or clothes with ink, it is recommended that you clean the Ink Cartridge Locking Cover (A) and the inside of the tray (B) with a facial tissue or the like as - Canon PIXMA MX340 | MX340 series Getting Started - Page 95
. Canon FINE Cartridge Black: 320 nozzels Color: 384 x 3 nozzels ADF capacity A4 or Letter size: Max. 30 sheets (20 lb/75 gsm paper), up to 0.16 inches/4 mm in height Legal size: Max. 5 sheets (20 lb/75 gsm paper), up to 0.04 inches/1 mm in height Other sizes: 1 sheet Scanner driver Maximum - Canon PIXMA MX340 | MX340 series Getting Started - Page 96
: After upgrading from Mac OS X v.10.5 or lower to Mac OS X v.10.6, install software bundled with the Canon inkjet printer. • Internet Explorer 7 or later is required to install Easy-WebPrint EX. Additional System Requirements for the On-Screen Manuals Browser: Easy Guide Viewer Note: Internet - Canon PIXMA MX340 | MX340 series Getting Started - Page 97
de Mac OS X v.10.5 o inferior a Mac OS X v.10.6, instale el software incluido con la impresora de inyección de tinta Canon. • Se necesita Internet Explorer 7 o posterior para instalar Easy-WebPrint EX. Requisitos adicionales del sistema para los manuales en pantalla Navegador: Easy Guide Viewer - Canon PIXMA MX340 | MX340 series Getting Started - Page 98
Canon Email Tech Support - www.usa.canon.com/support Soporte técnico por correo electrónico: www.usa.canon.com/support Toll-Free Tech Support - 1-800-OK-CANON Soporte técnico personal mediante llamada gratuita: 1-800-OK-CANON This option provides live telephone technical support, free of service
-
 1
1 -
 2
2 -
 3
3 -
 4
4 -
 5
5 -
 6
6 -
 7
7 -
8
-
9
-
10
-
11
-
12
-
13
-
14
-
15
-
16
-
17
-
18
-
19
-
20
-
21
-
22
-
23
-
24
-
25
-
26
-
27
-
28
-
29
-
30
-
31
-
32
-
33
-
34
-
35
-
36
-
37
-
38
-
39
-
40
-
41
-
42
-
43
-
44
-
45
-
46
-
47
-
48
-
49
-
50
-
51
-
52
-
53
-
54
-
55
-
56
-
57
-
58
-
59
-
60
-
61
-
62
-
63
-
64
-
65
-
66
-
67
-
68
-
69
-
70
-
71
-
72
-
73
-
74
-
75
-
76
-
77
-
78
-
79
-
80
-
81
-
82
-
83
-
84
-
85
-
86
-
87
-
88
-
89
-
90
-
91
-
92
-
93
-
94
-
95
-
96
-
97
-
98
 |
 |

ESPAÑOL
ENGLISH
series
Asegúrese de leer este manual antes de usar el equipo. Consérvelo a mano para utilizarlo como referencia en el futuro.
Guía de inicio
Equipo multifunción de oficina
Léame en primer lugar
Make sure to read this manual before using the machine. Please keep it in hand for future reference.
Getting Started
Office All-In-One
Read Me First