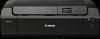
Canon PIXMA PRO-200 PRO-200 Getting Started Guide
Canon PIXMA PRO-200 Manual
 |
View all Canon PIXMA PRO-200 manuals
Add to My Manuals
Save this manual to your list of manuals |
Canon PIXMA PRO-200 manual content summary:
- Canon PIXMA PRO-200 | PRO-200 Getting Started Guide - Page 1
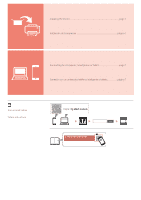
Getting Started Guía de inicio Online Setup Configuración en línea Detailed instructions and videos are available on the Canon website. Hay vídeos e instrucciones detalladas en el sitio web de Canon. Connecting to a Computer Conectar al ordenador Connecting to a Smartphone Conexión con un teléfono - Canon PIXMA PRO-200 | PRO-200 Getting Started Guide - Page 2
Installing the Printer...page 1 Instalación de la impresora página 1 Connecting to a Computer, Smartphone or Tablet page 7 Conexión con un ordenador, teléfono inteligente o tableta página 7 Instructional Videos Vídeos instructivos Go - Canon PIXMA PRO-200 | PRO-200 Getting Started Guide - Page 3
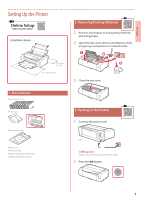
material inside. a b c 3 Close the top cover. 1. Box Contents • Ink Tanks for setup • Print Head • Multi-purpose Tray Power Cord • Setup CD-ROM • Safety and Important Information ••Getting Started (this manual) 3. Turning on the Printer 1 Connect the power cord. Back Important At this time, do - Canon PIXMA PRO-200 | PRO-200 Getting Started Guide - Page 4
Setting Up the Printer 3 Use the {, } and OK buttons to select a language. 4. Installing the Print Head 1 Open Remove the print head from its package. Important There may be some transparent or light color ink on the inside of the bag the print head comes in - this has no effect on print quality. - Canon PIXMA PRO-200 | PRO-200 Getting Started Guide - Page 5
no tape or film is left. 2 Twist the orange cap, and then remove. 7 Lower the print head lock lever completely. • Important Do not squeeze the ink tank with the L-shaped air hole blocked. Important Once you have installed the print head, do not remove it unnecessarily. • Do not touch the areas - Canon PIXMA PRO-200 | PRO-200 Getting Started Guide - Page 6
displayed on the screen even though you have installed the ink tank, the color of the ink tank may be wrong or you may have installed an ink tank, such as one with a different model number, that is not supported by this printer. Either install an ink tank for the correct color or use the provided - Canon PIXMA PRO-200 | PRO-200 Getting Started Guide - Page 7
the paper output support. • Follow the on-screen instructions to continue setup. This includes making selections related to sending information. Refer to "Sending Information To Canon" in Safety and Important Information. • When Select the connection method. appears on the printer's screen, proceed - Canon PIXMA PRO-200 | PRO-200 Getting Started Guide - Page 8
you select Wi-Fi connection : Do not connect a USB cable until instructed. When Continue to perform Wi-Fi setup from your • If you select Wired LAN connection : The wired LAN connector is on the back of the printer. computer or smartphone. Please confirm. appears, select Yes. b Back a 3 When - Canon PIXMA PRO-200 | PRO-200 Getting Started Guide - Page 9
. 8-b page 8 1 Access the Canon website from a computer. 2 Select Set Up. 3 Enter your printer's model name and click Go. • printer, go to Connect. Note The following steps are for Windows users. 6 Click Download. 7 Run the downloaded file. 8 Click Start Setup. 9 Follow the on-screen instructions - Canon PIXMA PRO-200 | PRO-200 Getting Started Guide - Page 10
8-b. Connecting to a Smartphone Setting Up the Printer 8-b Connecting to a Smartphone If you are using multiple smartphones, perform these steps on each smartphone. 1 Install the "Canon PRINT Inkjet/SELPHY" app on your smartphone. • Search for "Canon PRINT" in App Store, or Google Play. • Access - Canon PIXMA PRO-200 | PRO-200 Getting Started Guide - Page 11
la impresora • Bandeja Multiusos 1 Conecte el cable de alimentación. Cable de alimentación • CD-ROM de instalación • Información de seguridad e información importante ••Guía de inicio (este manual) Atrás Importante En este momento, no conecte ningún otro cable. 2 Pulse el botón ACTIVADO (ON). 1 - Canon PIXMA PRO-200 | PRO-200 Getting Started Guide - Page 12
Instalación de la impresora 3 Utilice los botones {, } y OK para seleccionar un idioma. 4. Instalar el cabezal de impresión 1 Abra la bandeja de salida del papel. 2 Abra la cubierta superior. 4 Pulse el botón OK. 5 Establezca la fecha y la hora y, a continuación, pulse el botón OK. Precaución No - Canon PIXMA PRO-200 | PRO-200 Getting Started Guide - Page 13
ESPAÑOL 5 Retire la tapa protectora. 6 Coloque el cabezal de impresión en el soporte del cabezal de impresión. 5. Instalación de los depósitos de tinta 1 Retire la cinta y la película del depósito de tinta. a b • Compruebe que la cinta o la película se ha eliminado completamente. 2 Gire la tapa - Canon PIXMA PRO-200 | PRO-200 Getting Started Guide - Page 14
Instalación de la impresora 4 Compruebe si el color del depósito de tinta que instaló aparece en pantalla. 6. Carga del papel 1 Pulse el botón OK. Importante Si no se muestra el color en pantalla a pesar de haber instalado el depósito de tinta, es posible que el color del depósito de tinta no sea - Canon PIXMA PRO-200 | PRO-200 Getting Started Guide - Page 15
continuar con la instalación. Esto incluye la realización de selecciones relacionadas con el envío de información. Consulte "Enviando información a Canon" en Información de seguridad e información importante. • Cuando se muestre Seleccione método de conexión. (Select the connection method.) en la - Canon PIXMA PRO-200 | PRO-200 Getting Started Guide - Page 16
Instalación de la impresora 7. Selección del método de conexión de la impresora Seleccione un método de conexión de la impresora en la tabla a continuación. En las siguientes descripciones se utiliza "teléfono inteligente" para referirse colectivamente a teléfonos inteligentes y tabletas. Conexi - Canon PIXMA PRO-200 | PRO-200 Getting Started Guide - Page 17
Teléfono inteligente 8-a Conectar al ordenador Si utiliza varios ordenadores, realice estos pasos en cada ordenador. 8-b página 8 1 Acceda al sitio web de Canon desde un ordenador. 2 Seleccione Configurar. 3 Escriba el nombre del modelo de su impresora y haga clic en Ir. • Si se le solicita - Canon PIXMA PRO-200 | PRO-200 Getting Started Guide - Page 18
inteligentes, realice estos pasos en cada teléfono inteligente. 1 Instale la aplicación "Canon PRINT Inkjet/SELPHY" en su teléfono inteligente. • Busque "Canon PRINT" en App Store o Google Play. • Acceda al sitio web Canon para descargar la aplicación. 2 Abra la configuración Wi-Fi de su teléfono - Canon PIXMA PRO-200 | PRO-200 Getting Started Guide - Page 19
How-To Video Library Videoteca sobre procedimientos RMC (Regulatory Model Code): K10512 - Canon PIXMA PRO-200 | PRO-200 Getting Started Guide - Page 20
Access Online Manual Acceso al Manual en línea From your browser Desde su navegador QT6-3550-V01 XXXXXXXX © CANON INC. 2020 PRINTED IN XXXXXXXX
-
 1
1 -
 2
2 -
 3
3 -
 4
4 -
 5
5 -
 6
6 -
 7
7 -
8
-
9
-
10
-
11
-
12
-
13
-
14
-
15
-
16
-
17
-
18
-
19
-
20
 |
 |
Conexión con un teléfono inteligente
Conectar al ordenador
Hay vídeos e instrucciones detalladas en
el sitio web de Canon.
Configuración en línea
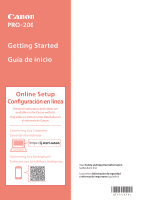
Lea primero
Información de seguridad
e información importante
(apéndice).
Guía de inicio
Getting Started
Read
Safety and Important Information
(addendum) first.
Online Setup
Detailed instructions and videos are
available on the Canon website.
Connecting to a Computer
Connecting to a Smartphone